
Matchbox Tiger Moth
By Dean Large
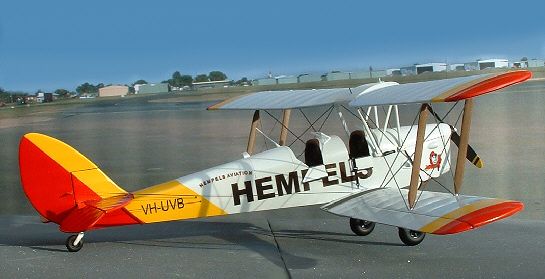
A couple of years ago I went to Australia for a month’s holiday. While I was there I decided to fulfil a longstanding ambition and do a loop in a Tiger Moth, so I rooted out a local flying club that ran one for pleasure flights, Hempel’s Aviation at Archerfield Airport on the Gold Coast. I enquired about the chances of taking the controls myself, and was told that as I had 150 hours of taildragger experience in my logbook that wouldn’t be a problem.
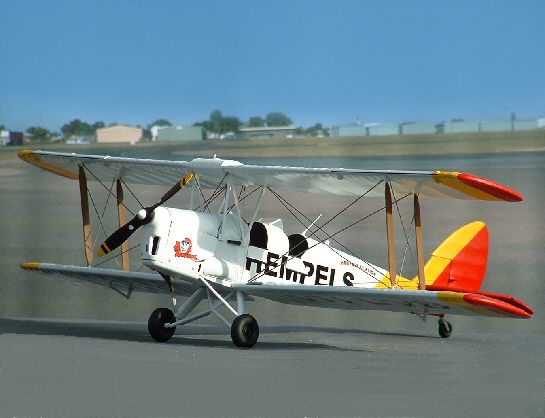
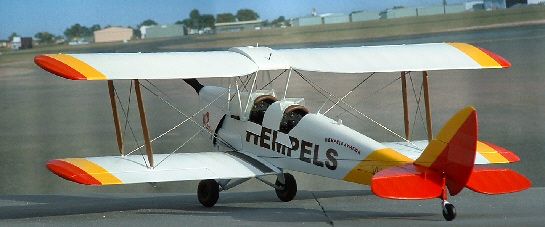
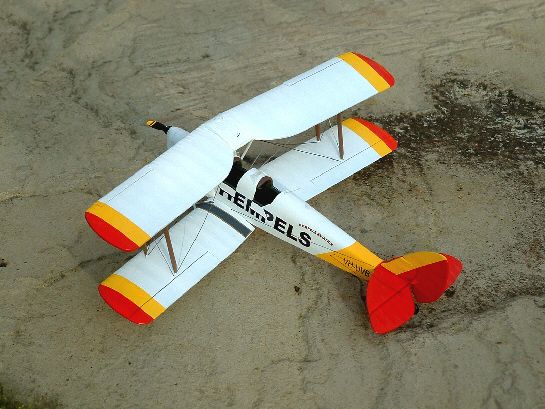
I arrived, and strapped in to the most colourful Moth I’d ever seen, and proceeded to spend the next hour looping and spinning over the coast just along from Surfer’s Paradise. I took some photos of the plane afterwards, and when I recently started modeling again I decided to use them as reference to build a replica of Hempel’s Moth. It’s the first time I’ve ever made a model of an actual aircraft I’ve flown.
I searched the eBay listings for a suitable candidate, and got an old Matchbox model. The model was typical 70’s in terms of fit, and a LOT of filler was needed on the fuselage, especially around the tail. The wings needed no filler though, as their joint with the fuselage on the real thing is hardly seamless! The engine cowling caused some headaches though, as its fit was abysmal. Never really sorted that one out, either.
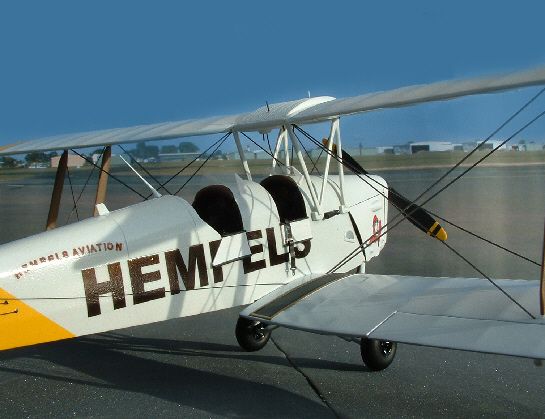
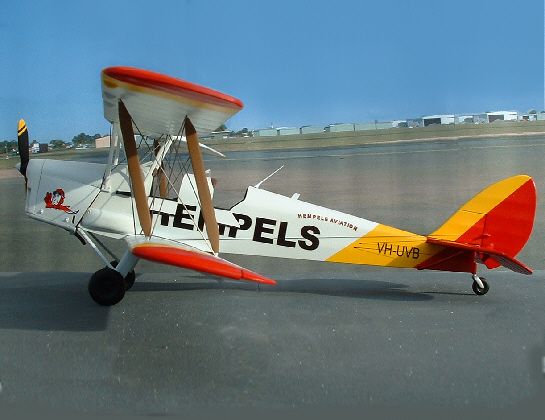
Matchbox tended to mould fine details very thickly and clumsily, so I had to scratchbuild certain parts that were just too thick out of the box. I had to make certain parts of the undercarriage, the cockpit hatches and both windscreens, the rudder and elevator horns, fuel lines, and the two aerials behind the cockpit. The cockpit itself was pretty sparse, so I made throttle levers and linkages from stretched sprue, and positioned the stick forward as I intended to drop the elevators. Hardly noticeable, but I know it’s all there. I also made some seat cushions out of Milliput and added some seatbelts so I could casually fling one of them over the side of the front cockpit.
Paints used were Tamiya acrylics, with Johnsons floor wax as the gloss coat. I used steel wire in 0.015” and 0.020” thicknesses for the rigging wires, cyano’d into my predrilled holes. The rudder and elevator cables looked thinner than this, so I made them from stretched black sprue.
The decals were tricky, as I had to make them myself. The Hempel’s logos and serial numbers were just a matter of patiently trying out sizes and fonts, but the nose art was a different matter. I had a photo showing the cartoon of an aviator in leather helmet giving the victory V sign, but it wasn’t clear, so I did it myself. I sketched the nose art out, scanned it in to the computer and printed it onto decal paper. It came out a lot better than I’d expected. I printed the decals out, let them dry overnight, and then coated them with Microscale Liquid Decal Film – disaster! The ink ran all over the place. In the end, after ruining another set of decals, I tried thinning the decal film with isopropyl alcohol (as I knew water wouldn’t work) and airbrushing it on. Success! Third time lucky…
I thought I’d return this Australian Moth to its home turf, so I printed out a large photo I took of Brisbane’s Archerfield Airport to use as a background, and photographed the model against this as a backdrop. It seemed to work OK for the most part. Do you think Hempel’s would approve? They don’t know about this yet…
© Dean Large
This article was published on Wednesday, July 20 2011; Last modified on Saturday, May 14 2016