
Academy Hornet
By Carlos Concepcion
From the official U.S. Navy Website:
Description: All-weather fighter and attack aircraft. The single-seat F/A-18 Hornet is the nation's first strike-fighter. It was designed for traditional strike applications such as interdiction and close air support without compromising its fighter capabilities. With its excellent fighter and self-defense capabilities, the F/A-18 at the same time increases strike mission survivability and supplements the F-14 Tomcat in fleet air defense. F/A-18 Hornets are currently operating in 37 tactical squadrons from air stations world-wide, and from 10 aircraft carriers. The U.S. Navy's Blue Angels Flight Demonstration Squadron proudly flies them. The Hornet comprises the aviation strike force for seven foreign customers including Canada, Australia, Finland, Kuwait, Malaysia, Spain and Switzerland.
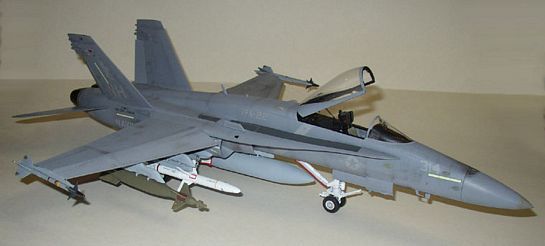
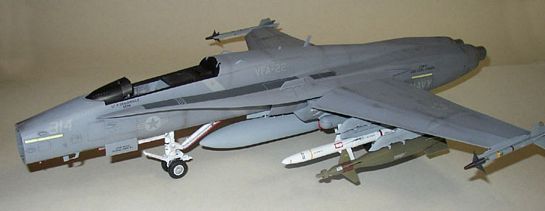
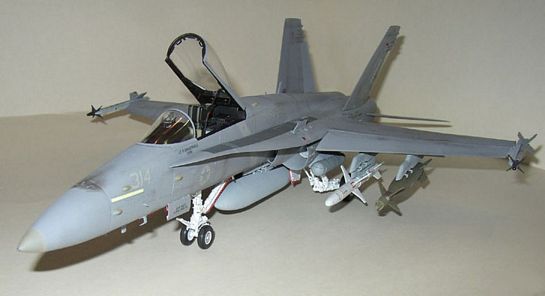
Academy's release of its 32nd scale F/A-18C Hornet is a beautiful addition to the ever-growing large-scale aircraft kit market. Molded in gray plastic with engraved panel lines, the kit has nineteen sprues, seven of which are ordnance (mostly duplicates), along with sprues containing four figures (2 deck crew, 2 pilots) with optional heads for the pilots. The clear canopy/windshield parts are practically scale-thickness and both have the molded-on seam down the middle. Metal parts are provided for landing gear reinforcements. The clear and metal parts are separately packaged in a smaller box to avoid damage, along with separately bagged solid rubber tires, screws and even a small screwdriver. Decals provide markings for 3 aircraft (one aircraft depicting 2 different schemes from different years) and are sharply printed on two large sheets, the second smaller sheet being mostly data stencils for the weapons.

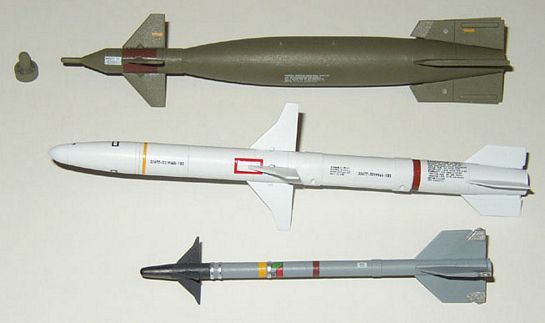
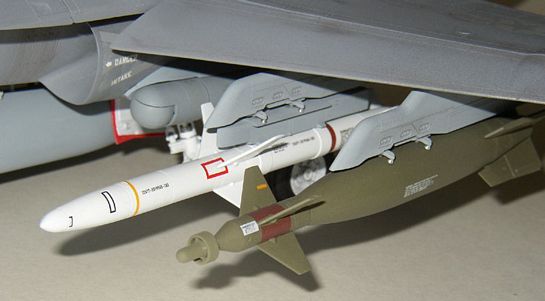
Except for the B57 and B61 nuclear devices, all external weapons approved for Hornet delivery are there. Don't let the amount of parts (900+) intimidate you from building this kit. As stated earlier, a lot of the parts are duplicates for the external weaponry, not all of which can be carried at the same time. It has the necessary parts to build the wings in a folded position, different angled flap hinges to set the flaps in varying angles of 0, 20 and 45 degrees and options to display the radar with the radome open. Two different sets of Sidewinders are included, one set for the wingtip rails and another set specifically for under-wing pylons loading (I still can't tell the difference). The instructions booklet consists of 40(!) pages; pages 28 through 32 alone deal with the external weaponry and loading. For those wanting to build a two-seater, fear not; the upper fuselage is molded in such a way that provisions for the back seat are included. In fact, the cockpit tub has tandem-seating (like a Phantom's), but the back seat is void of any details. When assembling the fuselage, the rear portion is eliminated by attaching a plug, which is actually the rear deck portion of the single-seat variant. No doubt aftermarket companies are racing to fill this void and beat Academy's (hopefully) future releases of two-seaters as well as early "A" models and the currently entering service, E/F models.
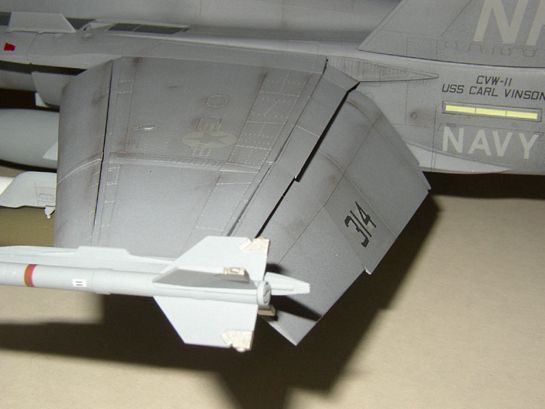
Most of my photo references show parked Hornets to have flaps and slats dropped, airbrake retracted, stabilizers partly drooping rearward or forward, and rudders either toed-in or deflected towards one side. I wanted to model these features.
Instead of starting with the cockpit, I broke tradition by first building the external weaponry. I generally build my mud-movers by first building the ordnance and their associated pylons and mounts; painting, decaling and paying as much attention to them as the cockpit and the rest of the airframe. After deciding on two GBU-10 Paveway, two AGM-88 HARMs, AN/AAS-38 flir pod, AN/ASQ-173 LDT/SCAM pod and wing-tip mounted AIM-9L Sidewinders, I went to work. I considered this as a mild exercise and a gradual transition to what I was about to jump into. No problems were encountered in building the weaponry. The fin tips practically clicked into place, barely needing any glue, signifying a preview of what would hopefully be a pleasant building experience. Be careful when building the wingtip Sidewinder rails, though. The instructions point out that parts D51 should mate with D52, and, D53 with D54. The correct match-ups should be D52 with D54 and D51 with D53 - each rail should end up with a locating tab for insertion into the wing. I found out too late since I used super glue on one set and there was no way I could pry the halves apart again. I double-checked the error with a second kit with the parts still in their trees. All four halves look identical especially when you match D51 with D52 and not even think about a locating tab being where it's supposed to be until you match up D53 with D54 (per the kit instructions) and you notice the error. Live and learn, although, I blame this one on the sketchy instructions.
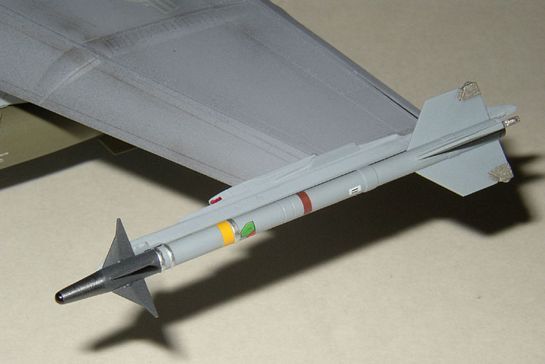
Painting consisted of Polly Scale Gravel Gray as primer and main color for the gray parts (Sidewinder body and pylons) and several coats of Reefer White topped off with Badger Opaque White for the AGM-88s. The Sidewinder warheads were painted with Polly S "Scale Black," which is more of a dark gray color than black, a close match to color photos of actual Sidewinders. I used a pencil to color the forward portion of the warhead then topped it off with a black permanent marker for the tips.
An evening was devoted to decaling these items. I airbrushed additional coats of Future to the AGM-88s and polished them once they were dry, since these weapons are usually painted in a high gloss finish.
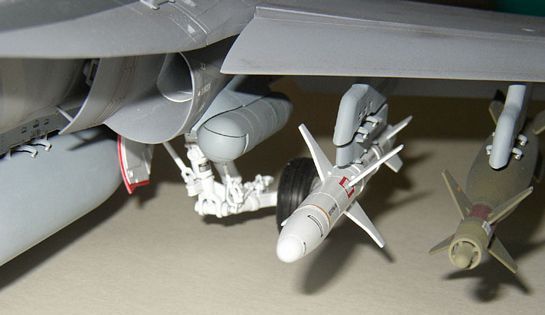
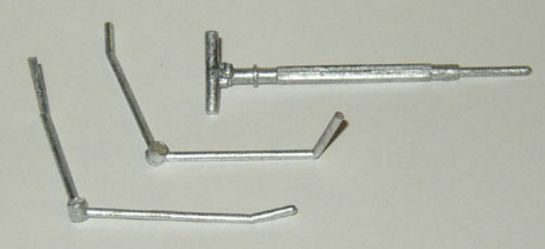
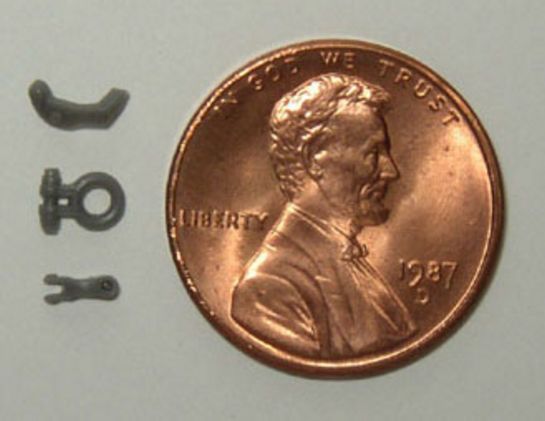
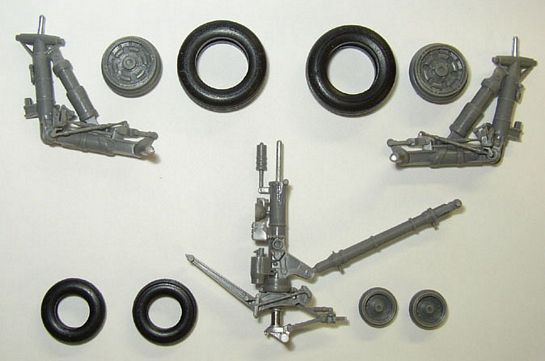
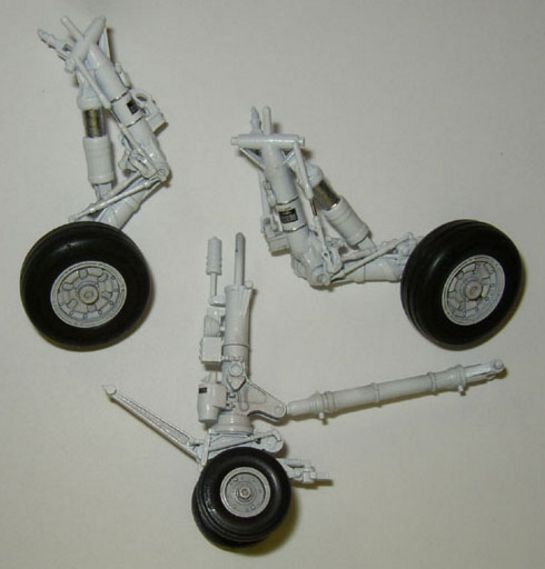
Academy supplies silver stripes for the Sidewinder missiles. I opted to paint them instead. Different colored stripes are also supplied to indicate inert, practice and live warheads for the Sidewinders. Check your references to see which ones you want to model. I then moved on to the landing gears. Like Tamiya's big F-15 and F-4 Phantom kits, Academy has included metal supports for the landing gears. A kit this big and heavy will need them. Constructing the landing gears will test your patience - prior experience in microsurgery is helpful. There are 20 parts in the nose landing gear and 22 in the main gears. There are several tiny parts used to model the actuating links and gears and fine-tipped tweezers are a must. When completed, they are fantastic miniature replicas of the real thing. I painted these after assembly with Gravel Gray as primer and several coats of Badger Opaque White, topped off with Future to gloss it up and decaled with the appropriate kit-supplied warning/weight restriction labels on the landing gear struts. When compared to photos from the "F/A-18 Hornet Walkaround" book, it's amazing how Academy has captured every little detail - they haven't missed a thing.
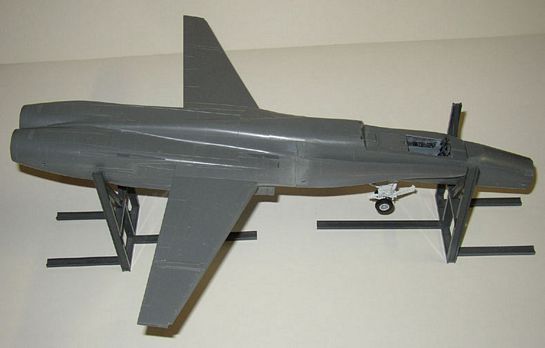
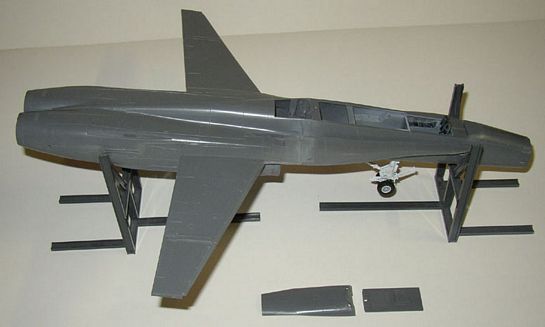
After the laborious task of building the landing gears, I moved on to something less hectic like the jet intakes and rear fuselage, along with the wings, flaps, slats, exhausts and twin tails. The kit has the option to display it with folded wings and the necessary parts are supplied. Not wanting to risk ruining such a nice kit in case I goofed, I chose the easier route and decided to stick to basics - extended wings. The intakes show a seam when completed, but once buried deep in the fuselage they're hard to detect. No doubt Seamless Suckers will produce replacements soon.
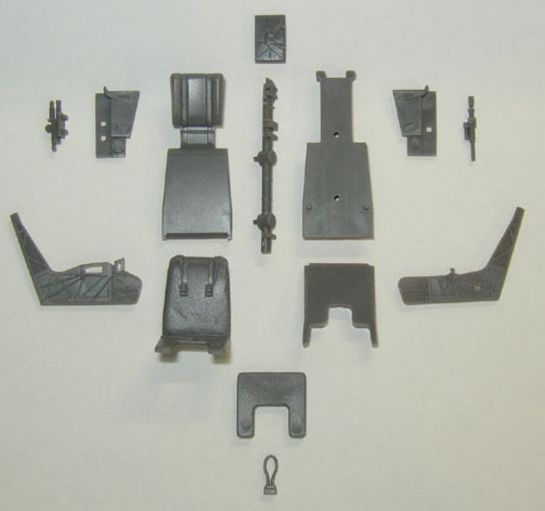
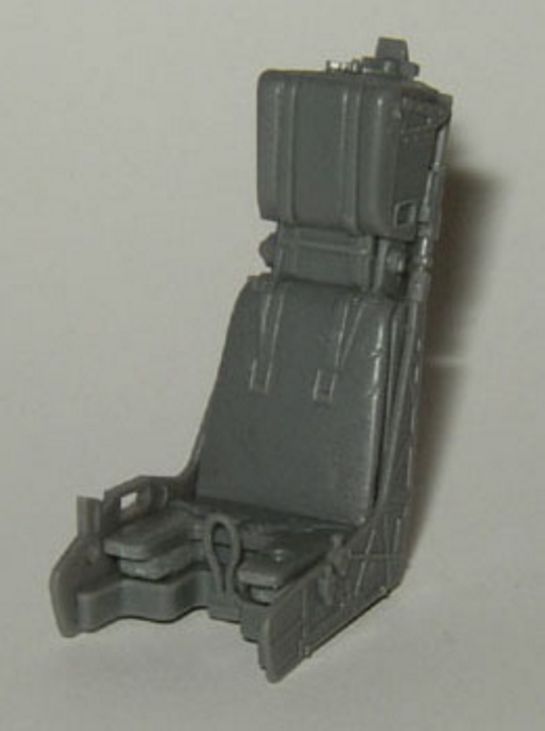
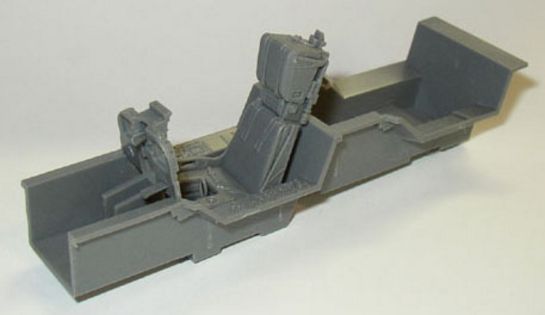
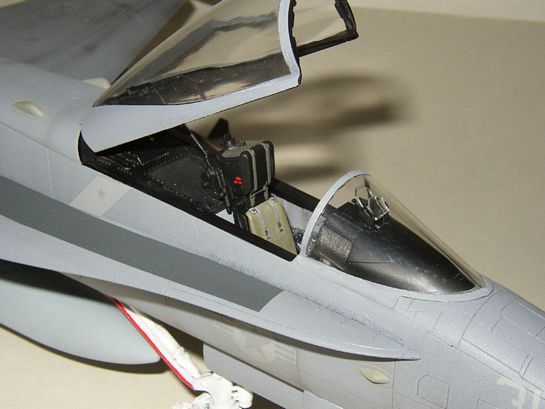
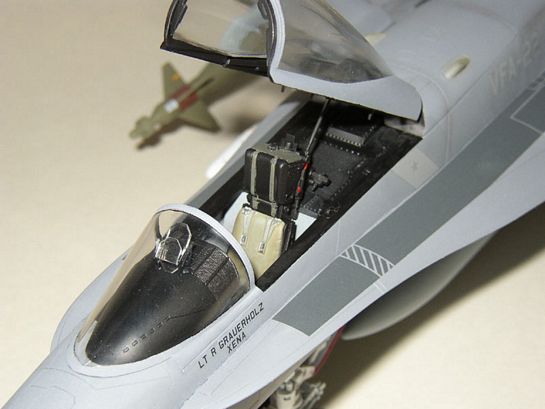
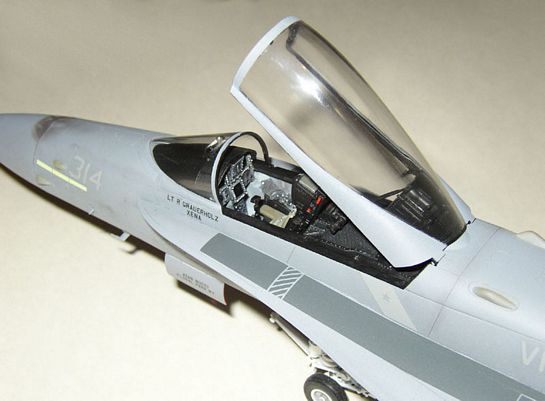
Once these subassemblies were completed, I saved the best for last: the cockpit. I assembled the 14-piece ejection seat, painted and decaled, then moved on to the instrument panel and side consoles. No surprises here, black panels on gray background. Switches and knobs were picked off in white with a little silver dry-brushing here and there for effect. Instrument gauges were topped off with clear nail polish. The three main CRT panels are supplied as clear parts with a decal backing showing electronics and flight data; nicely detailed, but, no offense to Academy, no self-respecting naval aviator or plane captain would dare leave the onboard computers and avionics turned on while the aircraft is parked and unmanned. I painted the back of the clear CRTs with black paint. Once mounted on the panel they look like regular computer monitors turned off.
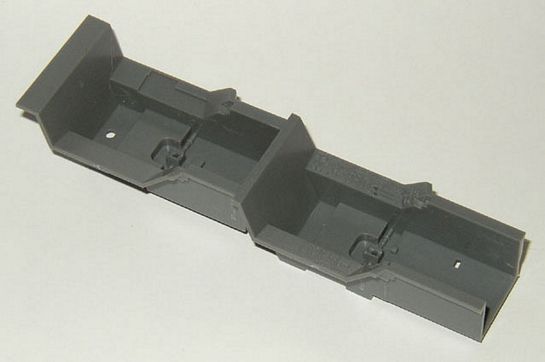
Next step involved the front fuselage assembly. The nose gear well is assembled and painted, and the cockpit tub is glued on top of this assembly which will then be sandwiched between the front portion of the fuselage halves. My only complaint of this kit comes at this juncture; the instructions state that the nose gear needs to be mounted at this point, prior to the fuselage halves being glued together - hence, wheel well, cockpit tub and nose gear assembly are trapped between the fuselage halves exposing the nose gear. After many dry-fits and experimentation I could not come up with a satisfactory compromise to this situation. I reluctantly followed the instructions and glued everything in place. Even though the nose gear is a strong unit with its built-in metal mount, use caution when handling this piece.
I glued the top and bottom nose panels at this point, prior to mating the front fuselage with the main body. I then super-glued the front fuselage to the main body, using a minimum of gap-filling super glue to eliminate any seams. The intake lips came next, which did not line up properly and produced large gaps. I had to use gap-filling super glue to remedy this. Once cleaned up, I added assorted avionics bumps and antennas throughout the airframe followed by the flaps and slats assembly. I thought of leaving this portion off until after painting, thinking it would be a fragile assembly, but decided to glue them on now to paint as much of the airframe as possible. Much to my delight, the flaps and slats are quite sturdy and absorbed quite the beating as I maneuvered the airframe around during the painting process. I left off the twin tails and horizontal stabilizers until after painting was completed.
I plugged the wheel wells and cockpit with play-doh and tissue paper, and wrapped the exposed landing gear in aluminum foil. I prepped the parts with isopropyl rubbing alcohol to wipe off dust and grime and was ready to paint.
Rather than spending several hours and paint jars on painting such a big kit, I opted for the easy way and used Duplicolor automotive primer in spray cans as the main color. I used an entire 5 oz. can and a half of Primer Gray on this kit. Duplicolor sprays on thin and was able to coat the airframe with about two to three thin coats. After letting the parts dry for a couple of hours, I rubbed the entire aircraft with an old cloth to eliminate any paint dust and buildup.
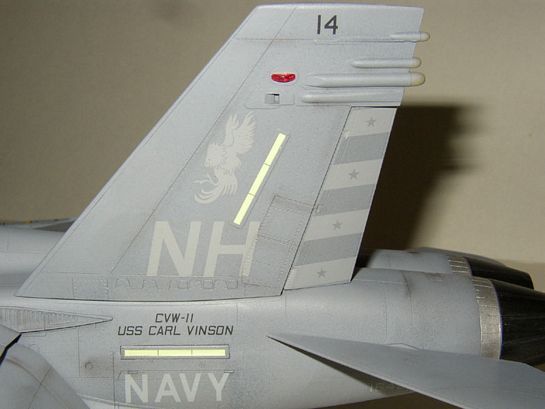
I used the kit decals for the reflector strips and walkways but selected CAMdecals #32-104, VFA-22, Fighting Redcocks for the unit markings as I wanted something a little different from the kit-supplied "Year of the Golden Dragon" markings of VFA-192. Rather than glossing the entire model with a gloss coat prior to decaling, I simply brushed on Future to the area as needed. Once the decal has had a few minutes to settle I applied Micro Set decal solution. The model was then left to dry overnight and a flat clear coat was applied using Testors Acryl Flat the following day. Leftover miscellaneous parts were then added once everything had dried. Weathering was accomplished using pastels.
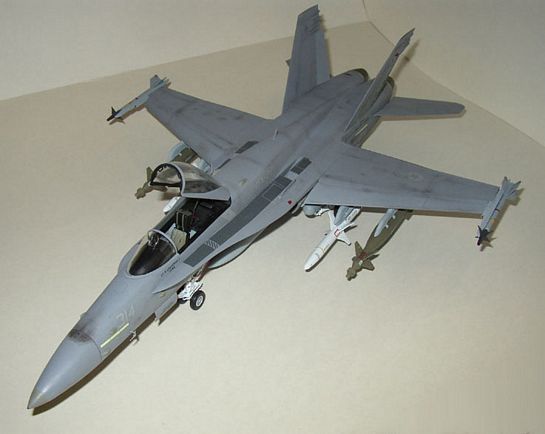
There you have it. Being a fan of U.S. Naval aviation, I particularly enjoyed putting this model together. Approximately 50+ hours over a span of several weekends were invested in building the kit. It compares well to 3-view scale plans; of course, I didn't use a micrometer. Other than maybe an aftermarket ejection seat (the kit supplied seat is nothing to sneeze at, either), there's really not a whole lot the super-detailer can add. This is probably the best scale kit out on the market to date. There were some trouble spots along the way, but nothing out of the ordinary. Prior experience in handling small parts is a must, otherwise this kit is highly recommended.
© Carlos Concepcion
This article was published on Wednesday, July 20 2011; Last modified on Saturday, February 04 2017