
Kinetic and Hasegawa 1/32 Avon “Frankensabre”
By JD King
The “Frankensabre” – building a 1/32 Avon Sabre using both the Kinetic and Haseagawa Kits
In a sweeping stereotype that the PC police will likely chastise me for, Australians have to modify things from overseas in order that they become uniquely Australian, or are ‘adapted’ to Australian needs. The military is particularly adept at it. Sometimes it works and the result is a class-leading example. Sometimes it doesn’t and we end up with a no more capable item, that cost twice as much and for which none of the masses of spare parts fit. In other cases, it means we get it late and have to sustain it well after it is obsolescent. But, enough of this, it sounds dangerously close to me mounting a soap box and what relevance does it have to a scale modelling article.
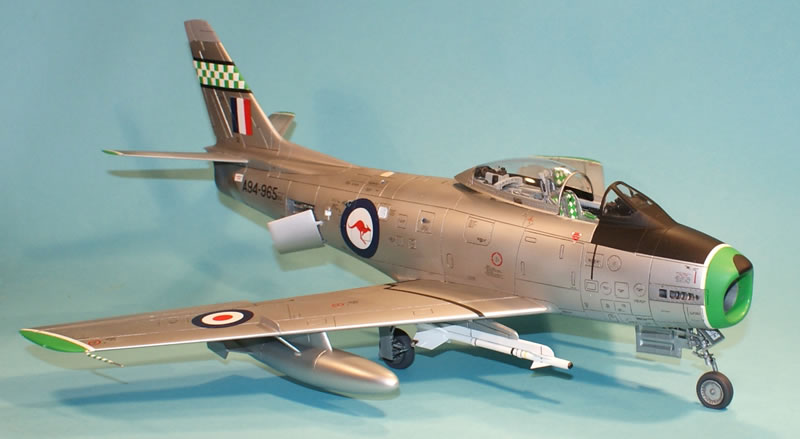
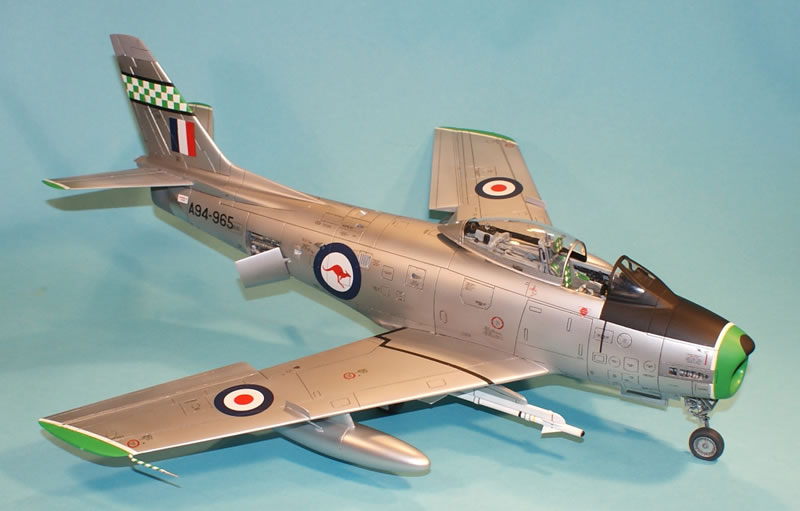
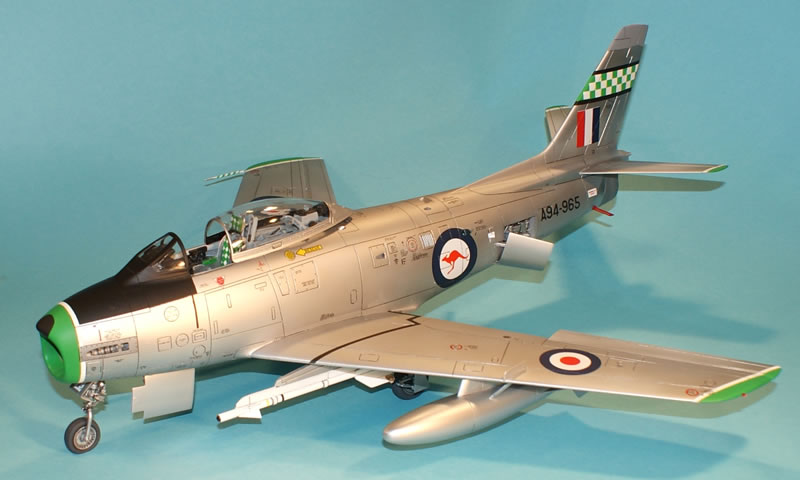
As one of the many users of the North American F-68 Sabre, Australia’s Avon version was particularly unique as a direct result of our passion for modification. Not only was its engine and guns different, it looked different, with a deeper intake, revised fuselage and fancy gun ports. Compounding that uniqueness from a modellers perspective was production scale, of the 9860 Sabres built only 112 were the Avon variant. As a modeller, this means the chances of a long run injection moulded Avon variant, is practically zero. Now, there are conversions available in both 1/72 and 1/48 and I have built them. The smaller scales, however, just don’t seem to have the presence and sense of purpose a representation of this aeroplane should have. Something bigger is needed; just like the Mustang, 1/32 would better portray that purposeful stance and presence. Like a glutton for punishment, this means converting a kit myself.
Kit Selection
As a basis for this conversion there are two choices; Hasegawa’s 1970s vintage kit or the more recent Kinetic. Each has their own strengths and weakness. The Hasegawa, has a great shape except in the cockpit where it’s a ‘bit narrow’, but it comes with raised panel lines and a slatted wing. The kinetic has good shape in the cockpit, but is a little off in other areas, notably the nose intake. The Kinetic does come with either a slatted or unslatted wing, dependent upon edition, and with recessed panels but this detail is not consistent or a little soft. Oh, the agony of choice. I will have to re-scribe either, but it will be easier to do this on the Hasegawa as I won’t have to fill the recessed detail first. If I use the Hasegawa, I will have to address the cockpit width, as well as the intake depth. As I mulled this conundrum I had the forward fuselage sections of both kits side by side on the workbench. Now they look to be almost identical in length and depth, I wonder if the rear sections fit together? They do! The front end of a Kinetic kit fits the back end of the Hasegawa. An idea was forming. What if I put the Kinetic cockpit section onto the accurate remainder of the Hasegawa? Problem, the Hasegawa wings don’t fit the Kinetic cockpit section, bugger. Ah… but what if in an attempt to achieve the deepened Avon intake and forward fuselage I carefully put the top of the Kinetic front end onto the bottom of the Hasegawa front end and used the Hasegawa intake? Twenty minutes with some calipers and steel ruler later the theory said it would work. So, rather than choose, both would get a jersey.

The Plan
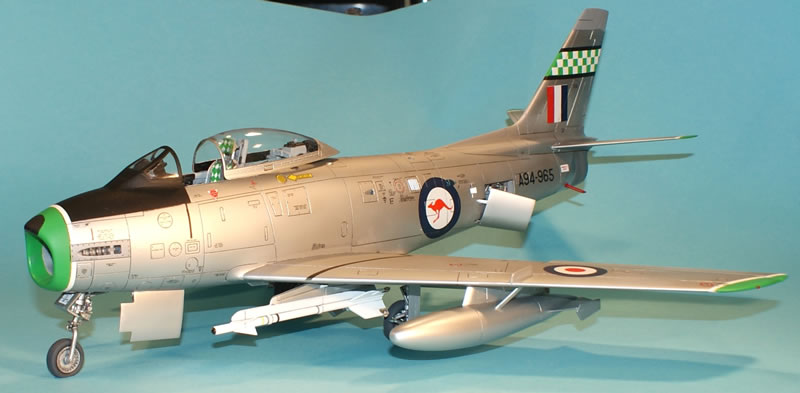
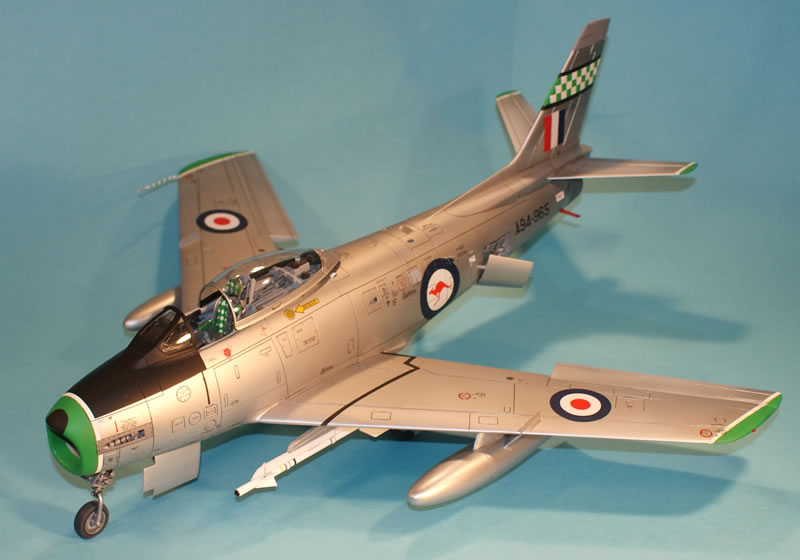
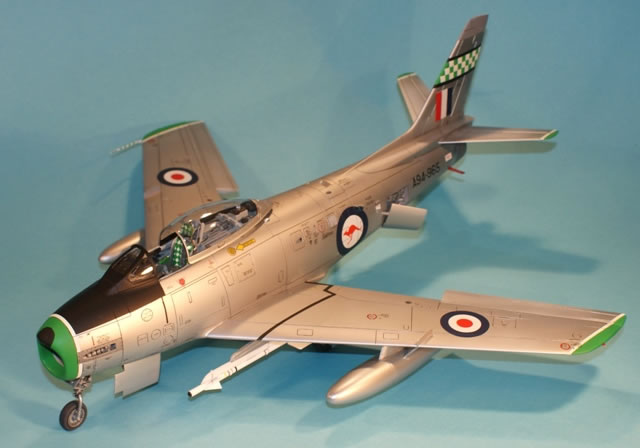
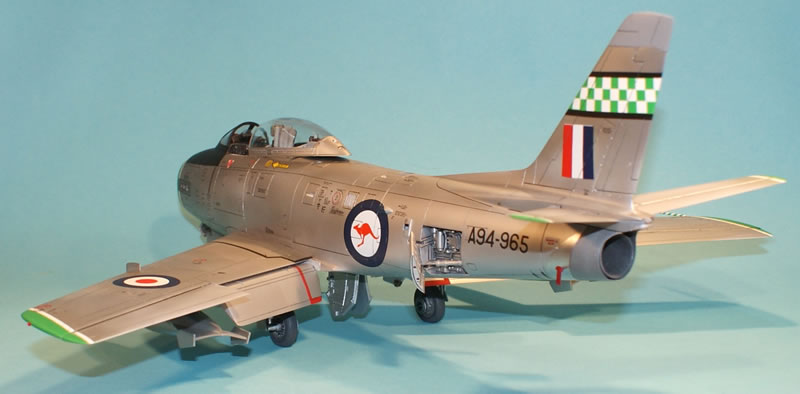
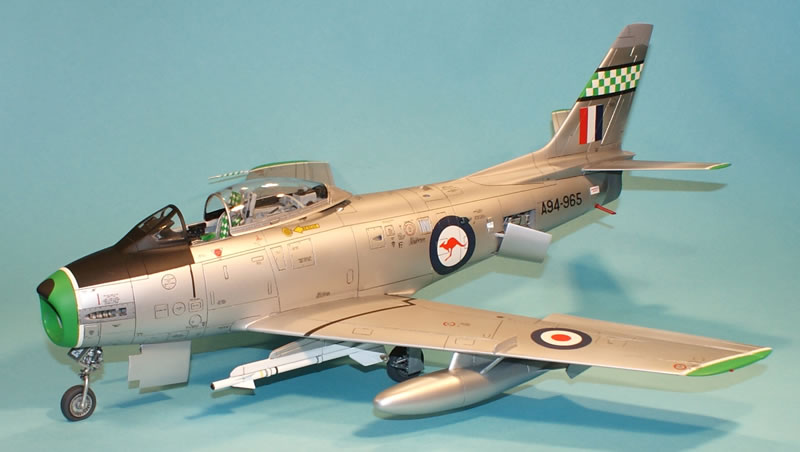
My aim was a MK 32, hard wing, with Sidewinders and in the colours of 77 Sqn as their green and white checkerboard markings had always impressed me. To achieve this I would use the Hasegawa kit with the kinetic cockpit grafted in place. It would all need to be filled and re-scribed. I would then dress it up with the Avionix resin cockpit, some Eduard PE and Southern Sky decals. From an actual boxing perspective; the Hasegawa was a ‘clear’ edition sourced from a fellow modellers stash, and the Kinetic a ‘Wolfpack” edition with some resin wheels and parts to make a South Korean F86F-40. The Wolfpack items would give the late model nosewheels seen on many Avons, which was a bit of a bonus. The ‘clear’ edition of the Hasegawa, though a perfectly acceptable kit, would present some ‘visual’ challenges as the build progressed.
A bit of a procrastinator I started on the easier wings. These needed to be converted from the slatted and extended F-40 to an un-slatted 6&3 wing. They were joined traditionally and with the slats in the closed position. The F-40 extensions were then sawn off and wing tip rejoined, to include full span ailerons. The full assembly was then sanded smooth removing all raised details and ensuring the slats disappeared. It was here that the ‘clear’ plastic was a challenge. Due to it’s transparent nature it was very difficult to see if an imperfection was on the upper, lower or inner surface when looking directly at it. The answer lay in holding it up to the light and looking ‘across’ it to negate the transparency. A little time consuming a problem, but not insurmountable. The wing was then re-scribed and wing fences were added by sawing a slot and inserting appropriately shaped plastic card. It was now time for the hard bit.

Fuselage
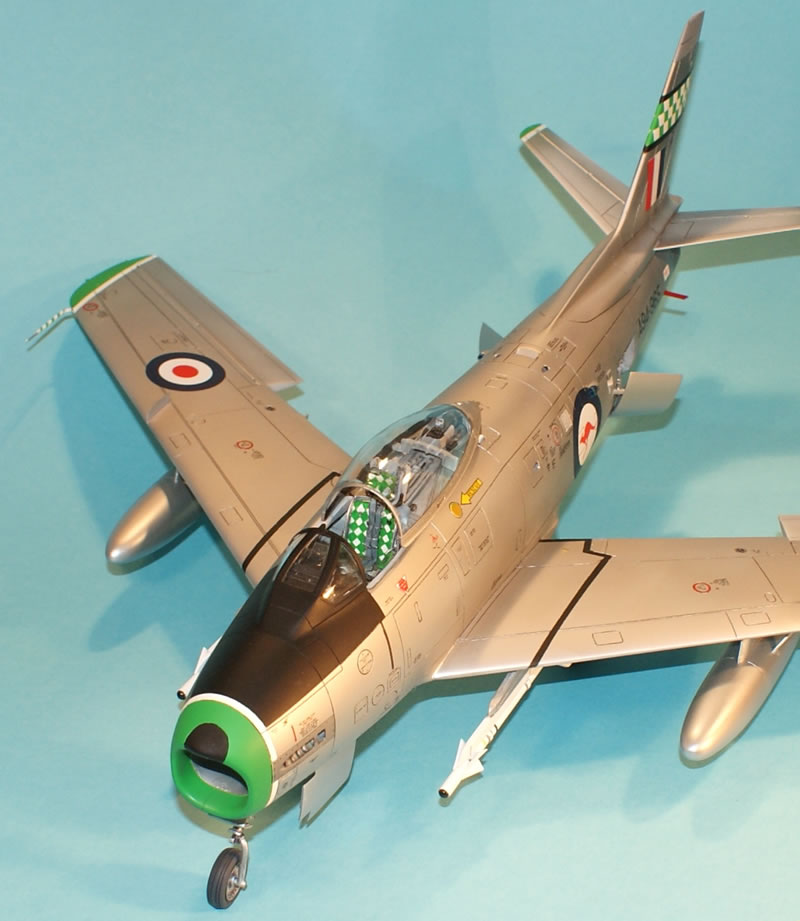
Fuselage front end. The heart of this conversion was always going to be the fuselage. The Avon variant required 60% of the basic airframe to be modified to accept the needs of the Avon engine and revised armament. Outwardly this is most apparent at the front end. The jet intake was significantly deepened to enable greater airflow and this changes the lower line of the airframe as far back a station 57, just behind the forward wing root. To build this in scale I started with the intake lip. Using the Hasegawa piece I cut it in half horizontally and inserted a 3 mm plug on either side. This enabled a firm starting point. To this I mated the intake trunking, but not in the traditional manner. As the two halves are joined horizontally they were glued first to the top and bottom of the intake. Once set the compressor end of the trunking was joined. This left a gap at the intake end that was filled and sanded. The result was a deepened intake with two faintly visible triangular inserts on each side just like the full scale. The next step was to blend the Kinetic upper to the Hasegawa lower. By taping both the kits together I was able to insert the revised trunking in and mark an appropriate horizontal join line on each kit to mate with the new intake. This achieved the Hasegawa kit was cut, joined vertically and then glued to the intake. This enables the nose wheel bay which is moulded to the trunking to be used as an alignment guide. The Kinetic kit was then cut and test fitted until the Avionix cockpit tub fitted and the least amount of filler would be required to finish the fuselage blend. Lots of nose weight was then fitted and the four key parts were joined and smoothed. I then test fitted the rear fuselage and found it was a neat fit. A happy modeller I moved on to the back end.
The fuselage back end went together conventionally but required some areas to be address to either cover deficiencies or update to Avon standard. First was to clean off the raised detail and replace with recessed. Second was to represent the visible internal structures above the jet pipe. The kit is simply bare and open such that you can see clean up the vertical tail. The internals were achieved with evergreen or Milliput and built in such a way as to support the jet pipe as I would not be fitting the engine itself as the kit requires. Lastly the large vent atop the fuselage in front of the fin was updated to Avon standard. This required the opening to be significantly enlarged and slightly forward of the original North American fitting. The back end complete it was joined to the forward section and the joint filled so that it was invisible. With this complete I could now turn to the finer detail of the Avon conversion.

Aden Guns and Avon Panels and Scoops
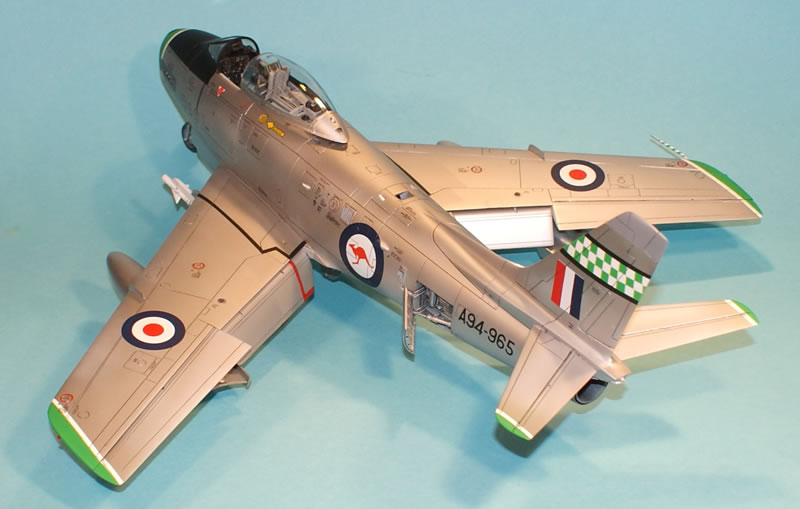
Not only was the Avon intake deeper its lighter weight necessitated it being positioned further aft to sustain the Sabres centre of gravity. The result was a very different vertical fuselage break line further aft and the revision of numerous panels. These were marked out and scribed as appropriate. I then turned to inserting four NACA vents on the right and left sides as well as two very prominent louvered vents just forward of the central break line. These were built by layering strips of evergreen card at a central point but with an alternating overhang at the outer edge. Once set the central join was cut vertically leaving two blocks of strips with alternating gaps. These were then inserted on an angle into square holes in the fuselage sides and then the excess cut way and sanded flush. The result was a louvered vent that had internal depth to create shadow that simple scribing could never achieve. Finally, I turned my attention to the gun ports. I started by filling the two upper most .50cal ports. Then I drilled out a significant angled hole into the fuselage, inline on all three axis, with where the Aden cannon was fitted. I then increased the size until I could insert 5mm styrene tube. This was anchored in the gun bay and to the fuselage extending beyond the intake lip with CA glue. The excess was then removed and tube opening sanded flush with the fuselage line. The result was the cannon blast tube and the inner face of the muzzle break. Into this opening I inserted shaped and drilled card to represent the prominent vertical blast deflector. The opening was then finished with 1.5mm vertical strips of 3mm tube glued to the inner surface and once set the overhang was sanded off. The result I think captures the unique look of the Aden cannon muzzle so prominent on the Avon.

The major construction complete attention was turned to appendages like the flaps and ailerons, undercarriage and canopy. The flaps were built conventionally but were updated to include openings and hinge representations. These were completed with brass rod anchored in the wing surface so the flaps sat in the extended position. Scale Aircraft Conversions white metal undercarriage was used to provide greater strength than the kits plastic items. This is most required for the nose gear which is quite spindly and must support a large amount of nose weight. External tanks are mostly from the Kinetic kit with sections of the Hasegawa F-40 tanks inserted to correct a shape deficiency. AIM-9s and mounts are both from the Kinetic kit as they are a little simple in the Hasegawa kit. Finally, the canopy was tackled. The Kinetic item was used, but I think the very thick representation of where the canopy is prepared for ejection in the plastic was just too prominent. It was removed with a motor tool and then much time was taken restoring a smooth and clear finish to the inside of the main transparency. It was then dressed up with some Avionix resin and it was time for paint.
Paint
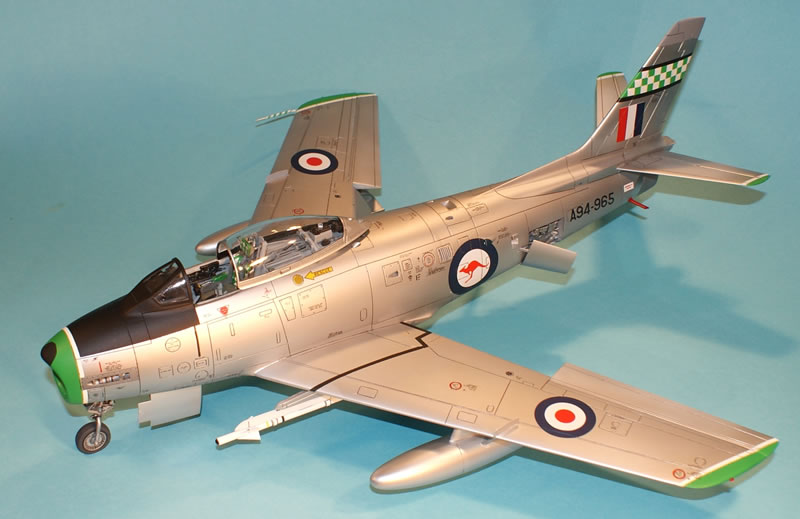
The Frankensabre, resplendent in its kinetic off grey and slightly opaque Hasegawa clear plastic was ready to be dressed up. My aim was a 77 SQN aircraft for which no decals existed and thus would require the green and white marking to be painted. As is now becoming my standard procedure I started by laying down the lightest colour first. In this case I primed the kit in Modelmaster Insignia White enamel. It was left to cure for a week before any imperfections identified by the priming were fixed up. Again, the second coat of white was left to cure for a week. At this point I masked out where the white would remain, on the wingtips, tail and around the intake. This included masking out the tail checkerboard using Tamiya tape cut to size. Tamiya X-28 ‘Park’ Green acrylic was then sprayed before being masked out. The whole kit was then sprayed with Humbrol gloss black enamel as a base coat for the following Alclad II. Appropriate areas of black were masked out on the tail, wings and nose before Alclad White Aluminium was sprayed and left to cure, again for a week. A gloss clear sealant was then applied and left to cure before decaling.
Decals
National markings, stencils and a number of odds and sods are all from the Southern Sky set which depicts a 75 SQN ‘Black Diamonds’ aircraft. The set provides sufficient A numbers to make any number of serials including my desired A94-965. All were then sealed with gloss clear and then flat clear in selected areas. This enabled final assembly of items like undercarriage doors, nav lights and the wing stores to be fitted. I think I’m done, a much talked and procrastinated about project sat finished in front of me. A strange sensation, from a modelling perspective at least, was then present; not satisfaction but relief. I had finished it.

As a modeller, it is not really the finished product that is the satisfying part of this hobby. It certainly helps, but the build process is what gives me most satisfaction. This project was just the sort of action I like. It was not a complete scratch build as I don’t think I am there yet as a modeller. It did, however, present the challenge of significantly modifying a basic kit base. It required me to build a number of smaller items from scratch and was big enough that all this effort was not being focused into a frustratingly small piece of plastic.
In the end, I had achieved my expectation. The model looked powerful and had purpose. It sat with a look of weight that 1/72 or 1/48 really struggles to capture. I was happy and I hope that this article might help any reader wishing to attempt this classic RAAF subject in scale.
© JD King 2013
This article was published on Wednesday, December 04 2013; Last modified on Wednesday, December 04 2013