
Hasegawa 1/32 F-5E
By Fred Krause
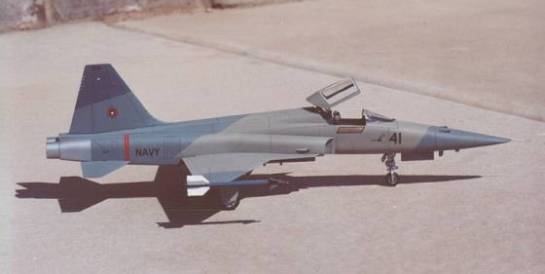
Hasegawa's 32nd scale release of Northrop's light weight fighter, the F-5E, has been around for at least 20 years. Overall it is an excellent kit, even today. However it wasn't until 2000 that they finally released the kit with the proper modifications to do a late export or US Navy model. These mods include the flat "duckbill" nose, and leading edge wing extensions (LEXs). Both of these mods help the aircraft corner better. I used to see this particular aircraft all the time during my visits to NAS Miramar in the '80s, and always wanted to model it. It must have been an effective paint scheme, because it was around for years.
Construction
This kit is built basically out of the box. There are a few substitutions, and a little detailing, but not much. The kit gives you the option of having the left side gun bay open. I've never been a big fan of open panels, so I closed it up.
The cockpit detail is pretty good, but the main instrument panel does not go all the way to the edge of the fuselage. I added some sheet plastic to this area, and shaped it to the curvature of the fuselage wall. The seat is okay, but I chose to substitute a CAM (formerly TAC Scale Dynamics) seat instead. It took forever to find one, but finally Great Models came through for me. The seat is very nice, but CAM needs to do another mold. My example had blobs of resin under the headrest where the mold had ripped out. I had to carve these blobs out.
The cockpit was painted black and Dark Gull Gray. I used a white artists pencil to bring out the gauge detail, and then added a few drops of Future to simulate the gauge glass. I scratch built a canopy opening lever for the right side of the cockpit wall out of stretched sprue, strip styrene, and the head of a pin. This is a very prominent feature in the cockpit. The area behind the seat is rather complex on the real a/c, but was lacking in the kit. I added some wire to the "black boxes" that are on the turtle deck. While not overly accurate, it did dress it up sufficiently.
Another area that needed some attention was inside the intakes. The piece that Hasegawa provides for the inside wall of the intakes next to the fuselage only covers about three fourths of what it should. I added a piece of sheet styrene, shaped it to fit, and blended the leading edge of the piece into the kit part with putty. After this was done, the intake insides were painted white, then glued into place on the fuselage.
The rest of the kit is extremely straight forward to assemble. Once I got the front & rear fuselage halves together, and mated, puttied (actually gap filling super glue), and sanded, I began the most time consuming part of this project; scribing the panel lines. The kit comes with finely raised panel lines, but I decided that it would look much better if they were recessed. This is the first time I've redone an entire kit, and it took awhile. I used my pin vise with a sewing needle inserted into it. After wasting money on aftermarket scribers, I was relieved when this method worked very well!
Once all the scribing was done, the wings, tail, and stabilizers were added without any problems. Before gluing the tail in place I cut off the tail top antenna with a razor saw, and filed it smooth. The kit gives you the option of having the auxiliary intake doors open or closed. I chose to close mine, as these doors are not open unless the engines are running. I also drilled out the wing position lights before gluing the wings to the fuselage.
I cut and inserted a piece of clear plastic rod into the hole, and glued it in place. Once dry, I filed, then sanded it flush with the wing surface. I then painted the left side light Tamiya clear red, and the right side Tamiya clear blue. Before painting the entire a/c, these were masked off. Once the masking is removed, the effect is quite convincing!
I added the centerline pylon to my model as it is permanently attached to the aircraft. Since I was doing a Navy adversary, which seldom carry the other pylons, I left them off. This kit is the Swiss Air Force Acrobatic Team release. It is one of only three releases of the kit to have the proper Navy/late export mods. All other releases of this kit are of USAF/early export machines.
To my surprise, the kit also included the necessary mod's for a Swiss AF F-5E, including the belly chaff/flare dispenser, and vent in the nose gear door (like an F-5F). Now it was time to paint!
Paint & Decals
As mentioned in the intro, I chose to model Topgun #41. This aircraft wore an attractive three gray splinter scheme for about five years while assigned to the NFWS. During this time frame, it appears that it was repainted about three times, because I've found three slightly different variations of this scheme on the a/c. All involve a change in the color of the gray on the nose.
On a side note, I just discovered that this aircraft flies on today as VFC-13 #25 at NAS Fallon Nevada. It is one of the few VFC-13 F-5s that I haven't photographed.
The original scheme, which is the one I did, is from about 1982. It is the only one of the three to have the red engine warning stripes on the rear fuselage. The second version is the one featured on Superscale Decals sheet # 32-53, and Detail & Scale Colors & Markings Volume #6. The main difference between the version I did, and this one is that the gray on the nose; FS35237 Medium Gray, has been changed to FS35164 Intermediate Blue.
The red engine warning stripes were also deleted. I have a third photo of this a/c from the 1987 time frame, and it looks like the gray on the nose has again changed. This time it is a much lighter gray like FS36492.
The canopy, and windscreen were masked off with clear tape, and the frame area to be painted was trimmed away with a sharp Xacto blade. Both pieces got a coat of black paint, then were painted Light Sea Gray with the rest of the model. The third gray used in this scheme is FS36307 Light Sea Gray. This was the first color I painted, and was also used as primer. Once it was dry I masked off the area's to remain this color, then sprayed the Medium Gray, and repeated the procedure with the Intermediate Blue.
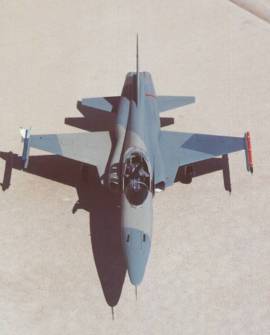
Unfortunately, like all of Superscale "aggressor" sheets, the instructions do not show the scheme on the bottom of the aircraft. A search for photos ensued, but yielded nothing. I ended up mirroring the upper wing pattern to the wing undersides, and did the "connect the dots" move with the paint demarcation lines on the fuselage bottom.
The exhaust section of the fuselage was painted Metalizer Aluminum, as were the wheel wells, and landing gear. The entire model was then gloss coated, and left to dry.
The decals came from Superscale sheet 32-53. The instructions to this sheet provide both side and upper painting patterns, but none for underneath the aircraft. The markings are sparse on this F-5E. They consisted of only Navy titles, Topgun badges, pilot name plaques, rescue arrows, serial numbers, and the numbers 41 & 541 for each side. A nice touch from Superscale was that they did include the false canopy for this a/c as a decal. There are no national insignia for this a/c on the sheet. There is a good reason for this too; most of Topgun's F-5E/Fs didn't use national insignia, and #41 was one of them! There were a few exceptions, but not many.
All of the decals went on well with some Solva-set, but I did experience a little silvering in a few spots. The arrestor hook was painted white, and striped with Superscale 1/16th inch black stripes. I also used Superscale 1/32" inch stripes for the tail antennas just above the rudder.
Once the decals were dry, I went over them with a damp cloth to remove any setting solution residue. This was followed by a coat of dull coat.
Final Construction & Weathering
After the dullcoat was dry I brushed the entire model, including the landing gear struts, and doors with black watercolor paint. Once dry I took a damp cloth to it to remove the excess paint. I added some Reheat placard decals to the nose gear using picture in Verlinden's Lock- On for reference.
The kits guns barrels were discarded, and replaced with stainless steel tubing, and painted Metalizer Gunmetal. I also used tubing, and a needle to make a new pitot tube. The landing gear, and gear doors all went on without any problems. The sway braces for the centerline pylon were also added at this time.
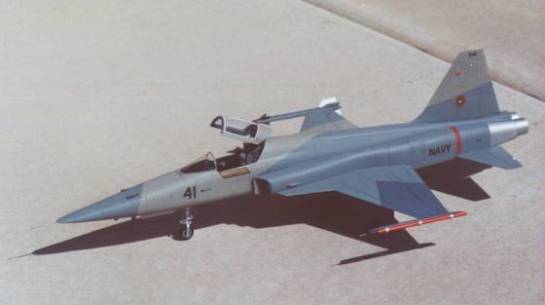
The most complicated part left to do was the canopy. I was fortunate enough to get a hold of a set of Model Technologies long out of production F-5E/F/F-20 photo etched canopy rails. I followed the instructions carefully, and ended up with a really nice looking canopy. I used the inside of the canopy rim as a guide, and cut framing for the forward edge from a sheet of .05 styrene. I then added two Waldron 48th photo etch mirrors (the 32nd scale mirrors looked too big) to the framing, and painted them Dark Gull Gray.
Next came attaching the canopy actuating mechanism to the CAM resin seat. This was a bit tricky, but with some trimming to the seat I was able to get it to line up with the canopy itself. The seat was then glued in with gap filling super glue. I added the HUD sight glass, and windscreen next, followed by the angle of attack vane. The exhaust nozzles were the last parts added.
Weapons Like their counterparts in the USAF, Navy adversaries carried a minimal amount of weapons. Unfortunately, there isn't much in the way of aftermarket weapon sets like in 72nd & 48th scales. Also, like Hasegawa's A-4 kits, the weapons supplied with this kit were downright inappropriate. This left me with one option; take them from another kit!
The Sidewinder was stolen from my Tamiya F-14A kit, and painted up as a training round. The ACMI pod was scratch built, as to my knowledge, no other kit comes with one. For the ACMI pod I used plastic rod for the body, and a piece of stretched sprue for nose section. I was fortunate enough to find a length of aluminum tubing that was the perfect inner circumference to fit over the body of the round. I cut three lengths, and these became the mounting lugs. Lastly I drilled a hole in the nose, and once painted, inserted a piece of hollow tubing.
The body of the round was painted International Orange, and the nose section was painted black. Number decals came from Superscale. I slide the lugs onto the body, and inserted the tubing in the nose, and wha-laa.... ACMI pod! The Sidewinder, and ACMI pod were glued onto the wing tips, and #41 was done!
Conclusion
This kit was a real blast to build! Other than the poor fit of the gun doors on the left side of the nose, it went together very well. I highly recommend using the CAM resin seat, as the kits seat is a bit lackluster. I've got six more of this kit in my basement, and when a certain high quality decal manufacturer (I can't mention their name now) releases decals for VFC-13 later this year, you can bet I'll be starting on another one! All we need now is for Black Box to work their magic on this kit!
References
- US Navy Adversary Aircraft: Colors & Markings Volume #6 by Bert Kinzey & Ray Leader
- F-5E/F in Detail & Scale by Bert Kinzey
- Verlindens Lock-On #26 by Christophe Donnet
- Personal Photos
© Fred Krause
This article was published on Wednesday, July 20 2011; Last modified on Thursday, June 14 2018