
Hot Forming
By Howard Weaver
Making your own canopies can be accomplished in several ways, but the two methods I use are Thermaforming and Vacuforming.
Thermaforming involves stretching a heated and pliable clear plastic sheet over a form by hand.
Vacuforming is a little more involved, but in my opinion, especially for larger scales, gives better results.
First Thermaforming or stretchforming as it is sometimes called: You will need a master of whatever you are attempting to duplicate. You can carve one from scratch, or sometimes if replacing a cracked or broken canopy for instance, the old one can be used as a master. Just make sure that the piece is glued back together and is smoothed out. Next it is a good idea to fill the inside with some sort of filler to keep it from collapsing. Epoxy or casting resin can be used for this. A wooden dowel rod can be glued to the bottom to act as a handle. Now the rod is clamped in a vice to hold it secure. I use Squadron Shop clear thermaform plastic sheet, .010" thick, which is made just for this purpose and comes with instructions on an accompanying sheet. The plastic is heated over a candle flame, and when soft, is then pulled down over the form. Viola! A canopy. Now simply trim, paint the frames, and install.
Vacuforming on the other hand is a little more complicated, and requires a little more specialized equipment. First, I made my own Vac machine. It is not too difficult, and in my opinion, can be made by almost anyone having a few hand tools. You’ll need a vacuum chamber and two or three clamping plates to hold the plastic sheet.
Here is a photo of the vacuum chamber box:
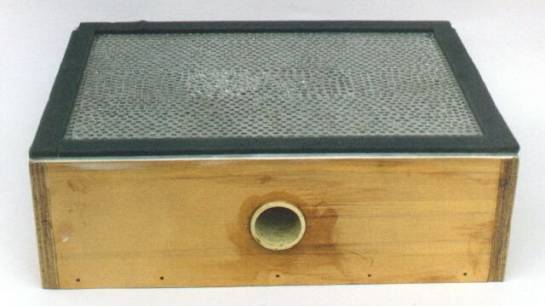
First the vacuum chamber. I made mine from 1/2" plywood, with a 1/8" masonite bottom, and a 1/8" aluminum sheet top. The box is 13" long. 10" wide and 4" deep. All wood joints are glued to keep them as air tight as practical. The aluminum plate has many 1/8" holes drilled through it to allow air to be pulled through them. The locations of the holes are not important, and can be drilled by hand using a hand held drill. Just make sure that they are fairly close together. This plate should be pretty sturdy to hold the subject being duplicated. I made mine from aluminum plate, but I have seen them made out of Masonite. Also, the aluminum plate I got was purchased at a sheetmetal shop out of the scrap bin (It’s cheaper that way) and I cut it to size on a scroll saw. The plate was screwed down with flat head wood screws. Be sure to countersink the holes to make the heads flush with the top surface. I also epoxied it down, just to also make it a little more air tight. Next a 1 1/2" hole was drilled through the side of the box to facilitate a vacuum cleaner fitting. You may have an old piece of an old tool laying around the house or you can purchase one at a vacuum cleaner shop. just saw it off and epoxy it into the hole. This is where you will plug in your household vacuum cleaner. A strip of 3/16" thick X 3/4" wide automotive weatherstrip was glued around the top of the box. This finishes the box.
Here is a photo of the clamping plate. The wooden part at the bottom is a guide:
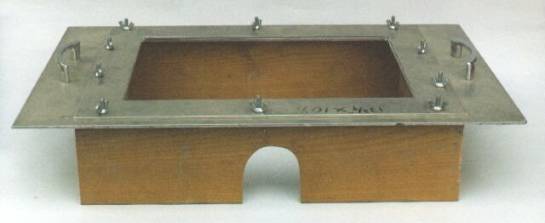
Now for the clamping plates. For these, you are only limited by the size of the oven you have. Also, I use an electric oven. I have never tried this with a gas one, so use caution! I made a plate that will hold a piece of .030" thick styrene plastic sheet that is 13 1/4" X 10 1/2". I use this one to vac wings and fuselages etc., etc. I have a smaller one that holds a .015"-.020" thick butyrate plastic sheet 4 1/4" X 5 1/2" for smaller parts like canopies, etc. The clamping plates are made from 1/8" aluminum sheet and the two plates are clamped together using 1/4" screws and wing nuts.
Now to use it! Place your form on the vac box. Now, heat the oven to around 350 degrees, place a clamping plate with a plastic sheet clamped between it into the oven. Plug your vacuum cleaner hose into the vac box and turn on the vacuum cleaner. Watch the plastic that is in the oven. When it sags about 1 1/2"- 2" for the large sheet and 1/2"-1" for the clear smaller sheet, and while wearing gloves, remove the clamping plate from the oven and quickly place it down over the form. The vacuum will draw it down over the mold to the desired shape. It will quickly cool, and you can now remove the mold from the plastic sheet.
I’ve included two photos of the rig I made, But remember, this description of how to make a vacuform is only a guide. You can make yours with many variations to suit your own needs and from various materials. I still have the molds and now I can make as many Claudes as I want. This came in handy because my cat Pokey destroyed the first one I made. Also the canopy for the F9F Panther was also vacuformed on this machine.
Once you have the machine, you can make all kinds of things. I buy my plastic styrene in 4’ X 8" sheets. you can make a lot of aircraft wings out of a sheet like that! One other word about vacuforming. I make my master molds from basswood, and the parts you make depend on how accurate the master molds are. You can’t make a silk purse from a sow’s ear. The molds must be as accurate and detailed as necessary to achieve the results you are after. Right now I’m working on an MS-406. I hope to have photos of it soon. Happy modeling!
© Howard Weaver 2002
This article was published on Friday, October 30 2015; Last modified on Friday, October 30 2015