
Revell 1/32 F-4B
By Larry Hawkins
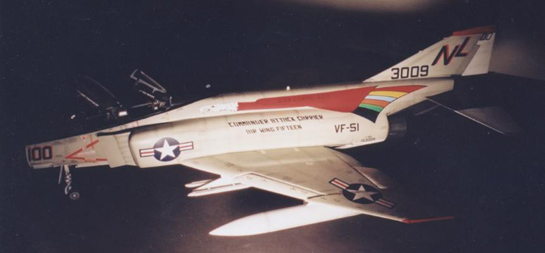
This is the old 1969 release of the F-4J Phantom II. The same I did to the F-4J that is in the jet gallery, I went overboard loading it with extras. This kit has its faults, but as Dr. Menelos has shown, these puppies can be made into something that is worth the effort. The following shows what and how it shows in the photos.

- Tail was modified for the "B" model, adding the small bulge in front of the fin
- Tail planes are the non-slatted ones from the Tamiya F-4D kit
- Wheels and tires are from the same kit as above
- Used CAM's resin nose piece to modify the "J" to a "B"
- Pylons are from the MiG Killer kit, plus I added the main pylon from this kit on the bottom of the wing section
- Added the Seamless Suckers intakes. These are not easy to install and I had to more than modify them to get them to fit. I also added a intake trunk, which went well all the way from the front of the engine all the way up to the front of the intakes
- Front windscreen is a vac piece, the kit piece is way to short
- Cockpit is from the Tamiya F-4D kit, same for the seats added, side consoles also. I added some insulation that was used from a vac kit that had several release holes in the sheet. Everything was painted 231 MM color
- Added the clear center section from the Tamiya F-4D kit
- I modified the rear cockpit where the rear canopy is attached, used the Tamiya kit part
- Drop tanks are from the F-4J by Tamiya
- Cut off fuel dump and made new one out of flattened aluminum tubing
- I added the Tamiya kit part at the bottom at the front of the fin
- The Tamiya tub will fit in the Revell kit. I added an instrument cover, it never looked right
- Glued all parts that needed to be glued and set aside
- After all other items were laid out, I glued the wings to the fuselage and modified the wings to fit the bottom of the fuselage. After everything was glued, I started sanding down the whole kit until it was smooth, wet sanding helps a lot
- I cut out the front slats, flaps, and ailerons
- I rescribed the panel lines and did some free scribing using an old #11 blade
- I primered the whole plane with with a can I get for $1.00 at the dollar store here in town, saves a lot of trouble without beginning the airbrush
- After the primer has dried two days, I wet sanded and went over the plane for boo-boos. I fixed the bad areas and got ready to paint
- I painted the areas that were painted on the real plane, after that had dried for three days, I masked off the bottom and shot the top color 440 MM color
- I cleared the whole plane and decaled after the clear had dried
- I used the CAM sheet that has all the stencils for F-4's in naval service. The black nose and canopy band are painted with a can
- I applied a black wash over the whole plane, wiped it off and let it dry and wiped it off after it dried
- I added dirt streaks and weathering after the flat coat had dried
One last thing. I would like to express my thanks and gratitude in sending cockpit tubs and pieces for helping me complete this project to Jarrod Cunningham and Ron Hoover, a BIG thank you!
© Larry Hawkins
This article was published on Wednesday, July 20 2011; Last modified on Saturday, May 14 2016