
Combat Models 1/32 F9F Panther
By Larry Hawkins
This F9F Panther is the vac kit by Combat Models and was again a fun kit to build. John of Combat has been adding some detail to his molds and like the others that he puts out,the panel lines aren't that crisp but the detail is there.
As usual,I started by cutting out all parts and added the balsa strips along the inside of the fuselage for strength. The cockpit tub was built and as for the instrument panel as well. This was detailed and various dials and such were added before it was glued into place. After this was done,I glued the fuselage halves together and put it to the side.
I went to the tailplane that I scratchbuilt from sheet plastic. The kit part was to say the least not worth the time to sand and fit to the rear position of the plane. When this was done,I cut the tailplane to the plans as to position them to the tail part of the fuselage. These then were glued into place and left alone to dry. Making sure that they were at the right angle as to the plans.
I then started on the wings and got them ready for fitting to the fuselage. But before I did this I cut out the wheel wells and nose gear bays, then I added some tabs to them as to fit them into place as some of the 48th sale kits have. This comes in handy when u want to align the wings and gluing them to position. After this was done I got the tip tanks ready also and added then to the tip of each wing.
When all was done from the above mentioned,I started sanding and filling with spot putty and re-sanding again and again,making sure that all the little pin holes and scratches were covered with spot. After this was done I added the windscreen to the front of the cockpit and glued it in place. I re-enforced the inner back of the windscreen with a solid piece of plastic stock. This gave it more support and added a little more detail to it. I then went ahead and masked off the windscreen and started to sand and fill around the edges of it so it would be ready for primer. I masked off the cockpit and any other area where I didn't want paint.
I primered the whole plane with primer,about 6 coats and let it sit up for 24 hours. I use automotive primer on all the vac stuff. It does get warm,but not hot to melt the plastic and it seals and fills in all the little cracks and scratches left after u have sanded down the surfaces.
After this had dried,I sanded it again and checked any areas that needed to gone over again. This is time consuming,but if u want that perfect paint job and no little boo/boo's then this has to be done. I shoot 6 more coats of primer and let it sit up for 72 hours. This was to let the first 6 coats mingle with the last 6 coats to dry and hope that it doesn't pull or shrink. Primer has a bad habit of shrinking and pulling,depending on the amount of primer that one uses.
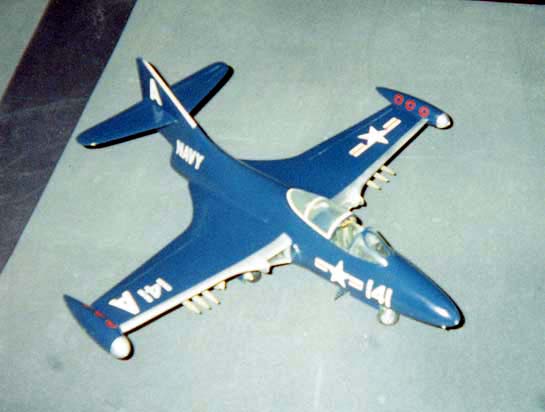
When all the coats were dry,I then took an old scuff pad that I have after using them to paint cars along time ago,and scuffed the primer down to a smooth surface and to give the paint something to grab on to. I went ahead and painted the panther using a mixture of Flat Black and blue for the color. After the paint had dried (5 days) I removed the masking tape. I added decals from the scrap box,rockets from the Revell P-38,bombs are from the monogram P-38 kit. Wheels and tires are from the scrap box. Gear legs are scratchbuilt as the nose gear. I did add Mg's to the nose as well. It took me about 2 months to get it done and was well worth the effort.
© Larry Hawkins
This article was published on Wednesday, July 20 2011; Last modified on Saturday, May 14 2016