
Airfix 1/24 Messerschmitt Bf 109G Conversion
By Frank Mitchell
The story of my 1/24th scale Me 109G-6 has two chapters. In 1975, I converted the then-new Airfix Me-109E kit to a Avia S-199. After deteriorating over time, it was resurrected a couple years ago to a 109G. I hope these brief notes might inspire others to try things that don't seem all that obvious at first.
I have scanned a couple of underexposed slides taken during the original conversion; not all the details are visible, but they do show a few of the construction steps.
The wings for the Avia were made by first carving the new wingtip shape from the kit wing (that span for the E and the G are essentially the same) with filling and re-scribing as necessary. New control surfaces were cut out along with the radiator flaps. New radiators were needed, and those were heated-and-smashed on a balsa mold. Separate lower radiator flaps were made from styrene sheet. Changes were also necessary to the wheel wells. The E gunbays were filled in and re-scribed. The underwing guns were made in that same way as the radiators, and new wheel bulges for the top of the wing were made on a Vac-U-Form machine. The wheels were modified to look more like late-model wheels.

The fuselage was cut in front of the cockpit and a new nose was carved from pine and balsa (this was 1975, remember) which was glued to the plastic with epoxy. The gun troughs were molded from styrene and glued into the wood. New gun "bulges" were also made on the Vac-U-Form. The kit fin was modified to the tall tail shape and a new rudder carved from balsa.
A spinner mold was turned from wood on a lathe and the spinner itself made by heating-and-smashing styrene, but the mold was left in the spinner to serve as an anchor for the blades. The prop blades were molded with plain old 5-minute epoxy from a wooden mold in what I think was my first use of RTV. Exhausts were made up from square brass and glued into slots in the wood.
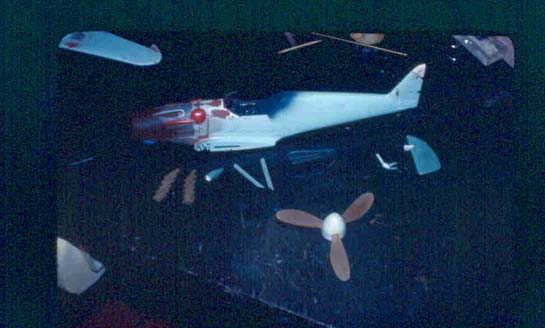
A new canopy was made by gluing together the middle and rear parts of the E canopy, filling them with slow-curing epoxy, and then shaping it into one piece (I still have that mold--never throw anything away).
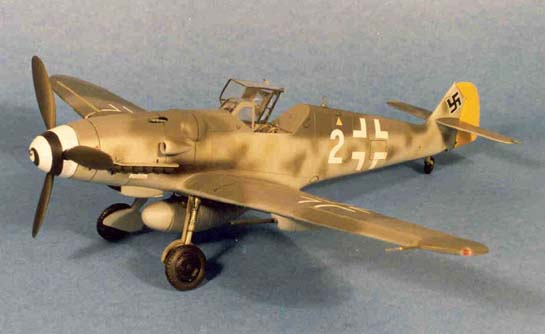
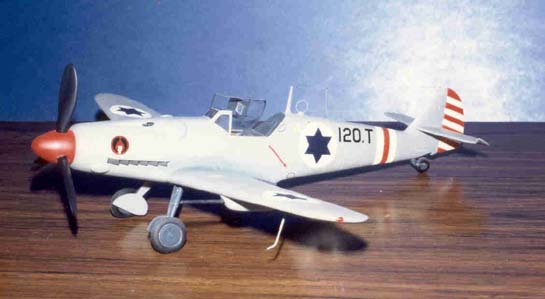
The model was painted according to information in the Augsburg Eagles by William Green. The national markings were painted on using frisket, and the squadron badge came from a decal sheet issued for the old Revell F-4.
The model was a favorite of mine over the years but finally deteriorated to the point it was relegated to a basement shelf along with other deceased or moribund models.
One day about two years ago, I was looking around the stash of kits (which is also in the basement) for an inspiration, and my eye lit on the Avia. I suddenly found myself wondering if a 109G could be hidden in there. I took the pieces to the work bench and got out all references. After blowing up a few of the better drawings, I decided that it could be done.
First on the agenda was to strip and sand the S 199. I had acquired another 109E kit at a flea market for little money, so I just replaced some of the smaller parts. Also, because I had done the tall tail on the S 199, I cut the whole tail section off and replaced it with the older style (if I were sane I wouldn't be a modeler).
The wing really didn't need much, just some clean-up and minor revision of lumps here and there
The cockpit had deteriorated pretty badly over the years, so that was re-done, which is not all that easy when the thing is already built.
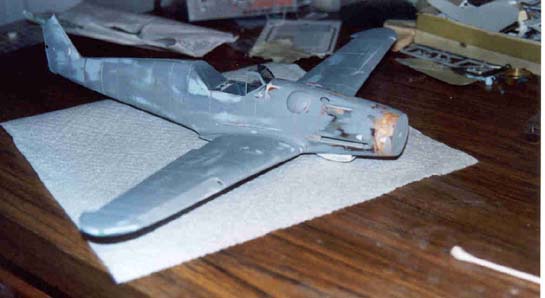
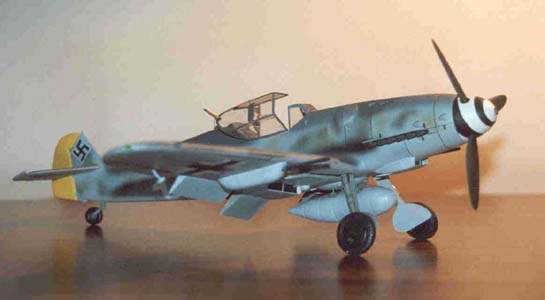
The nose, of course, needed the most work. The S 199 nose was amputated on a line about the forward edge of the exhausts A new section was carved and sanded to shape (from some scrap hardwood), and a mold for a new spinner was turned from the same wood. That was formed from styrene by heat-and-smash. The prop blades were molded with resin after making one blade from hardwood.
I used the same canopy as the S 199, mainly because I thought it looked cooler.
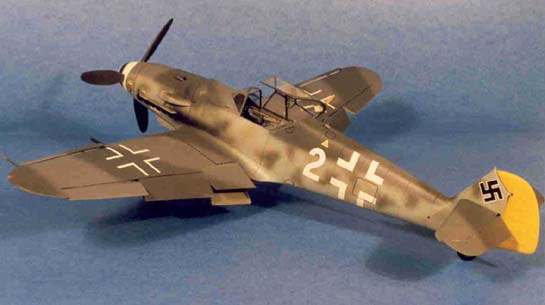
Gunze paints were used this time in the common three-gray scheme. The spinner spiral was masked and sprayed. The wing and fuselage markings were again sprayed on using frisket. The decals (just swastikas and numbers) were scrounged from the decal stash. The markings are an aircraft from an unknown unit which I got from one of those post-war pictures of a bunch of wrecks.
I am once again happy with the outcome and it really was fun. A perfect example of cutting away everything that didn't look like a 109G. What made it all even better was that I didn't have to throw away an old friend.
Perhaps it could be further converted to an Me 262? No, I guess not.
© Frank Mitchell
This article was published on Wednesday, July 20 2011; Last modified on Saturday, May 14 2016