
Revell 1/32 P-47D - Gabreski's Last Thunderbolt
By Mike Dobrzelecki
Gabreski's Last Thunderbolt - P-47D-25RE, Bubbletop
Using Jerry Rutman's Resin Update and Fred Yarema's Gabreski decals.

Any modeler of a certain age with any familiarity with the venerable Revell 1/32nd scale P-47D Bubbletop kit knows the amount of work it takes to bring it up the standards of today's "shake 'n bake" Tamiya and Hasegawa kits. The cowl is the wrong shape, the tail and rudder woefully undersized, the main gear is so tall that it is well on its way to Fiesler Storch territory, the canopy is the wrong shape, the wheels are horrible, the tail gear arm is on the wrong side, the waste gate fixed and variable doors are thick lumpen shapes, the bleed doors, ramps and louvers on the rear fuselage either have trailing edges the thickness of armored hatches, or are incomplete or mere solid indentations, the prop doesn't resemble any windmill ever fitted to this Republic fighter, and the infamous Airfix riveter would feel right at home with the mold finisher who dressed out this puppy.
I could go on, but you get the picture. You'd either have to be in love with "doll-house" scale (as I refer to aircraft models over 1/48th), or you'd have to have committed to building one for a museum project, which is the reason for this model.
After 20 years of coordinating exhibits for the Intrepid Museum in Manhattan and various other museums and institutions, I've come to the conclusion that "bigger is better" for museums. While most modelers limit themselves to the type of model, i.e., aircraft, armor, etc., and, even to one scale within their genre, I consider myself to be "Rennaissance Modeler", who builds all types of model, in any scale, and in all medias. Growing up in 1950s and 1960s, that's what "modelers" did and it seems to have stuck with me all these years. One thing's for sure - I'll never get bored.
With Revell's P-47, luckily, Jerry Rutman, the grizzled resin molder ensconced in the hinterlands of Pennsylvania, has come to the rescue with a series of resin update products, including a full interior with a Fotocut sheet for the instrument panel and other fittings, wheels - either covered or non-covered - 6 or 8 spoked variety, a Hamilton Standard prop, a vac canopy, a replacement wing section for correctly aligning the eight .50 cal. blast tubes parallel with the ground, metal main and tail gear, replacement cowl and ducting, replacement wheel wells, weapons pylons, flat belly tank, as well as alternative Curtiss props, a fin fillet and some other items.
As the model was built under deadline for an permanent exhibit, entitled, "Colonel Francis S.Gabreski - Polish American Ace of Aces", that I'm supervising for the Polish Military Museum in America in New York City, I did not use all of Jerry's parts for this first model. I did use the cowl, cowl ducting, metal gear, resin wheels, vac canopy and Hamilton Standard prop.
Because of a time crunch, I did not use the wheel wells, resin retrack rails for the canopy, resin interior, resin canvas boot for the tail wheel well or the replacement wing sections with the corrected gun openings. I did use the Fotocut instrument panel, though. I found it quicker to redrill the correct location for the .50 cals, rather than fair in the resin wing section. The bad seam in the wheel wells was corrected with a combination and filling and sanding, as well as, judicious use of Evergreen plastic strip.

Although I sanded off the rivets, I did not rescribe this particular model. I also did not correct the waste gates or the fin and rudder shape. In lieu of Jerry's resin canvas boot, I made one up out of Elmers Glue impregnated facial tissue, which nicely obviated the need to correct the nasty seam in the tight enclosed quarters of the tail wheel well. The nav lights on the wing tips were simply painted on. I did use the oleo scissors from the Fotocut sheet, which dresses up the gear nicely, and thin down the bleed doors, ramps and scoops. The .50 cal. blast tubes and pitot tube are made from brass tubing. The antenna wire is 2lb. fishing line attached to the mast which is offset to starboard from the centerline of the fuselage. The mast was previously removed from the kit, reshaped and installed just prior to painting with a piano wire pin installed for strength.

Rutman's resin parts need some attention to pinholes and other casting issues. The inside of the cowl needs extensive sanding to insert the kits engine - I wrapped 180 grit sand 3M paper around a prescription bottle to perform the major work, then finished up with 400 and 600 grit. I cut off the mounting hub from the kit's firewall and reduced its depth to the correct size to mount the engine on Jerry's resin firewall.
Rutman provides a pre-marked .010 sheet already cutout for the cowl flaps. Simply cut on the scribed lines. First, though, I imparted a curve to the cowl flaps by wrapping it around successfully smaller dowel shapes. It made the fit on the cowl lip easier in the end. I built the Hamilton Standard prop on a jig made from an enlargement of the drawings in the Detail & Scale book on the Jug - simply glue the drawing to a sheet of thick plastic and router out a hole for the hub, then mount the blades with a twist and elevate the tips while the glue dries. The blades have piano wire pins for strength.
Rutman's tail gear is too thin and delicate for the heavy 1/32nd scale model and collapsed in about two days. Jerry was toying with the idea of installing a brass pin while casting future parts, but given the offset yoke, it won't do the trick. He needs to remake this part beefing up the cross-section, even if it means sacrificing some scale fidelity. Likewise, the main gear may still be too tall, but I have not gone back to measure it. I still think that the canopy needs to be reshaped, also.
These comments are meant to be minor criticisms, at most, and I heartily recommend Rutman's resins to anyone looking to improve the appearance of the 1/32nd scale kits he covers out there on the market - God knows, they need it.
The colors and markings on Gabby's last P-47 are a matter of some controversy. I spent about two years researching this aircraft, including spending a day at Gabby's house in January 2001 going through his extensive photo, film and document archives, which are prodigious, to say the least.
I first met Gabby back in 1981 at the IPMS USA Nats in the Big Apple and he was an honored guest at several exhibit openings aboard the Intrepid, as well as, an opening of an exhibit on the Polish Air Force at the Mighty Eighth Air Force Heritage Museum in Savannah, GA. I also met and corresponded with Gabby's crew chiefs, Ralph Safford and Felix Schacki, as well as the 8th Air Force Historian, Roger Freeman, who, as a lad, spent a lot of time around the 56th F.G.'s airfield at Boxted.
Gabby's last Thunderbolt underwent a hell of a lot of changes in a relatively short period of time between May 1944 and when he went down on July 20. Most model companies, decal manufacturers and aviation illustrators get his markings wrong, often mixing up details between schemes.
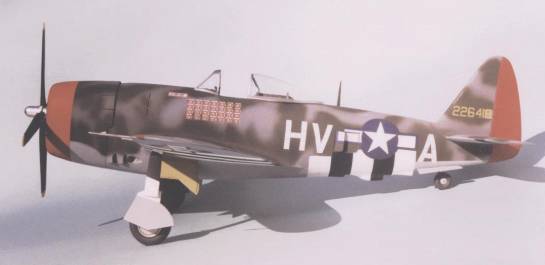
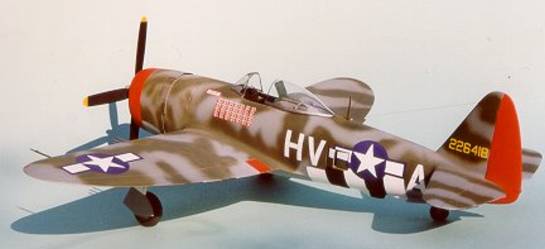
This model depicts Gabby's last P-47 on July 20, 1944, with his full air-to-air score of 28 kills, when he pranged his prop when he got too low on a strafing mission against a Luftwaffe airfield outside of Koblenz, Germany. After evading for a couple of days, Gabby became a guest of the Luftwaffe for the next ten months.
The top surfaces are finished in RAF Ocean Grey and Dark Green with the lower surfaces in Medium Sea Grey. There is better than even money that the undersides were left natural metal, however. One clue is that the black ETO bands were still present on the undersurfaces of the stabilizers. The other possibility is that the fuselage may have been painted in Medium Sea Grey and the undersides of the flying surfaces natural metal. On the other hand, they may have simply masked the lower ETO bands, when they painted the aircraft.
Gabby and Schacki believed the undersides were a lighter gray than used on the top surfaces. Freeman and others believe that they were left natural metal. I used the last of Aeromaster enamels for the RAF colors. By July 20 1944 the invasion stripes on the top surfaces were removed and the areas repainted, with the paint job on the wings much nicer and neater than that on the fuselage.

Model Master Red was used for the 56th F.G. cowl band and 61st F.S. rudder, both areas having been undercoated first with white. The interior of the cockpit was finished in Model Master European Green - a first rate match to the dark green used by Republic Aircraft, according to Bert Kinzey.
The wheel wells were finished in the new Italian Life Color Chromate Yellow. The Lifecolor paints do not cover well, at all, but the end result was still nice (good luck trying to hand paint with this product without brush strokes). The excellent Alclad line was used for most things natural metal, although I used some ancient Pactra Steel for the gear, simply polishing the oleos on the metal gear for a great natural look.
The invasion stripes are done in Tamiya black and white and are applied slightly outboard of the positions indicated in the Detail & Scale book - again, pay attention to photos of the actual aircraft you're modeling. One thing that I did not replicate on the model is the yellow overspray above and below the serial number. All masking was done with Tamiya masking tape.
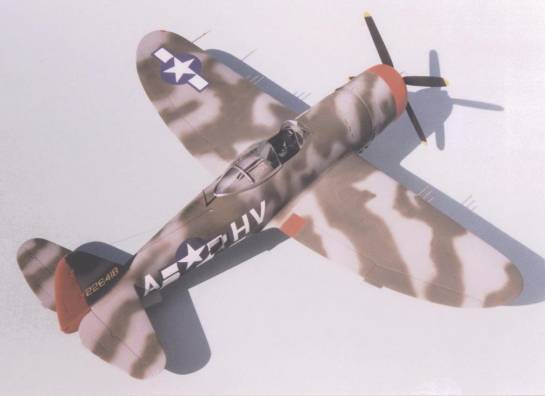
The top surface camouflage scheme was free-handed with an Iwata HP-C airbrush - nicemachine, by the way, replicating the complex spray-job as best as I could from the photos I gathered. The scheme on the starboard side of the fuselage and the top of the wings is not well documented.

The model is finished with custom made decals done by Fred Yarema on an Alps printer. I provided the research for the decals and believe that these are the first truly accurate Gabreski markings available, right down to the description of each kill, i.e., "ME-109", FW-190" above each victory flag, which, by the way, Schacki advised were actual decals bought in London (Gabby mentioned how Schacki would nag him about being careful when he got in and out of the cockpit to NOT damage his decals, "Schacki and those Damn decals!", Gabby muttered to me, even after 57 years). Two oversized natural insignia grace the underside of both wings. The fuselage star & bar is precut to mount in the opened and actuated intercooler ramp doors. The decals are translucent, so back up the star & bars with white decal stock, but don't worry about the code letters. When dry they look like they were painted on. Nice job, Fred.
The model won a 1st Place Award in the 1/32nd scale Prop Category at the IPMS Region 2 Convention at Roanoke,VA, in the beginning of October 2001, beating out about ten other entrants.
I have second Gabby P-47D-25RE under construction with all the bells and whistles on it, including ALL of Jerry Rutman's resin parts, the waste gate fixed and variable doors and intercooler doors and ramps replaced with sheet brass or this card stock, model is totally rescribed and the shell ejection ports narrowed to correct size, as well as a wealth of work in the interior and the nav lights replaced with clear fairings and bulbs drilled in and colored, just to mention a few improvements. The fin and rudder have also been enlarged to correct shape and a lot of detail added on the wings and fuselage. This model will be circa D-Day with the so-called black tape/white overspray full wrap around invasion stripe scheme, sporting just 27 kills. I will finish the undersides of this second model in natural metal, just to hedge my bets. It's about half way done, fully rescribed, with the wings ready to be mounted to the fuselage. Ironically, I started this one before the one in the pictures, but had to put it aside to finish the one for the museum.

Look for an article in the future in (probably) a British model mag covering my research on the complete evolution of Gabby's colors and markings on his last Thunderbolt. Jug fans will have to wait until then for full details. Patience modeling fans, this is just a teaser.

Here are two photos regarding the Battleship New Jersey, now a museum ship on the Delaware River in Camden, NJ. One shows Ron and I along with my aunt and cousins visiting the U.S.S. New Jersey at the Philadelphia Navy Yard in 1968, just after her modernization and just before she left for service off Vietnam. The second shows Ron and I with the former President of the Battleship New Jersey Historical Museum Society, Walt Olkowski, who gave us a VIP tour a week after the museum opened allowing access to areas not yet available to the public.

© Mike Dobrzelecki 2001
This article was published on Wednesday, July 20 2011; Last modified on Saturday, May 14 2016