
Revell | 4664: Curtiss P-40E Warhawk - Part 2
Reviewed by Rato Marczak
In part one we saw that, like many other Revell kits of this vintage, this one is accurate in shape and dimensions. On the other side of the coin are the detail parts, which leave a lot to be desired. This is probably not new for you who experienced an old Revell kit before. Let's see why...
COCKPIT
Just like other old kits, the cockpit is unusable for a serious modeler. The kit brings the floor, side walls, control panel, seat and strut, pedals and control stick. Interestingly, in the instructions the cockpit is installed later in the assembly sequence, being inserted through the bottom fuselage opening.

Cockpit details (control panel, pilot's stick and seat).
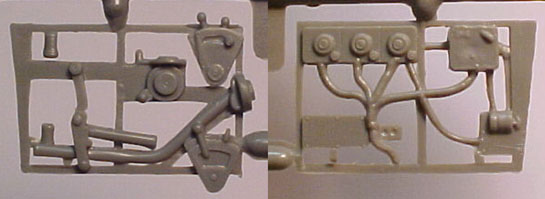
The left and the right cockpit side walls. Very crude...
The control panel has some resemblance with the actual part. It is always a good idea to provide the side wall details as separated parts, but those of the kit are not good at all, with many important items missing. The stick can be used with modifications, because the elevators rod should be linked with the stick by the right side.
The seat is over thick, and its shape would be appropriate for a dash-N, not an E. In some P-40s, the seat was made from wood to save metal (after the Parts Manual), then check your references. I'm currently working on a conversion of this same kit to the B/C version, and the correct shape of the seat can be seen in one of our articles. I included below a drawing of my interpretation of the seat, based on photos and drawings. You can print it and make personal use as a template (because the bitmap is out of scale, scale it to approximately match the noted dimension).

An approximate drawing of the pilot's seat. Reduce the picture 27% to get it in true dimensions.
We also included some pictures of the cockpit from the E&M manual. I don't know why, but some instruments are missing from the right side wall. These pictures are not much clear, so we also added some drawings. It's worth to note that the transmitter, the receiver and the filter were replaced by a single 274-N (or BC-450-A) control unit (the one represented by the kit part) in later production P-40E's. You should find some photographic evidence to know which one to use for any particular bird, if you care.
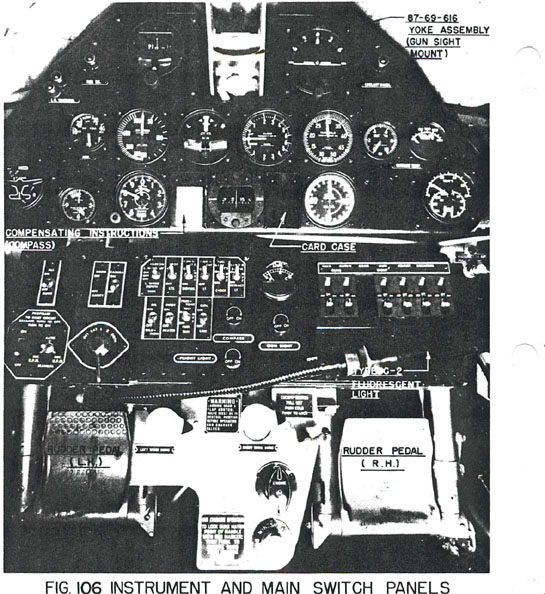
Instrument panel (P-40 E&M Manual).
Instrument panel layout.
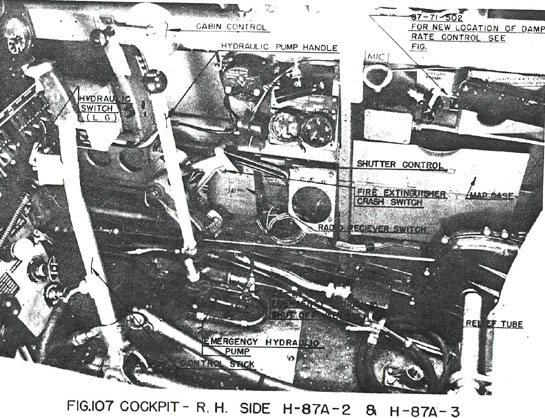
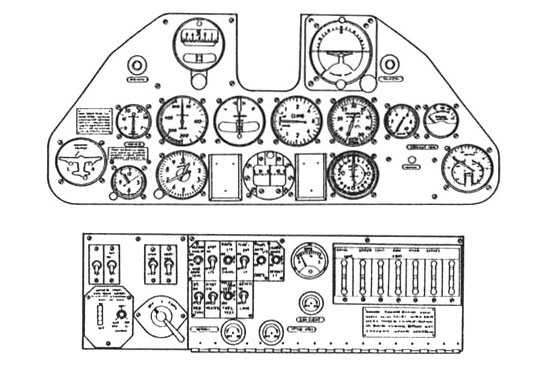
Right side wall (P-40 E&M Manual).
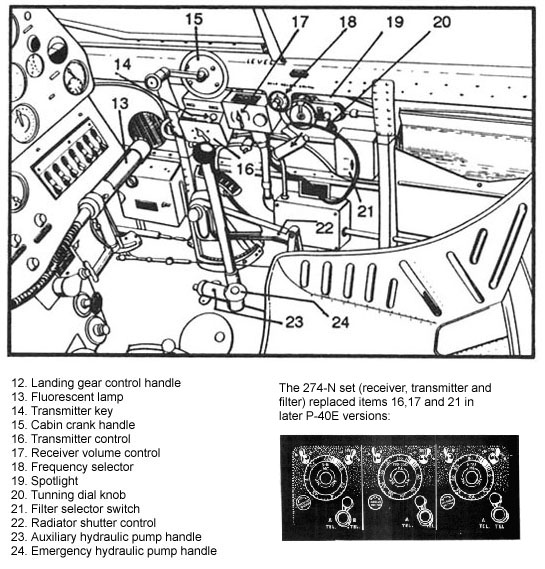
Right side wall layout.
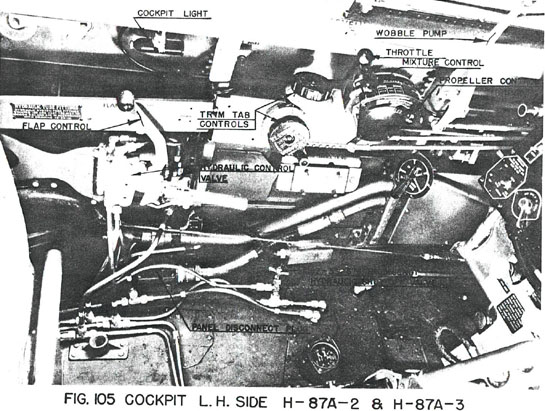
Left side wall (P-40 E&M Manual).
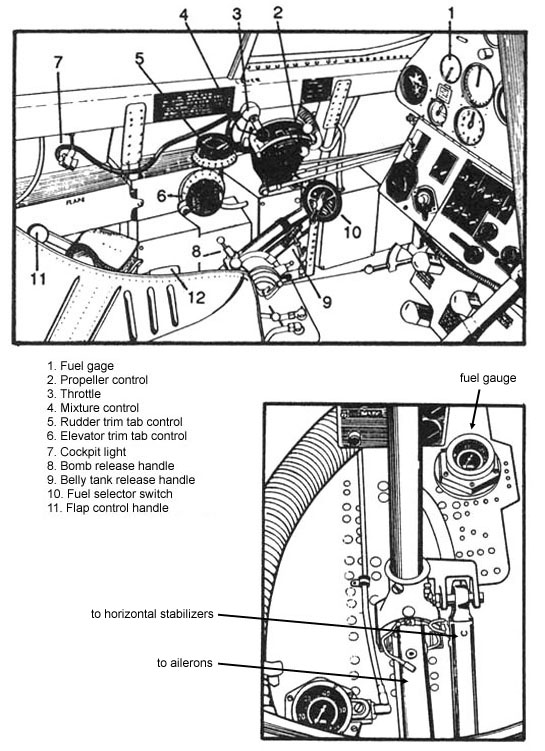
Left side wall layout. Note the correct configuration of the control column.
However, we are just exercising our appetite for details here. If you want a handy shortcut, go for the excellent Jerry Rutman's P-40E detail set reviewed here at LSP by Mark Proulx. This set is very detailed, includes photoetched buckles, and will save you many hours of scratchbuilding. Not only with cockpit, but also with the landing gear. Another option is the Eduard set #32017, designed for this kit. However, many details in this fret are hopelessly wrong, and I don't think it is worth the money.
ENGINE
The kit comes with a fairly decent representation of the Allison V1710-39, to be installed in the nose. It lacks details like ignition wires and plumbing, which I think is a good idea, as we can add them in a more realistic way without having to scrap molded on details. The engine mounts are reasonable, but the firewall is only symbolic.
The kit's engine halves.
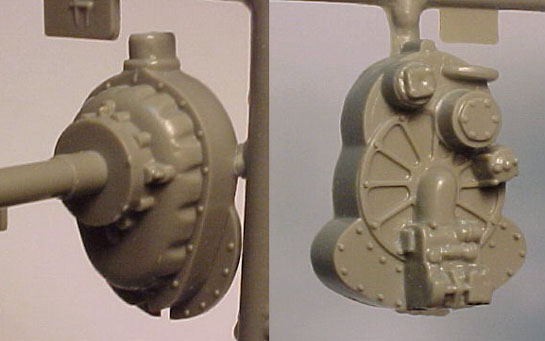
The front and the rear parts of the engine mount.
Engine mount and glycol/oil radiators.
.The glycol/oil radiators are a single piece (part #10) to be installed under the engine block. The mentioned Eduard set provides replacement PE screens to be added to that part. Although the part is not bad when viewed from the front, there is nothing when looking from the radiator flaps. Yes, you can see a lot from that angle. Alas, the flaps also deserve some attention. There are a couple of actuating rods and hinges quite visible with the flaps open. Furthermore, the FO manual states that the radiator shutters must be open while the aircraft is landed. The Eduard set mentioned above brings replacement radiator flaps, but they lack some "three dimensionality". I have no doubts that the scratchbuilders will test their skills here (see photo below).
The propeller seems good, except for the fact that our sample suffered from "mold shifting", leaving a "stepped seam" difficult to correct around the hub. Not a serious problem, because most of it will be hidden inside the spinner. Sorry, but I forgot to measure the prop diameter.
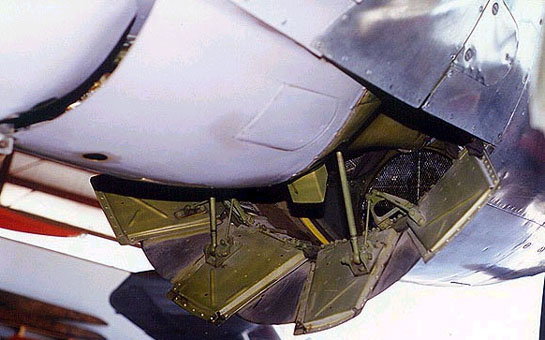
Radiator flaps in the P-40E preserved at British Columbia Aviation Museum. Note the visible back of the radiators.
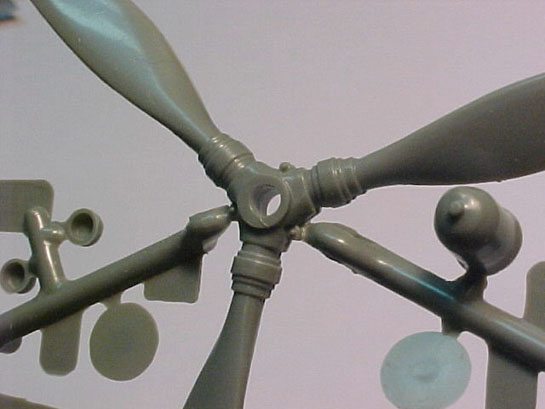
The propeller.
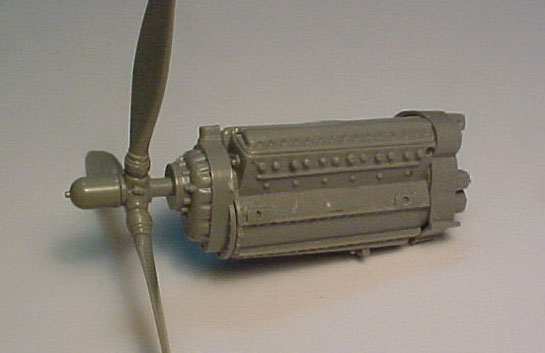
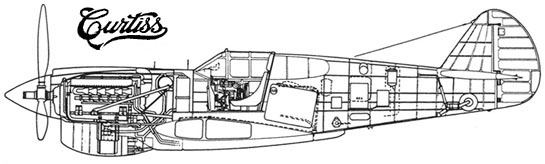
A view of the engine test fitted.
LANDING GEAR
If you think the cockpit is marginally passable, you won't think that way about the landing gear. The retractable main landing gear was something interesting in early seventies, but for today's standards it is, in a word, crap. The retracting mechanism is completely fictitious, having no resemblance with the actual machine. And no, there is no gears (like in the 1/40 Skyraider of the shame manufacturer - remember that?), you have to rotate the wheels by hand. Furthermore, the wheel wells are not enclosed, what adds something to the already toy like appearance.
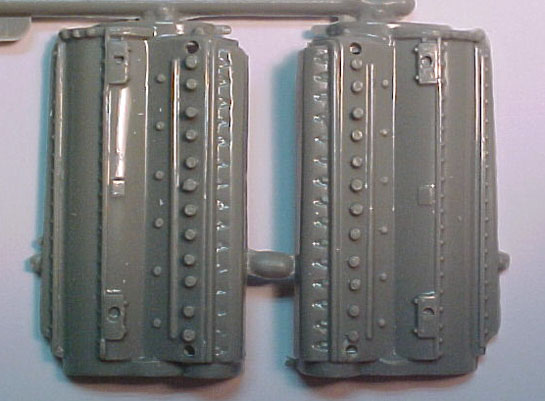
The main struts are too short, and I think that this explains the low profile found in many assembled examples of this model. The reason is in Revell's approach for the retracting mechanism: the pivoting line of the main strut is positioned aft the strut end. So, as the landing gear is retracted the whole assembly is moved backwards. In the actual machine the pivot was located at the end of the strut, about the same level of the wing skin. Then, in order to make the kit wheels fit into the bays, the main strut had to be shortened. Besides, the struts look horrible. The wheels are on spot in what concerns the diameter (30"), but their hub caps are completely flat.
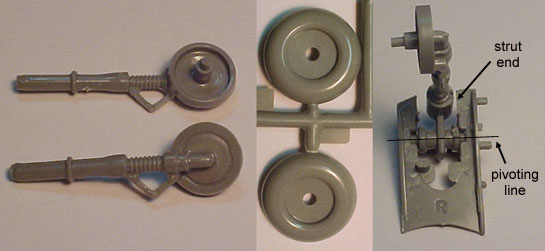
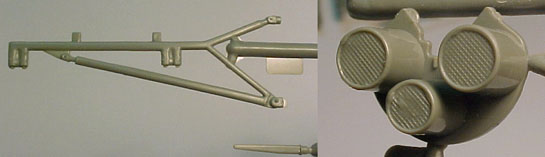
Main landing gear struts and wheels. On the right, the reason why the kit's struts are too short (see text).
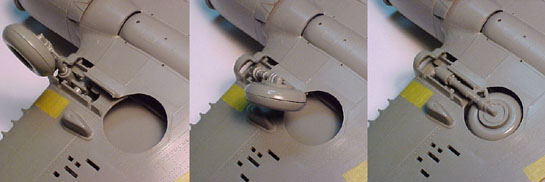
Let's play! The landing gear retraction mechanism in action.
You think I'm exaggerating? The wheel bay doors are devoid of any detail. They should be covered with perforated plates on the inner side. There's no retracting arms, no pivoting point and no gears. What the heck of gears I'm talking about? The P-40 inherited the retraction mechanism from the P-36, which employed conical gears to make the wheels rotate and lay flat in the wells. The two shots below can explain it better than me.
I know from the hard way that to scratchbuild a new landing gear for this model is a painful task. All I can offer now for you who accept the challenge of building a new one is a drawing I prepared using a few drawings and photos. Please, understand that this an approximate drawing, but it is probably no more than a couple of inches in error for the length. Small deviations can be compensated with the oleo cylinder.
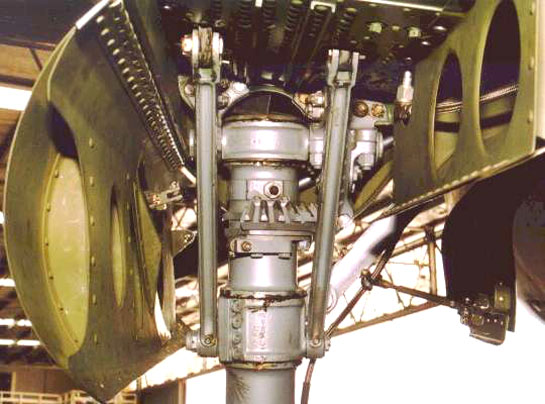
Detail photo of the landing gear retraction mechanism (looking from the back).
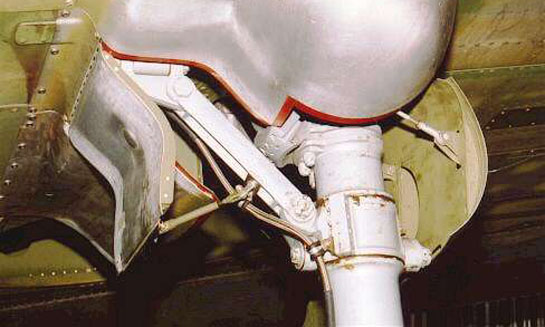
Detail photo of the landing gear retraction mechanism (looking from the front).
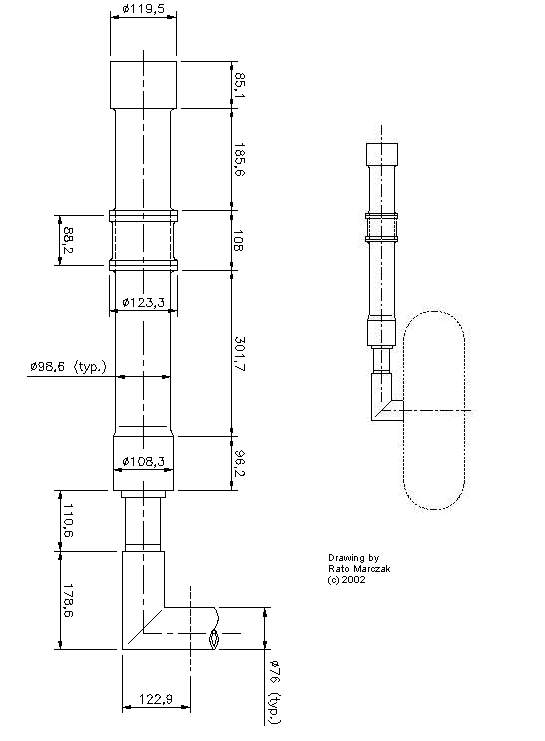
My interpretation of the landing gear leg (the tie-down ring and torque link are not included). Dimensions in mm. Better to round off the figures to the next integer (my CAD system doesn't understand what I say...).
There is much of a debate about the wheel wells: were they covered with canvas or not? Up to the P-40E, the canvas was factory standard. I don't know about later versions. The canvas covers were installed to protect the inner areas of the wing from dust and debris. Under heavy use, however, they eventually tore and were not always replaced or repaired by ground crews. There are a few wartime photos of Warhawks showing the underside with torn canvas hanging from the wheel wells. The mentioned Eduard set includes photoetched parts to enclose the wheel wells, but they are not accurate. It is up to you what to do here. We will leave a picture of the wheel well without the canvas in case you go out of control and decide to make a new one from scratch. We also included a photo taken at the production line showing the canvas being installed on the well.
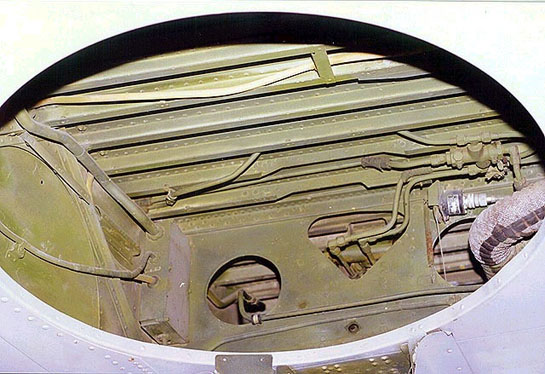
Detail photo of the left wheel well (viewed from the front).
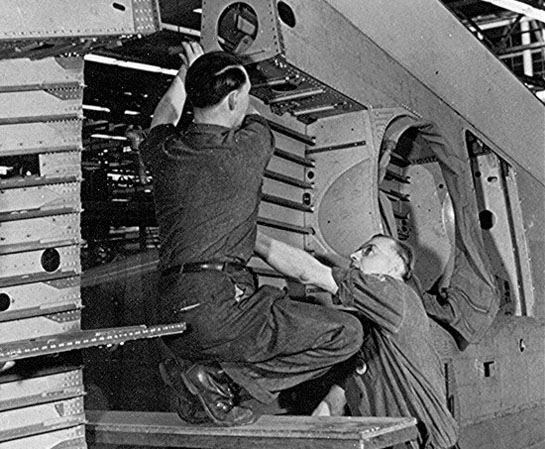
A Curtiss H-87-A2 in the production line. Note the protecting canvas prior to be tied into the wheel bay.
The tail wheel used the same expedient. Having a smaller exposed area, however, the canvas there inside was not so prone to tearing. The kit parts can be used, although the wheel yoke seems too weak for the job. As for the tail wheel doors, the kit parts are over thick and don't have any detail on the inner side. The picture below if from the E&M manual and hopefully will help you to add the missing details.
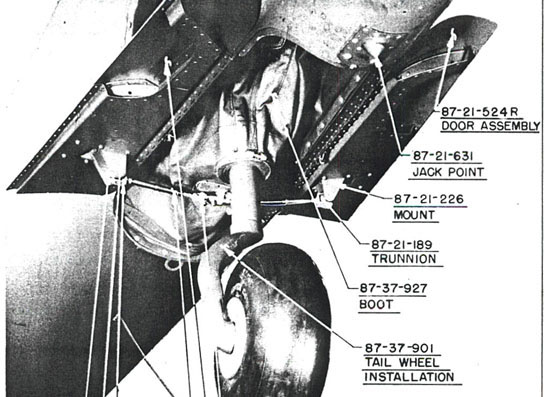
Tail wheel details (P-40 E&M Manual).
But don't put the kit back to the closed yet. Again, there's a simpler solution: Jerry Rutman's P-40E detail set. It comes with all you need to make a well detailed landing gear without scratchbuilding a single piece (ok, maybe the brake lines). The main and tail wheel bays are depicted with canvas. And as far as I know, these resin bits click perfectly in the kit's parts.
CLEAR PARTS
There are 4 clear parts in the kit: windscreen, sliding canopy and the rear windows. The frame lines are a bit on the heavy side but very well molded. Even the hinges for emergency exit are printed on the sliding portion. Two non-clear parts are glued to the bottom of the sliding portion to fit the rails, and I'm afraid it will be difficult to dissimulate the resulting joint. By the way, the rails are very heavily molded. The windscreen fits surprisingly well in the fuselage after a gentle clean up, and only a small amount of Mr Surfacer will do the job.
The rear windows are good, and their curvature follow the fuselage. On the other hand, they are slightly undersized in comparison to the corresponding fuselage slot. Open your tips & tricks box here because their installation will need a very careful operation in order to not leave a visible seam all around them. I suggest to glue a thin stripe of plasticard around the edges of the fuselage rear windows' slot to reduce the gap. Wait until dry and sand flush. Now sand and dry fit the clear parts until a good fit is achieved.
The clear parts.
ORDNANCE
Nothing here but the characteristic P-40 belly tank. I didn't find good drawings of this to compare, but the shape looks right. It comes riveted all around. The attachment points (including the braces) and the fuel cap are crude, at best.
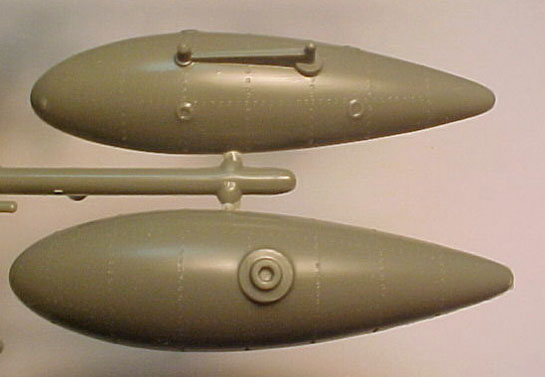
The belly tank.
OTHER DETAILS
There are a number of smaller details missing that are worth to mention, but and it's up to add/correct them:
- The USAAF Type N-3 gun sight (part #70) is symbolic. Scratchbuilders company produces a very good resin one in case you want a replacement. Here is the LSP review by Saso Knez.
- The backup gun sight ring and mast (parts #71 and #72) are both too fat. You are plenty of photo-etched options on the market.
- Some (later) P-40Es had the 'fish tail' exhaust stacks installed in lieu of the round ones represented in the kit. Check your references and help yourself in case you need the former.
- Another common feature found in P-40E (generally field installed) was the rear mirror. This has to be installed in the upper framework of the windscreen, offset slightly to the left in most cases.
- Don't forget to scribe a small circle on the fuselage, beneath the left aft window. No, it wasn't the tank filler (like in the P-40B/C)...it was a landing gear warning horn! Now you know why WWII pilots wore goggles. The fuselage fuel tank filler should be scribed on the fuselage just behind the sliding canopy, about the bulkhead station.
- And last, but not the least, remember that the British export version of the P-40 had the cranked pitot tube.
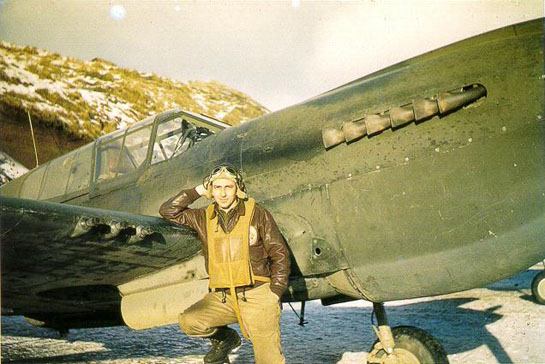
These features were not installed in all P-40Es. Check your references... again and again. The photo below shows a Flying Tiger P-40E (by then belonging to the USAAF as the 23rd FG) and illustrates some of the above mentioned details.
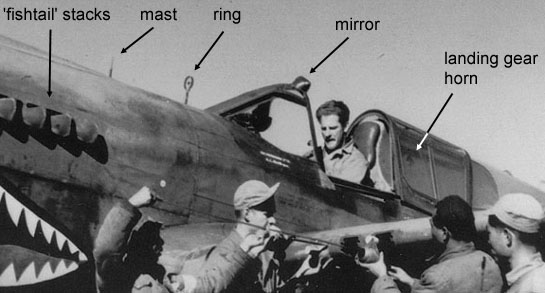
A Flying Tiger wartime photo showing some of the details pointed out in the text.
DECALS
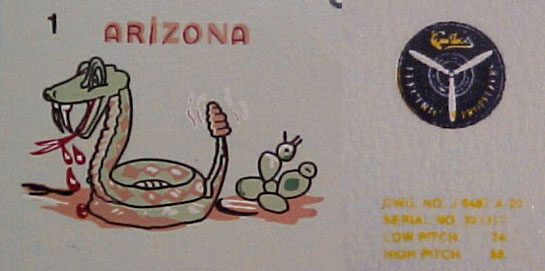
Sorry, no option here. The only markings with the kit are for "Arizona", the first mount of Sidney Woods, then serving with the 9th FS/ 49th FG. Later he became a double ace in the ETO.
The decals are very well printed by Scale-Master with the popular Invisa Clear system. All the sheet perfectly registered with good color saturation. The stencils are readable, even those for the propeller blades. I'm convinced there are many stencils missing, maybe because they were painted on in "Arizona". The rattlesnake (very well done multicolored) nose art of the right side is different from the one to go on the left side, what is correct. However, the "KIP" initials were not applied to the vertical stabilizer in the only profile I managed to find.
That's about what I can tell you on this bird and its pilot.
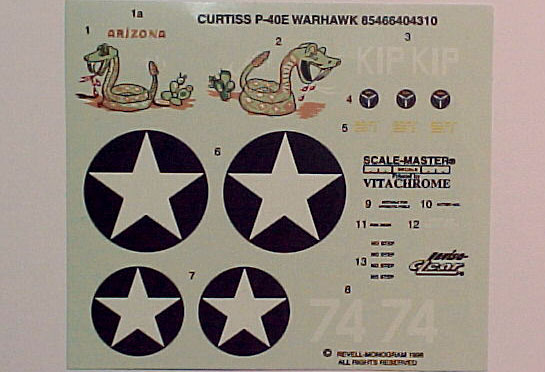
The decal sheet.
A zoom on the decal sheet.
FINAL COMMENTS
Well, a Warhawk is a Warhawk, no matter what...and this one is a true survivor from times when our hobby used to be more fun and less work. His contemporary brothers (the Bf 109 and the Spitfire) were surpassed by the competitors but the Revell P-40E resists as one of the oldest injected 1/32 kits still on the market.
The number of interesting versions for this aircraft is countless. From Flying Tigers to Aleutian Tigers, you can find anything you like: dark green/dark earth, overall olive drab, splotched, forest green, desert cammo, shark mouth, tiger head and so on. There are also interesting schemes for stateside aircraft used for training purposes. Superscale produced some decal sheets for this kit in the past. Unfortunately, they are all out of production. With luck, you can still find one around.
The P-40E was the best that the USAAF had in the first year of the war, and it was pressed into service in all theaters of operations. Wartime photos generally show frontline Warhawks dirty, oily, faded and full of paint chipping. This model is the perfect subject to put your weathering tricks in action.
You are in charge of the rescribing, if you want. Some of you scratchbuilders will extend the tail to make a unique dash-F. This model can also be used in a P-40B/C conversion using the Scratchbuilders resin/white metal set.
When I think in what can be done with this kit, one thing that comes to my mind is the work of Rodney Williams on this model (in Scott Murphy's web page). It is worth to take look. It will inspire you or make you give up...
A heavily weathered Aleutian Warhawk. Note the radiator doors shut and the antennae.
Here is a good list of references on the P-40:
- McDowell, E. R.: Curtiss P-40 in Action, Squadron Signal Publ., 1976.
- Kinzey, B.: P-40 Warhawk in Detail - Part 1: YP-36 through P-40C, Detail & Scale Vol.61, Squadron Signal Publ., 1999.
- Kinzey, B.: P-40 Warhawk in Detail - Part 2: P-40D through XP-40Q, Detail & Scale Vol.62, Squadron Signal Publ., 1999.
- Drendel, L.: P-40 Warhawk Walk Around, Walk Around Number 8, Squadron Signal Publ., 1996.
- Famous Airplanes of the World, No. 39: Curtiss P-40 Warhawk, Burindo, 1993.
- Bridgewater, H. C.: The Curtiss P-36 and P-40 in USAAC/USAAF Service - 1939 to 1945, Combat Colours Number 3, Guideline Publ., 2001.
- Phillips, G. and Hjermstad, K.: Building the P-40 Warhawk - A Scale Modeler's Project Handbook, Kalmbach Books, 1997.
- Johnsen, F. A.: P-40 Warhawk, Warbird History, MBI, 1998.
- Curtiss P-40, The Aero Series #3, Aero Publishers, 1965.
- Stafford, G. B.: Aces of the Southwest Pacific, Squadron Signal Publ., 1977.
- Technical Order No. 01-25CF-1: Pilot's Flight Operating Instructions - P-40D and P-40E Airplanes, AAF Headquarters, Air Service Command, Patterson Field, Fairfield OH, Feb 1943.
- Pilot Training Manual for the P-40 Fighter, AAF Headquarters, Office of Flying Safety, 1943.
- Ethell, J.L.:P-40 Warhawk in World War II Color, Motorbooks Intl., 1994.
- Technical Order No. 01-25CJ-2: Erection and Maintenance Instructions - P-40E-1, AAF Headquarters.
- Technical Order No. 01-25CJ-3: Overhaul Instructions - P-40E-1, AAF Headquarters.
- Technical Order No. 01-25CJ-4: Parts Catalogue - P-40E-1, AAF Headquarters.
- John Baugher's aviation encyclopedia (P-40 section).
- Brad Hagen's P-40 page.
Now we finish off this review with two little gems attesting what can be done from this kit...
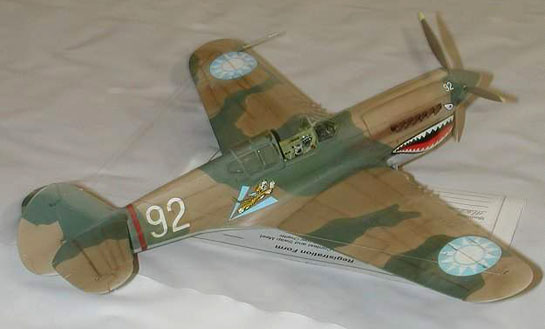
A marvelous AVG "Tiger" built from the Revell kit, with full scratchbuilt interior.
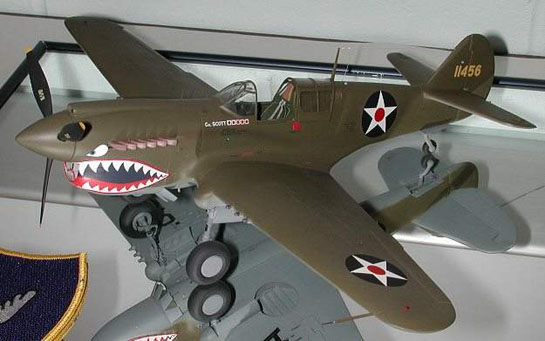
Another tiger built from this kit. Note the added details in the wheel bays.
SUMMARY
As most other Revell kits in 1/32 scale, this one is recommend to anyone who doesn't care about filling and sanding. Rescribing is not mandatory in view of the beautiful surface details, but they will disappear in some areas after sanding. Dedicated modelers will have many hours of research and work on the cockpit and landing gear to bring this models to high quality standards. Of all Revell kits in the big scale, the P-40 is one of the best, given the good dimensional and shape accuracy (ok, I'm forgiving the ailerons). And it is not plagued with thousands of orange caliber rivets. If you can, do yourself a favor and use the Jerry Rutman's detail set for this kit.
Yes, this is one of the oldest injection 1/32 models, and it is still around - strong as in its first days. It reflects its age in what concerns engineering and details, but is an inexpensive shell - as well as many other Revell 1/32 kits - to show your skills and produce unique models (something a Tamigawa addict will never claim). Ask modelers Rodney Williams, Larry Hawkins, Scott Murphy, Brian Cauchi and other fellows what I mean and they will show you. Don't step away of this kit because it is 30+ years old. Build it and have fun. Besides, it is the only E-game in town.
ACKNOWLEDGMENTS
We would like to thank the support Forrest Cox, owner of Scratchbuilders, for providing the review sample, and the modeler/photographer Brian Silcox for providing the scanned pictures of the E&M manual.
In case you missed it, don't forget to check out Part One.
Rato Marczak 2002
This review was published on Saturday, July 02 2011; Last modified on Wednesday, May 18 2016