
Williams Brothers | Wedell-Williams Racer
Reviewed by Brad Hagen
History
Wedell-Williams, Inc. was organized in 1928 by pilot/designer James Wedell and millionaire Harry Williams, they offered charter services, passenger flights, and flying lessons. They then branched into manufacturing, starting with sport types, then racing aircraft.
At the 1931 races, Jimmy Wedell came in second place in the Thompson Trophy event behind Lowell Bayles in the Gee Bee "Z" in what was the great contest between ideas, the tear-drop of the Gee Bee's and the long narrow shape of the Wedell-Williams which went into 1932. Among those impressed by the Wedell racer was Roscoe Turner, who contracted for a new Wedell-Williams racer. Since the Wedell-Williams were busy with their own projects, Roscoe had his mechanic Don Young build a major portion of the racer. No drawings existed for the racer, so Don had to measure one of the other racers to get the correct dimensions, Jimmy would also rattle off tubing dimensions.
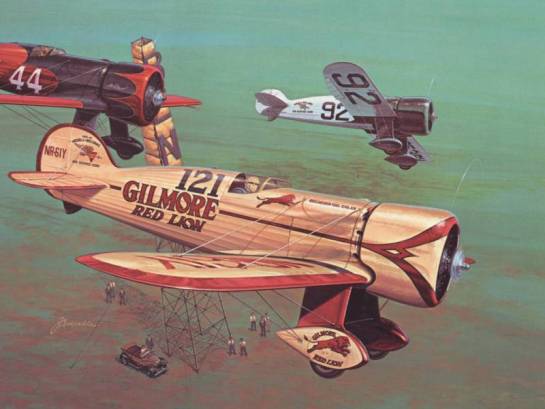
Once Don finished the racer, Jimmy took it for a test flight. After he landed, Harry said Roscoe weighed more than Jimmy did, so another test flight should be flown with weights added to the seat to equal the weight of Roscoe. During a high speed pass, a wing failed and Jimmy just managed to get out and the chute open before he and the plane hit. A second strengthened machine passed all tests, becoming the famous #121 "Gilmore Red Lion", lead a long life and is now in the Crawford Museum. Photo's of Roscoe's planes throughout his career shows he mastered the art of sponsorship.
Jim Haizlip was contracted to fly #92 in 1932, part of the agreement between Jim Haizlip and Harry Williams was if Jim won the Bendix, his wife Mary would be allowed to race #92 in the women's events. Harry wasn't thrilled about women flying airplanes, but he became Mary's greatest fan when she set a new women's speed record at 255 mph, 45 mph faster than the previous record. Mary was also the first person to use 100 octane fuel. With only a 15 minute flight to get to know the plane (not known for it's stability), flew in eight races, came first in one and second in seven.
Jimmy Wedell won races all over the country, at some races some people wouldn't even enter if Jimmy entered the race. At the International Air Races in Chicago during Sep. 1933, Jimmy Wedell became the first person to officially break 300 mph flying #44 at 305.33 mph. Wedell-Williams updated the two racers built previously, #44 "Miss Patterson" and #92 "Miss New Orleans" for the 1932 season. The planes original 300 horsepower engine was supercharged to produce more than 525 horsepower, in later years the engines were upped to 1,000 horsepower.
Jimmy Wedell had a reputation as a mercy flier after he flew several aerial searches for people lost in the swamps. He also made news when he flew through fog to rush a baby from Texas to Baltimore's John Hopkins hospital for brain surgery.
On June 24, 1934, Jimmy Wedell was killed in a plane crash. Frank Seeringer of Mobile, AL was a student on the flight and has been blamed for freezing on the controls, but now they believe the plane suffered structural failure. Will Rogers stated after Jimmy's death "Who knows but what aviation might not be permanently set back 100 mph through the loss of this fellow, with the knowledge that was buried with him".
General
The kit comes in a nice box with artwork of the three Wedell-Williams in their 1932 paint schemes. There are around 65 parts with minimal flash, recessed panel lines, and very good representation of the fabric covering and is a typical Williams Brothers kit with no locator pins.
The first choice you will need to make is which plane you will build as there are differences between the three and a few changes will need to be made to the kit. There are three main areas that are different on the planes; the first is the landing gear:
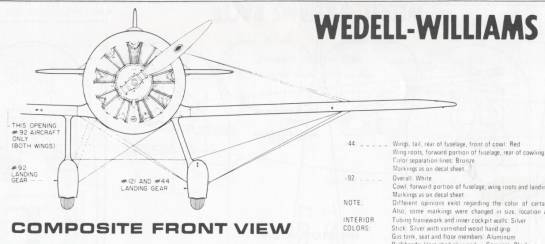
The Wedell-Williams landing gear had no shock absorbers and the shock of landing was absorbed by the tires (and as can be seen in this drawing had very little forward visability, confirmed by pilots flying replica's). As can be seen from the drawings that come with the kit, the WW had two different landing gear positions. #92 had the gear straight up and down, while #44 and #121 had the gear set at an angle. The kit supplies you with both types of struts. The second area that will need to be addressed is the wings:
The ailerons are not the same on all three aircraft. #92 is how the kit is supplied, if you want to build either #44 or #121 and want to be accurate, you will need to reshape the ailerons. The drawing above shows the difference between the two different ailerons. Not too much trouble reshaping them, but you might loose the rib detail with sanding which you'll need to put back on. The third area that will need attention is the fuselage sheeting in front of the cockpit:
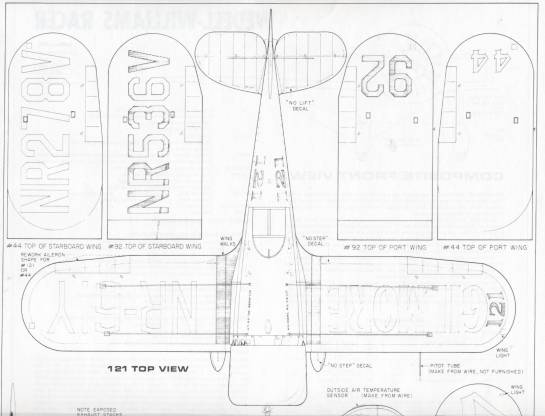
There are two spots on the fuselage that will need attention. The fuselage is scribed for #44 and #121, if you want to do #92, you will need to fill in the panel line and rescribe a new line as seen in the drawing above. The drawings that come with the kit are in 1/32nd scale so it makes it very easy to lay the new panel line out.
The other difference between #92 and the other two is the landing wires, they are closer together on #92 on the fuselage than the other two. Not to worry though, Williams Brothers has the hole in place for the flying and landing wires making their placement a snap. On my copy, the 3 holes were all the way through on one fuselage half, and not quite on the other half. Still, it's very easy to fill the tiny hole and saves measuring and drilling. There are also louvers molded in the fuselage just behind the cowling, but only #44 used them, again, easy to fix if you're building one of the other two.
Instructions
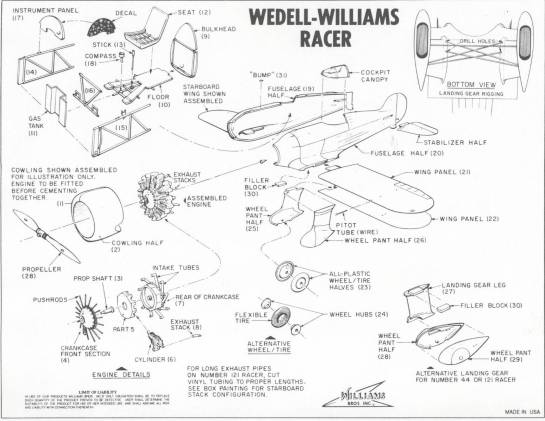
The instructions are typical Williams Brothers with an exploded view, scale drawings, and text. The exploded view is broken down into five parts; cockpit; engine; fuselage; landing gear; and landing gear rigging.
The scale drawings are in 1/32nd and are on a two page fold-out and give a good representation of the differences between the three racers, plus the decal placement for each racer. The other side of the drawings has the written instructions broken down for the painting that would be the same for each aircraft, plus the different exterior paint scheme for each aircraft. There is also a written description of the changes that need to be made to make an accurate representation of each racer, but if you're only making the model for your shelf and aren't picky about details, most can be avoided and you will still have an outstanding model, but for those who want to go whole hog, the information is there.
The rest of the written instructions covers the general construction which is pretty normal if you're an experienced builder, but if you haven't built a Williams Brothers kit before, it would be good to read it completely as they have some unique building techniques. For the Wedell-Williams racer, the final assembly is important as there are filler blocks for the landing gear and are put on one side for #92, and the other side for #44 and #121.
Cockpit
There are only a few parts for the cockpit, but given that the real planes were void of anything that didn't make them go faster, not even space for baggage for long distance flights (pilots joked there wasn't even room for their toothbrush), it is probably very close to the real plane. It consists of 11 parts, the side tubing, rear bulkhead, floor, dash, stick, compass, and rear of fuel tank.
A decal is supplied for the instruments, but mine was pure black. I haven't contacted Williams Brothers yet to see if I received a bad decal yet, but any other kit I've had of there's has had a decent representation of the instruments. The cockpit is very tiny, so unless you're going to display it with the canopy off, any detailing you do will be out of site, that's how small these Golden Age racers were.
Engine
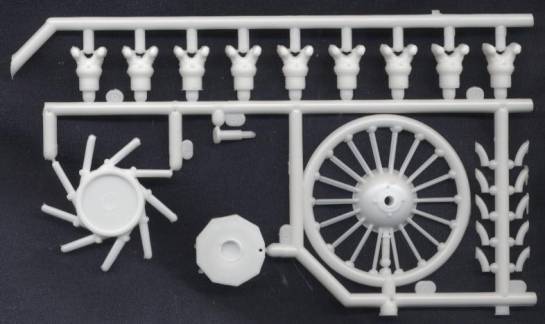
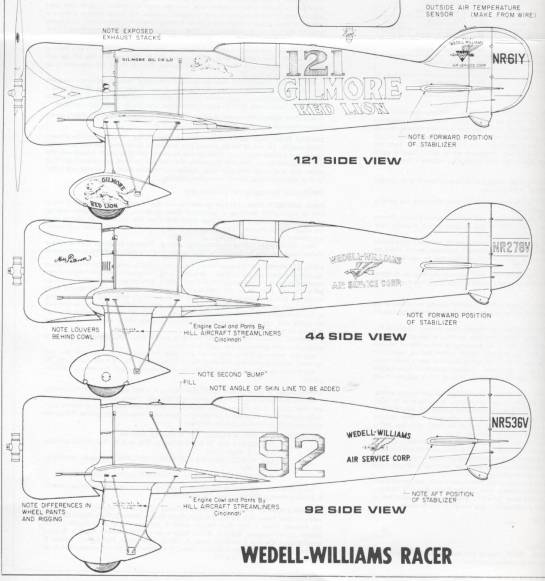
The engine is a kit in itself. The crankcase is in 3 sections, the rear section has the intake tubes, there's a center section, then the crankcase front with the pushrods to be glued to each cylinder. Each of the nine cylinders is separate and the exhaust stack for each cylinder is also separate. If you are planning on building Roscoe Turner's #121, some vinyl tubing is supplied because Roscoe had longer exhaust pipes on his racer. With a good paint job and some wiring added, this engine can be turned into a real jewel.
Fuselage & Wings
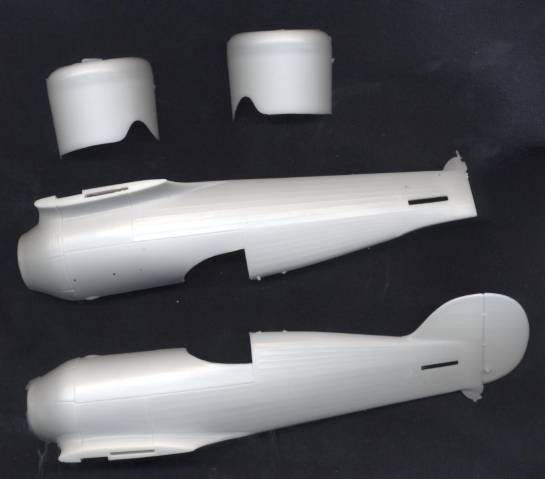
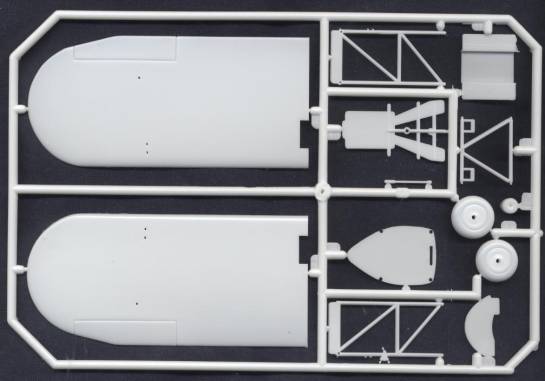
The fuselage and wings are made up of thirteen parts; four parts for the wings, two fuselage halves, two cowl halves, two stabilizer halves, canopy, pitot tube, and a part that goes on top of the fuselage called "bump"……really.
It's pretty straightforward building wise, the cockpit and engine need to be built and painted, the cockpit is sandwiched in the fuselage and the engine is sandwiched between the cowl halves. Both the wings and stabilizers have alignment tabs to make positioning them easier. You will need to have opened (or closed as the case may be) the rigging holes in the fuselage and opened them in the wings (mine are open) before you glue everything together. The canopy and "bump" and the fuselage and wings are done. Monofilament line is included for the rigging.
Landing Gear
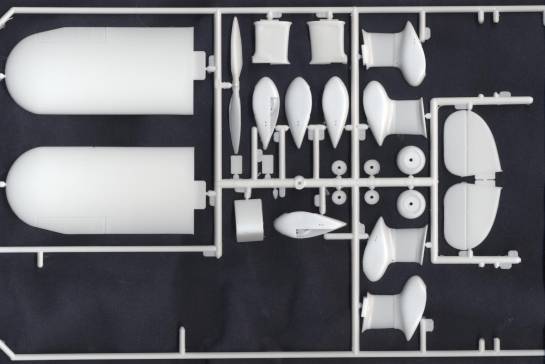
#92's landing gear consists of three parts for each gear, the wheel pants and struts are together and there's the filler block. #44 and #121 has four parts per gear, the strut, two wheel pants, plus the filler block. As usual with Williams Brothers, you have your choice of wheels/tires. There is the two piece plastic wheel/tire combo, and the rubber tire with a two piece wheel.
Decals
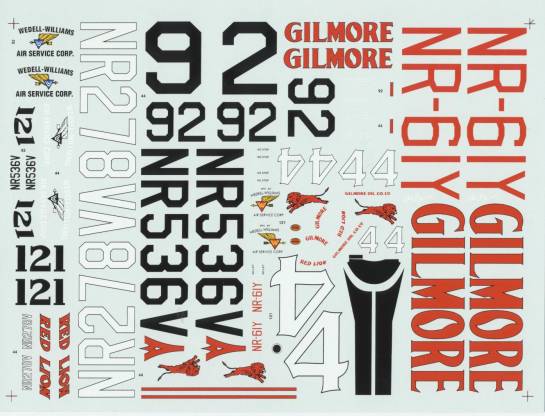
The decals are very good quality, on par with aftermarket decals. They appear to be pretty thin, and the register is very good. The only problem noted was stated above, the instrument panel is pure black with no instruments. All three racers are well represented, the lettering is very crisp.
Roscoe Turner's racer has a complicated design on the cowl, the decals ease the task a bit by having the Y shape with the diamond as a decal, the rest of the stripes on the cowl will need to be painted.
Final Comments
Obviously, this kit can be used to build the three different 1932 racers, but with more modifications, later versions can be made. #44 had a larger engine installed in 1933 but was still painted the same, and one of the more obvious modifications that Jimmy's and Roscoe's planes had were the bumps on the cowls to clear the rocker covers.
Roscoe's Turner was a master at getting sponsorship, and his Wedell-Williams was raced from 1932 through 1939, except for 1936 when on the way to the races, his carb iced up and he crashed in the desert, snapping the racer in half right behind the cockpit. The racer was rebuilt, but was a few inches shorter. Joe Mackey raced Roscoe's Wedell-Williams after Roscoe had his new racer built in 1937.
His plane was in quite a few paint schemes over the years to reflect his different sponsors. Some were Pratt & Whitney, H. T. spark plugs, Bendix, Heinz 57, Twentieth Century Pictures, Ringfree Oil (it's current scheme in the Crawford Museum). Its basic color was gold, you'll just need to check photos for the different schemes as sometimes only the fuselage was repainted, the wings and cowl retained the previous scheme.
Most Golden Age racers only give you one, maybe two scheme's. The Wedell-Williams gives you three, then Roscoe's versions could give you quite a few more choices. Another plus is you get a break from weathering as the planes were always polished up and will make a nice alternative to the WW2 and modern jet fighters on your shelf.
References
- Williams Brothers instructions
- Louisiana State Museum
- The Golden Age of Air Racing (S. H. Schmid & Truman Weaver) (EAA Aviation)
Thanks to Williams Brothers for the review sample.
© Brad Hagen
This review was published on Saturday, July 02 2011; Last modified on Wednesday, May 18 2016