
Building a Flying "Coke Bottle"
By Steve Robinson
If you’re tired of modeling that third or fourth Bf 109 or have finished the last variant of the Fw 190, then how about modeling something from one of the most interesting times in aviation, the "Golden Age of Aviation". This era is one of the most prolific in terms of advancements in speed, distance and endurance. Innovations such as the monoplane, retractable landing gear, controllable pitch propellers, new forms of construction, and of course developments in engine technology, were all hallmarks of this period. Speed however, was the ultimate goal. The Bendix and Thompson Trophy Races kept pushing the speeds higher and higher and eventually aircraft built in little towns like Wichita Kansas and Springfield Massachusetts. were setting world speed records even the military’s most advanced pursuit ships couldn’t touch. The world seaplane speed record set in 1934 at 440mph has yet to be broken. All the advances during this "Golden Age" between 1920 and 1940 set the stage for the air war which would be fought high in the skies over Europe and the South Pacific just a few years later.
Over the past several years, the "Golden Age" has seen a revival in the form of flying replicas of some of the most famous aircraft, the Air Racers! Aircraft such as Roscoe Turner’s Laird Turner Special and Howard Hugh’s H-1 are currently under construction. There are replicas now flying of the Travel Air Mystery Ship, Mister Mulligan, Wedell William’s #44, Roscoe Turner’s Lion-emblazoned Gillmore Special, D.H.88 Comet, Pete, Miss Los Angeles and Gee Bee’s models E, D, Z, Y and R-2.
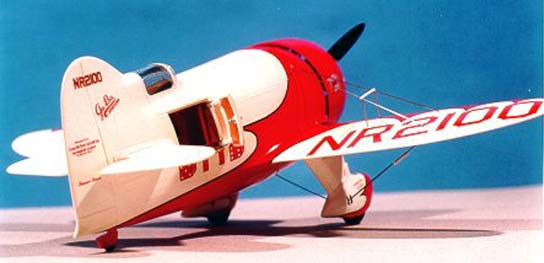
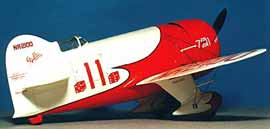
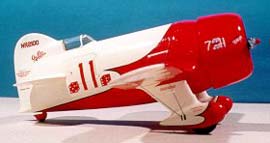
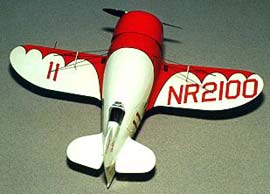
With their red and white paint scheme, stubby, all-engine no-wing appearance the Gee Bee R-1 & R-2 epitomizes the »Golden Age of Aviation«. The R-1 & R-2 were the ultimate machines in the quest for speed built by two brothers, Zantford and Granny Granville. The concept was simple, fit the largest engine into the smallest airframe.
One only has to attend one of the local air shows to be completely awed by the performances of Delmar Benjamin in his replica Gee Bee R-2. With the muscular sound of it’s Pratt & Whitney, Delmar’s knife-edged passes and on-the-deck high-speed fly-byes would send chills up anyone’s spine! Makes me weak at the knees just thinking about it!
Well…
I only get to the air show once or twice a year so I thought it was time to bring some of that thrill closer to home….
The Williams Brothers Model Co. has reproduced some of the most famous Racers in 1/32 scale, including the Gee Bee R-1/R-2. So, of course I had to have one!
The model is molded in white plastic. The fit of the parts compared to the other Williams Brother’s kits I’ve built is fairly good. With this kit you have two options. You can build either the R-1 that Jimmy Doolittle flew to fame in the 1932 Thompson Trophy Race, or the R-2 that Lee Gehlbach piloted. I liked the larger engine of the R-1 so that’s the one I built first. The decal sheets are great; they were registered well and lay down on the model perfectly. I usually just scan the instruction to see where the little bits go and come up with my own way of assembly.
On the Gee Bee, I built the engine first. The cylinders were cleaned up then I worked on the crank case halves. The back of the case halves are molded solid so you have to assemble the prop and shaft into the front case then put the main case halves together. I hollowed the back of each case out so I could assemble the whole engine and install the propeller and shaft later. I installed some spark plug wires made from thin sprue and used Bare Metal Foil on the propeller blades to give them that polished look. Black decal material was used for the anti glare panels (the propeller was installed later). Next I installed the horizontal stabilizers to the fuselage. To accurately install the stabilizers I laid the fuselage half flush on a table and used a protractor to installed the stabilizers at 90 degrees to the table.
I next started on the interior. The kit has all the tubing structure, seat and pedals. I wanted to be able to see all of the interior detail, so I cut open the door located on the starboard side of the fuselage. The kit comes with a separate door and with some sheet plastic and piano wire. I made a hinge assembly so the door could be opened and closed. I also added a door handle on the inside and a small button on the outside. This assembly was then installed into the starboard half of the fuselage. Next I painted the interior of the fuselage halves with white paint then assembled the bulkheads, seat, instrument panel and tubing structure into the starboard fuselage. I then painted the tubing structure red and applied the instrument panel decal. To add more detail and obscure the view of the forward portion of the fuselage (which is just one big cavern), I built a fuel tank approximately 1-inch square out of sheet plastic. I covered the tank with Bare Metal Foil and installed it to the front portion of the tubing structure. I then glued the fuselage halves together and cleaned up the seams.
The wings and landing gear were next. The wings do not have locating pins so once you have glued the halves together, that’s it! On the landing gear you have a choice for tires. All Williams Brothers’ kits come with the option of rubber or plastic tires. I opted for the rubber on this model. I cleaned the seam off the tires with some sandpaper. (they look very realistic). On all the models I have built since this one I used plastic tires for fear that the rubber ones might age badly (But that’s just my opinion). When all was assembled I then cleaned up the wings and gear with sandpaper and was ready for the final assembly. I installed the wings one at a time. I cut a small template out of paper and used it to set the proper dihedral while the wings were setting up. The landing gear went on last.
Now the real fun began…the painting! I used all acrylics except for clear lacquer topcoats. I first shot the whole airframe with white. The instruction sheet has a 1:1 drawing of the Gee Bee so I made several photocopies. I then taped one of the wing plane views over 2 layers of 2« masking tape that was taped onto a piece of plexi glass. The scallops were then cut out and »voila!« a perfect stencil for one top and one bottom wing panel! I repeated this step for the other side of the wings. All that was required to align the stencils was to mark where the scallops started on the leading edge and ended on the trailing edge and lay the tape down. The same process was used for the fuselage.
The rest of the model was then masked off leaving only the areas to be painted red. After painting the interior of the cowling red, I then installed the engine into it. I masked off the engine and the whole airplane was sprayed red. After demasking I clear coated the whole model with clear lacquer. The pinstripes around the red were the next big challenge. I had thought of a couple of ways to do them. The method that worked the best was to cut thin strips from a black decal sheet. I then trimmed a sharp edge on one end of a strip and starting at one point on a scallop. Using Microscale Micro Sol and a paintbrush I bent them into tight radiuses around the border of the red. As I started another scallop I trimmed the excess from the previous scallop. When all the pinstriping was complete I trimmed all the other decals from the decal sheet and installed them. The whole model was then clear coated again with clear lacquer.
I then installed the propeller, canopy and flying wires. The canopy frame was done with automotive pinstripe tape then dipped in Future floor wax. The flying wires where cut from .010 piano wire and installed with 5-minute epoxy. Cleaning the wire with fine sandpaper before installing made them nice and bright. I noticed that the inside of the door was looking a little plain and the original Gee Bees had wooden doors. In order to replicate the veneer on the inside and around the door jam I browsed though some of my wife’s magazines and found some advertisements for floor covering and furniture. I picked the color and grain I liked the most and trimmed some pieces to fit. I glued these in place with Crystal Clear glue. When done it all looked pretty convincing!
So… there you have it, one cool racer!
Now when I’m sitting at home and I get that need for speed and that vision of Jimmy Doolittle flashing past the grandstands at Cleveland I just pick up my R-1…make that throbbing engine noise, pull a couple of hard pylon turns around the floor lamp and a speed run across the living room and I feel a little better! If that doesn’t work I start building another race plane!
Reference Material
Gee Bee (color)
Author: Delmar Benjamin and Steve Wolf
Publisher: Motor Books International
Gee Bee - The Real Story of the Granville Brothers and Their Marvelous Airplanes
Author: Henry Haffke, Harry Robinson, Robert Benjamin, Bill Hannan
Publisher: Vip Publisher Inc.
© Steve Robinson
This article was published on Wednesday, July 20 2011; Last modified on Saturday, May 14 2016