
1/18 Scale Wallis WA-116 Agile Autogyro
By Nick Karatzides
The following construction is a tribute to RAF Wing Commander Kenneth Horatio Wallis DSO MBE CEng FRAeS PhD, a pioneer gyrocopter aviator, who passed away early on Sunday morning, September 1st 2013. Ken was 97 years old. During the WWII, Wallis served in the Royal Air Force as Westland Lysander and Wellington pilot and flew 28 bomber missions over Germany. After the War, he flew the massive Convair B-36 and later involved in research and development, before retiring in 1964. He later became one of the leading exponents of autogyros and earned 34 world records, still holding eight of them at the time of his death. He was an inspiration to us all and we shall greatly miss him. A local hero and a national treasure.
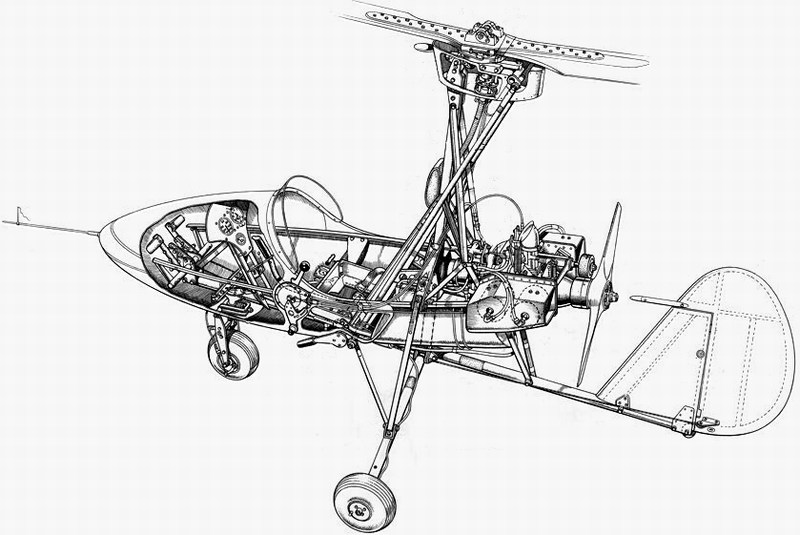
The autogyro differs from the helicopter in that it has a upwards thrusting propeller and a second prop to drive the forward. The gyro's upwards prop lifts air much the same as a glider. The autogyro's roots go back in 1921 when it was invented by Juan De la Cierva, when he was looking to develop a light and fast bomber for the Spanish military. Development continued over the years and during WWII both Germany and Japan built their own autogyro versions. Wallis Autogyros Ltd was founded in 1961 by RAF Wing Commander Kenneth Horatio Wallis and has produced an extremely wide range of special purpose autogyros. The Wallis WA-116 Agile created by Wallis runs on the same principles as that built by Cierva but is much smaller and more nimble. The first prototype, registered G-ARRT, was a single-seater ultralight autogyro first flown on 2 August 1961 and being developed with different models over the years, with such uses as military training, police reconnaissance and survey work. It could lift twice its own weight, fly 210 km/h and rapidly climb to 4100 m, even though it weighed 110 kg. This aircraft could take off in 30 yards of space at a minimum speed of approximately 20 km/h. In 1962, five WA-116s were built by Beagle Aircraft at Shoreham, three of which were for evaluation by the British Army Air Corps.
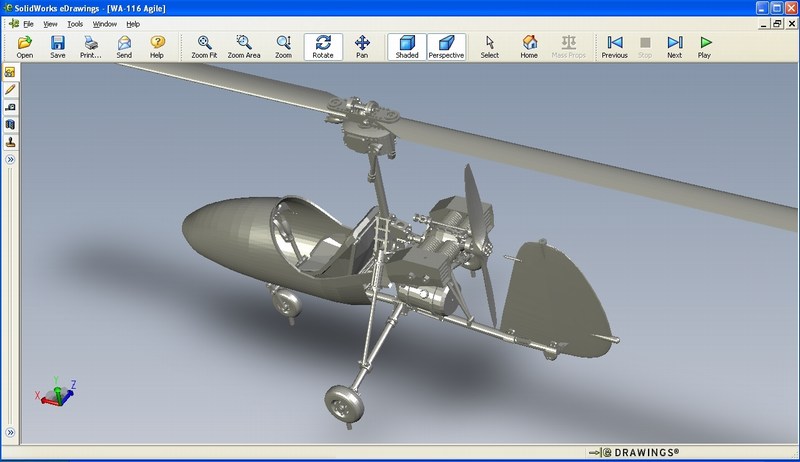
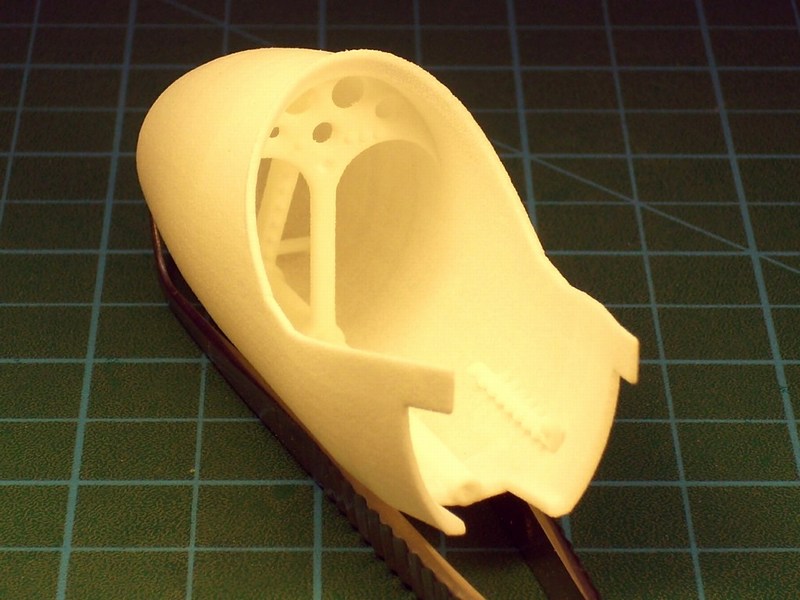
Before start building a new scale model, I always try to study as much as possible the object of construction. Any available technical manuals and detailed walkaround photos, always help during model building process. The plan is to design a CAD file and then print it, on a 3D replicator. This method, helps a lot and gives the opportunity to scratchbuild almost anything, under any scale, within only few minutes. The 3D printing technology introduction into scale modelling and free access to the average modeller is a great evolution in the hobby and a creative tool that helps us to build better and more realistic models. Certainly the new technologies and gadget tools in the hands of talented enthusiasts open new horizons and provide wide potentials on scale model building.
It took a couple of hours of CAD work on my laptop, to 3D design, scale into correct 1/18 size and then digitally cut the autogyro’s compartments into virtual pieces, having always in mind that the later printed parts, should perfectly fit and finally become a fine scale model. And voilà, we have a winner! A new Wallis WA-116 Agile autogyro virtual model, is ready to be forwarded to the 3D printer and become an actual object under 1/18 scale, within short time.
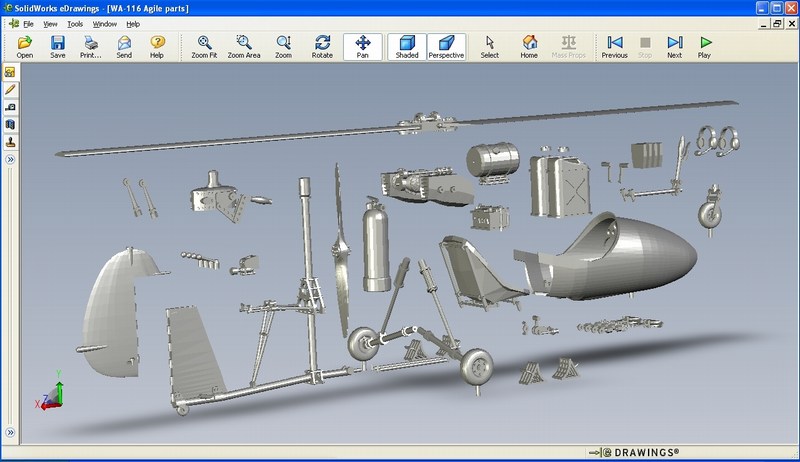
After building the 3D model and double check for possible mistakes, I saved it as a digital file and forward it on a 3D printer to start generating the individual parts of the autogyro scale model. Shortly thereafter, the printing proceeding outcome pleased me, while watching the Mbytes, magically converting into actual items. Once again, the 3D printing technology on scale modeler’s service. As seen in the following pictures, as soon as the produced parts were cleaned, I checked for broken parts & imperfections. The model now consists of only a few parts, found into basic frame sections. Some additional details such as supporting rods, control bars & wires etc made of styrene, will be later added.
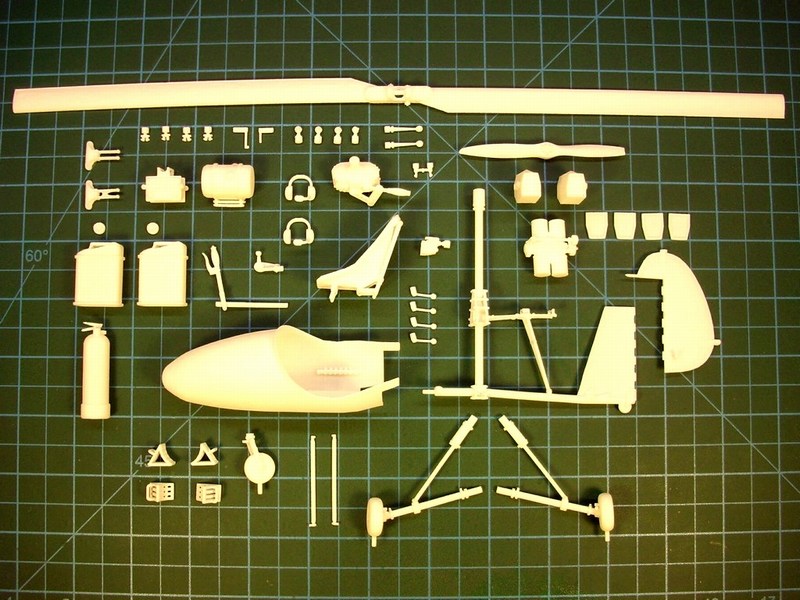
As soon as the individual scale model’s parts were already produced, cleaned & dry fit tested, I had to assemble everything as one piece, without damaging the frame construction. The plan is to assemble all model’s parts first, sand if required and later apply paint and weathering effects as a final touch. During assembling process, everything was secured in place & glued with CA liquid adhesive superglue, which does bonds in only few seconds, reaches extremely strength at room temperature and it is suitable for materials such as wood, rubber, plastic, metal, ceramics, leather, marble, polyethylene, polypropylene, teflon etc. Some tiny gaps were filled with putty, applied with an old brush. As soon as the joints were securely glued with CA superglue and later filled with putty on tiny gaps, it was carefully sanded with nail files & sanding sponge block. When it looked OK to me, the whole model was sprayed over with Humbrol acrylic primer to spot any mistakes and placed into a box to wait the final paint applying.
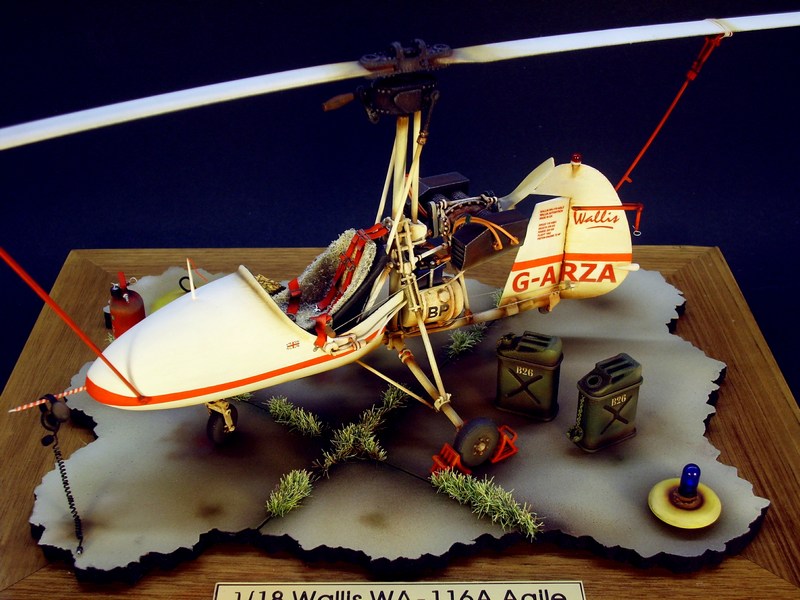
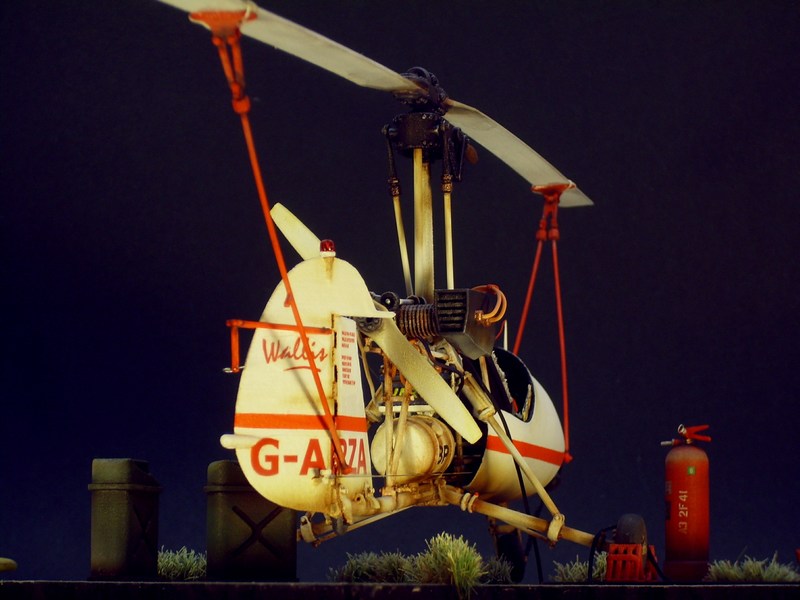
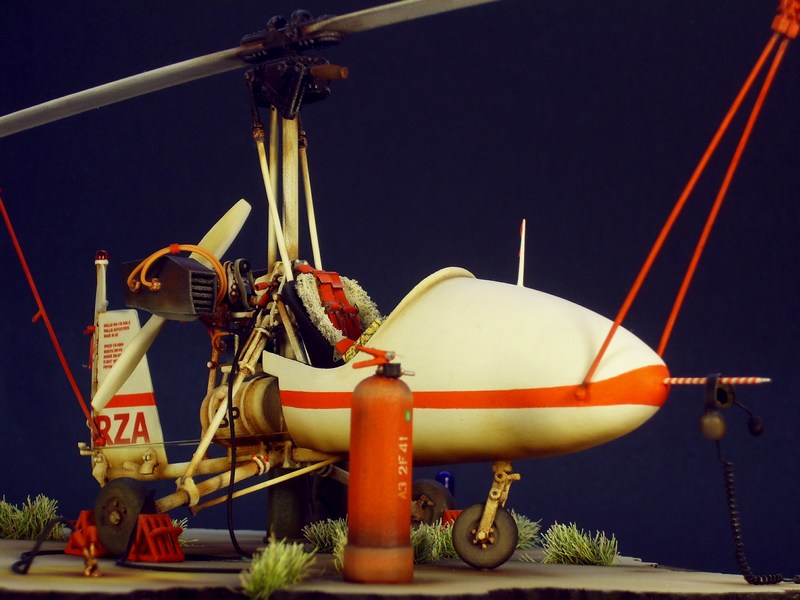
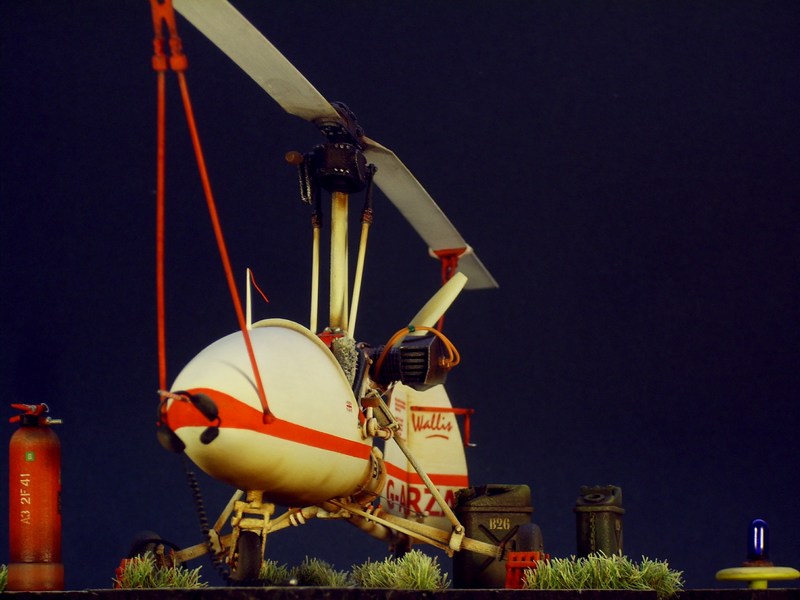
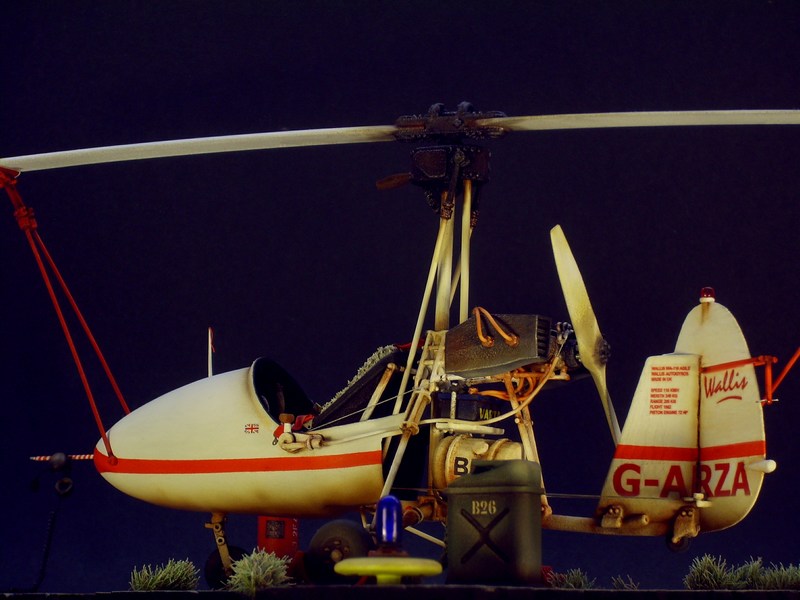
As soon as the individual scale model’s parts, fuel canisters, fire extinguisher, both main & push rotor blades were already painted & weathered, I had to conclude the final part. To assembly everything in one piece and setup the final scene. The autogyro, would be the first to be placed on the apron concrete ground display base. The model secured in place, by wedging the pins under the wheels into holes that had been already opened on plaster. Yes, that was the reason that the wheels had pins underneath! Later, the fire extinguisher & both fuel canisters secured on ground with hidden metal pins and glued with transparent silicon. Final details were added, such as headphones set, tire chocks on main LG wheels, rotor blades & locking bars, some extra dust & weathering effects on some areas, etc. As a last moment’s addition, an earthing cable also added to connect autogyro's frame with ground and discharge electricity while refueling process.
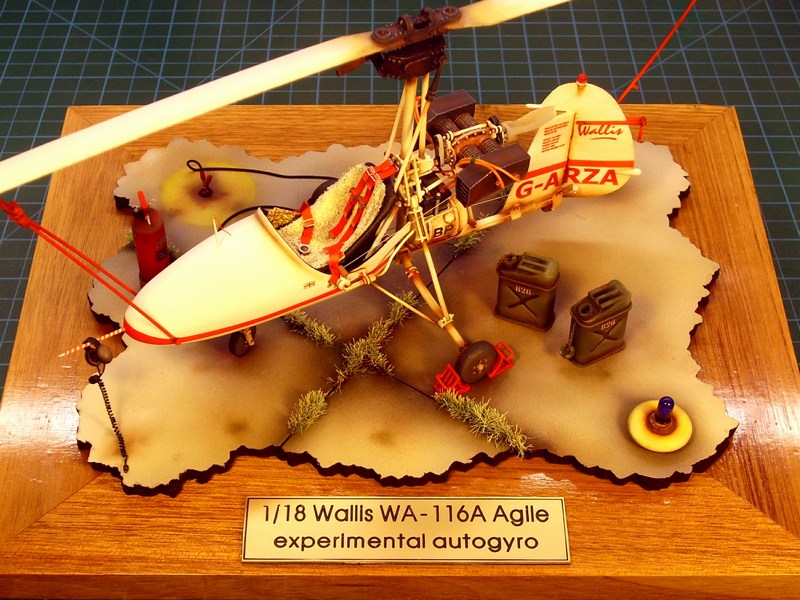
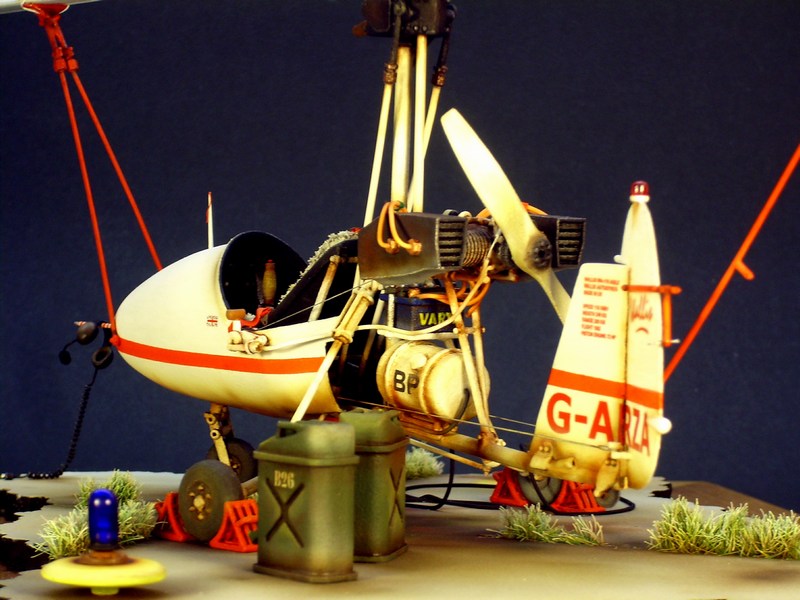
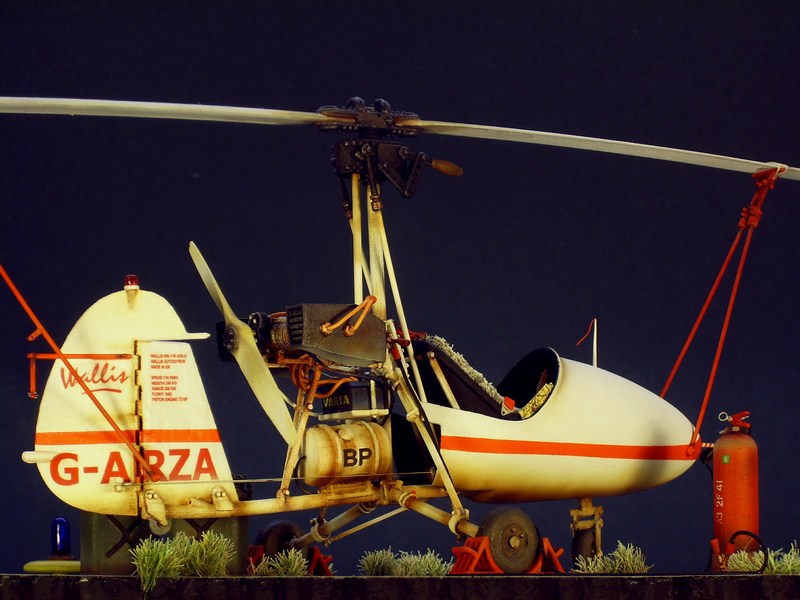
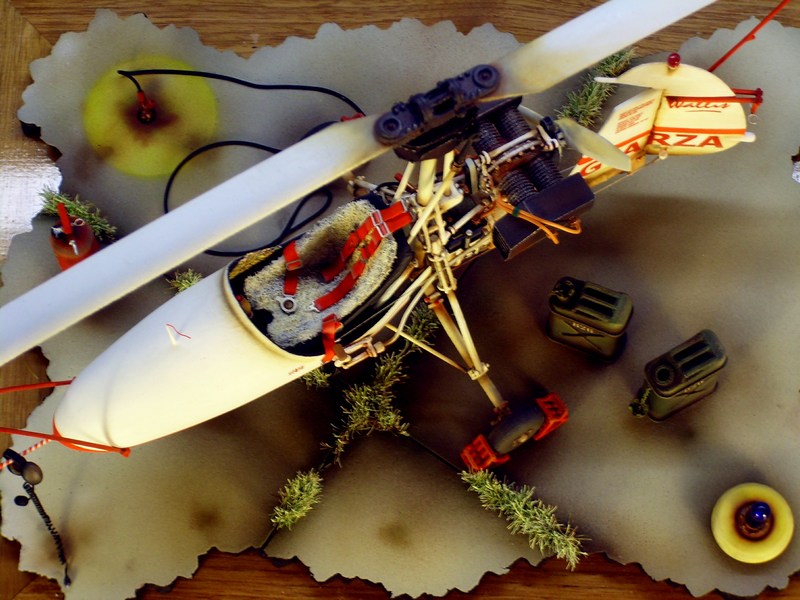
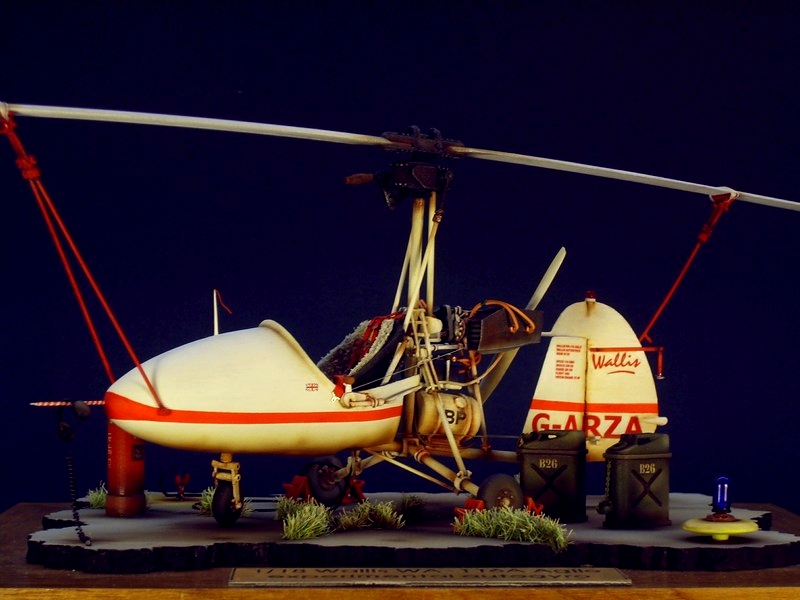
Final Result
I would like to express my special thanks to:
- The administration of the Norfolk & Suffolk aviation museum where Ken Wallis has been its President since 1976, for providing me the printed matterial, technical manual & blueprint diagrams for Wallis WA-116 autogyro.
- All fellow scale modelers, who have expressed their ideas through this forum and suggested solutions to technical issues encountered during the build thread.
Finally, thank you all who followed the thread and I hope you enjoyed reading this article.
© Nick Karatzides 2013
This article was published on Saturday, November 09 2013; Last modified on Saturday, November 09 2013