
The F/RF-4E in the Hellenic Air Force Service - Part 2
By Dr Menelaos Skourtopoulos
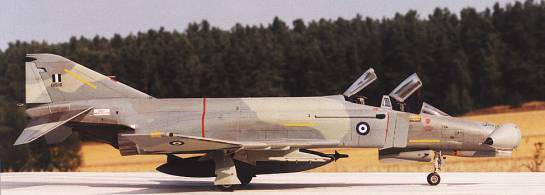
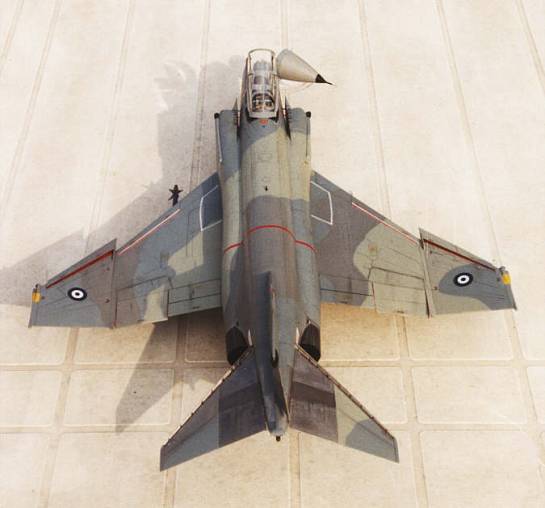
This is the second part of the story about the F/RF-4E service in the Hellenic Air Force from the mid '70s until today, a story that is most interesting concerning the colours and the technical diversity that carried by the Hellenic Phantoms.
As I wrote in the first part Greece received between 1974 and 1978 58 new F-4Es. They had following serials:
- 72-1500-72-1535
- 74-1618-74-1619
- 77-1743-77-1760
- 77-0357-77-0358
In 1997 the Hellenic Aerospace Industries (EAB) started together with DASA in Germany an update Program for the modernisation of 39 F-4Es, to make them flyable until 2018. These aircraft were all from the new F-4E batches received in the 70es, because they were in a much better condition as the other F-4s received between 1992 and 1993 from the US National Guard. This project called Peace Icarus 2000 (I and II) and included a new radar (APG-65), new color multi function cockpit screens, AMRAAM and AIM-9M capability, AFDS, advanced friend/foe identification, and many more changes that based partially on the F-4F ICE program.

The Peace Icarus I batch (28 aircraft) includes aircraft from the serial no. 72-1500 through 72-1535 with the 72-1523 serving as the prototype. This aircraft was updated in Manching-Germany and nicknamed "Princess of Andravida" (Andravida is the home AB of the 338 and 339 F-4E Sqs in Greece).
The Peace Icarus II batch ( 11 aircraft) includes aircraft of the second order in 1976 with serial no: 77-1743 through 77-1760 with 77-1760 serving as the prototype. The rest of the aircraft will be updated in Greece.
The Peace Icarus F-4s had lost their original AIM-7 capability due to the new electronics and the launcher, which was made to fire only the AIM-120. Further differences to the German F-4F ICE is the air to ground capability of the Peace Icarus F-4E, the IFF, and the cockpit configuration.
The program will be finished at the end of 2001 and will make the Peace Icarus 2000 Phantom a very dangerous adversary even for the newer and more advanced "electric" jets of today.
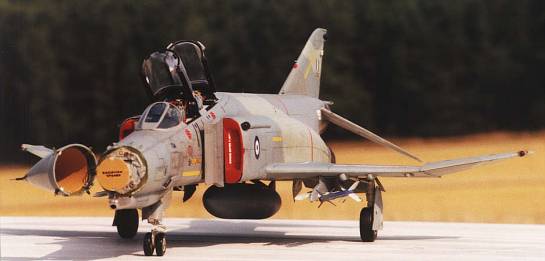
Building the Peace Icarus Phantom II
As I saw the first pictures of the cockpit of the Peace Icarus Phantom, I thought, that it will be a nice opportunity and challenge to make a model of such an aircraft. I used once again the Revell 1/32 F-4F kit. It's a very good kit with fine recessed panel lines and many detailed corners, but the kit has also its problems.
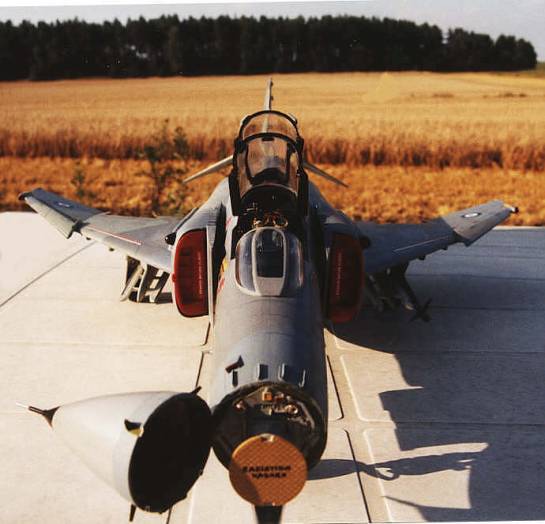
First of all you'll find the APG-65 Radar in the kit. It's nicely made and you MUST cut the nose to show it, if you want to make either a German ICE or a Hellenic PE Phantom.
The kit also includes 3D instrumentation in the cockpits, the F-15 style centerline tank, four AIM-120 AMRAAMs and many more details. And the problems? Well, here they are:
- The cockpits are in the normal configuration and I had to change them.
- The F-4F has no slated stabilators and I had to order them from Revell/Monogram (thanks guys!).
- The upper part of the fin (part no. 208) is not correct and I had to rework it (in the F-4E kit you'll find the right one!).
- I also had to build some other parts that they are only on the Peace Icarus Phantom to see, but they were easily made from scratch.
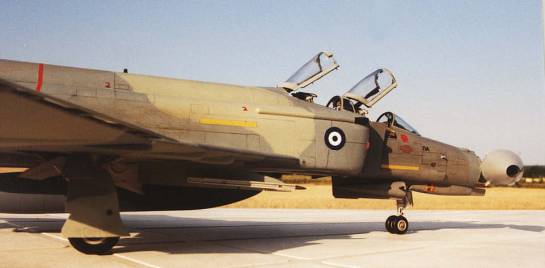
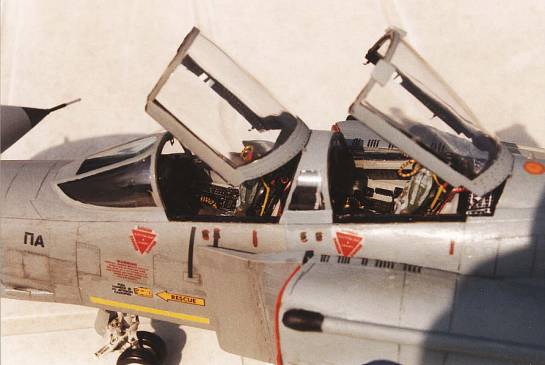
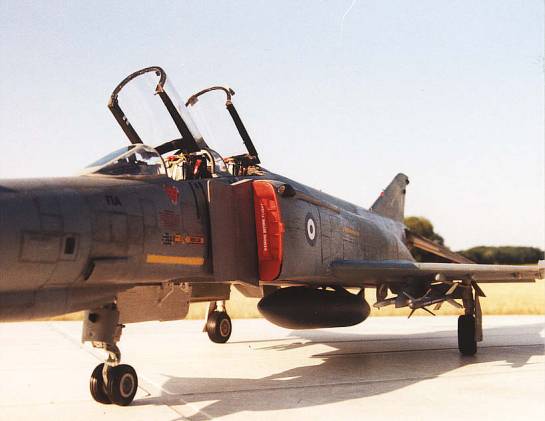
Cockpits
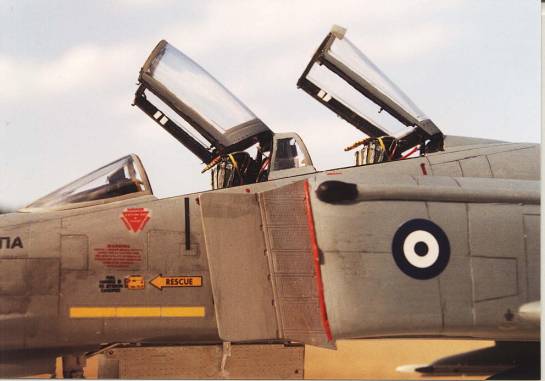
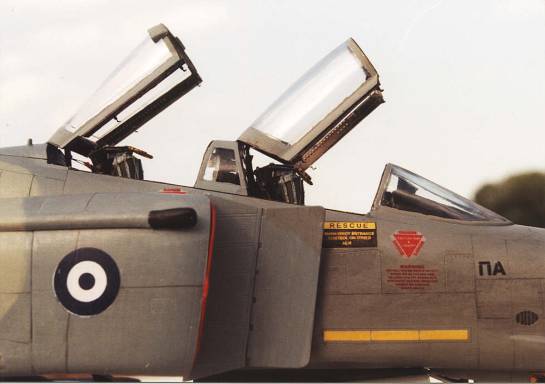
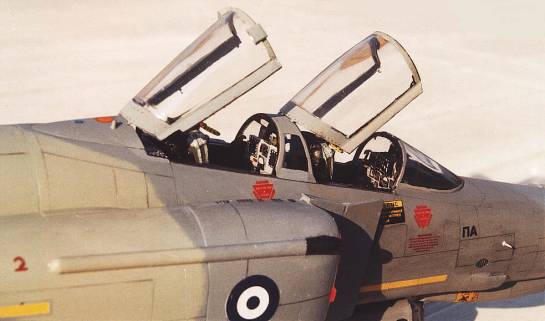
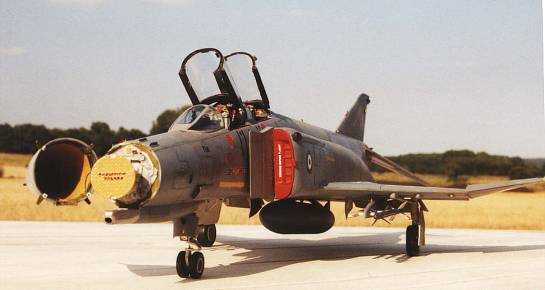
As I wrote above, the new F-4E has almost totally changed instrument panels. I was glad to have some detail pics of the new cockpits, so I made them almost from scratch.
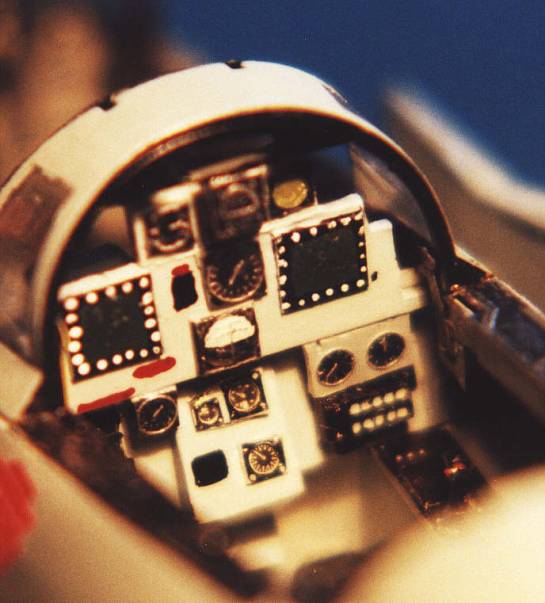
The front panel is not the same anymore and has a color multifunction screen on the top left side and the old APQ-120 radar scope is gone. I used the Eduard photoetched kits to make things better. I cut the area where the screen is, and I made that screen from a piece of resin covered with sheet styrene of Evergreen. The screen is overall black with dark green front and light gray knobs. A new HUD was done from sheet styrene and clear plastic sheet. The old radar screen was removed and a new panel made from sheet styrene and covered with a decal sheet, that I found in Tamiyas F-14 in 1/32 scale, took its place now.
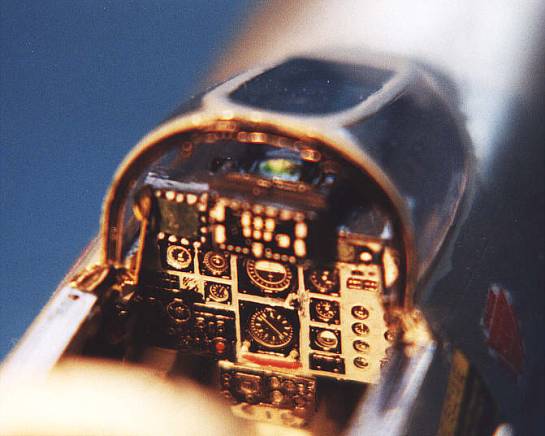
I had to made the hole WSO front panel from scratch. The two screens made in the same way as for the front cockpit. I used many instruments from the F-4F kit. I just cut them away from the original panel and glue them in their new position on a new panel made from sheet styrene. I also added some cables in its back to simulate the typical F-4 ... cable chaos there.
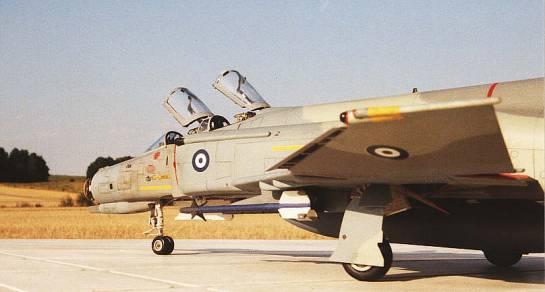
The back cockpit is too deep, so I had to cut it away from the front and back wall, and glue it again 0.5cm higher. If you don't change it, you'll have to put the seat much higher and it doesn't look right ... otherwise the situation in the cockpits is OK.
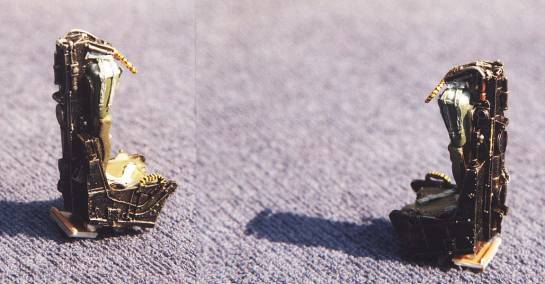
The seats that I found in the F-4F kit are very good, but I changed them with resin ones from CAM. I used only the face curtains handles from the kit. If you use them it's better to change the harness and buckles on them (the Eduard sets 32-032 and 32-024 are just fine for that purpose). I put two REMOVE BEFORE FLIGHT in the area behind the seats, and a yellow band for the safety pins on each seat.
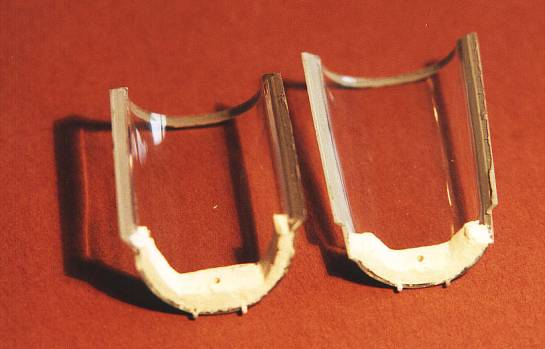
I also had to make some work inside the canopies. I used sheet styrene and putty to represent the structure of the front and the back canopies and the Eduard sets to represent the canopy rails.
Radar
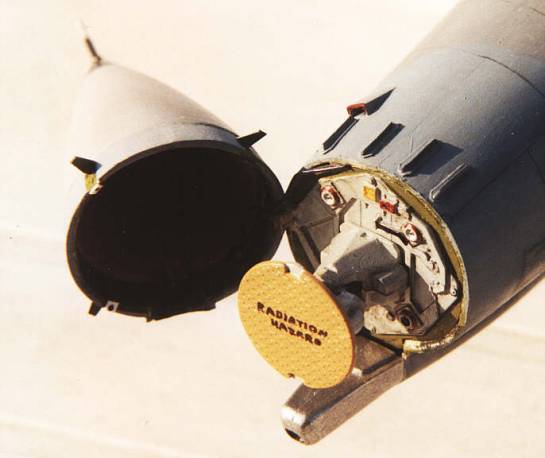
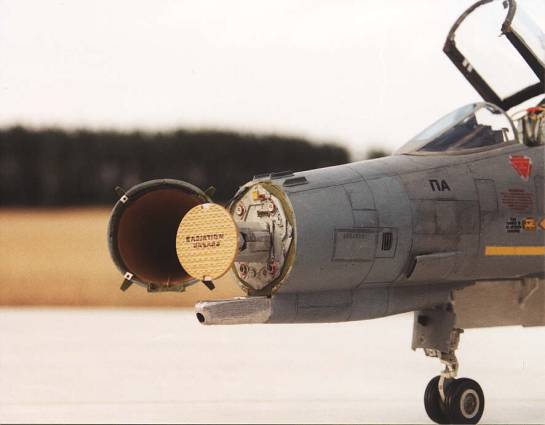
The kit gives the APG-65 antenna which is just fine. I didn't add any other extra detail parts except some cables that going inside the open radome and the open locking clips of the radome. I also printed the "RADIATION HAZARD" on transparent decal sheet.
Undersides
One more problem showed up here. The front landing gear is out of scale being too thin!. I had to make the hole thing from scratch for all F/RF-4s in this series (I used photos from the real thing and the same part from the Tamiya kit as a template), but for the Peace Icarus Phantom I used the Tamiya part. Sadly enough, that kit is broken badly last year while I moved to another town and I had to cannibalize it and use its parts to make the other F-4s looking better. The main undercarriage is otherwise well done from Revell. I took also the wheels from the Tamiya kit (sorry guys..!)
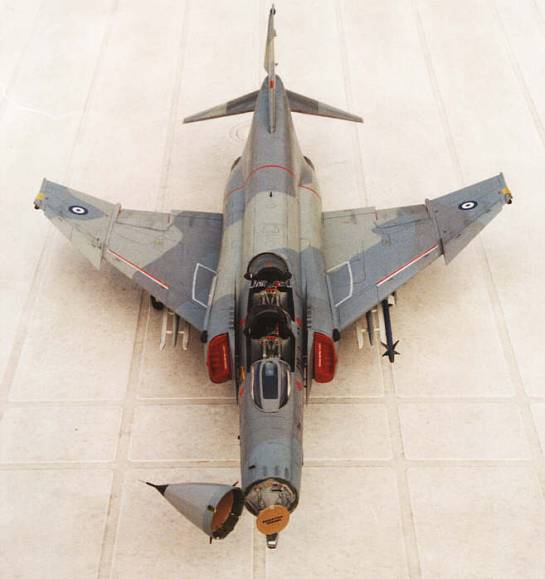
I used only the F-15 style centerline tank (you have also the option for the original tank!) and no wing tanks.The Sidewinder rails from the Tamiya kit made things better in the area. I had to open the bleed air doors under the fuselage between the centerline tank (do it before you glue the fuselage halves with the wing) and glue them in the open position.
Some more extras
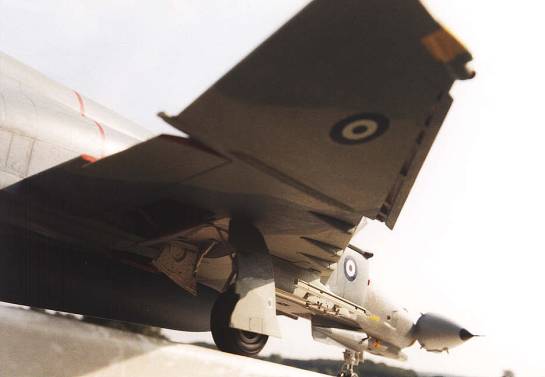
The PE Phantom has four small IFF antennas in the front part of the nose (just like those on the F-16C) and four antennas of the DIAS self protection system that carried since 1984 on the majority of the Hellenic Phantoms in four positions: under the radome, on the left and right air intake (just like those found on the F-4N), and under the drag chute cover. I made them from sprue styrene and putty.
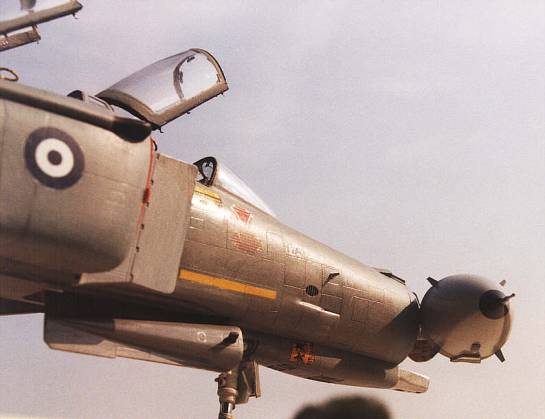
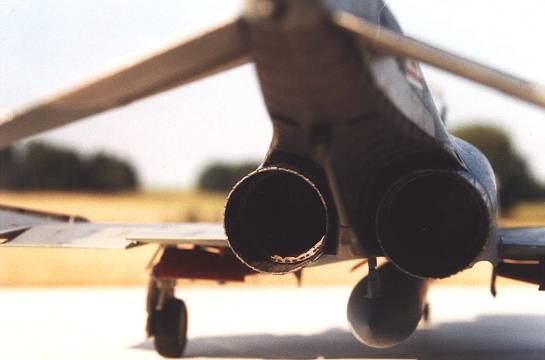
The nozzles of the J-79-17 engines are partially good, and if you want a perfect result, you have to add some more details inside them. This means more extra kits and more money and .... well, I thought I could live with them! The only thing I worked here was to make the afterburner deeper using the parts from the Tamiya F-4.
The FODs are from Reheat, but only for the Tamiya F-4 and they are a little bit smaller and I had to use some putty to make them looking better. I put once again two REMOVE BEFORE FLIGHT on the FODs.
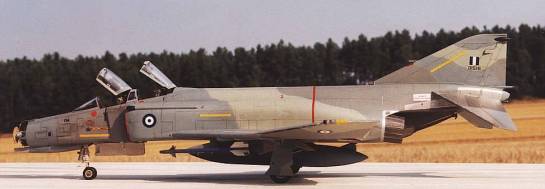
Painting & Decals
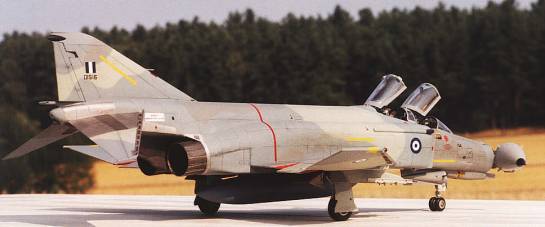
The painting schemes found on Hellenic Phantoms varied from the standard US SEA scheme to the new Ghost scheme. The Aegean blue scheme was used until the recent days and it is been replaced now with the new ghost scheme seen on the F-16C/Ds and F-5A/Bs. You need four colors to represent the ghost scheme: Blue gray FS 35237 , gray FS 36251, gray FS 36307, and gray FS 36320 for the radome. I used enamels from Humbrol (145, 140, 141, 128).
I didn't used a spray gun to paint the model. Once again everything is made by brush.
Some of the decals were made by drawing and printing them on clear decal sheet. The Greek roundels are made in Greece from Plastimodellismo. They are now smaller on the Greek F-4s for low visibility reasons…
In the part III we will take a look at the RF-4E's of the HAF, so...stay tuned!!
References
- Ptisi & Diastima Vol 168/ 178/ 185
- Modelling Magazine Vol 72/ 73
- F-4 Phantom (Kostas Dimitropoulos) (Costandinidis Publications)
- Machitika Aeroskafi Polemikis Aeroporias (Combat Aircraft of the (Hellenic) Air Force) (in Greek) published from the Model magazine "Modelling"
- F-4 Phantom II in detail and scale (Part 2, 1, 3) (Bert Kinzey)
Part 1 | Part 2 | Part 3 | Part 4
© 2006 Dr Menelaos Skourtopoulos
This article was published on Wednesday, July 20 2011; Last modified on Saturday, May 14 2016