
Revell 1/32 RF-4E
By John Wilkes
When I first heard about the kit I was expecting like most to find an old kit with some new parts and a new decal sheet! To my surprise and delight I was wrong and even more excited when I found that my local model shop had one in stock well below the list price, even though it had just been released. Upon opening the large box you are confronted with several large sprues in a dark green plastic and a huge decal sheet, also a sprue of clear parts.The whole kit has scribed panels and at first they look a little over done, once painted they look better.
The cockpit on this early release was empty except the ejector seats, the instruments are supplied as a decal, I decided that this wasn't good enough for me so I copied the separate instrument panel and side consuls from the Revell/Monogram 1/32 scale RF4C which had just been released in the States. I cast them in resin and used these as a starting point to work from. Small alterations were made to the panels working from good reference, any missing switch or instrument was made by drilling a small hole in the right place then inserting a piece of stretched sprue, once glued in place I took a soldering iron and held it very close to the exposed end of sprue. What happens is the sprue starts to melt and forms a dome on its self, the more practice you have the easier it is to make different sizes to suit your needs. Once the size is determined simple cutting with a sharp scalpel will make the shape you need.
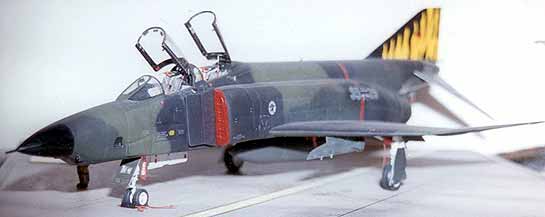
The instrument panel came next, this was a challenge as I prefer to have the instruments drilled out and replaced with a Re-heat instrument decal in order to get the depth right the panel also has to be thinned down a bit. The ejector seats were easy they are resin from Paragon with some minor additions. With most of the cockpit together I still had the gaps at the side of the cockpit to fill, luckily Verlinden produced a set which includes cockpit walls with circuit breakers and electrical connections and bulkheads . With all of this together the cockpit was starting to look like a very busy place indeed, one thing was left and that was the cockpit sills and canopy locking devices, these would be placed later and came from the Xtraparts set. All in all I had spent a lot of time and effort in the cockpit and painting it right was the next priority.I painted the basic cockpit a medium grey from the Gunze Sangyo rang of acrylics, any panel needing to be black was hand painted with Humbrol matt black thinned and mixed with a little light grey.I tend not to dry brush like some people, instead I paint each switch with my own colour mix of oil paint this gives you lots of drying time on the brush and allows you to go slowly and steadily. Where there is a splash of colour like yellow or red then I will wait until the first colour is dry before I do any more. If like me you think that painting the raised dials and knobs doesn't look realistic on its own then do as I do, I use a pin and run the point through some oil paint on the pallet, then apply the paint to where you need it in the cockpit. This will take a while but if done properly it looks like the instructions that are painted around the switch. A lot of effort goes into my cockpits as that's where most people look first. Now all that needs doing is to gloss varnish the dials where the decals are and add any colour to them.
The airframe construction can now begin, the nose section containing the cameras and gear bay need little except some wiring and small details.With the nose section together you notice that the bulge bellow the camera bay is too deep.Easy to rectify with a large file and a lot of elbow grease. The shape is easy to change and is worth the effort, once done all that needs doing is to re-scribe any lost panel lines.
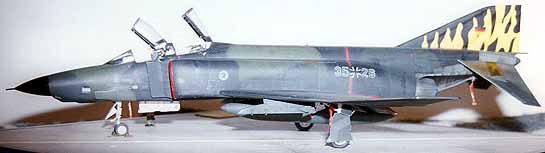
The rear fuselage can be made following the kit instructions, only two small updates were made as follows, firstly I found that on all photos of the Phantom you can see two flat doors hanging open from under the centre fuselage when the aircraft is at rest. To replicate these I cut out the appropriate area of the fuselage and found some suitable resin parts to put inside, these were in fact copies of the Verlinden cockpit sidewalls. The reason that I used them was that I could not find suitable photos of the bay and when the model is made its all most impossible to see anyway. With these in place I then moved onto the other area that needs correction in the kit, that being the top of the vertical fin. Its the wrong shape and its too high. The remedy is to take the rear light cluster and remove it. Then I needed to re-profile the remaining fin to a more realistic shape, once done I could re-attach the rear light cluster to the fin and the simple modification is done.
The wings are the next to go under the scalpel and these had the prominent wing fences removed to represent the Luftwaffe F4.The rest of the airframe went together without any major problems and starts to look like a Phantom.
The painting guide in the kit seems to be for people with an I.Q.of over 160 as every one I know said the same thing that it was impossible to read. Instead I found some photographs of the real aircraft and used these to work from. Another problem is the colours mentioned in the instructions are a mix of Revell's own paints and in the last few years I have gone over to acrylics. As a result I decided to mix my own colours to match my photos. After mixing up enough of each colour the model was primed with Halfords Grey Primer and inspected for any flaws, the defects being rectified and the model then getting primed again. Once happy with the finish I sprayed the first colour, that being the yellow for the tail as, in the kit the tiger stripes on the tail are a decal. The second colour was sprayed after masking of the fin had been done this next colour being an olive green . The next colour was then sprayed by hand, this was a dark forest green, the last colour to do was an almost black again sprayed freehand. With the nose suitably sprayed gloss black, the whole model was given a coat of Johnsons Klear acrylic floor polish. This gives a good gloss surface to put the decals onto.
The decals were an experience as you will see. Application of the decals went as with all models with the help of some Micro sol and Micro Set, all seemed to settle down well to the detail. the only annoying thing was the rather thick carrier film which is on every single decal from the smallest to the largest being the black tiger stripes for the fin. After the last decals had been applied I left the model for about 24 hours for everything to settle down. Normally my next step is to remove all of the excess dried setting soloutions, I normally do this with a damp tissue with some thinners or White Spirits in it. Now as I was doing this and it was working well I noticed that some of the smaller decals seemed to be reacting to the thinners, the problem was that they were beginning to bubble up. Upon closer inspection I could see that It wasn't affecting the decal underneath just the carrier film. Then I realised that where I was holding onto the model a finger print was evident in the carrier film, as this was on a small decal I decided to rub it off with my finger. Imagine my amazement when I found that the carrier film came away and left the printed part of the decal behind. This left the marking looking like it had been painted on, so, I tried the rest of the model and ended up with no carrier film on any of the decals.
Once all the decalling had been done I applied a coat of Klear ready for the weathering process.
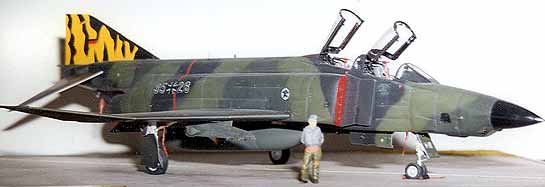
I accentuate all panel lines with a wash of Paynes Grey Oil Paint thinned to the consistency of ink, this is painted into all of the panels and allowed to sit for about twenty minutes. I then take a piece of tissue dampened with some thinners and following the flow of the airstream over the plane wipe away the excess. What is left is mainly in the panel lines and any extra that is dragged over the model is a good representation of oil and grease streaks. Next was an experiment in weathering, I tried a technique called forced panelling, this is where I start from the rear of the plane and from the centre line out to the wing tips. I take a tint of white paint and mix it up with some gloss varnish about 5% white, 55% gloss varnish and 40% thinners and spray using masks. The idea is to use any panel line and accentuate it on one side only this gives the impression of a worn panel at its leading edge. This worked well and the model was now ready for small areas to be painted and weathered. the last painting step was to matt coat the whole model and remove any masks.I then went over the model and sprayed several small patches of semi gloss varnish along with some streaks of thin oil paint to simulate oil and hydraulic fluid.
Any final assembly and remove before flight tags were added and all that remained was to add my own trade mark, I always put a folded map somewhere in the cockpit (I know this is wrong but it is my own little mark).
The finished model has won numerous awards at local and national competitions and has prompted lots of questions especially how did you get rid of the decal carrier film? My weathering techniques have been copied several times by other modellers and have bought them a lot of satisfaction as they have won more competitions than ever before. That is one thing that I like about this hobby and that is that we can all learn from each others mistakes and experiences, I am always learning and am always willing to pass on my own knowledge without prejudice.
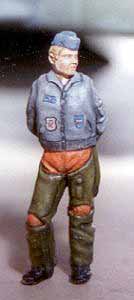
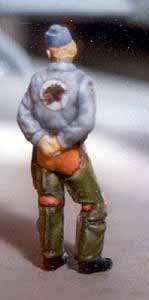
As a matter of course I also did a figure to go with the model. I used the Reheat modern U.S.A.F. figure and did some sculpting to change him into a Luftwaffe pilot, painted to match the tiger squadron of the aircraft, with a large tiger squadron badge on his leather jacket.
© John Wilkes
This article was published on Wednesday, July 20 2011; Last modified on Saturday, May 14 2016