
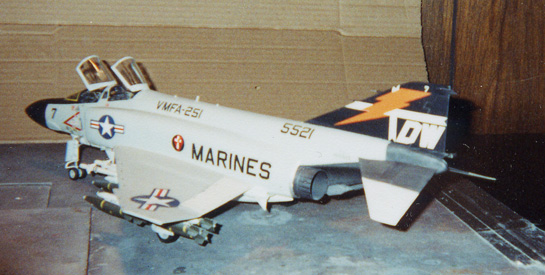
Revell 1/32 F-4J
By Larry Hawkins
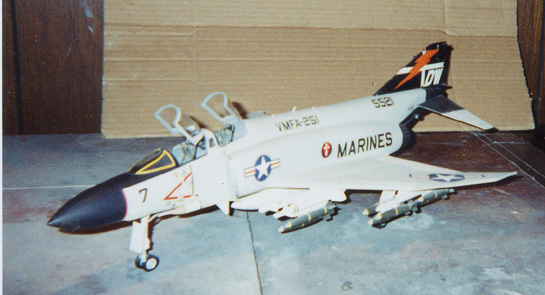
This kit is the Revell '69 issue of the F-4J, and I know from the comments that I have heard from others that this is one bogus kit, but one must remember back in '69 these 32nd scale kits were the front line models of the time and the price was right, $10.00 to $12.00 tops and they were all over the place.
So, the first thing after I bought it from a guy who lives in Bermuda at a reasonable price was to shelf it until I got the other items together, and there was a few as to make this an upgraded version of the F-4J. Here is what it took to get ready for this conversion and upgrade.
- True Details-resin wheels and tires.
- True Details MK-7 Ejection Seats.
- Tail pales from the F-4E MiG Killer kit.
- Sidewinders from the Hasegawa F-86 kit.
- MERs and TERs from the Revell F-16 and Tamiya F-4D kit.
- Decals from another guy who I was trading parts with.
After getting all this together, I started by cutting off the nose gear bay and scratching a new one, this is after the wing halves have been glued together and set aside to dry.
Then I went after the fuselage halves and glued them together with the addition of the engine bulkhead that comes with the kit, it give strength when you're sanding the fuselage down. I then decided to scratch a new cockpit tub, the kit one was trash as all of you know so it just made since to do it this way. After all measurements were done and etc. I cut out the tub from sheet and went from there and glued it into place when everything looked right. The instrument panel was used from the Tamiya kit and so were the consoles. They really added the detail here where it was needed greatly and as I said before this kit needed an upgrade to make it look like it was suppose to.
I then got the wing section ready to glue on to the fuselage and got it ready for some major putty and sanding after the glue had dried over night.
Within the next day or so I started sanding the bondo down to the right contour and shape of the fuselage, wings and tail. I sanded all raised panel lines and when it was painted all panel lines were to be done again in pencil. The plane was sanded smooth and I mean smooth. I didn't want anything sticking up or any kind of scratches and etc. This paint job had to be right on the money.
But that's getting ahead of the program, so I went and cut off the pitot tubes that are located on the front of the tail and glued into place tubing and super glued them into place, then I went to the rear of the tail and to the bottom of it and cit off the fuel dump that is molded there, I went on to make a new one out of aluminum tubing which was flattened and cut at the angel of the fuel dump.
After this was done, it was ready for the primer and paint job. The gear legs were used from the kit and the same for the nose leg as well. The hole plane was masked off and painted white to the areas that were suppose to be white as to naval A/C from the 'Nam era. The plane was left alone for one week and gone over and it was ready for the gray top color but the masking tape was removed as soon as this was done so as not to let the tape pull any white of the parts that were painted white.
While this was drying I went on to paint the pylons, center drop tank, gear legs, wheels and tires were painted flat black as well. These were also left to dry and then I proceeded to mask off the nose and it was painted as to the pic's I had on hand. When all was dry, I added the bombs, missile's and drop tank to there locations. After this was done the decals were added to where they needed to go and after they had dried I applied a coat pf flat to them and sealed the whole plane. As this was drying I went to the canopies and added strips of solid stock to the insides of the canopies to give them a more detailed look other than the way I have seen them on other Revell F-4s.I added all the gear and tires to where they had to go and then went over everything again to make sure that all the stuff I had collected went to the right places. Then I penciled in the panel lines and one last time a flat coat was shoot on to seal those and then for the final step added the canopies and the nav lights to the tips of the wings and was done for the time. The last and not the least was to position the tail plane to the proper angel and that was that. And for the final step I took my airbrush and gave the burner cans a hit of shading to give it a burnt look for that area.
It turned out better than I thought and I'm going to do an F-4B with Duke Cunningham's markings on it next and use the same ideas I did for the J model.
© Larry Hawkins
This article was published on Wednesday, July 20 2011; Last modified on Saturday, May 14 2016