
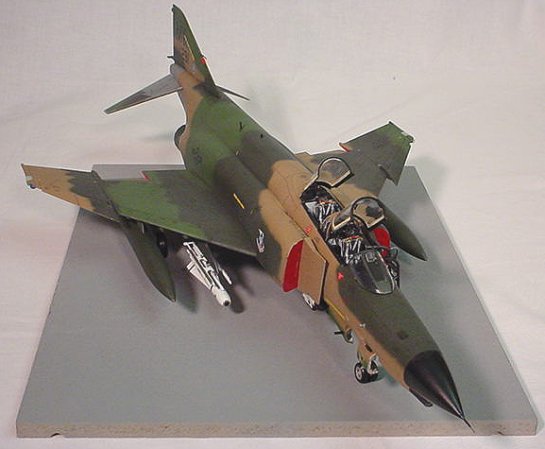
1/32 F-4E "MiG Killer"
By Mike Phillips
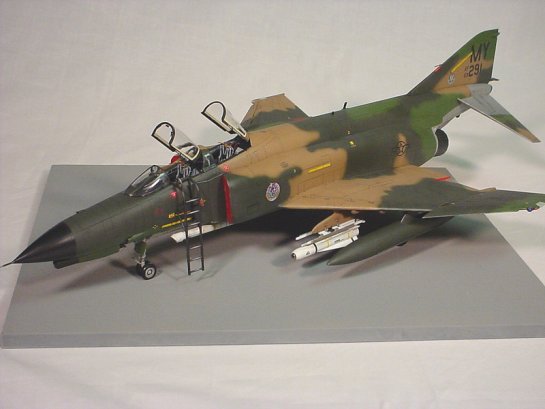
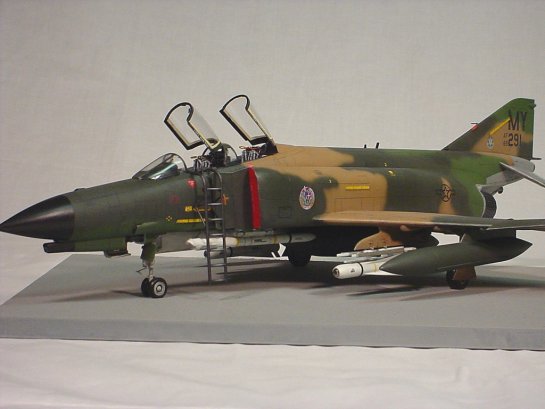
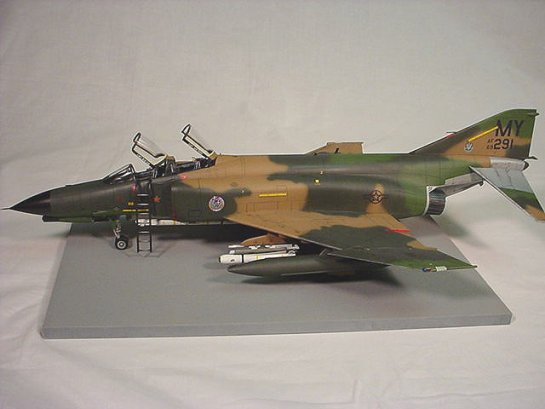
This is my latest effort, the Revell-Monogram 1/32 Mig Killer kit. This kit has been on the market for several years now. This it the third one I've built, and I've enjoyed them all! As I've built each one, I've noticed the age that the molds are seeing, but it's still a great kit. My model is finished as F-4E serial number 69-0291 of the 68th TFS/347th TFW from Moody AFB in 1985. A good friend of mine was the assistant Crew Chief on this plane. As for a little history for this jet, on August 19th, 1972, Capts. Sam White and Frank Bettine shot down a MiG-21 while flying MigCAP with the 4th TFS/366th TFW. Later in it's career, it was converted to an F-4G Wild Weasel, and the last place I could trace it, it was assigned to the 90th TFS/3rd TFW at Clark AFB in the early '90s. Aeromaster did a sheet of this jet as a G in 1/48 scale. One frustrating thing about this project was researching it. I have about a dozen pictures of serial #'s -0290 and 0292, but finding pics of 0291 was nearly impossible! I was able to find ONE. But on to the kit...
CONSTRUCTION
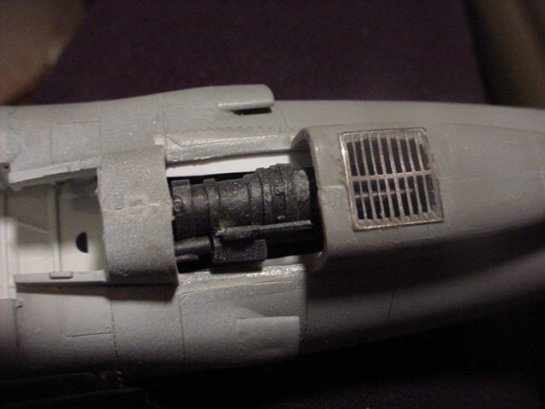
I decided when I told my friend that I was going to build "his jet" that I would try to do something special to it and not just build it out of the box. So I decided that I would open up the gun access door under the nose, as most every picture of an F-4E at rest shows this door opened. So there would be something to see, I snagged some of the Vulcan cannon parts from the Hasegawa F-16A kit. Using these and some Evergreen pieces, I made what seemed to be a reasonable facsimile of the real thing.
I looked for pictures of what panels on the nose would be open to access the gun, but couldn't find any, so most of my creation cant be seen. The gun barrels were made with plastic rod, and can be seen somewhat thru the vent in the bottom of the fairing and thru the muzzle at the front. But I gained some confidence in scratchbulding by doing it. After it was finished, I set it aside and started where most kits begin: the cockpit.

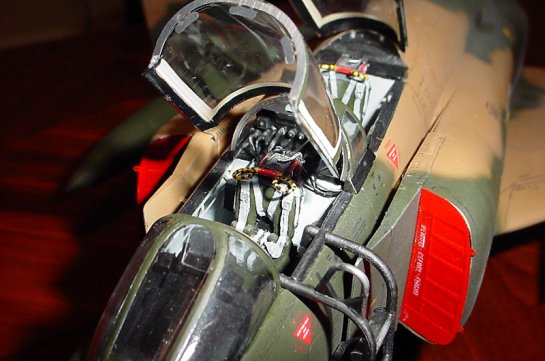
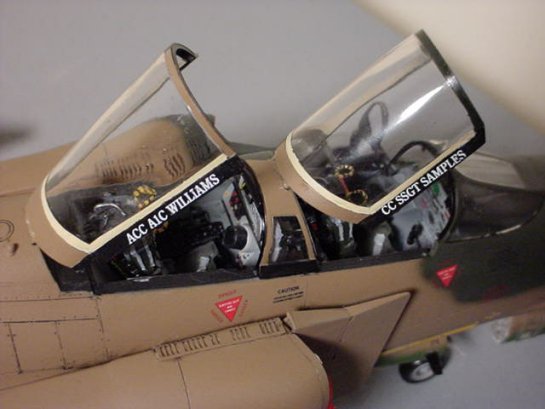
I don't know if this would constitute scratchbuilding or not, but the only thing I used from the kit for the cockpit was the tub, side consoles, and the control sticks. For the front cockpit panel, the Eduard PE set was used. I painted the panel a dark gray color, and then coated it with a clear gloss acrylic. After it dried, I then painted it with a lighter gray enamel, and used some turpenoid on a fingertip to remove some paint, leaving the raised areas the darker gray. I got this idea from a great article here on ARC! I also found out that you can do this on the plastic parts as well, not just the PE. I used the kit piece as a template, and fashioned a new "panel" from some Evergreen plastic sheet. I left the center portion white for the dials on the instruments, and then sandwiched the clear instrument portion between the plastic and the PE. Some of the plastic was built up in layers to give some depth to the panel.
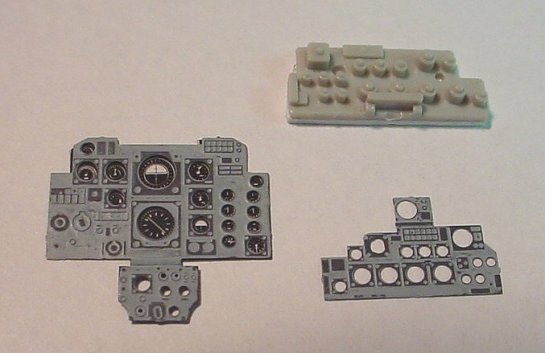
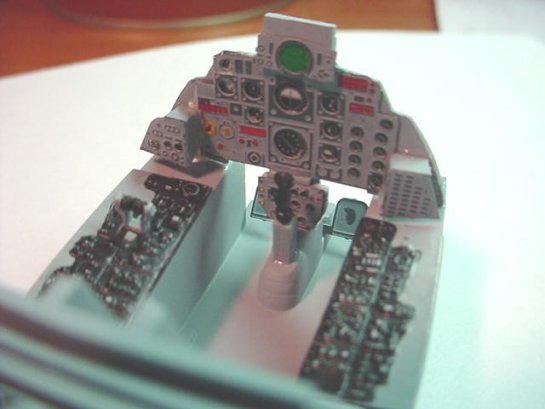
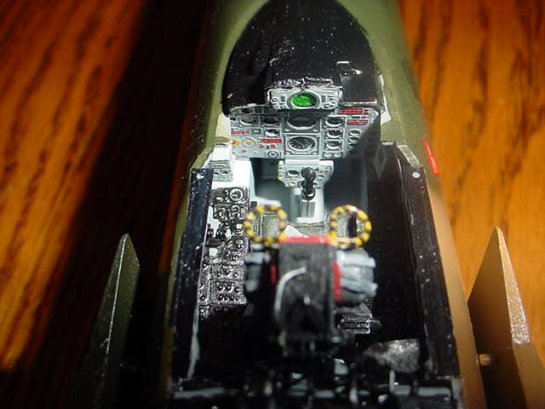
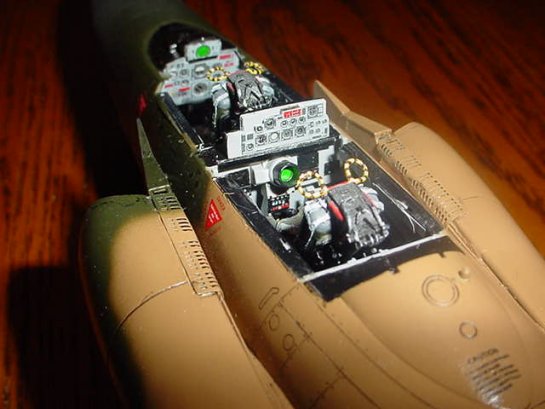
Moving to the back seat, I really went crazy! I wanted to make the area between the two cockpits look busy as it does on the real thing. Since I was using the PE in the front, I decided to completely redo the back too. For the top portion of the rear panel, I used the same method as the front panel, but as a guide for the plastic I used a left over rear panel piece from the Tamiya F-4. It has the "backs" of the instruments on it and looks really nice. For the lower portion, I used some leftover cockpit pieces from the same Tamiya kit. I'm glad the J kit has cockpits parts for both the AF and Navy versions. I know its not accurate, but I think it is a much more convincing looking cockpit. The seats came from CAM, with the pull rings coming from the kit seats. A tip here: a fine point "Sharpie" pen works great to paint the black stripes on the pull rings. Inside the cockpits, I used some scrap pieces of resin pour blocks sanded down to look like cockpit boxes and so forth, just to give the cockpit a "busy look". For the cabling coming from the back panel, I used some very small diameter plastic rod. This proved to be a challenge, as the rod didn't want to stay connected to the backs of the instruments on the panel. So I finally started making what I thought of as small "cannon plugs" on the end of the rod with some CA. It built the ends of the rod up enough to give me something to glue to the panel. For oxygen hoses, I used some pieces of guitar string bent to various positions. Around the front panel coaming I used some Tam. pieces (again!) just to add some detail. The HUD was also a leftover, and the kit glass was trimmed to fit.
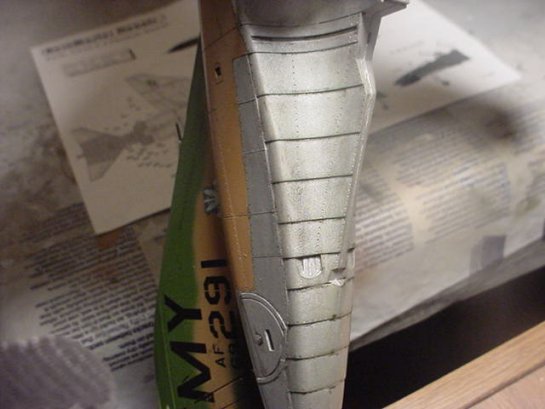
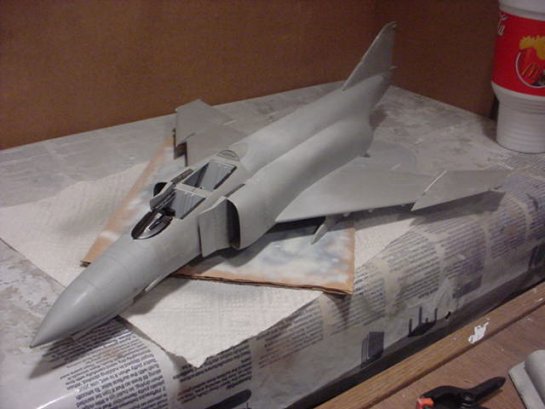
I put the gun assembly and the cockpit assembly into the fuselage halves and here is where the first problems started occurring with the kit. Since this kit has been around for a while, the molds are beginning to get old I guess, because there was a lot of warpage in the pieces. Also, when I cut out the gun access door, I took with it the locator pin for the bottom of the fuselage. This made the area hard to line up. I also had to make a wall for the inside of the gun bay area. This was made with a piece of plastic sheet, but was hard to get to join at both sides of the fuselage so I finally just built it up so it would cover the bottom half. The bottom fuselage piece was also badly warped, and it was hard to get the steps in the seams to sand out. The top seam on the nose was also pretty bad. After I sanded them down, there wasn't much detail or panel lines left. So I rescribed the entire nose, a first for me. Before all was said and done, the entire fuselage would be rescribed. After the nose section was done, it was set aside and I moved on to the fuselage.
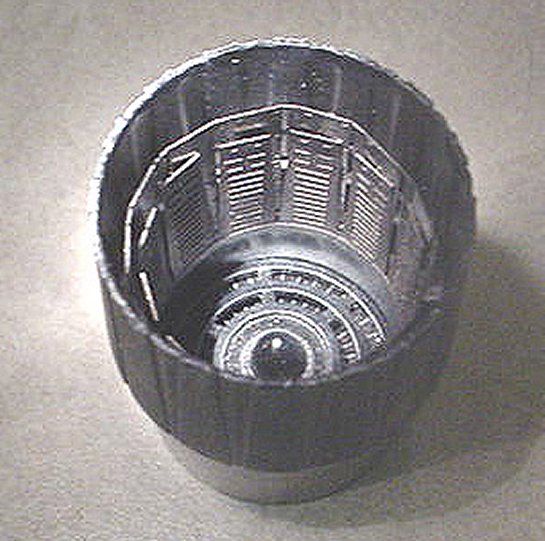
More fit problems were encountered here. There was a pronounced step between the fuselage halves on the top. After sanding and priming numerous times, it was rescribed also. Fortunately, I had just purchased a scribing template, and was able to get the circles back that run along the top. I had already decided that I was going to use the FOD covers that come with the PE set, so I didn't bother with all of the engine face parts that go inside, just the large piece that goes inside the intakes. The back section near the exhausts also had a large step that I was never able to really clean up to my satisfaction. I then started on the intake trunks. Anyone who has built an F-4 knows this is probably the worst part of the build. I had a really hard time getting a smooth join out of the parts. I think the fuselage parts might have had a slight twist because the parts were crooked on the top on one side and the bottom on the other. After I installed the vari-ramps, I noticed that the backs were hollow, so I cut some pieces of plastic sheet and shoved them down the top and up from the bottom to fill it in. I sanded off the inlets on the top and bottom of the kit trunks and replaced them with the PE parts.
Next...the wings.
These went together fairly straight forward. I cut out the ailerons, and then built up the area on the wing with some very thin plastic sheet. I thought about cutting the flaps too, but chickened out! I think the kit instructions would have you put the outer wings on at too drastic of an angle, so I put mine on a little lower. I had to insert a plastic shim and sand it down to fill in the gap on the top of the wings. The wings were then glued to the fuselage and it was off to the paint shop.
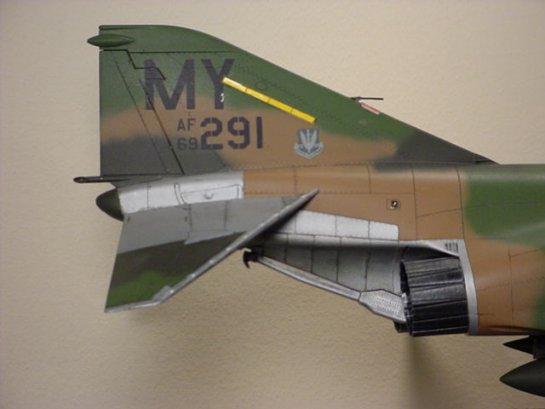
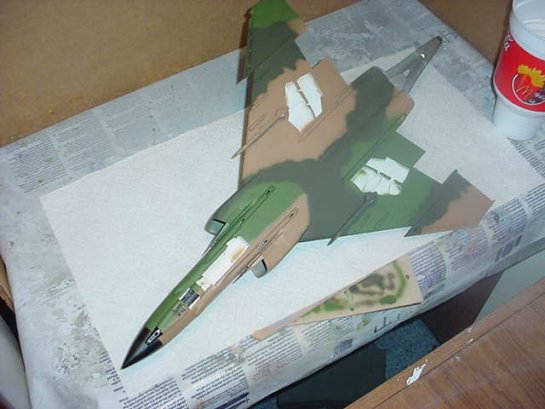
After masking the cockpit, the whole kit was primed and sanded, and then rescribed a little to fix any lines that were lost. I then sprayed the tail area aluminium, and then dry brushed some other colors like titanium gold, black, gunmetal, rust, and blue to give it a "burnt" look. I also used heavy wash on this area and on the metal areas of the tail surfaces. After this was clearcoated, I masked it off and got ready to do the wraparound SEA paint scheme.

Then disaster struck...
As I was getting ready to start painting, I sat a glass of orange juice on the shelf that my air compressor resides on. I mixed my paints and fired up the compressor. As I was painting away, I heard a CRASH, BANG, SPLOOSH, BANG and thought "what the ^)(^*^)^&) was that!?!" as the wave of OJ hit me and everything on the table. Yes, the glass was full. In case you're wondering, OJ will strip acrylic paint really well! Some small pieces were broken and had to be repaired or replaced. After cleaning up the mess(some of my sanding sticks are still stuck together) I started over. I painted the model with MM Acryl straight from the bottle. I used dark tan, and medium green. For the darker green, instead of dark green I used Marine Corps Green, as it seemed to contrast better with the medium green. My airbrush is one of those Testors double action jobs you can get in the "gift pack" at Wal-Mart. It seems to do the job well. After I got the camo done, I sprayed the gloss coat on for the decals. At first I used MM Acryl clear. I've never had any problem with this stuff, but it didn't want to go on very smooth this time. So I bought a can of the Tamiya Clear Gloss and sprayed it on. This gloss coat seems to cover pretty well, and dries nice and smooth fairly quickly.
DECALS
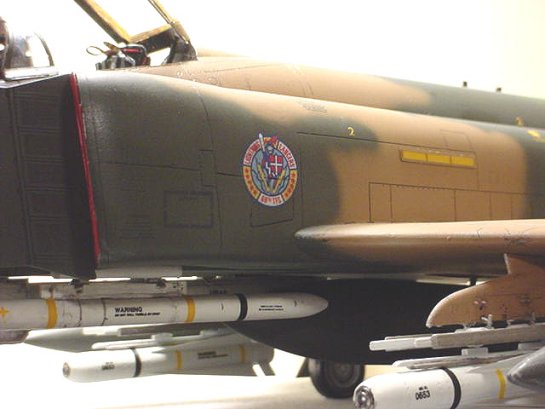
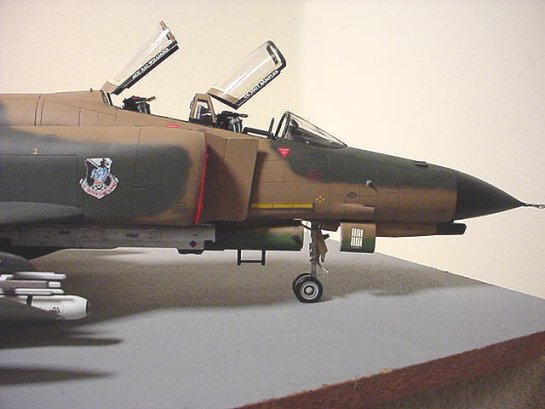
Since this was a special plane, I needed some specific decals. Mike Grant came to the rescue! I talked to my friend about the markings that his jet carried, and he supplied me with the pilot and WSO names and the CC and ACC names. He also searched the net and found me a picture of the squadron and wing crests, and told me where they went on the plane. I sent the info to Mr. Grant, and he printed me some decals. These are far and away the best decals made IMHO. They are EXTREMELY thin, and went on without any silvering whatsoever. Mr. Grant provided me the names in two different styles ( a nice touch ) and even printed a few extra tailcodes and wing badges in case I made a mistake, which was good, because I needed them! The rest of the markings, stencilling and such, came from the Aeromaster stencil sheet and the kit sheet. The AM decals silvered some after I shot the dullcoat on them, so I shot another coat of gloss on the whole thing and then another coat of dull. That seemed to fix the problem. Before the dull coat, I weathered the panel lines using the "sludge technique" and drybrushed some silver on the leading edges of the wings, tail and intakes to simulate wear. I wanted to keep the weathering to a minimum, as I didn't want my friend to think that I thought he kept a dirty airplane! :)
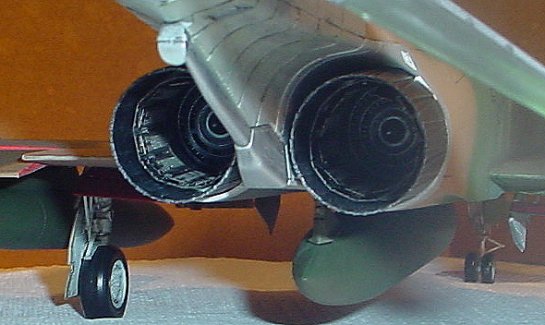
Then came disaster #2, which was actually a blessing in disguise. For the exhausts, I usually just assemble the PE parts as two circles, paint them, put them on the pipes that go in the fuselage, and then stick them in there. That to me always looks better than the kit parts do. I use the tubes turned around backwards to keep the PE round as I glue it together. That way it doesn't get smashed flat. But as I was putting the last of the CA on the etch parts, I realized that I had goofed in a big way. The PE was now firmly attached to the plastic. Pulling it off resulted in a badly mangled piece of etch. In the trash it went. I would just suck it up and use the kit exhausts. But as I was painting the plastic parts I kept looking at the one PE assembly that had not gotten mangled, thinking that there had to be a way to use it. After the outer kit exhaust pieces were painted. I took the good PE pieces apart, reversed them, so the detail was on the inside of the circle. I then put them INSIDE the kit part. It looked really great, so I took the ruined piece out of the trash, cleaned the CA off of it, and used it for the other side. Voila! Quite possibly the most realistic exhausts I've ever done!
LOADOUT
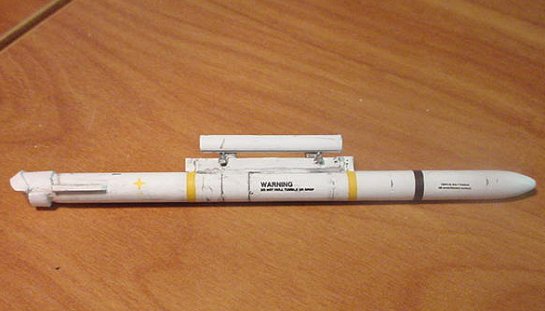
Moody AFB Phantoms were known for dropping LGBs and as Maverick shooters as their specialties. My friend was a valuable resource as to information on what the planes usually carried. He informed me that their jets usually carried the Pave Spike designator pod in the forward left Sparrow bay and the ECM pod in the forward RIGHT missile bay. Since the E model has a large bulge on the nose door, the ECM pod was mounted farther back in the bay. I worried about this for a while, thinking it would look strange, but I have found two pictures of this, so I guess it's right. The problem with the Pave Spike pod was that one doesn't exist in 1/32 scale. So I made one! The body of the pod came from two Sparrow missile halves from the kit. I used the halves that don't have the fins on them. To make sure the size was right, I used a very scientific method. I got a 1/48 Sparrow missile and got out my 1/48 Spike pod from the Hasegawa weapons kit. Using the TLAR method (That Looks About Right) I decided it would work. I left the missile length as it was. For the seeker head, I held a piece of clear sprue over a candle until it started to form a ball on the end. This took a few tries before I got one that I liked. I then used some plastic sheet and tube to build up the area around the seeker. For the mount on the pod itself, I used some square plastic tube and a few other scraps. For the part that mounts in the missile bay, I used a piece of U shaped plastic and a piece of T shaped plastic, and some spare sway braces. For decals I used some scrap stripes and stencils.
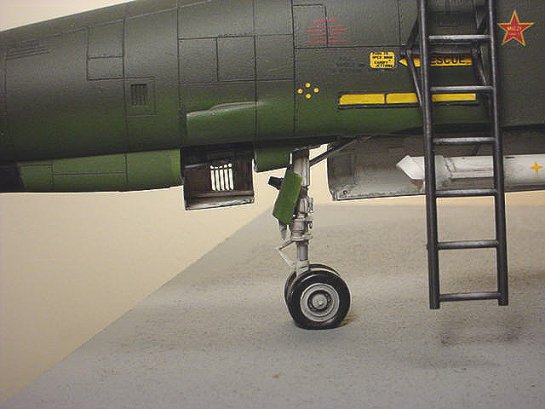
The Maverick missles and launch rails came from the Trumpeter A-10 kit that I'm waiting to get the nerve up to build. The finishing touches were added at this point: antennae, pylons, landing gear, FOD covers and the weapons and drop tanks. The Tam. kit gave up one more part, the boarding ladder. All those leftover Tamiya parts came in handy on this project. For the formation "slime lights" I tried something different. I cut pieces of reflective yellow tape so they would fit on the back side of the PE frames. This was CA'd to the frames. Instead of using glue to fix them to the jet, I just used the tape adhesive. This way, if one wasn't in the right position, I could remove and reposition it. After they were on there for about half an hour or so, they wouldn't come off, so I know they are secure!
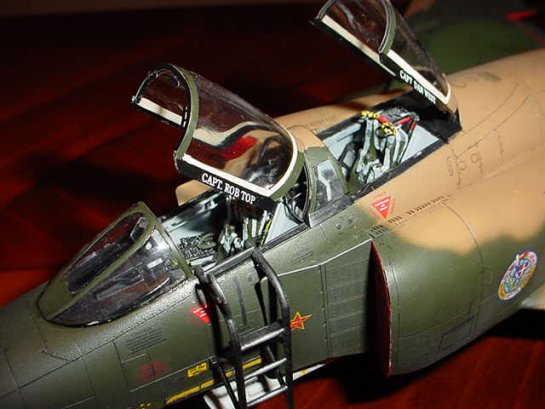
For the canopies, I brushed Future on them, another first for me. I cant believe I have waited this long to get on the Future band wagon, but I'll be using this from now on. The canopies came out crystal clear, and any scratches were gone. I used the PE details and a part from the Tamiya F-4 kit for the back seat rear view mirror attachment. The PE part that goes here was put on the front of the center section instead of the back so it would look like there was some framing there.
CONCLUSION
I started on this kit in April of last year. I finished it on Feb 25th! I stopped work on it while I was waiting for the custom markings, but really started hitting it hard toward the end of the year. It has been by far the most enjoyable model I've built to date, but I say that every time I finish one! Even with the fit problems it was a joy to build and finally finish. I have learned many new techniques from this kit. Special thanks go out to Mike Grant for the custom markings and my friend Wayne Williams for helping me get it right. This project was a little stressful because someone who has actually seen and touched THIS jet was going to see the final product. If there was something wrong with it, he would know it. When he told me "that looks exactly like my jet!" I was very proud...and relieved! The G model that I built years ago is going to go into "deep maintenance" and come out with a new paint job...marked as 69-0291 after it was converted! I think those will look nice sitting next to each other on the shelf. PS--I entered this kit in a local show shortly after I finished it. I took first place in the 1/32 scale jet category with it. Now, before you start saying "geez, what a big head..." let me tell you something. I had all three kits that were entered in that category! :) So I guess I was competing against myself in that one! But I also received a special award, the "Award for Excellence in Scale Aircraft". This award isn't really the "best aircraft" award, but is the award given for most realistic detailing on a aircraft. The kit that won "Best Aircraft" was extremely well built, and deserved the BA award, but the finish looked factory new, as if it had never flown a mission. I tell you this because winning the award taught me something about how I go about building a kit. After the show, as I was packing up my kits, the head judge came up to me (a first, probably because I usually don't win!)and told me why I won the special award. He told me one of my kits was built as well as this one, but this one just "looked like it was really used". He went on to point out several things about it. These were all things that I normally don't bother with on a kit, like washing panel lines or dry brushing some chipped paint because it would take too much time or just wouldn't be "worth the effort". I had never really considered these things before, but you can bet I'll start doing them now! I also thought that the head judge taking the time to point things out was great too. That interaction has helped me to become a better modeler! Happy Modeling!
© Mike Phillips
This article was published on Wednesday, July 20 2011; Last modified on Saturday, May 14 2016