
Trumpeter's 1/32 A-10 Thunderbolt II "Warthog"
By Scott Sampley
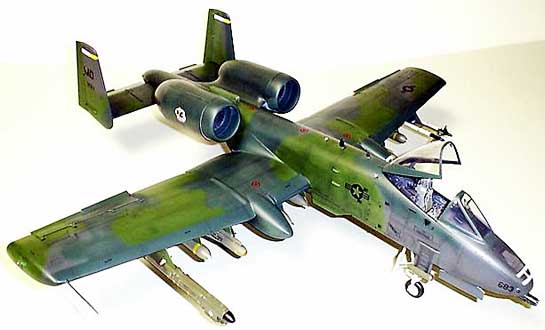
My A-10 was enhanced a little with the following modifications and additions:
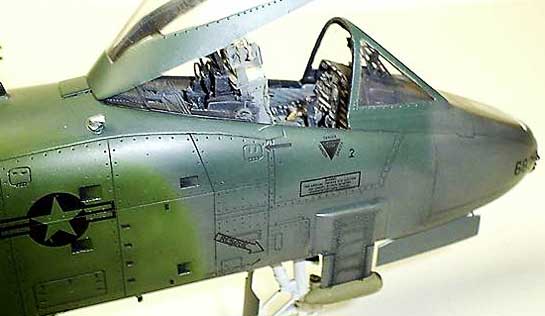
- Cutting edge cockpit set
- Removal of all external LASTE mods, including the GPS dome antennae
- Placement of the 1st stage engine fans correctly in the engine nacelles (moved aft)
- Scratch built metal pitot probe for the starboard wingtip
- Scratch built GAU-8 Cannon muzzle (not exactly accurate but it's a big improvement over the kit part)
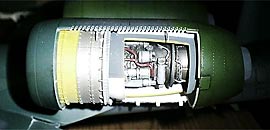
- Cut open the engine core access cowl panel inside of the port nacelle to show the engine core inside
- Drilled out the APU exhaust and replaced with brass tubing
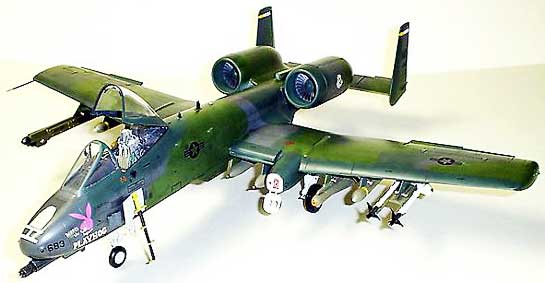
- AIM-9L Sidewinders were acquired from the old Revell F-15E kit
- AeroMaster Decals, sheet 32-007 "Warthog Warriors"
- Paint is MM enamels and metalizers with pastel chalks used for weathering
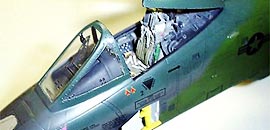
Overall I enjoyed this kit a lot, it's a pretty big project and I must admit it became a bit tedious at times, there is a lot of flash and that means a lot of sanding. I purchased the kit about 6 months ago and obtained the cockpit about a month after that. Total hours expended during this build were about 200, I probably could have gotten it done in less time but just couldn't bring myself to rush the project to completion. The only thing I didn't fix that would have helped with the overall finished look of the kit was to fill all of the ejector pin marks in the gear doors. Yes they look horrible, but they are also one hell of a bear to fill because of the stiffening strips that run across the interior of the doors. These would have to be built up inside all of the marks to preserve the detail. After attempting this on one door I realized my limitations and just decided to paint them and glue them on. Overall it doesn't detract from the look of the model and most people don't even notice they are even there.
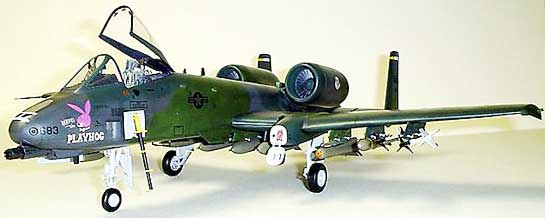
The kit decals are very thin and have a very bad habit of folding over upon themselves when you try to apply them. I decided to use AeroMaster's sheet 32-007 "Warthog Warriors" because I really wanted something different. The "Norris The Play Hog" markings definitely fit the bill and I just couldn't resist doing this particular plane!
Weathering is chalk pastel mixed with water and a bit of dish soap to form a paste. The mix is applied to the panel lines and all the nooks and crannies and left to dry, then wiped off with an old T-shirt. This was the first time I had used this method and I have to say I am quite pleased with the effect. It's also nice that if you screw it up you can wash it off and start over. In the past I used artists oils for weathering and they are far less forgiving than the pastels are.
The kit really is an eye catcher, even with its flaws. If you like big models then you will definitely want to try your hand at one of these Trumpeter A-10s.
I've been asked about how I relocated the engine fans a few times so if your interested in fixing this glaring error in your hog, read on.
I relocated the 1st stage fans in the engine nacelles by doing the following:
In the kit instructions on step 30 I was pondering this before gluing everything together and was playing with the parts. I happened to notice that if you took the fan (part Q1) and inserted it into the rear of the duct (part Q5) it fit perfectly. Trumpeter instructs you to install the fan at the front of the duct on a step that is molded in to provide a mounting point for the fan.
All I did was to grind/sand off that step and then just push the fan back inside the duct until it touches the engine core assy (the 2 clear halves that hold the resin engines). As luck would have it this places the fans in the exact scale position they should have been placed at in the first place. Paint all of the parts first and then use white glue to install the fans in the pre-painted ducts, the fit is snug once the parts are painted so the white glue is more than enough to hold them in place.
One caveat to be aware of though, make sure you have the fan square in the "bore" of the duct when gluing it in. If you don't it will be VERY noticeable. This is a real simple fix that makes a huge difference in the finished look of the model, IMO even more so than the inaccuracies of the kit windscreen, and unlike the windscreen is something that average modelers can fix themselves with minimal effort.
I hope everyone enjoys the pictures, I'm still trying to figure out my digital camera so some are a bit blurry.
© Scott Sampley
This article was published on Wednesday, July 20 2011; Last modified on Saturday, May 14 2016