
Trumpeter MiG-21
By Tomas Chmelik
This is my latest model, MiG-21 from Trumpeter in 1:32 scale. There was a lot of said about this model already so let me just pick up some points I made during the construction.
What you get in the large box was also already described here, so just to remind you that you get a large number of parts made from grey styrene, packed in separate bags, one sprue of clear parts, couple of resin parts, metal parts consisting of undercarriage struts and a nose cone and a rubber tires. Decal sheet depicts two planes, one in German (west) markings and one in Iraqi ones. Sides of box cover include colour pictures of some details including engine and seat. And of course, instructions.
The model also includes a siting pilot plus four ground crew members making various activities around and on the plane.
The quick look into the box will show you that all pats are nicely made and engraved up to today's standards, let's say. The model comes with the optional nose cone where you can choose from plastic or metal one. The plastic one seemed me to have a smoother surface, but the metal one serves as a clever nose weight so I decided to use this one. Everything I was wondering of about the nose cone later disappeared under the coat of paint so you do not have to worry.
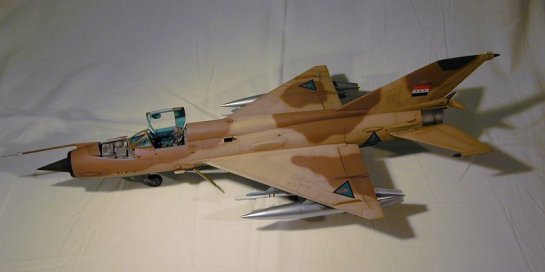
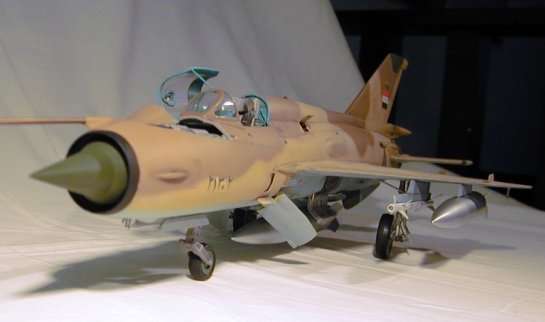
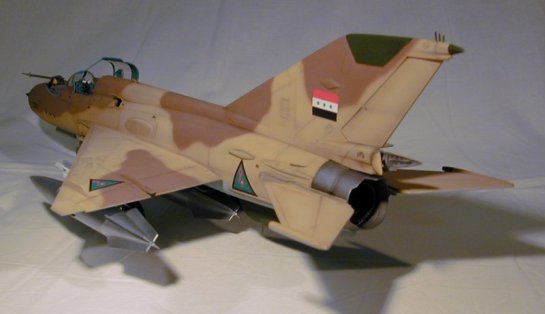
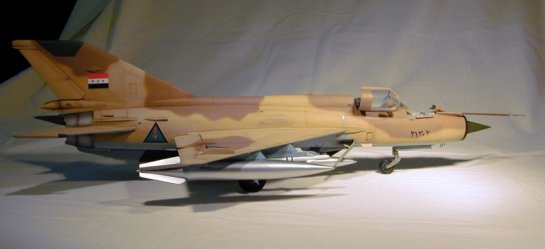
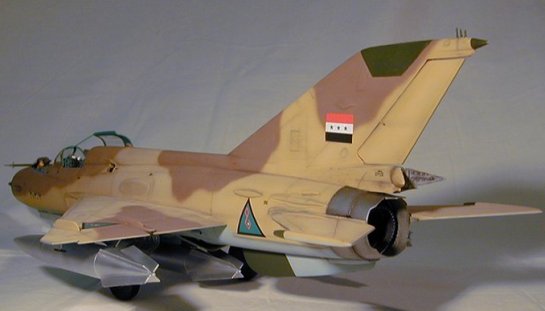
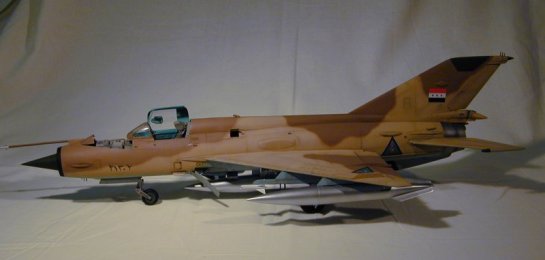
I decided to make a plane in Iraqi markings just because I liked the desert camouflage and wanted to try some weathering techniques. Quickly after the release of the model there are tons of aftermarket decals available (Russian, Czech, Romanian etc.) but I decided to use the original ones.
The construction started with two major subassemblies - engine and cockpit.
Cockpit
Those of you who expect as poor cockpit as was in A-10 from Trumpeter will be fortunately disappointed. The cockpit is much improved, includes cockpit tub, instrument panel (made from clear plastic) and relatively nice seat (plus other details, all this makes number of parts together). In my opinion the cockpit will look O.K. directly out of the box, but still does not reach the standards we expect, especially in this scale. There are two nice aftermarket replacements available at he moment - Cutting Edge and Black Box. Both were compared a few months ago on the internet and I think that both are excellent. I decided to go for a Black Box for a simple reason - price.
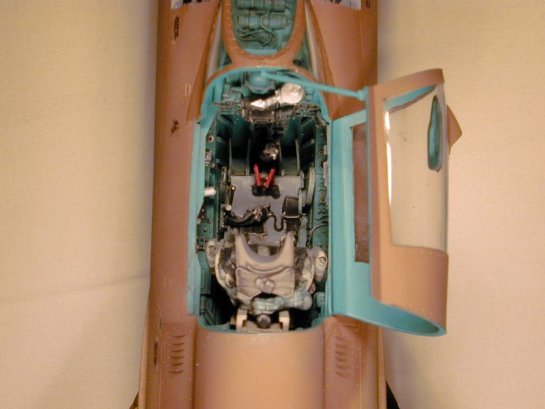
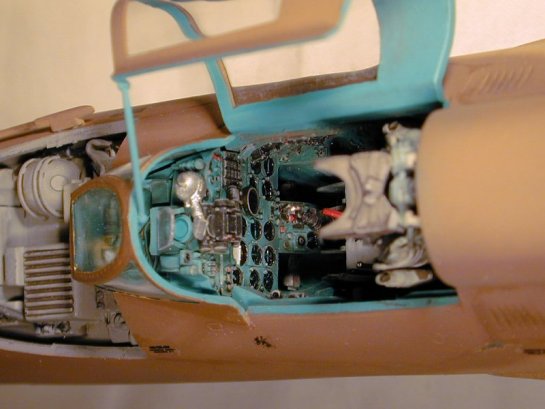
Black Box Cockpit
What you get from Black Box is their usual clear box filled with nice resin parts. For details, check the Victory models web site. The parts are nicely moulded and especially the seat is excellent. Black Box selected a different breakdown of parts than Cutting Edge which is mostly visible with the seat which comes with separate head rest and couple of other details. The instructions are clear enough to guide you through the construction process, however there are few points where it is not exactly clear how the parts should fit together (drawings are simplified and you are a few times not sure whether this or that should go exactly here or a few millimetres next). Check the fit to the fuselage and leave some parts such as instrument panel left until the fuselage assembly.
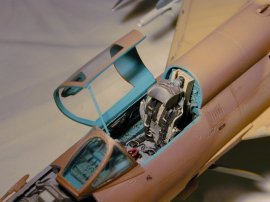
The fit to the fuselage is good, all you need is to remove all ribs inside the fuselage (which is mentioned in the Black Box instructions) and carefully check the fit with some minor sanding of the resin tub to jump inside. Nothing that could not be fixed by an average modeller. The casting of the resin parts is excellent and matches the actual photos perfectly. For painting it is the best to check references, a cockpit photo is also on the side of the box cover. The question is the painting of the seat - various references show a little difference in seat painting, especially on the back side. This probably depends on actual aircraft (repairs, seat from different period etc.). I decided to paint the seat according to one of the references and not to think about too much. The cockpit was painted by Agama Russian interior colour and received a usual mix of washes and drybrushing. The results were really outstanding and the cockpit is definitively a worth of money. I was really happy with the results and was excited to continue the construction. Later on I realized that there is threat that from a certain angle it could be possible to see the inside of the front fuselage through the cockpit (under the instrument panel), so I decided to cover this area to protect possible light come through. Whether it was necessary or not is a question which I cannot answer - I have no chance to compare that "before" and "after".
The Engine
The engine is another major subassembly. The larger scales such as 1:32 just call for some additions and opened avionics bays or engines are a good choice to add some business to the model. The scale also allows to represent these in a good quality so the results are often really nice.
From above mentioned reasons I wanted to make the model with rear part of the fuselage off, which can easily be done - the model is made to allow this with fuselage split into front and rear parts. There is also a trolley for the rear part included in the model. I wanted, but I finally gave up and made the model with front and rear fuselage together. Why?
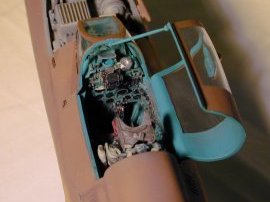
Well, the addition of the engine is a very good idea, but the manufacturing chosen for this one is a modellers nightmare. The engine is crisply moulded, but split into four parts along, which means four seam lines running along the whole length of the engine through all details. Even if the fit is relatively good, one cannot avoid some sanding and filling. And as there is due to some details a very little space for sanding, the whole thing is even more difficult (but probably not unfixable). But as the engine should be mostly in various shades of metallic colours, every not perfectly smoothed scratch will be very visible (there were some of course). Also, there are some other parts representing cables, wires and other tubing attached to the engine and it has to be said that their moulding is very crude and rough.
The main reason which take me off the idea of displaying the engine open was the fact that there were absolutely no details on inside of both the front and rear part of the fuselage. Simply said the insides looked like as inside of any model part which is supposed not to be visible when assembled - nothing inside, just sink holes and such stuff. I am almost sure that the real Mig does not look like this inside. For fixing of this it would be necessary to do a lot of scratchbuilding together supported by adequate references. Well, I didn't have references nor the need to do some scratchbuilding so I decided to put the fuselage together and hide the engine inside. The final reason was that taking off the rear part would destroy the shape of the Mig and I didn't want that to happen.
General Assembly
There are a few other minor subassemblies necessary before putting the fuselage together. This includes wheel wells, nose cone and opened electronic compartment in front of the windshield. Everything is straightforward without major problems, but few comments can be made anyway:
- Details on the wheel well bays and the thing in front of the cockpit are bit heavier, especially when compared to Black Box cockpit. With references some tubing can be added. I decided to leave it as it is.
- Colour instructions are vague - even if the instructions are clear enough to guide you through the construction, calls for painting is only here and there so most of the painting has to be decided on the base of the references or guess.
- Metal struts sound like a good idea - the model in this scale are quite heavy. Well I finally realized that the overall weight of the model is not as bad. The problem with the struts is that they are relatively heavily moulded (or how to call that) - I have almost no experience with such parts so I do not know what the standard is - they contain seam lines and even ejector pin marks (?). As they are from a relatively hard metal (or heavy metal J), they are difficult to sand and clean. In my opinion they should be (or at least are in metal) thick enough that could be represented by a regular plastic without problems.
- The wheel bay doors (main) are bit on a thick side. There are few ejector pin marks inside which have to be carefully filled and sanded.
- I was wondering about the fit of front and rear part of the fuselage, but it was excellent. There were more problems with the vertical stabilizer, but again nothing that could not be easily fixed.
- I had problems with wing and fuselage attachment. I do not know what I made wrong , but there was an ugly and relatively wide seam between the lower half of the wings (on undersides). This can be fixed by careful sanding of the upper halves of wings(it seemed to me that the upper and lower part of the wing has a different depth) or by filling the gap. I decided to fill the gap by a method described on aircraftresourcecenter using a filler and nail lack remover. It worked fine and I was able to get the seam filled without damaging the details on the wing.
- I had problems with attaching the windshield. The problem is that due to opened avionics (or whatever it is) bay there is only a small stretch of plastic holding the windshield which was originally bent (finally broken). Careful bending, sanding and filling in this area was necessary. Generally, the construction was relatively easy and once the fuselage with all the wheel bays, cockpit and engine plus some other few things is glued together, the construction continues relatively quickly. Wing problem is described above, horizontal stabilizers were attached after painting. There are several small antennae on the fuselage which are easily breakable (guess what happened to me) so think about their possible removing and adding later on as every maintenance puts them into the danger of breaking and disappearing somewhere on the floor
Generally, the construction was relatively easy and once the fuselage with all the wheel bays, cockpit and engine plus some other few things is glued together, the construction continues relatively quickly. Wing problem is described above, horizontal stabilizers were attached after painting. There are several small antennae on the fuselage which are easily breakable (guess what happened to me) so think about their possible removing and adding later on as every maintenance puts them into the danger of breaking and disappearing somewhere on the floor.
Painting and Decals
I wanted to make my model weathered so I decided to combine several techniques widely used here on the Hyperscale. Firstly I sprayed the whole model by Model Master buffing aluminum to have a base for later paint chipping. This was sealed by the sealer and pre shading was applied. Then I sprayed a light blue on undersurfaces. Instructions call for light grey, my other references call for shade similar to "sky", other light blue or light grey blue. I prepared a custom mixture of various shades of grey and light blue to my satisfaction.
Also, from the instruction it is not clear what colour the air brakes should have. Some pictures show the inside in the same colour as the undersurfaces, some not . I decided to paint the insides same as undersurfaces, but paint the inside part of the brakes yellow zinc chromate which I saw on some pictures of actual aircraft. Again, in my opinion, number of options is possible and I doubt there were any strict rules for that.
My consideration about colours of Iraqi plane comes from the following - pictures of Iraqi planes taken under a reasonable conditions are very rare. I do not have a picture of a Mig-21, but other planes I saw in some magazines show the planes from a distance and in a poor quality, both from the detail point of view and from the quality of colours as well. Also, I think that desert conditions caused an extensive sun fading and weathering (even in European conditions the Migs can be very, very weathered - once I saw a picture of a Mig-21 which was almost half natural metal - and it did not even enter combat or extreme weather conditions !). So I finally decided not to care about exact match of colours (anyway, match to what ?) and paint the model in the way it represents an Iraqi Mig-21 in desert camouflage as it could look like in my opinion.
So I prepared a custom mix of sand (I made it more yellowish) and dark earth for upper surfaces, spraying them freehand. The model was finally post shaded to accentuate sun fading. Than it received a wash into some panel lines followed by pastels. I wanted to make the weathering visible, but not too much. Finally I wanted to do paint chipping by removing some paint to show the aluminum primer underneath. Well, as I am not familiar with this technique too much, I probably made a mistake by spraying to much layers of colours (sealer, preshading, camouflage colours, postshading etc.) and scratching of the upper colours became very difficult. After few attempts I gave up and left the few ones I made as a representation of minor paint chipping.
After the model got a clear coat I applied decals. My ones were on a register, thin enough. One of the problem was that all the stencils included on the decal sheet are readable, but in German. I do not know where the planes to Iraq came from, but I doubt that they included German stencils. I decided to added some unreadable stencils from a sparse box not to leave the model empty. I have absolutely no idea whether the stencils even were or in which language on Iraqi airplanes.
The model got a final flat finish from Humbrol 49 and was ready for final touchups.
Weapons
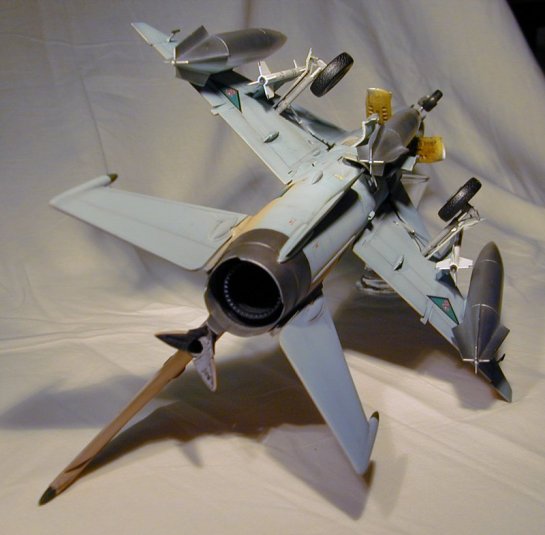
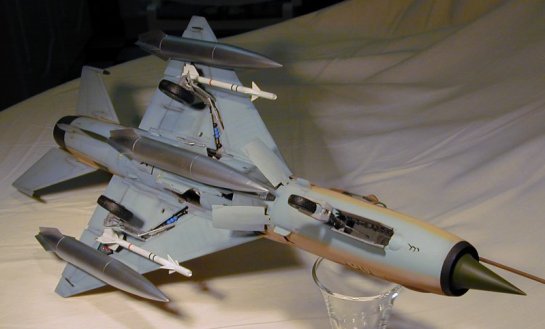
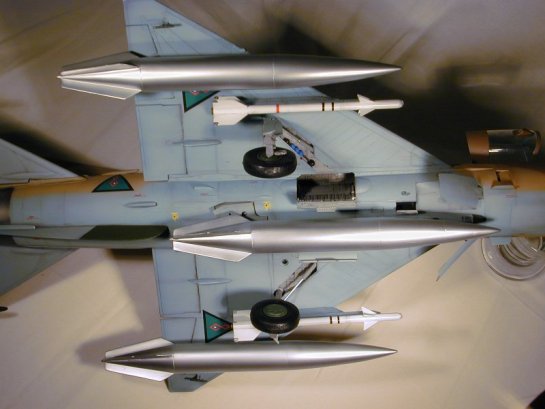
Model includes an extensive selection of weaponry, including air-to-air missiles, fuel tanks, bombs and unguided air-to-surface missiles. The first problem I entered was that a smaller fuel tanks (which consist of two halves and a front cone) have a "suspicious" shape. Quick look into the drawings showed that (at least to me) the front part, added as a separate piece does not match the rest perfectly and makes the front part of the tank somehow "bulged" which is in my opinion wrong. Lot of wet/dry sanding with extensive puttying cured this. Generally said, the fit of weapons is on the poor side of the kit.
There are no options of the combination of weapons for the Mig in the instructions. This can be easily fixed by references (4+ publication for example). I decided to make my Mig in fighter version, carrying three smaller fuel tanks (forgot the volume in gallons or litres) and two R-3S missiles. Instructions call for tanks in the same colour as undersurfaces. As I initially wanted to do the same attempt for paint chipping as on the whole plane, I sprayed them buffing aluminum first. The scratches from extensive sanding became very visible but I suddenly started to like the natural metal look of the fuel tanks. I decided to deal with scratches again, then prime the tanks with Humbrol gloss black (enamel !) and after drying spray the aluminum again to make another try. Well, the result was satisfactory for me ! Scratches became invisible, fuel tanks had smooth and uniform surface and after polishing and final sealing looked like natural metal fuel tanks (at least to me). They add something different to the model and its appearance in natural metal is in my opinion very real (prove me that I am wrong!).
As I mentioned above, there is a possibility to add some crew members to the model. The figures are relatively good, they depict ground crew in putting the ammunition in the fuselage (3) and putting the drag chute in the rear (1+ladder). Figures are relatively well moulded and when compared to real photos of the process they aim to depict, they represent that good. My problem was that I was wondering whether they represent the European or Far East persons (don't call me racist !). I actually don´t know how the Iraqi ground crew looks like (colour of the uniform - I guess green only). So I decided to paint them somehow "neutrally" and put them aside to decide whether to put them on the model or not later on. The only resin part of the model - ammunition box with some other equipment was also left out.
Conclusions
There were some remaining details added to the model and it finally looked as a weathered Iraqi Mig-21 which was the purpose of this construction. I am very satisfied with the result, it is probably my best model ever. I enjoyed the construction, tried some new techniques and made something I am proud of.
Well, I decided to go further and do some criticism of the model by myself to inspire you (just kidding - your comments are very welcome). The overall impression can be made on the base of the pictures, but:
- I didn't make any measurements according to plans or drawings, I did not want to make any surgery anyway so I decided that it is better not to know whether there is something wrong or not.
- Some of my decals silvered, my Solvaset treatment was not strong enough. I realized this too late to fix it so I decided to leave it as it is and hide the most visible ones by touch-ups of the surface colours and weathering (which is similar to a crime in a modelling world).
- I added no additional details to wheel wells despite I had some references, the same goes for gear struts and other details.
- I added no additional details to the electronic bay in front of the windshield, I just painted that in a few shades of grey, added some washes, some black paint to several wires and again left it as it was. I gave up to make some additional research to get references for this area.
- Camouflage colours are based on my assumptions, not on real references, the same goes for markings and stencils (see text above).
- I added no details to opened access doors for refilling the ammunition.
- I was not sure about painting of the air-to-air missiles, I made them white and added black and red stripes to them according to instructions and some references. But I am not sure whether it really looks like this or not.
- Colours of inside of the wheel wells and such details is a mixture of suggestions get from instructions, pictures and my own assumptions. Again, I made no in-depth research for these purposes.
© Tomas Chmelik
This article was published on Wednesday, July 20 2011; Last modified on Sunday, October 02 2016