
Tiger Moth Kit Comparison
By Max Williams
Part 1 - The Kits
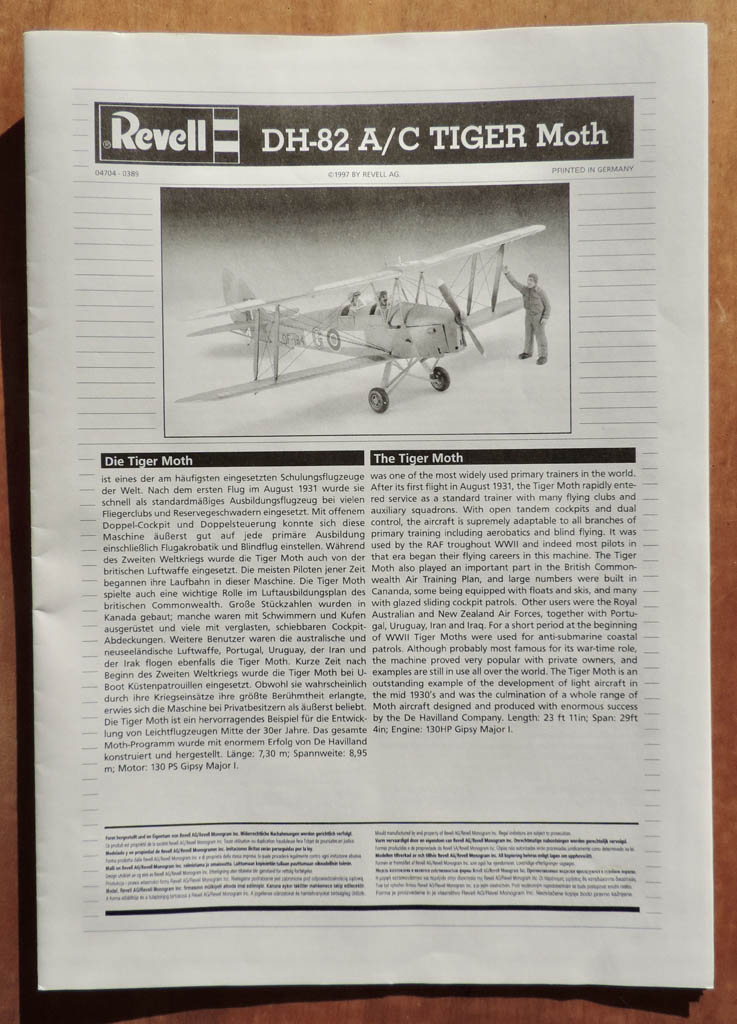
The oldest of the three is the Matchbox one, first produced as long ago as 1978 in multi-coloured plastic (why?) then latterly re-boxed by Revell in 1997 in a light grey plastic:
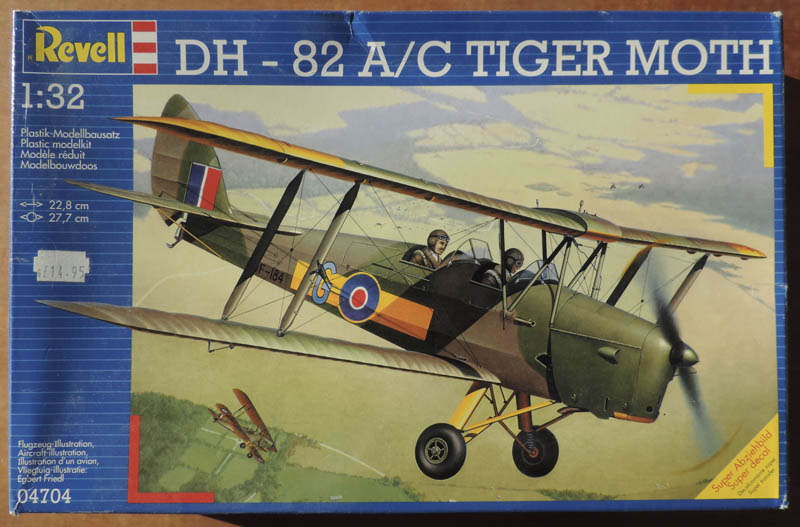
Matchbox/Revell is quite a mouthful and too much typing for me so from now on I'll call it Revell.
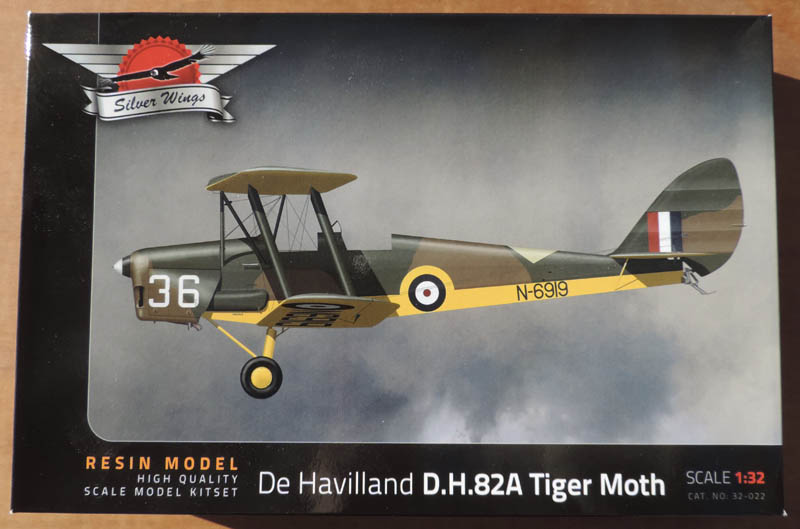
Only last year Silver Wings picked up the challenge in what appeared to be a gap in the market given the venerable age and increasing scarcity of the Revell kit. The Tiger Moth is very much in line with the type of aircraft that Silver Wings tend to specialise in so fitted the bill very nicely. A little persuasion from LSP members added to the chances of its issue:
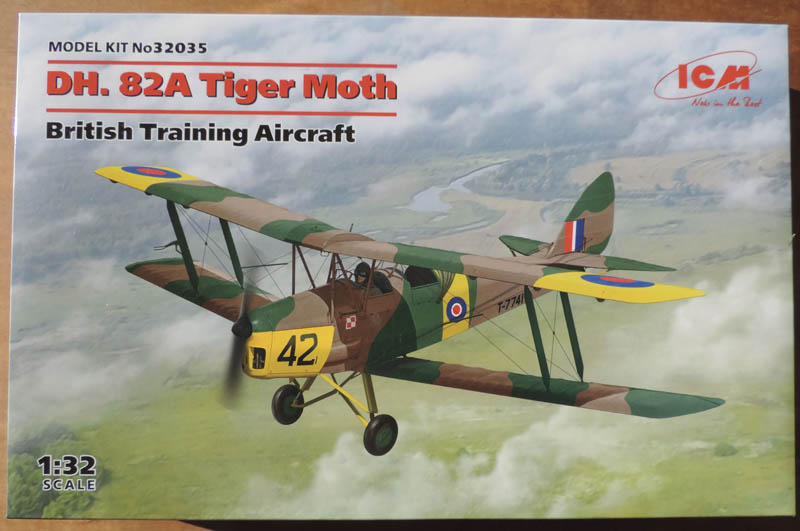
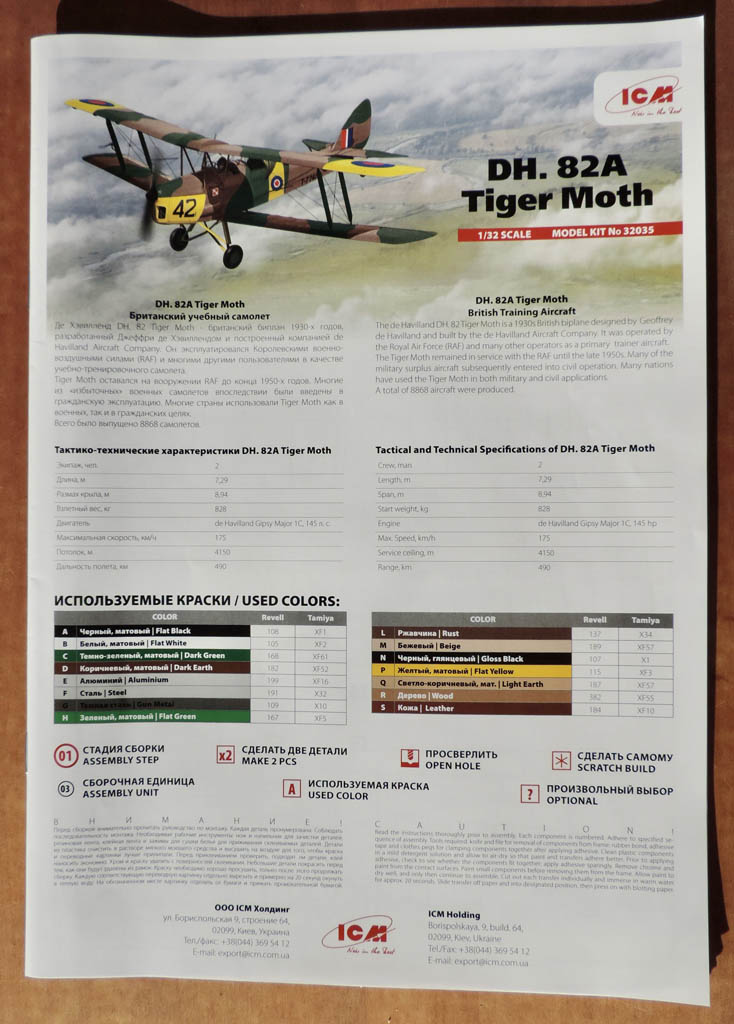
And then, completely out of the blue ICM announced a new Tiger Moth kit which has come out very recently indeed. ICM is the emerging player in 1/32 scale aircraft, we were all stunned and delighted by the Gladiator that they produced last year, so a new Tiger Moth was very welcome:
Boxes
It's worth mentioning the boxes, and indeed the box art because in each category one is notable for all the wrong reasons. The villain in box design is the Revell one, an end-opening box which as a storage box whilst working on the kit is as much use as a chocolate fire screen. The hero is the ICM box, it's the type we have come to expect from them of a cover lid lifting off to reveal a stout box which opens from the top and closes securely. ICM can't rest on their laurels though because the box art isn't that good, especially the representation of a Tiger Moth being flown solo from the front cockpit; it doesn't happen!
Material
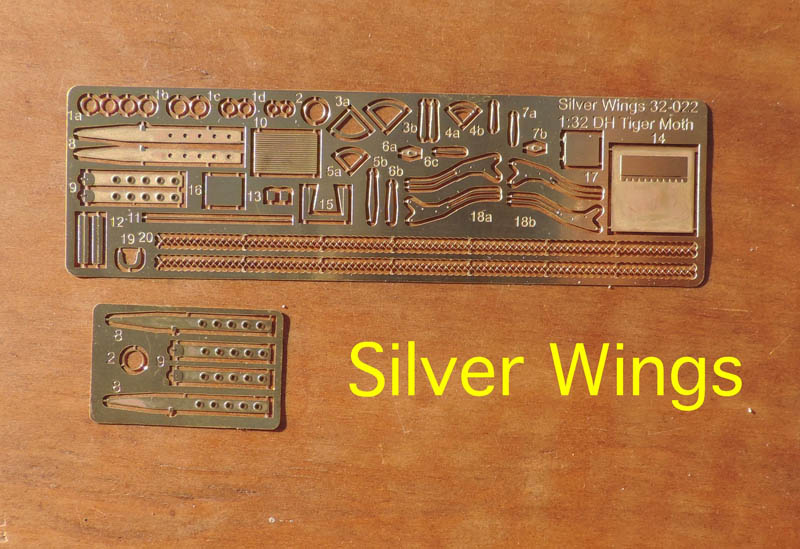
Both the Revell and ICM kits are injection moulded plastic, the Silver Wings resin with some photo-etch.
Costs
Most people wanting a Revell Tiger Moth will search on eBay and as we all know prices there can fluctuate wildly, a recent search showed kits available between £25 and £70.
Silver Wings kits, being short-run and resin are always expensive, slight variations can be found but typically they are around £120.
The brand-new ICM kit works out at about £35 from suppliers such as Hannants.
What's in the Box
So what do you get for your hard-earned money in terms of bits of plastic (or resin)?
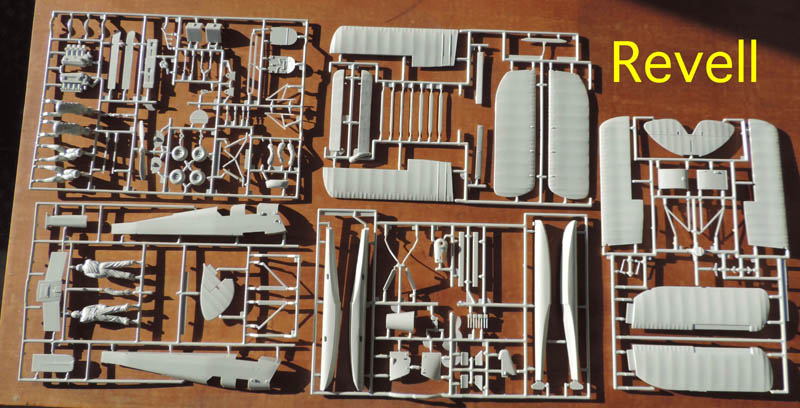
Five sprues with the Revell kit which includes two aircrew and a mechanic (not very well done I'm afraid), but also floats should that "float your boat" and an enclosed canopy if you want a Canadian version.
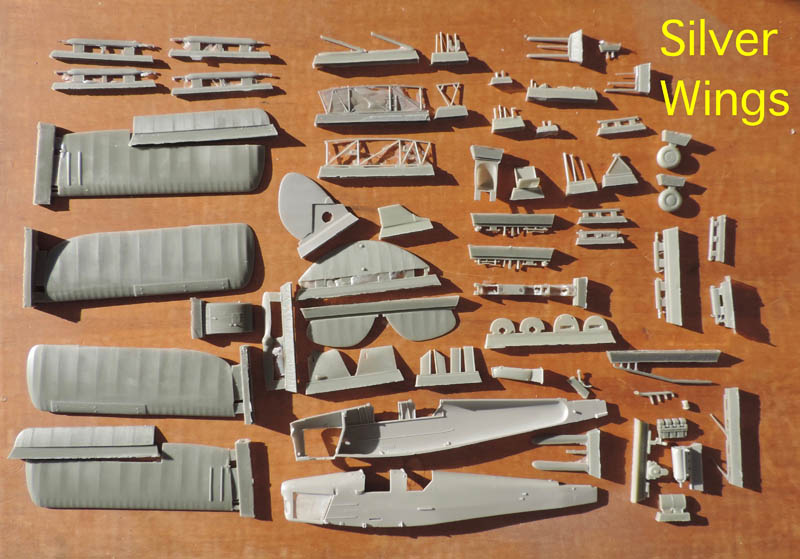
Lots of bits (I haven't counted them but some smaller ones duplicated) giving a high level of detail. For example, a one-piece mould in both the Revell and ICM kits of the main undercarriage structure comprises five pieces in the Silver Wings kit.

Just three sprues in the ICM kit, the most notable part is the lower wings and cockpit floor structure moulded as one, therefore setting the lower wing dihedral. More about that in later additions to the thread.
Instructions
Wide, wide variations here! All are A4 size. The Revell one:
Compared to the Silver Wings ones:
The main problem with the Silver Wings instructions is that apart from the PE, there are no part numbers showing allocation positions so the builder is entirely at the mercy of the clarity of the illustrations. Experience shows they don't always work!
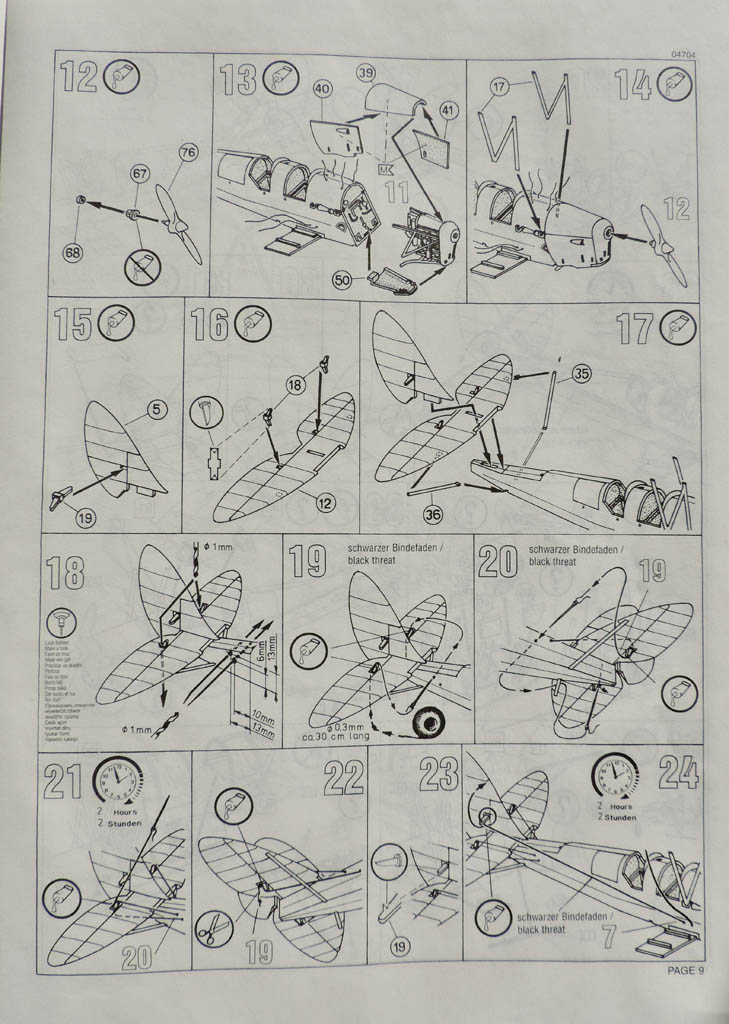
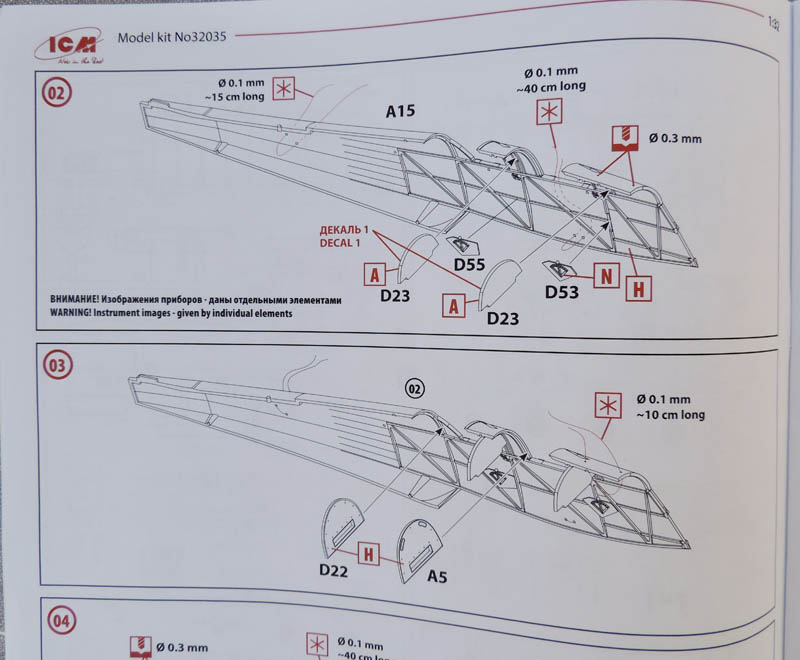
And the ICM ones:
Part 2 - Fuselage
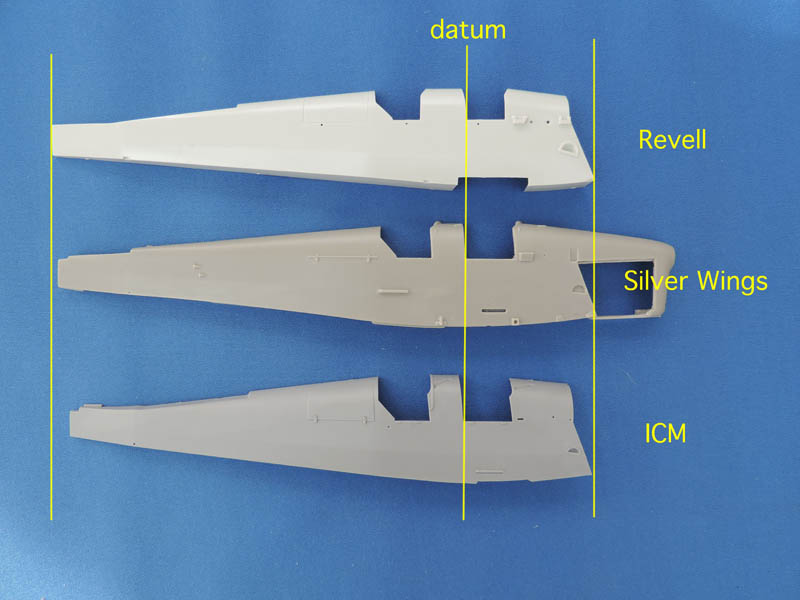
The Silver Wings fuselage halves differ from Revell and ICM in that with the former the nose section forms part of the fuselage whereas in the latter two it ends at the firewall. This has major advantages because attaching and lining up the engine bearers, the engine and the upper cowling can be tricky. Get it wrong and the whole of the nose section can look like it's been through a few rounds with Tyson Fury (insert your own choice of heavyweight boxer here!).
Other less obvious external differences include the treatment of the area below the forward cockpit where the control horns for the rudder bar project, see below:
The Revell kit ignores it completely, it just ain't there! The Silver Wings kit provides a slot and PE strips which you bend at an angle as the shield, and the control horns which you build into the cockpit framing. The ICM kit has the shield moulded in position but instructs you to drill two holes from the inside and secure the control lines early on in the build, ie no control horns showing. This is a compromise which can be easily overcome.
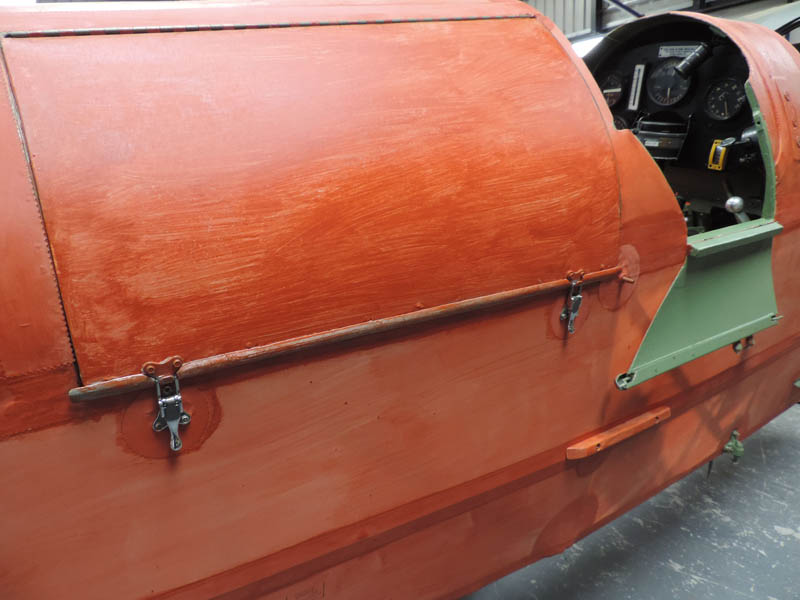
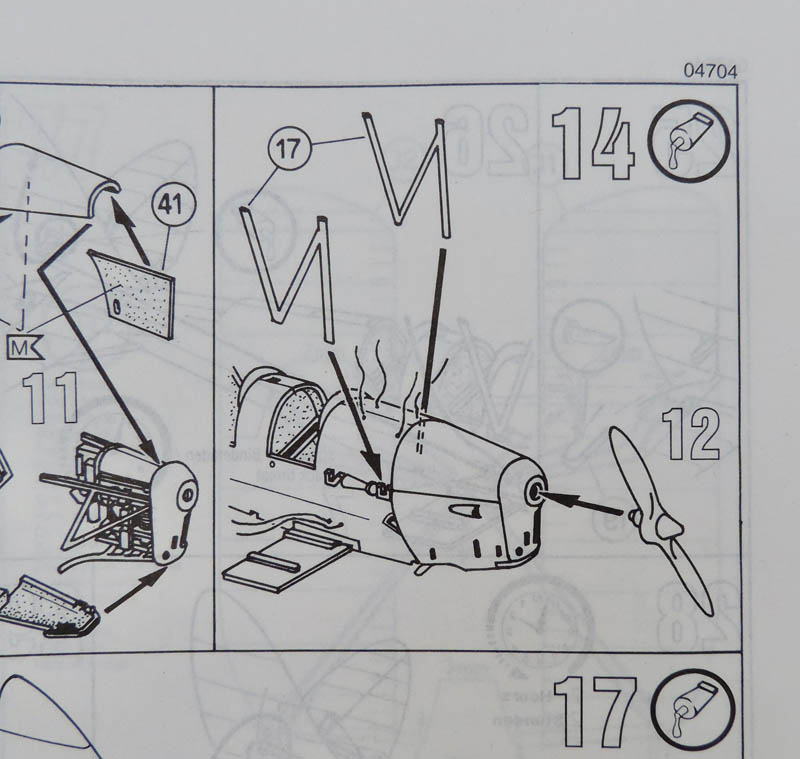
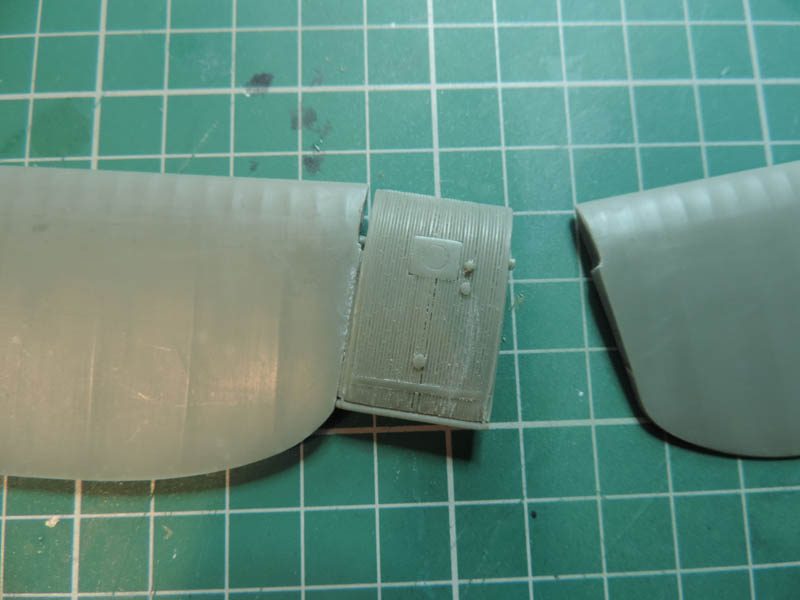
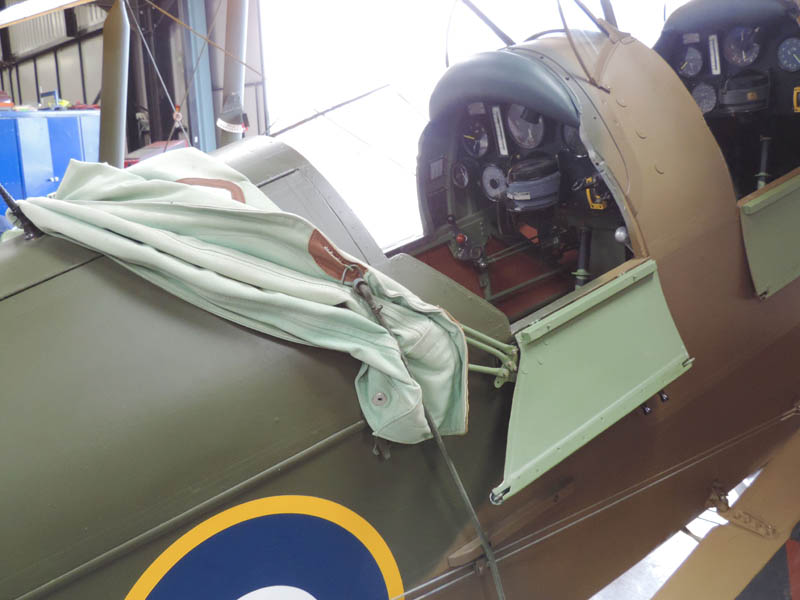
ICM's is the only kit which includes a blind flying hood to be fitted aft of the rear cockpit—Brownie points there! BUT whilst doing their research they have omitted the rubbing strips fitted below the rear cockpit which are there to avoid the thick rubber bungees from the hood ripping the fabric of the fuselage as the hood is pulled forward and backwards:

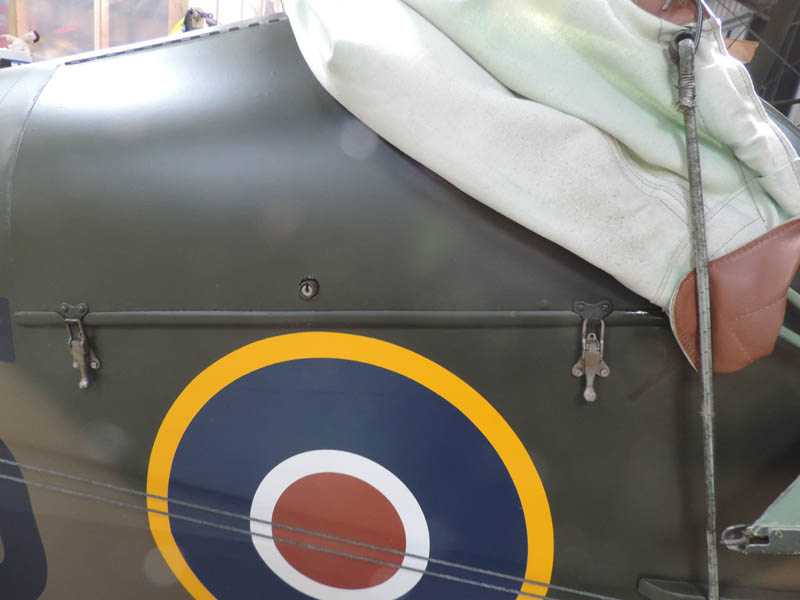
On the other hand, Silver Wings have included the rubbing strip (Brownie points!! ) but no hood! Can't have it all I guess. Whilst looking at this picture, note the baggage area aft of the rear cockpit. Revell acknowledges the existence of this area with an engraved line. Silver Wings have moulded catches and a PE strip for the hinge at the top. ICM similarly have moulded catches but their baggage door is slightly proud of the fuselage surface. It isn't:
Those catches are fiddly to reproduce aren't they if you're using the Revell kit!
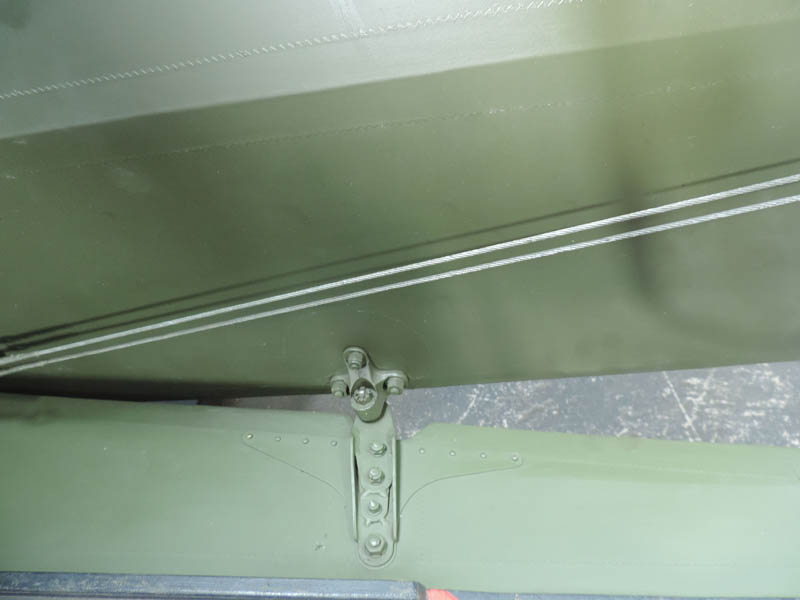
Just visible in the picture above towards the lower right corner is a green "bolted attachment". The vertical bolt secure the rear part of the wing to the fuselage. Silver Wings is the only kit which features this item, so more scratch-building Revell and ICM!
Notice how smooth the fabric is in these close up pictures. The ICM kit surface has a slight "grain" to it, I don't know whether this is an attempt to replicate fabric covering, and it will soon be lost under a coat of primer and top coat, but it really isn't necessary anyway.
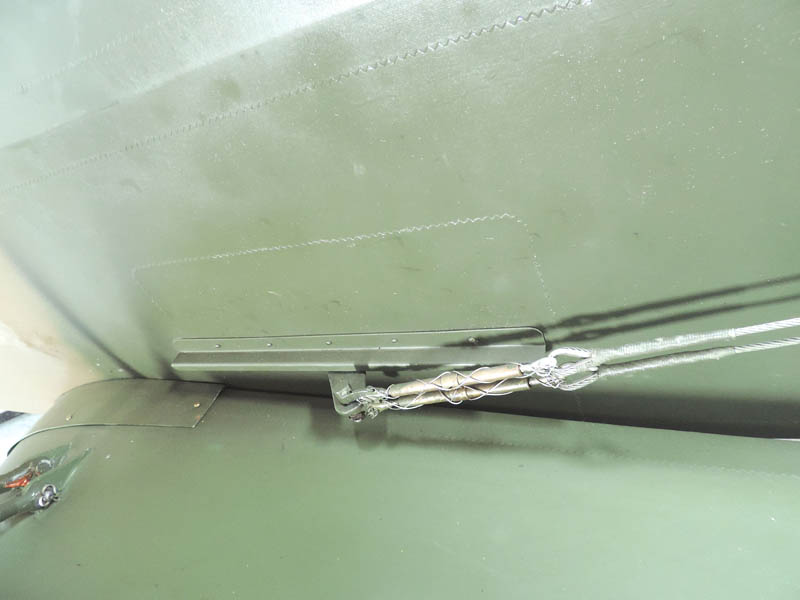
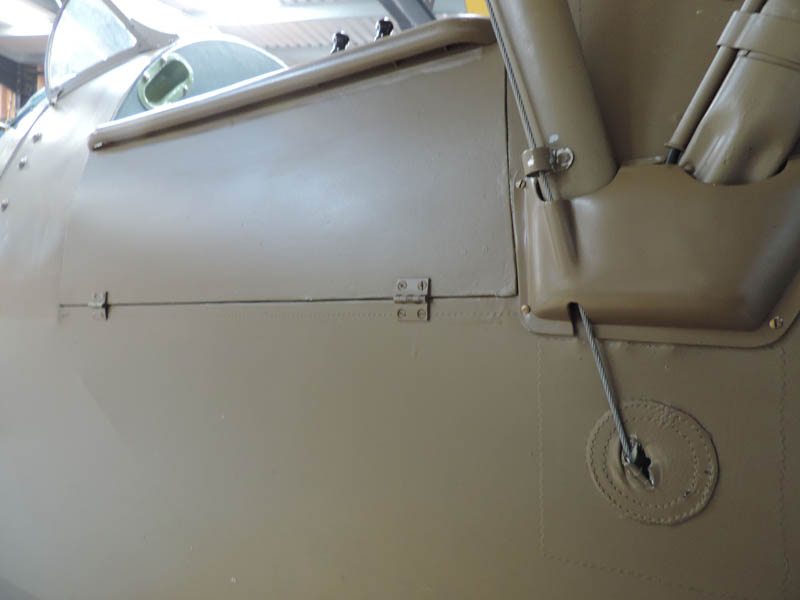
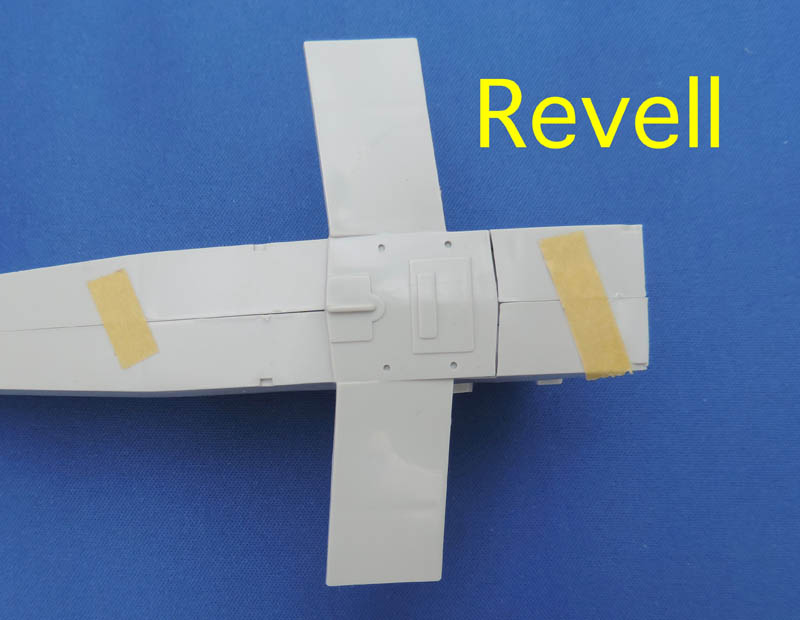
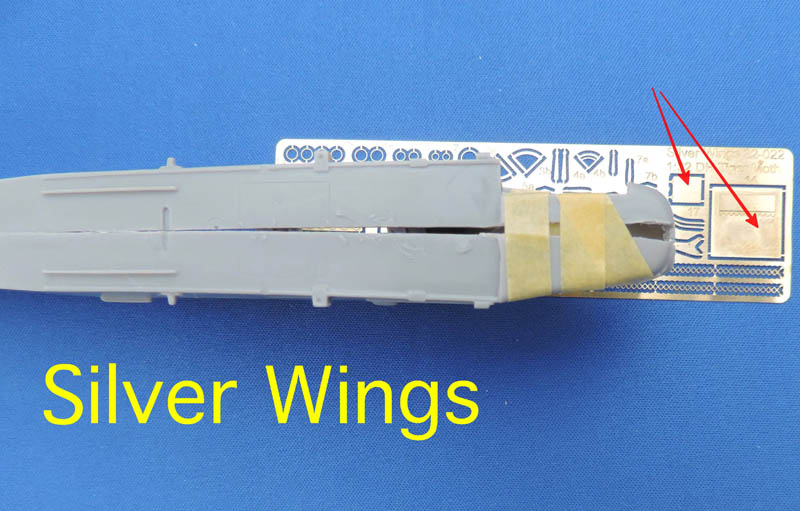
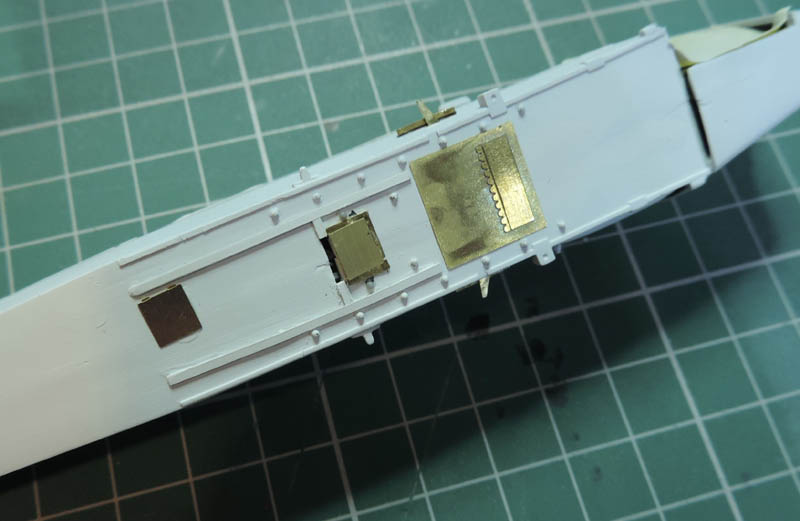
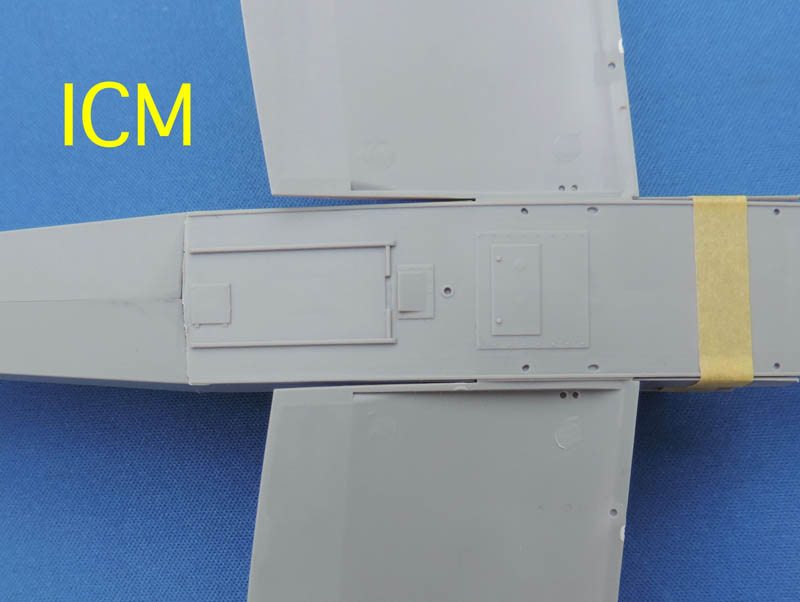
Moving to the aft end and the area of the fuselage where the cables for the elevator lines run:
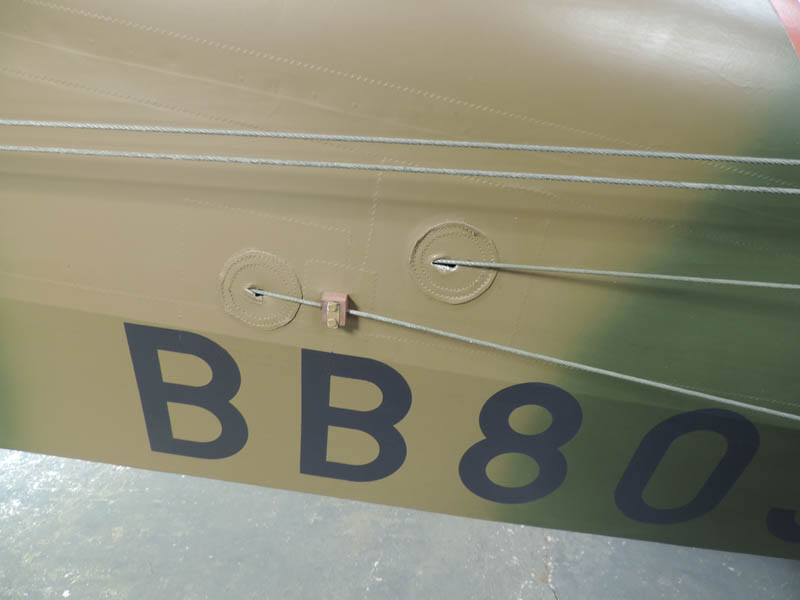
The Revell and ICM kits will have you drill these points; the former gives very precise dimensions for the correct position in the instructions, the latter drilling points are marked on the inside of the fuselage so these need drilling before halves are joined or else you're scuppered. The Silver Wings kit has small "fairings" moulded in place. They may have been on the Tiger Moth they used and measured but I can't remember noticing them before on the many Tiger Moths I’ve seen.
Shooting right forward finally: the lower location points for the cabane struts!
These really are horrible great square seats on the Revell kit moulded onto the fuselage, easy enough to streamline though. The Silver Wings rendition is much better, but interestingly they form part of the cabane strut on the ICM kit, not part of the fuselage.
Part 3 - The Cockpit
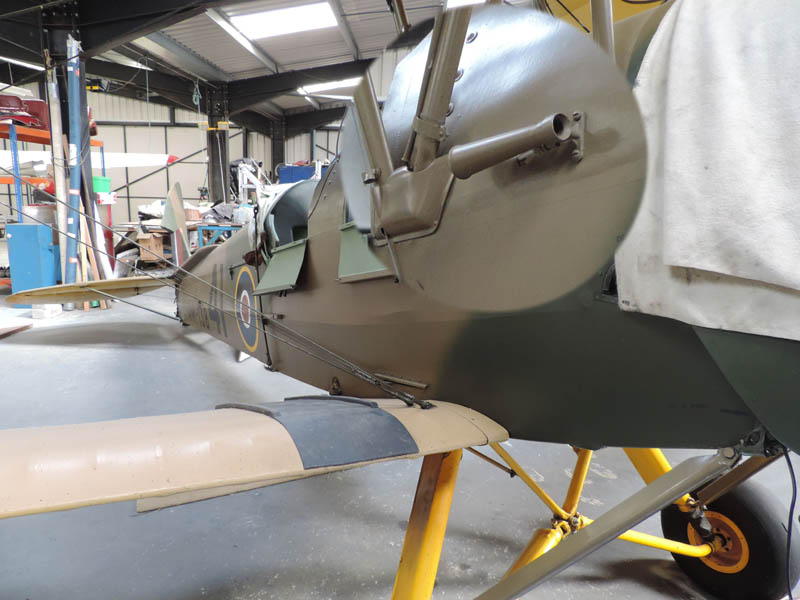
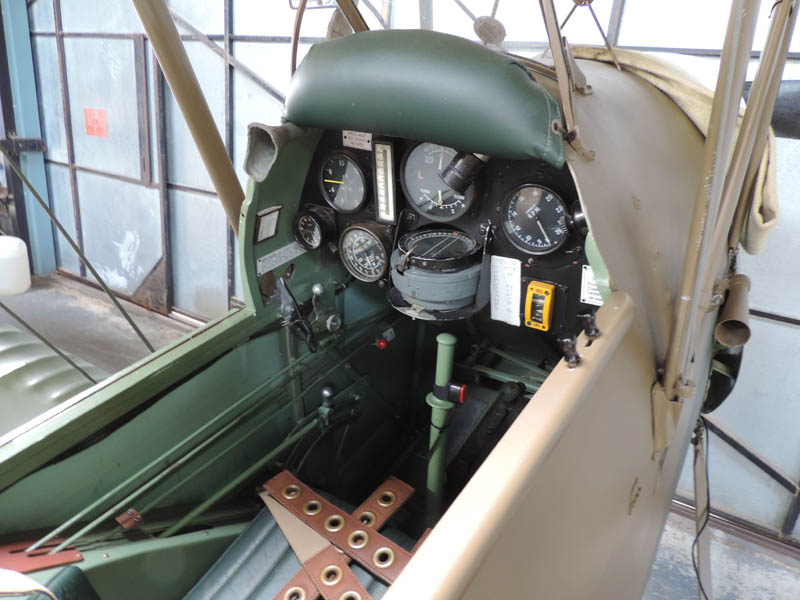
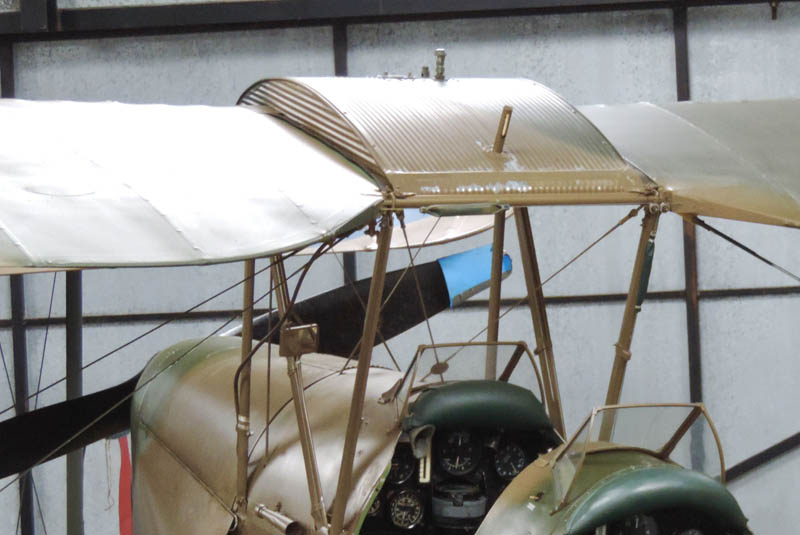
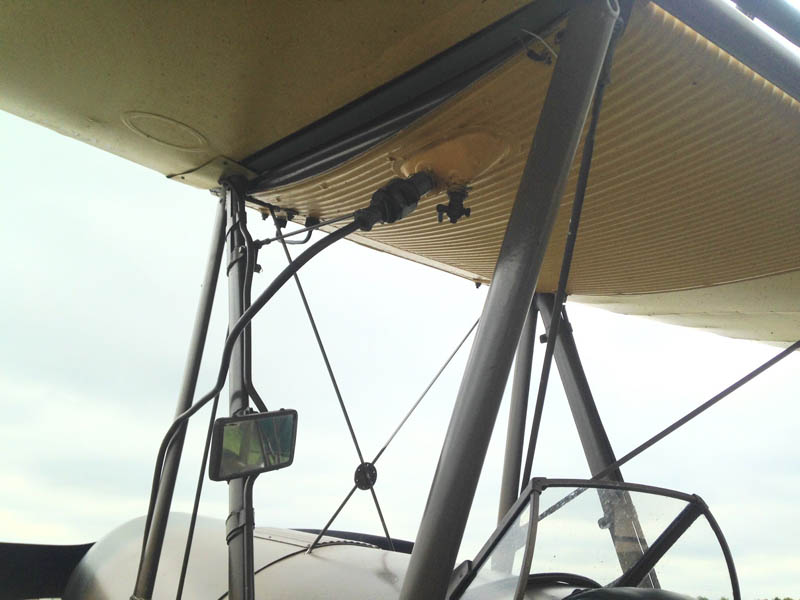
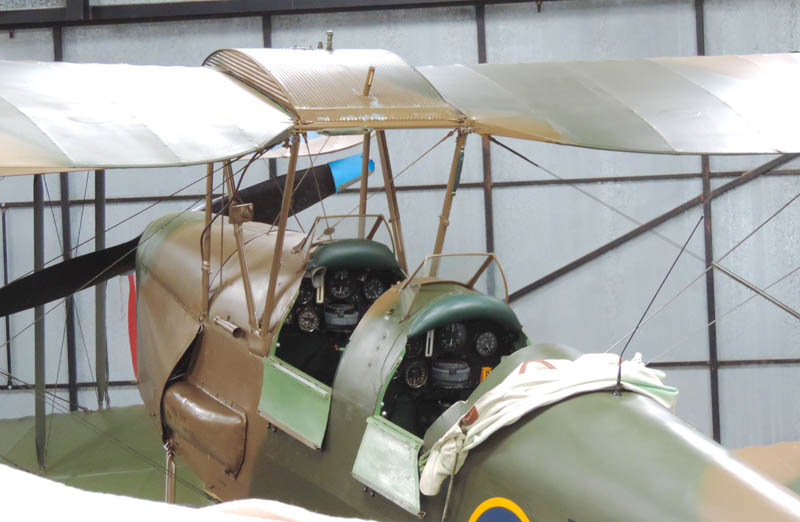
Inside the cockpit of a Tiger Moth you soon realise that it's not a complicated affair: a joystick that waggles between your legs, rudder pedals, half a dozen instruments plus a compass, a throttle and one or two other levers that you may or may not need, and that's about it! But our three Tiger Moth kit producers have treated this area is different ways. Firstly a few views of the real thing, a fully restored Moth in some pictures, one being restored in others which helps to show structure etc.
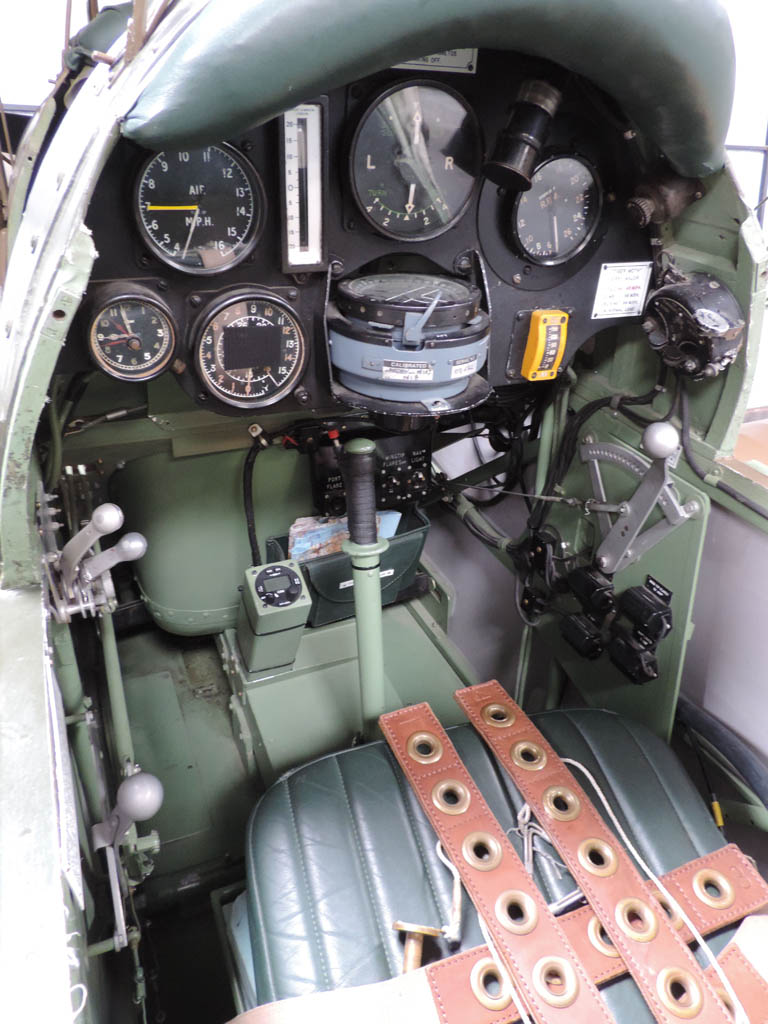

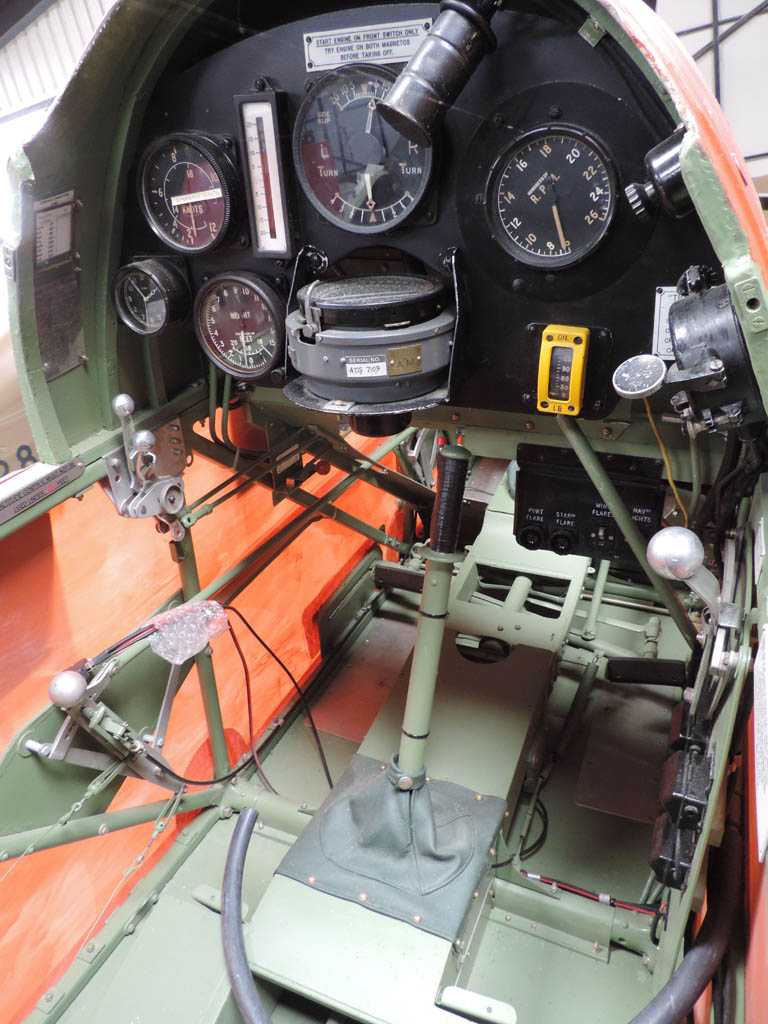
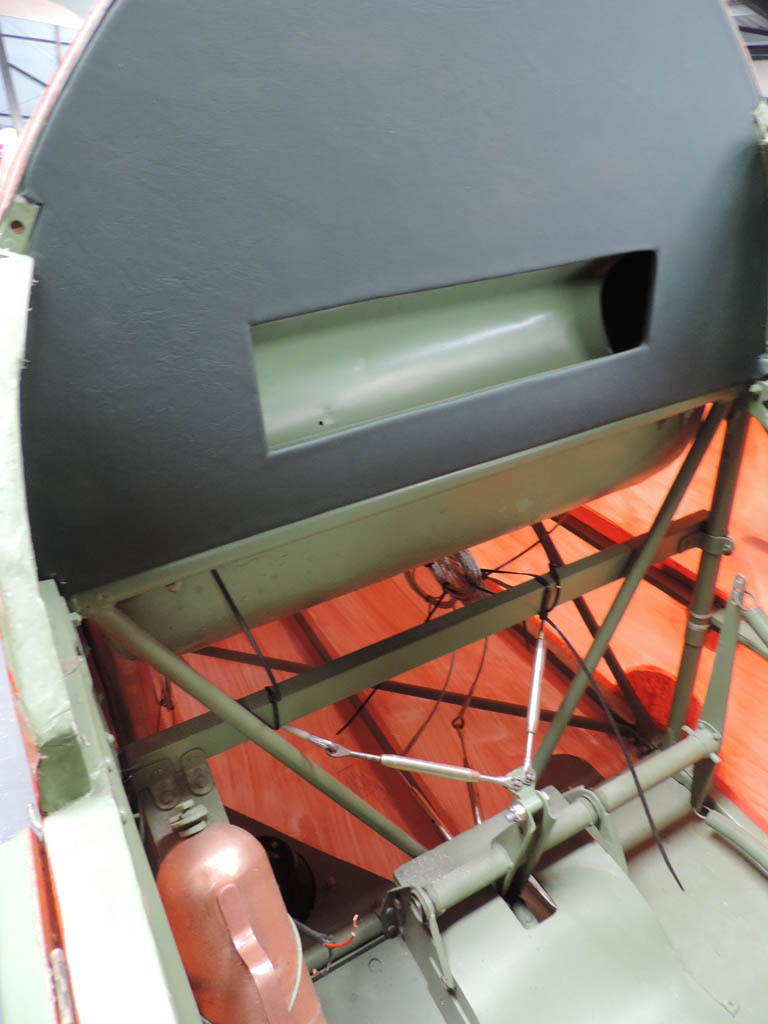
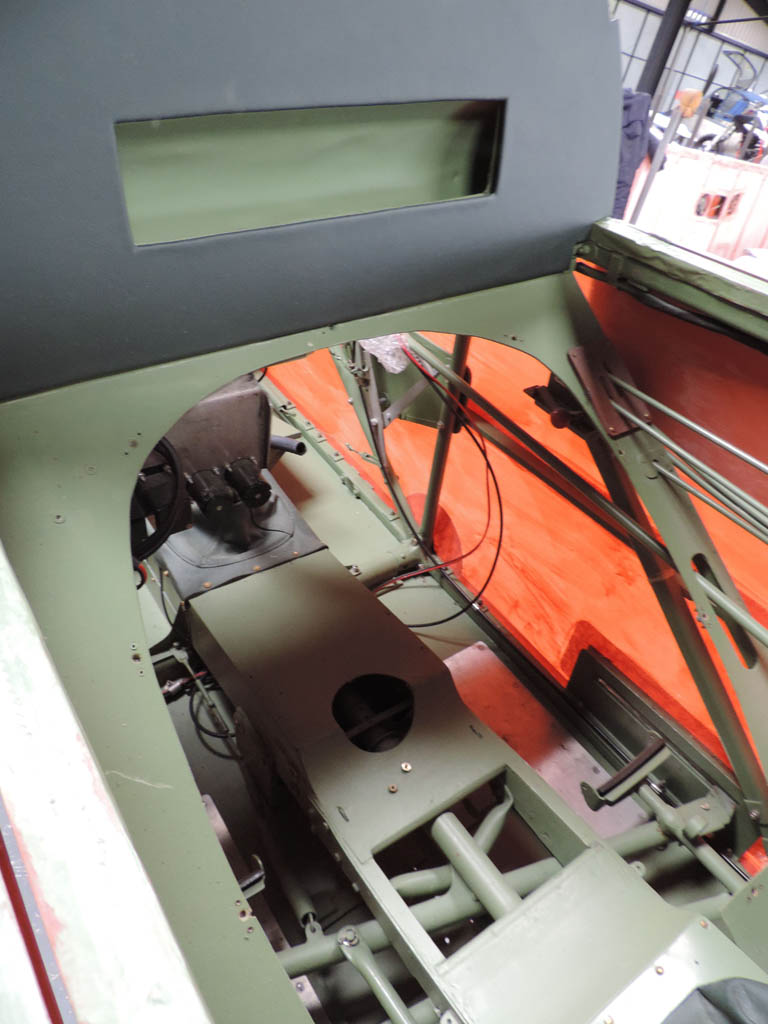
One or two bits of modern gadgetry have been fitted, most noticeably a radio/intercom box, but essentially these are WW2 standard.
So what's in the kit boxes? It varies quite a lot in content and standard:
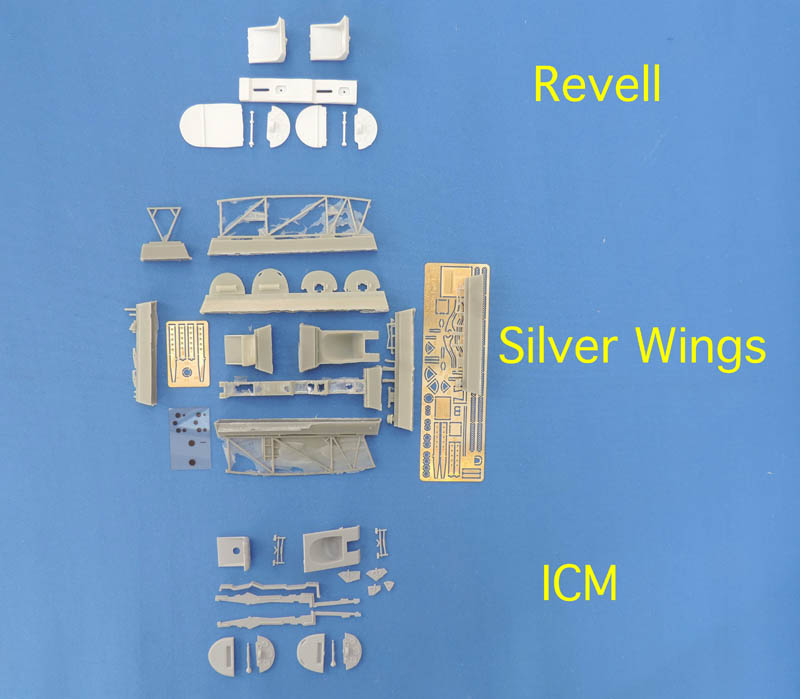
You can see that the 1978 Revell-based kit is pretty simple...and wrong! The front seat should be very different from the rear one, both Silver Wings and ICM have this right but ICM's looks a bit tight to me. Compare Silver Wings front seat with ICM’s then look at the last picture of the Moth under restoration, Silver Wings looks right to my eyes.
The Revell instrument panel is also a disappointment, and sadly 50 years on ICM seem to have taken little more effort to make something more presentable—half a compass moulded into the IP doesn't do it for me and means surgery and scratch-building almost immediately with either kit. On the Revell kit the bulkheads behind the pilots' heads don't include the horizontal slots, but that is where the seat belts are attached.
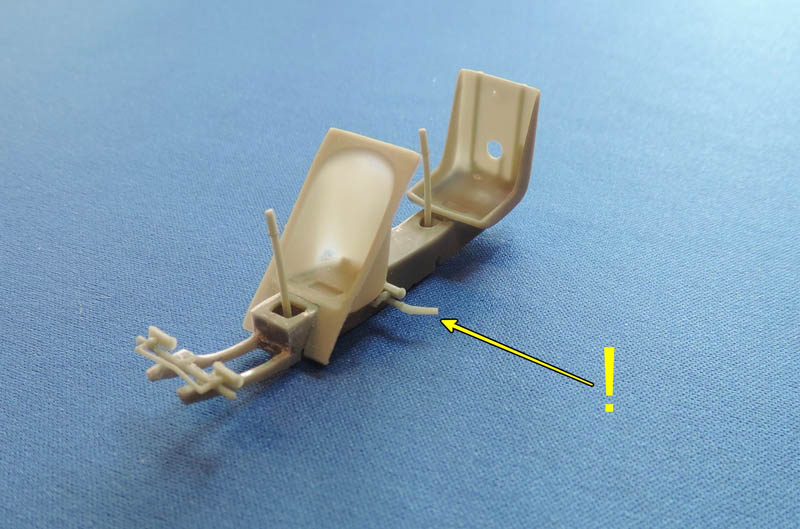
The Silver Wings kit is by far the most detailed, the most complicated, the most challenging and the most fragile! Even cutting out the resin flash can spell disaster with the merest slip of a knife. A build up of tolerances can also lead to a very tight fit into the fuselage. Some shots of work in progress on the Silver Wings kit.
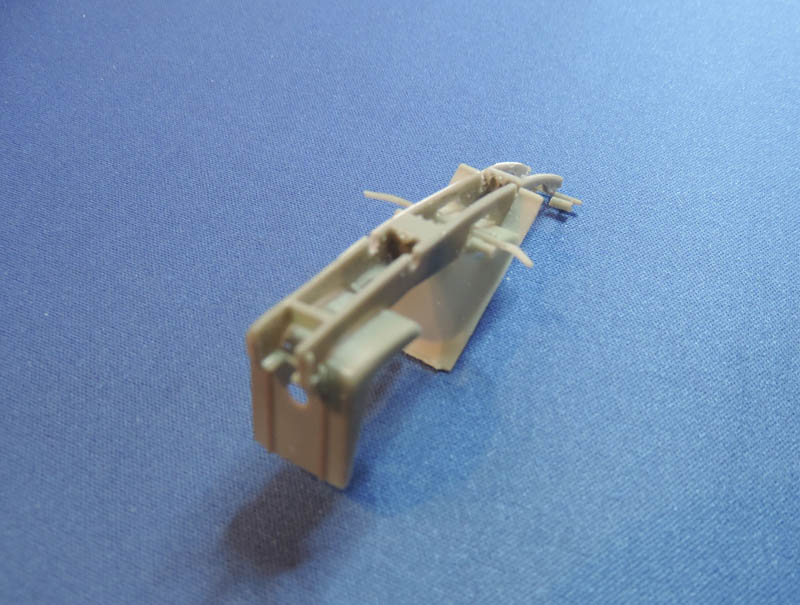
The "!" in the image below is the resin control horn in position, I thought it would probably snap off—and it did so I replaced the whole thing with a scratch-built brass piece. You can see though how fine the castings are.
The ICM cockpit is a compromise between the two, probably enough detail with the exception of the IP, without being too complicated. Leaving the front and rear side doors open will show a lot of the cockpit so there's a lot of potential and reason to spend time getting the cockpit right.
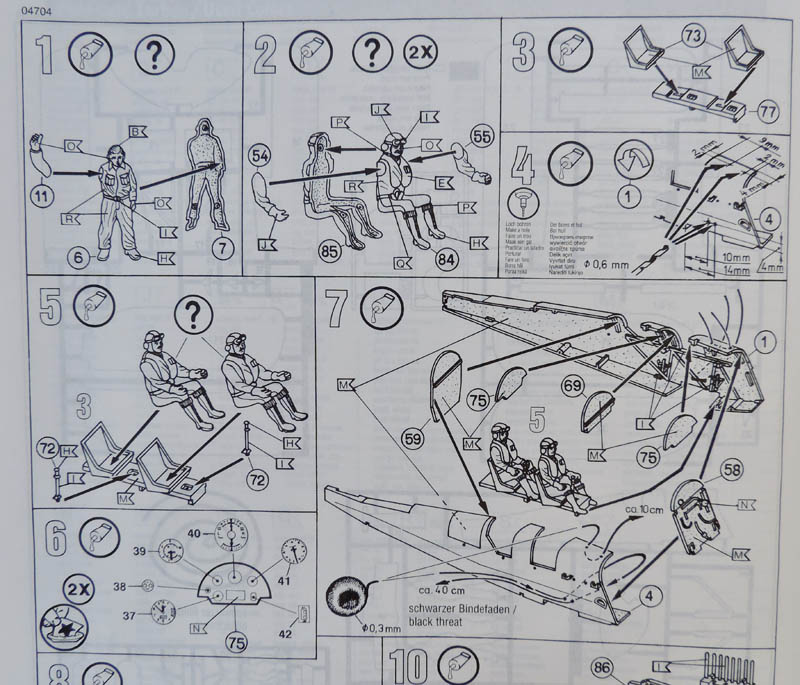
Extracts for the cockpit build-up from the instructions give an idea of what each demands in modelling input. Firstly Revell.....stages 3, 5 (at a push), 6 and 7....that's it.....simple!
And it fits in here:

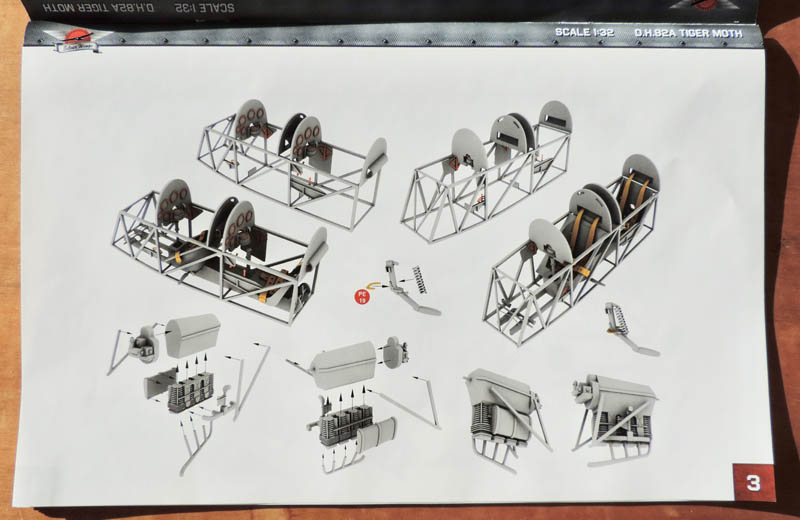
You'll notice the Silver Wings internal fuselage just has location points, here are their instructions:
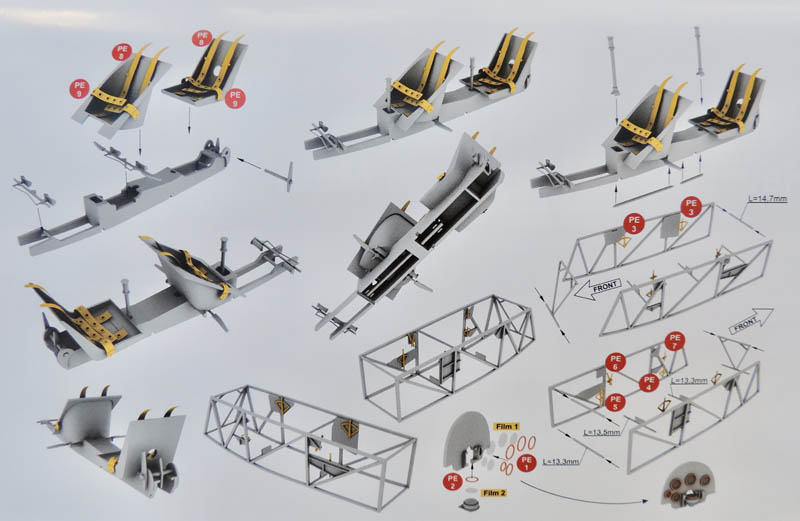
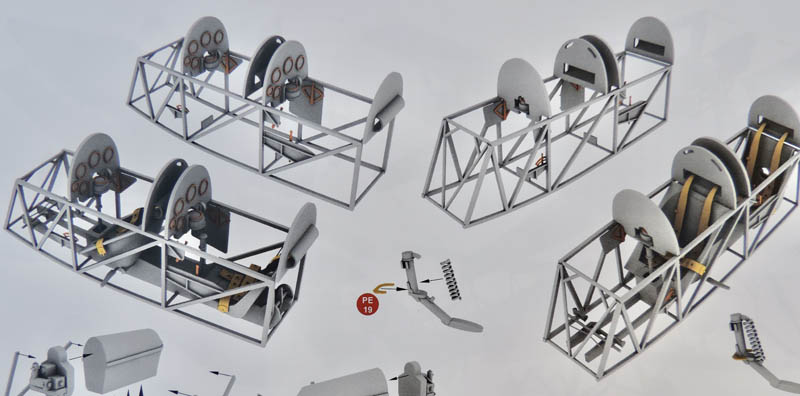
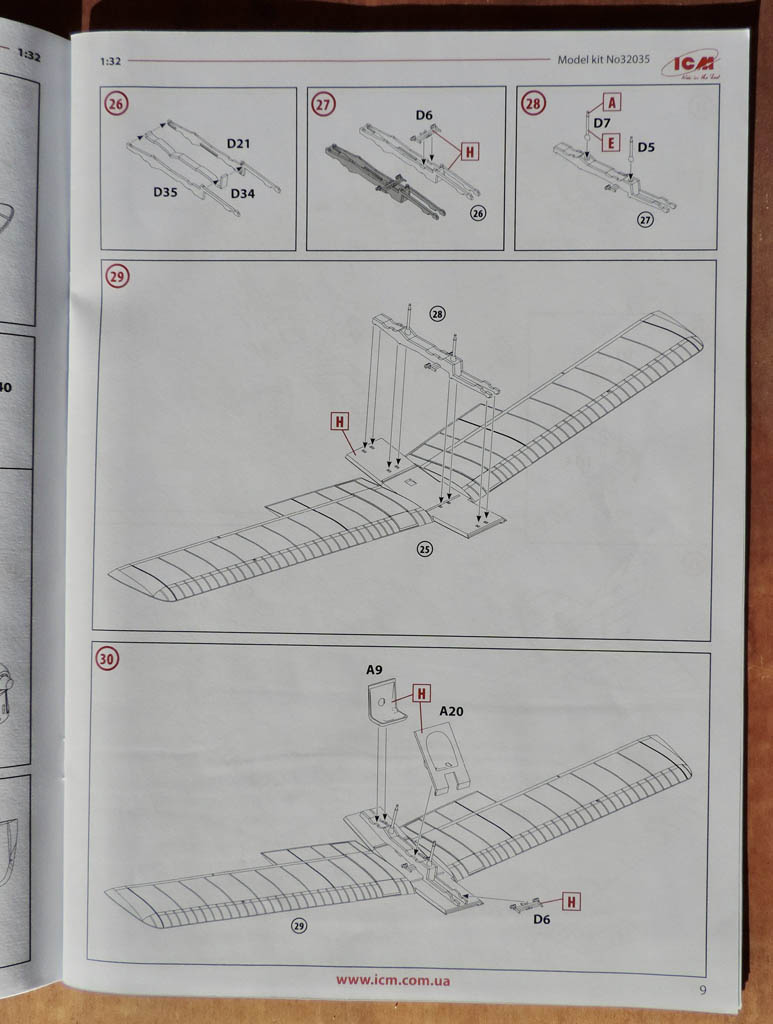
And the ICM fuselage has some good looking frames moulded in place, their instructions:
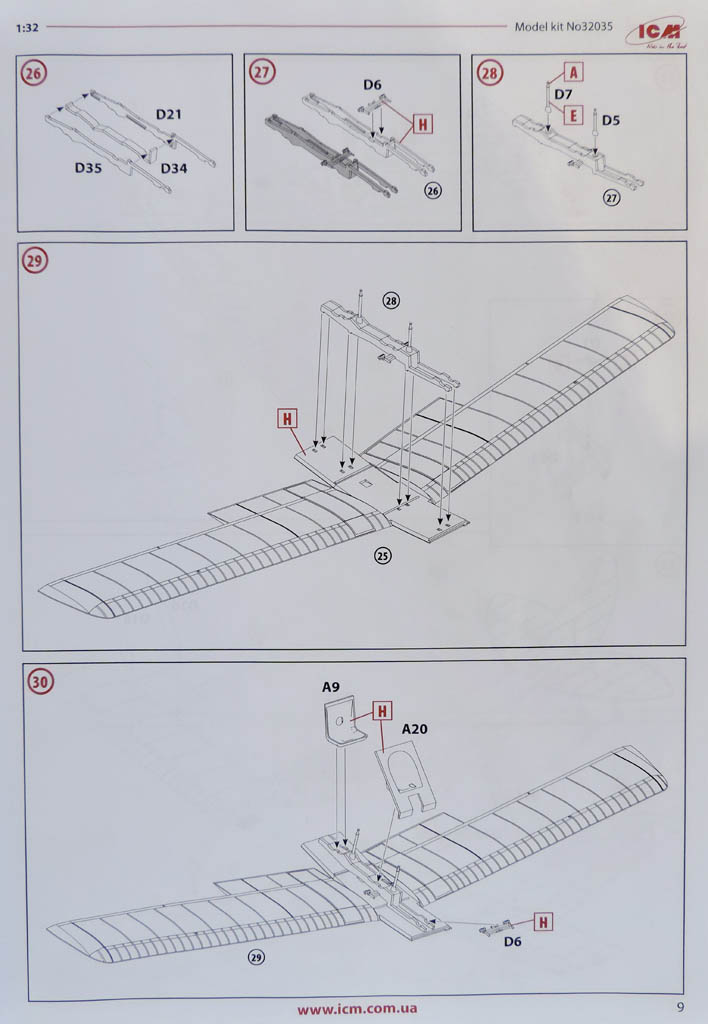
I think like the idea of putting the main control box and seats onto the wing and thence into the fuselage at a later stage, though if you want to add the control lines for the throttles for instance it doesn't work so well because those lines run through the whole cockpit, front to back.
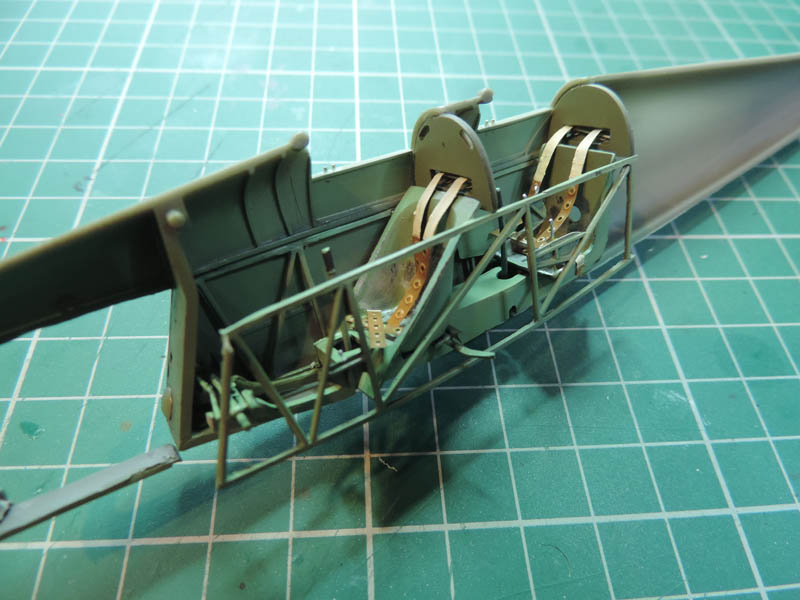
Wartime Tiger Moths were fitted with simple four-point Sutton seat belts, Silver Wings is the only kit to provide these in photo-etch form:
That I think just about ties up the cockpit area, I guess you pays your money and takes your choice as to how detailed you want it to look, I think most modellers will spend a lot of time here.
Part 4: Wings
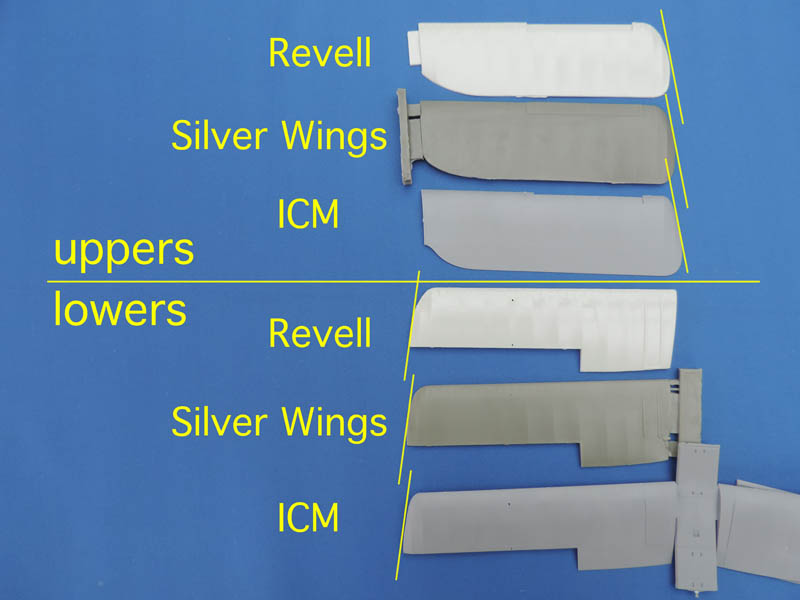
Each of the three producers have gone their own route with wing design. More traditionally the Revell kit wings each comprise an upper and lower half, on the upper wings separate slats/slots (whichever expression you wish but both are right) and on the lower separate ailerons:
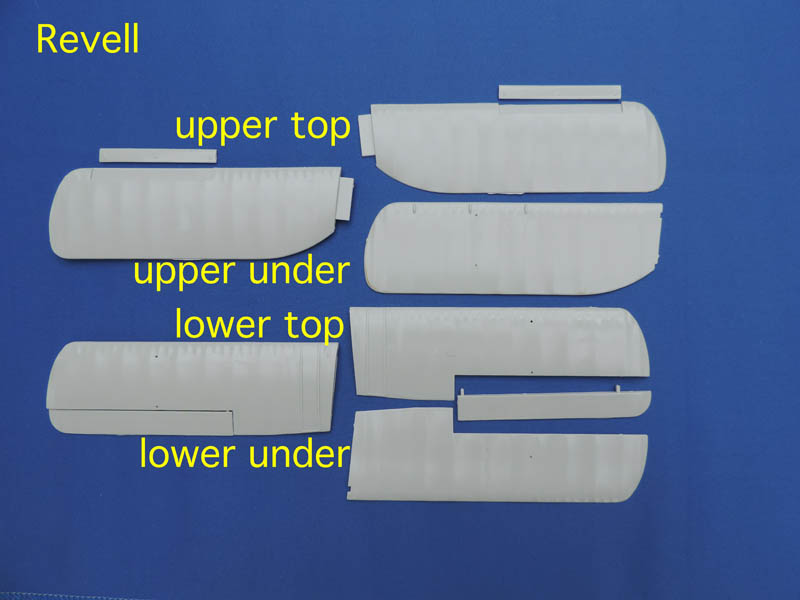
Attachment points for the interplane struts are pre-drilled.
Being resin, Silver Wings have gone for a one-piece construction for each wing:
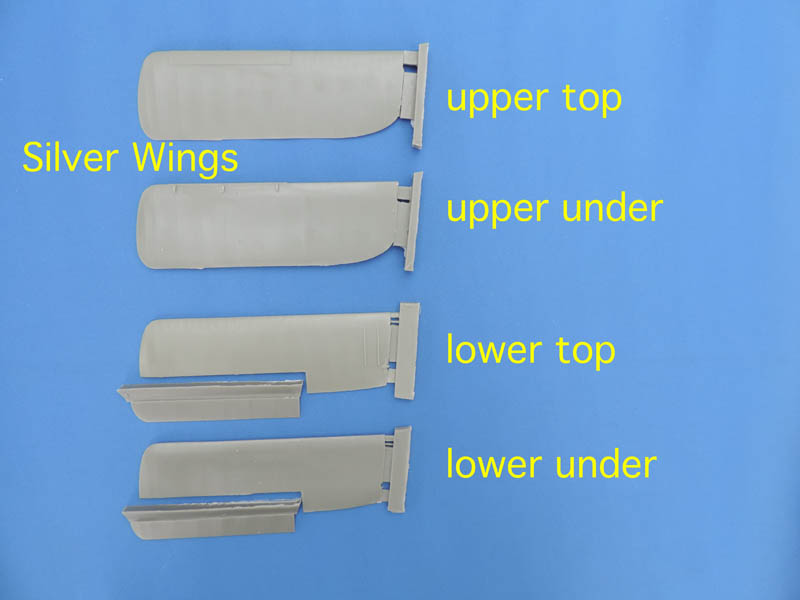
Slats are moulded with the upper wing but ailerons are separate on the lower. Attachment points for the interplane struts are shown but need to be drilled out, be very careful not to drill all the way through.
ICM is the company who diverge the most with a one-piece port/starboard upper on the top wing and under on the lower wing:
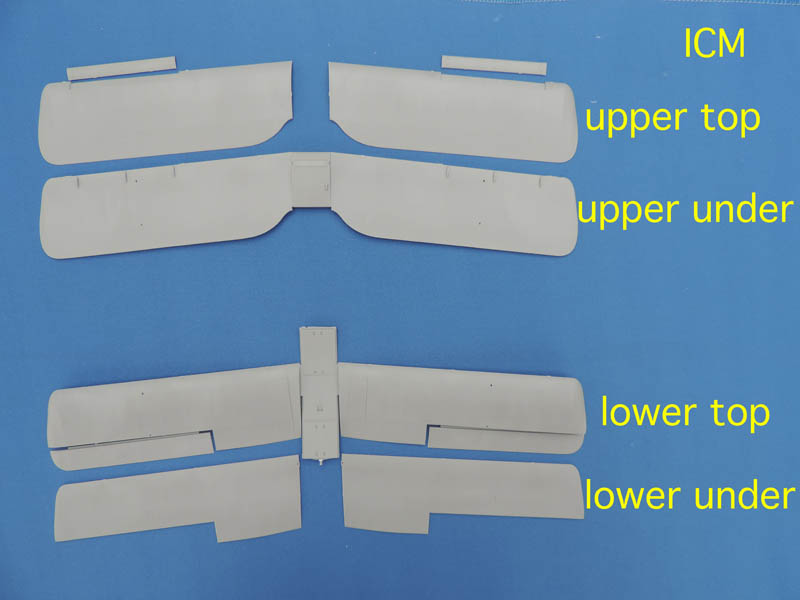
Slats and ailerons are separate. Attachment points for the interplane struts are pre-drilled.
Ribbing on all three is (too?) subtle and well represented:
...and the real thing:
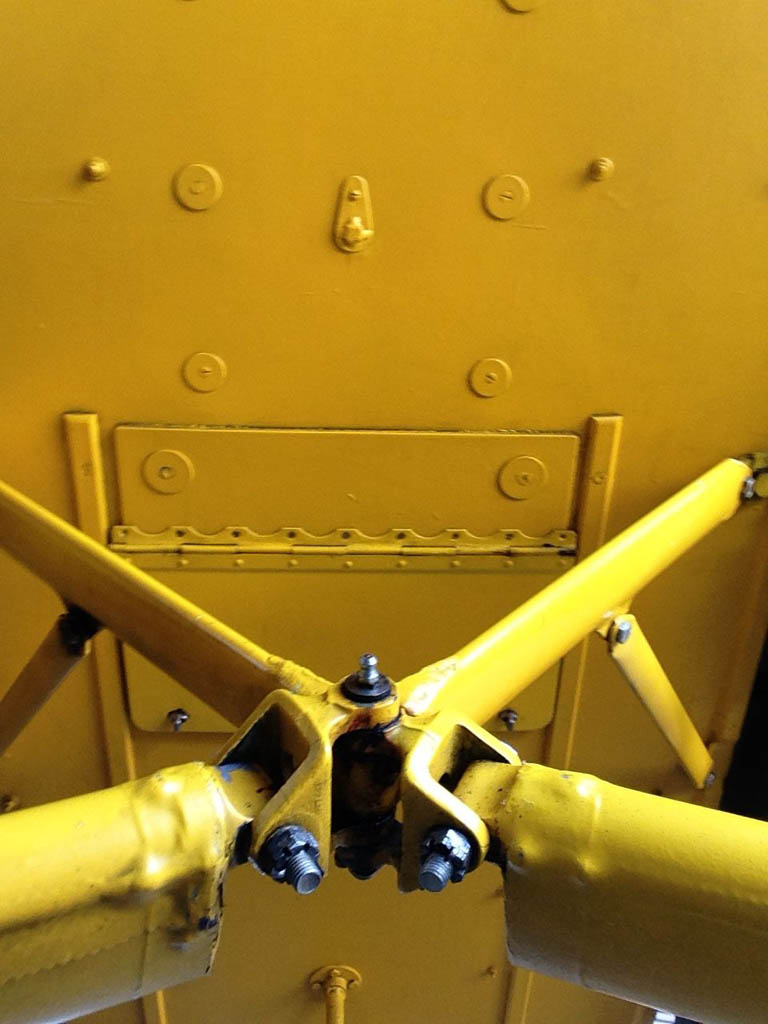
The walkways either side of the cockpit are shown on each, and again a detail from the real thing:

Whatever you do, you don't walk on the "X"!
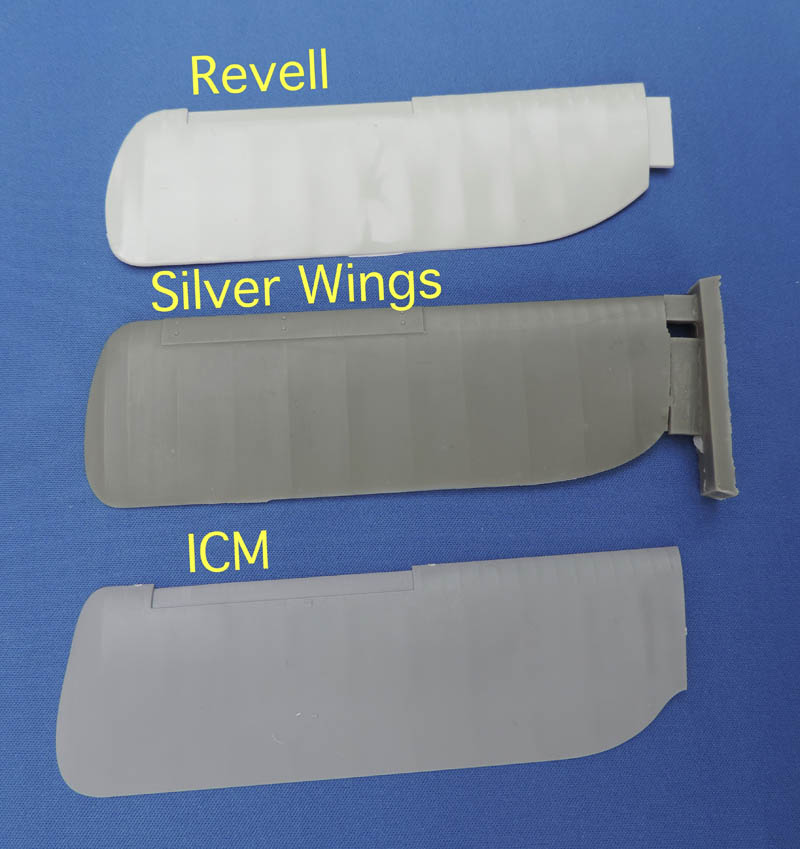
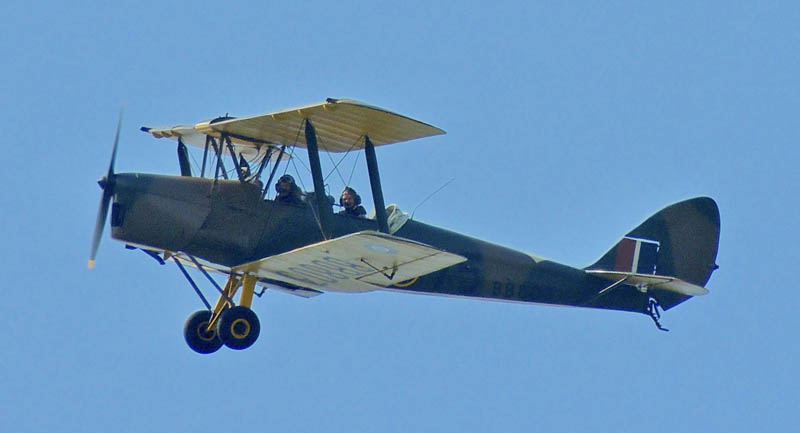
Looking at the shape of the wing tips, there is quite a bit of variation:
And it's difficult to judge which is the more accurate:
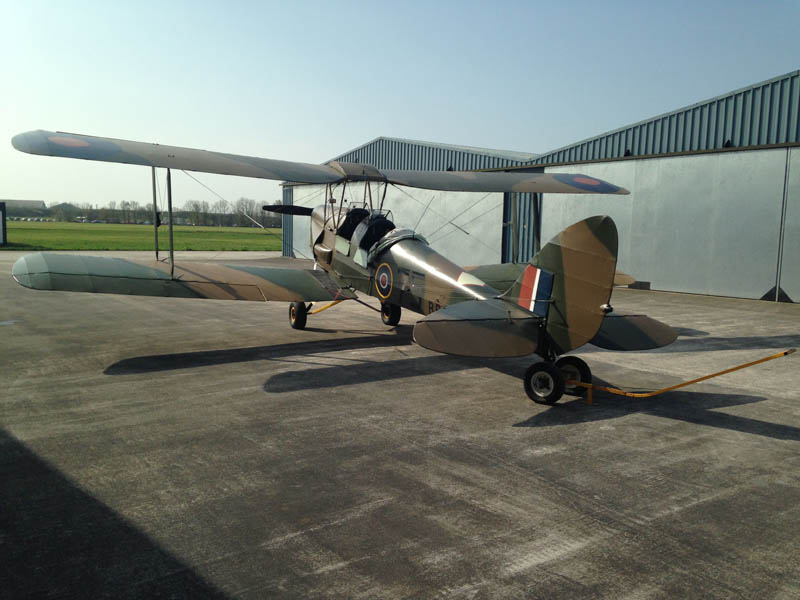
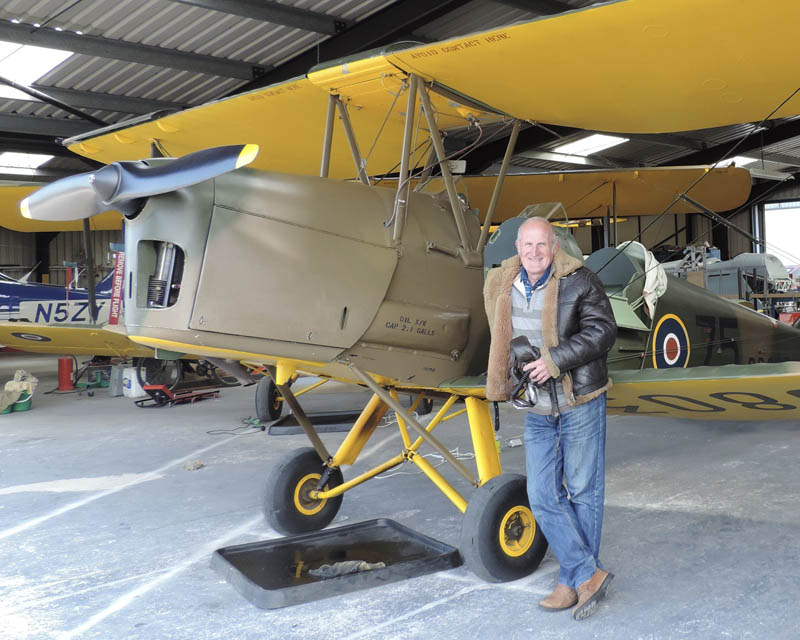
Definitely looks more rounded like the Revell kit, but...looks flatter like Silver Wings and ICM (yours truly at the controls!):
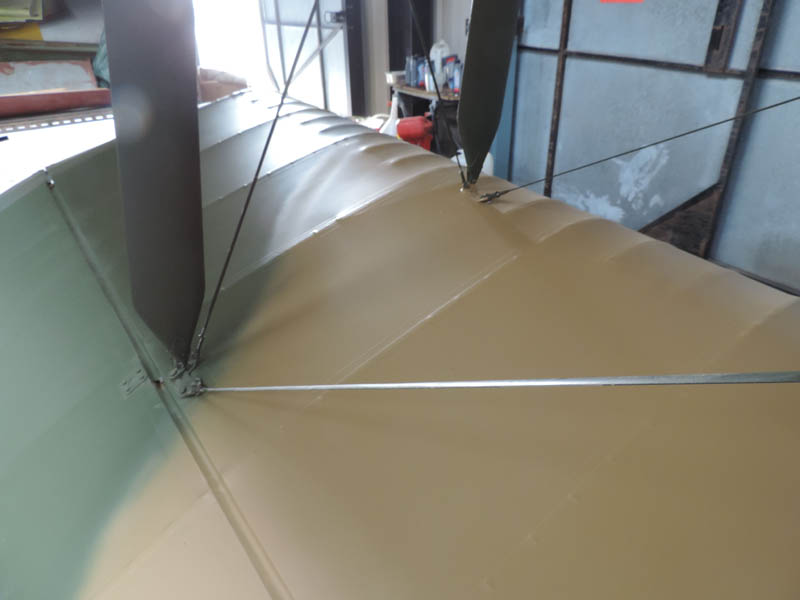
Again, some differences on the upper wings where the trailing edge meets the fuel tank:

Really not keen on the "swan neck" of the ICM wing; compare:
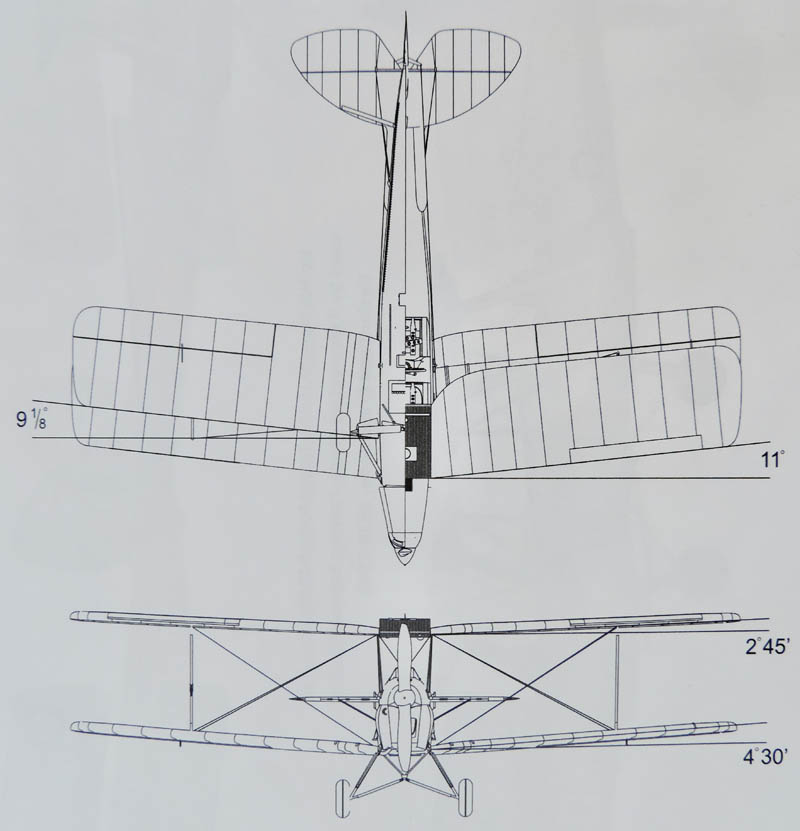
So, with such straightforward things as wings, quite a lot to consider, and that's without even mentioning (say it quietly)...DIHEDRAL!
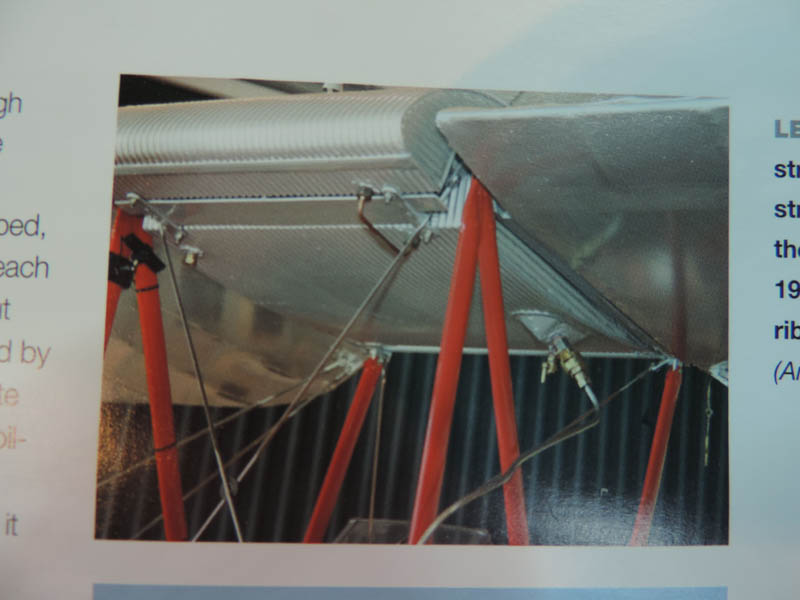
Part 5: Struts
There are two procedures with making model biplanes which can be rather frightening - one is getting the top wing on so that it sits properly in all planes, and the other not unrelated one is rigging.
The Revell Tiger Moth has been dogged by one particular issue for those who care about the correct "sit" of an aircraft, and that is the dihedral of the lower wing, which is too flat. This is primarily due to the way in which the wings are attached to the fuselage and the length of the struts. This is what the noted Moth expert John Adams has to say:
"The problem is they are over scale with the result that the very characteristic different top and bottom wing dihedrals of the Tiger are thrown out which gives the wrong "sit" to the aeroplane. The front struts should be (in 1/32 scale) 44.5 mm long and the rear struts 45.25 mm long."
This issue wouldn't have arisen if the design of the actual Moth hadn't needed to be changed!
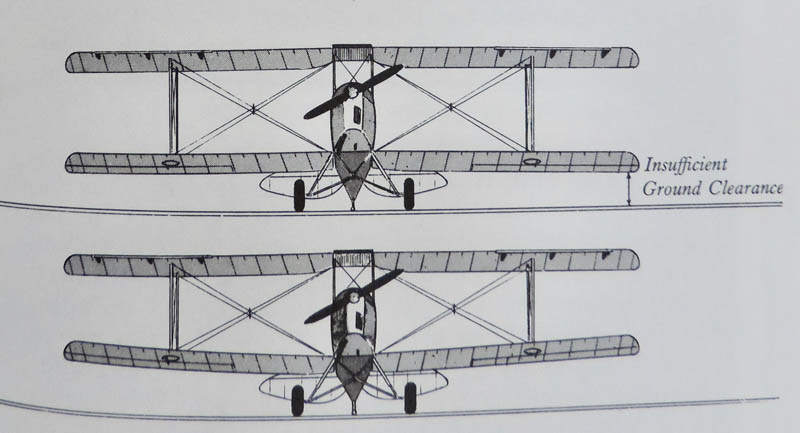
The original design of the line of aircraft that ultimately evolved into the DH82 Tiger Moth had the fuel tank directly above the pilot, this made an emergency exit by parachute very difficult indeed. It was found that moving the tank further forward adversely affected the centre of gravity, so to bring the plane back into balance the wings were swept back. This in turn caused problems with ground clearance at the wing tips, especially on rough grass airfields, and the answer to this was to shorten the inter-plane struts which lifted the lower wing at the tips. This of course increased the dihedral of the lower wing!
Given those issues, how do the struts compare?
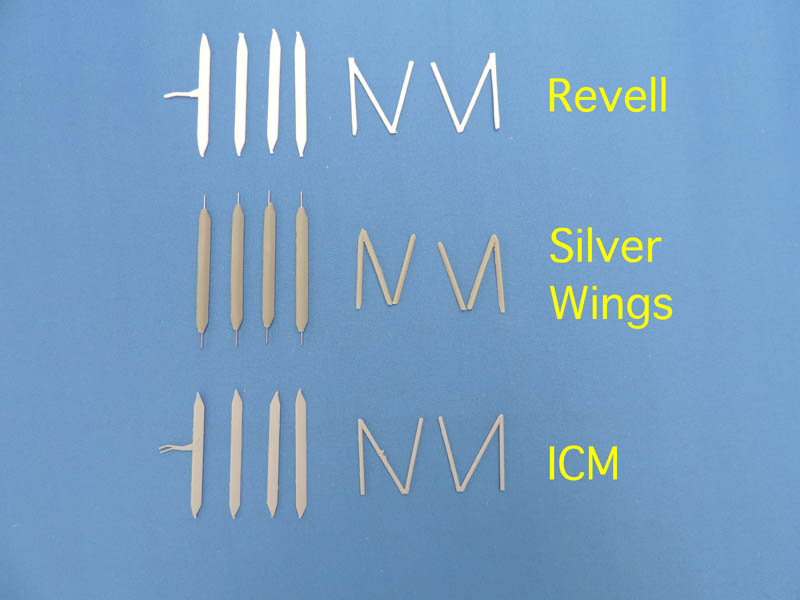
The fundamentally different ones are Silver Wings of course. Cast in resin, they use their traditional technique of having a wire core for strength. A small problem arises in that the wire that protrudes at either end is too long for the thickness of the wing and no guidance is given about the length that the wire should be cut, so it's trial and error. They do however give a very secure fix once in place. These struts are also noticeably thicker, more robust, than the other two. Whilst the pitot head is moulded fully on the ICM one, and well detailed, the moulded Revell one is rather crude and Silver Wings supply it as PE to be attached to the strut.
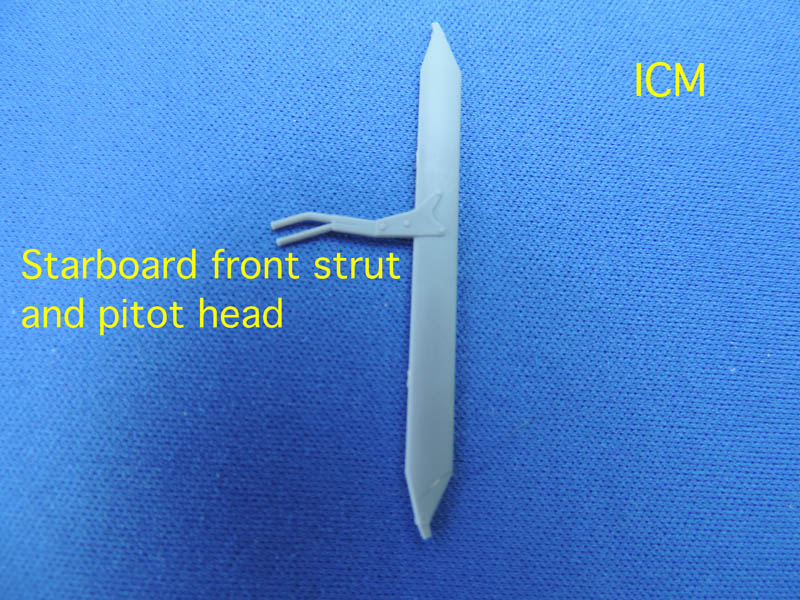
Oops, upside down!
Given what John Adams said about strut length, I measured the three with my trusted callipers:
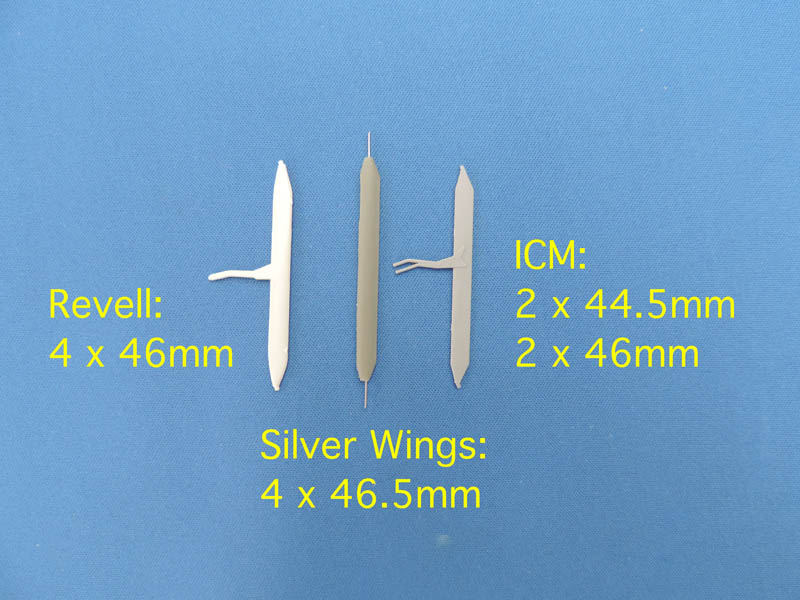
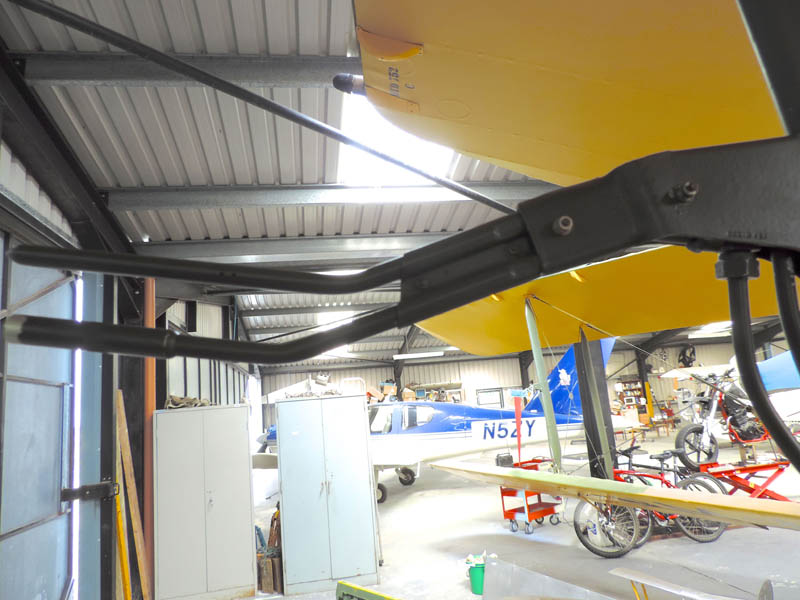
The slight difficulty of course in shortening the Revell struts is that you lose the locating spigots, drilling and inserting wire "a la Silver Wings" is the best solution. ICM obviously paid some attention to John's advice, though differing slightly in length. The shorter ones are the front ones. There are some minor differences in profile, so some actuals for comparison:
I like the ICM ones very much.
Moving onto the cabane struts, again Silver Wings differ with a two piece structure:

It's another piece to hold when you might already be needing three hands, but no big deal. A nice detail from ICM's port cabane strut:
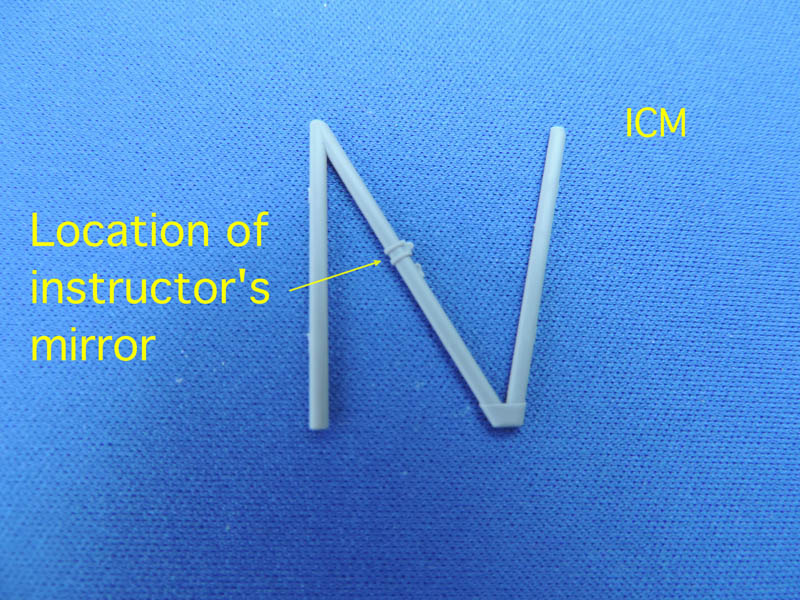
(The cable running up the cabane strut carries the electrics for the navigation lights so won't be present on all Tiger Moths.)
Measuring each leg of each cabane strut for the three kits revealed very little difference, only the rear leg varied by 1mm in each - 29mm for the Revell, 27mm for Silver Wings and 28mm for ICM.
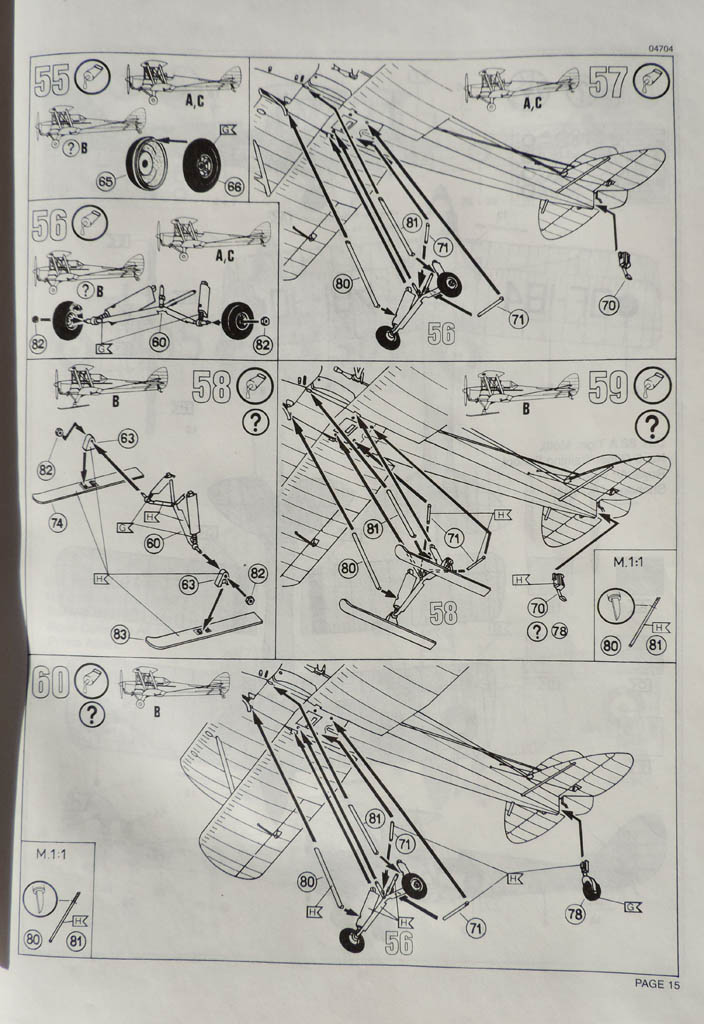
How do the instructions compare for this fiendish task? Revell's:
But if you're doing the Canadian version, different inter-plane struts:
Silver Wings...hmm:
And ICM, though I was hoping for the same style they used on the Gladiator which was quite a large "seat" which helped alignment.

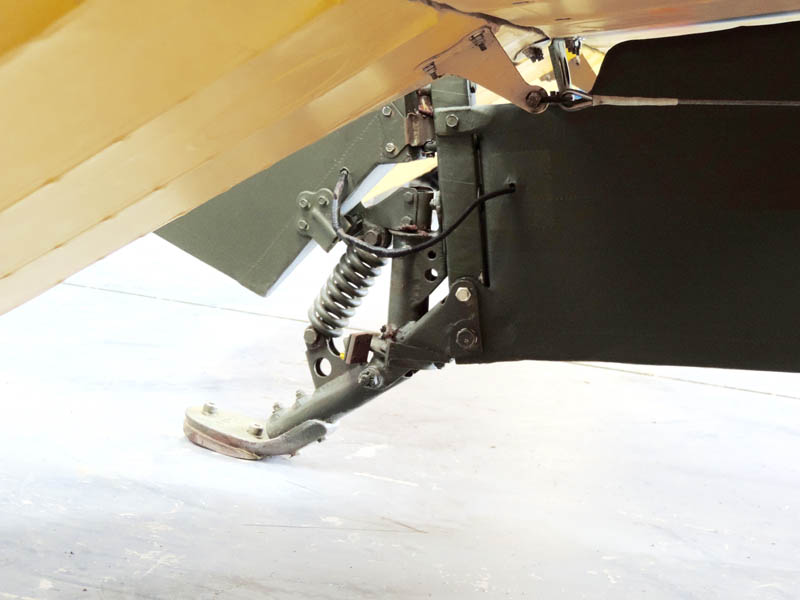
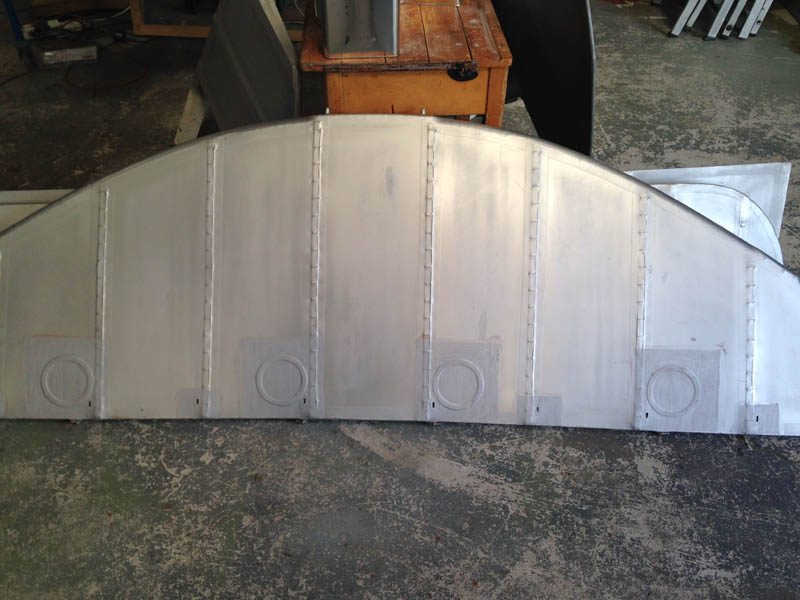
Part 6 - The Empennage
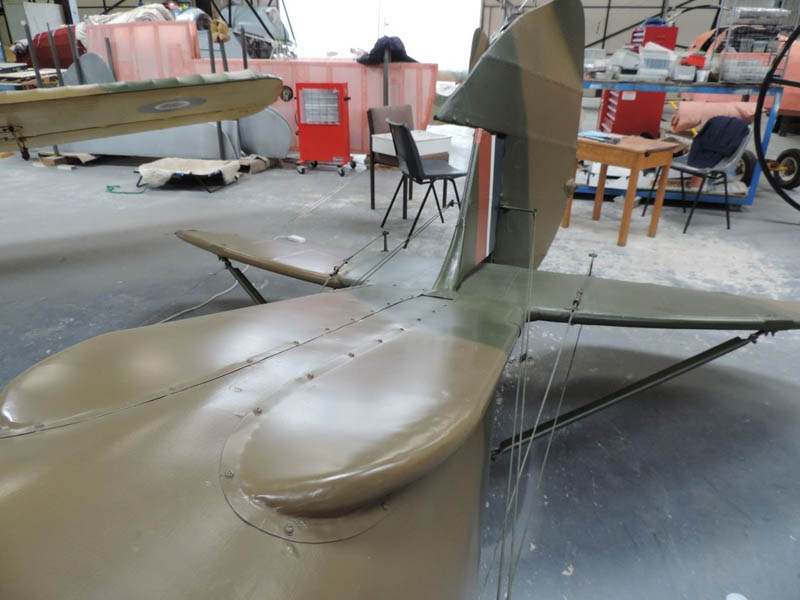
I had built a couple of Tiger Moth kits in smaller scales, including John Adams lovely 1/48th Aeroclub one, before I became "intimately acquainted" with the real thing. So when I had the golden opportunity to crawl all over one, or "Fill your boots" as Annabel (one of the pilots) said, I was surprised, nay even shocked, when I saw this:
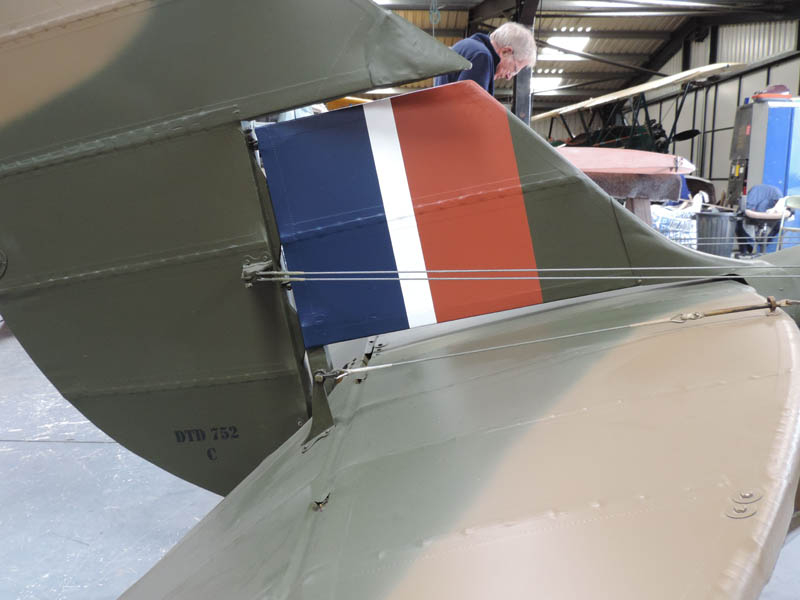
I never realised that there were those yawning gaps between the fin and the fuselage, and the rudder and the fin. Equally:
Underneath the horizontal tailplane and fuselage! Bit of a game changer when it comes to modelling accuracy and not one that is often appreciated. So I'm interested to see how it's dealt with in the kits. Again, big variations in what's supplied:
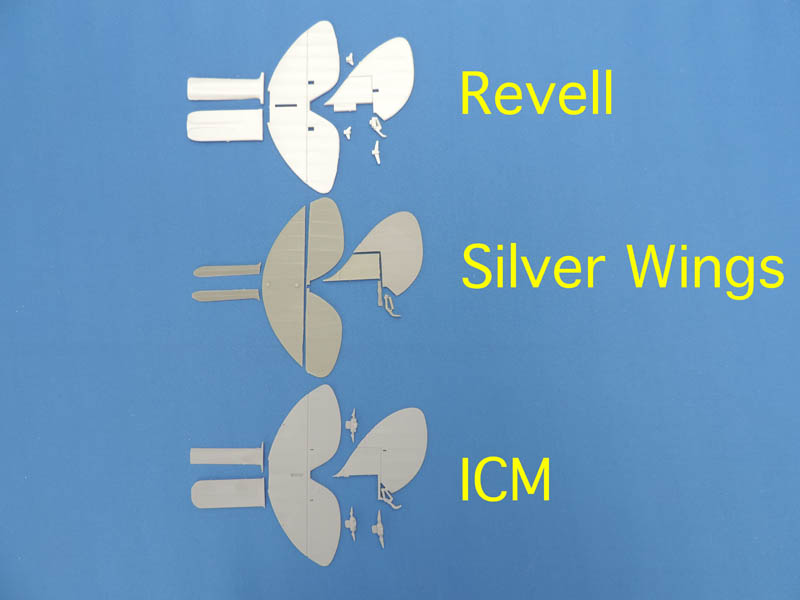
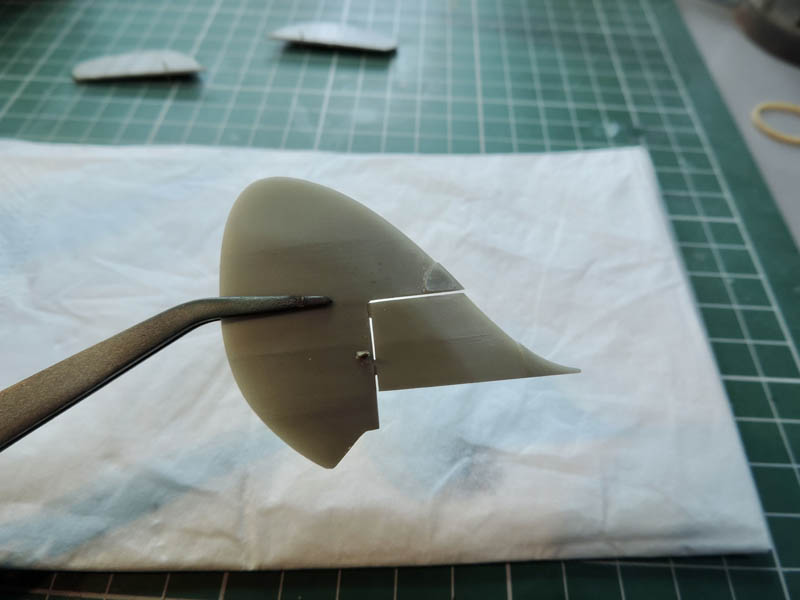
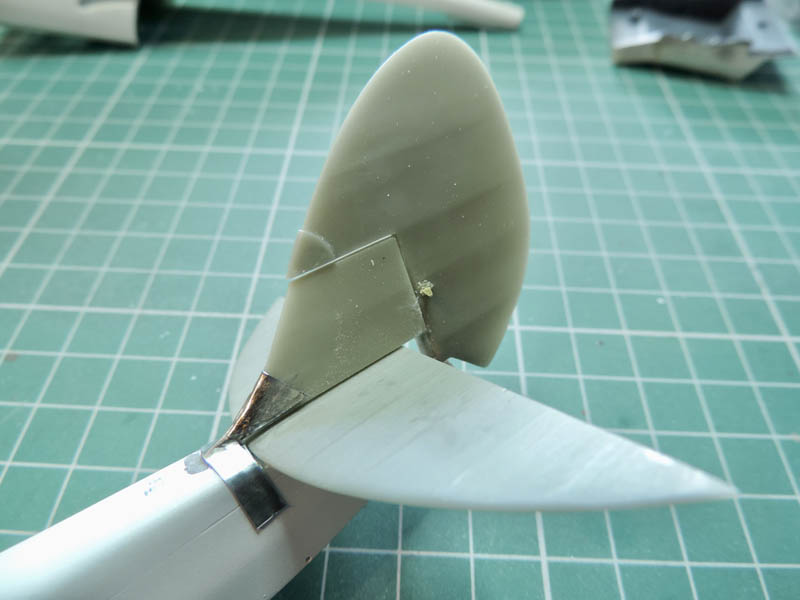
It's no surprise to see that Silver Wings is the most detailed with separate elevators, rudder and fin, the vertical pillar which is the hinge point for the rudder, a beautifully detailed tail-skid and its separate spring. In the picture above I haven't shown the control horns for the rudder and elevators because they are so small and delicate - in fact I didn't even know they were supplied initially. To be honest I'm not sure how they would cope with having rigging elastic attached, the tension could easily dislodge them? I made some from brass!
Talking of which, the Revell offering. As might be expected, fairly basic and control horns which in scale would probably be about 50mm thick! Whereas the Silver Wings kit incorporates the actual structure with its gaps shown in the first photos by the use of spacers, the Revell one doesn't—it's a solid affair. This is the Silver Wings kit in progress:
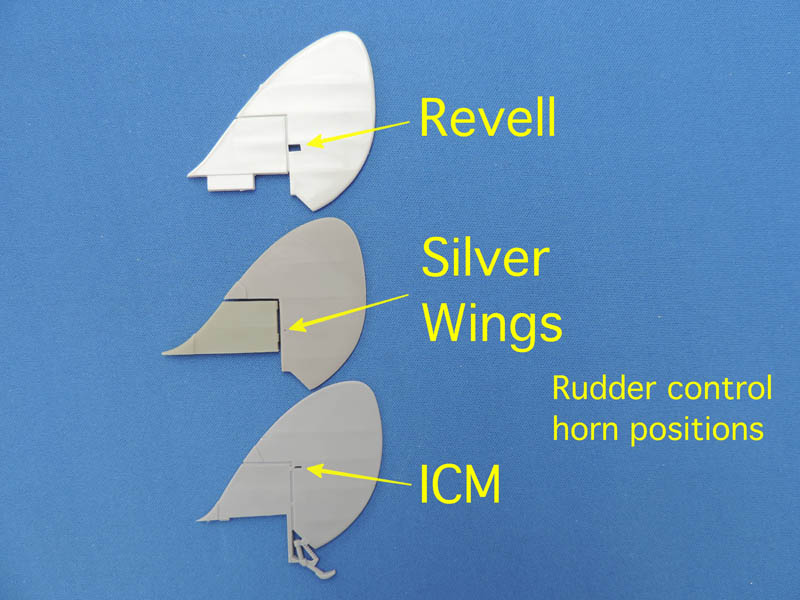
Once again, ICM are somewhere between the two - detailed (they have even modelled the square-shaped "stops" at the bottom of the rudder for the tail skid) yes, but a simple assembly. The control horns are much better than the Revell ones and manageable to fit. However I have a major issue with where ICM would have you fit the rudder control horns, so high as to be nearly level with the top of the fin. I clearly haven't seen the Tiger Moth which ICM used for their patterns, but let's say it's a surprise!
Anti-spin strakes (ugly things!):
The Tiger Moth isn't inherently unstable nor a "vicious" aeroplane to fly, until that is the powers-that-be started asking more of it than it could adequately cope with—it wasn't designed as a bomber. So again the question of centre of gravity became an issue, and those added strakes were the answer.
There is the option to make each without the strakes, what’s supplied is a one piece affair with Revell and ICM but independently moulded ones for the Silver Wings kit.
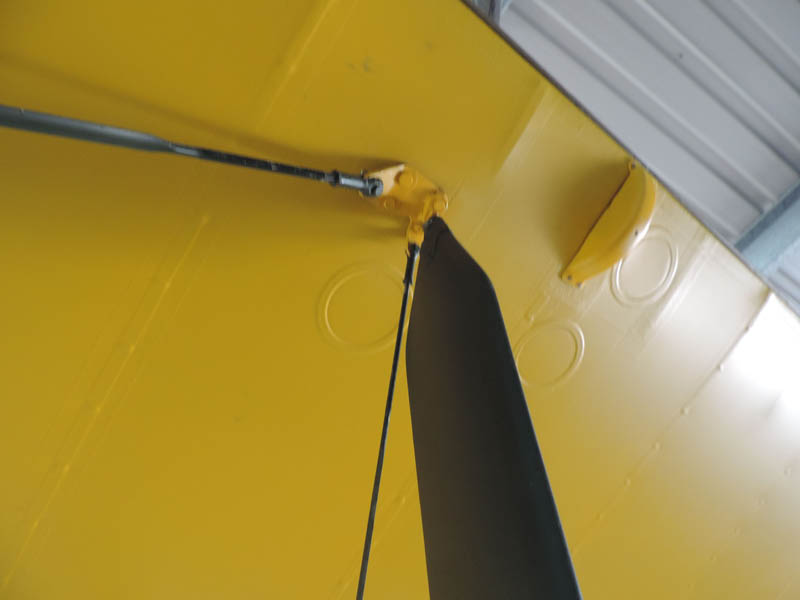
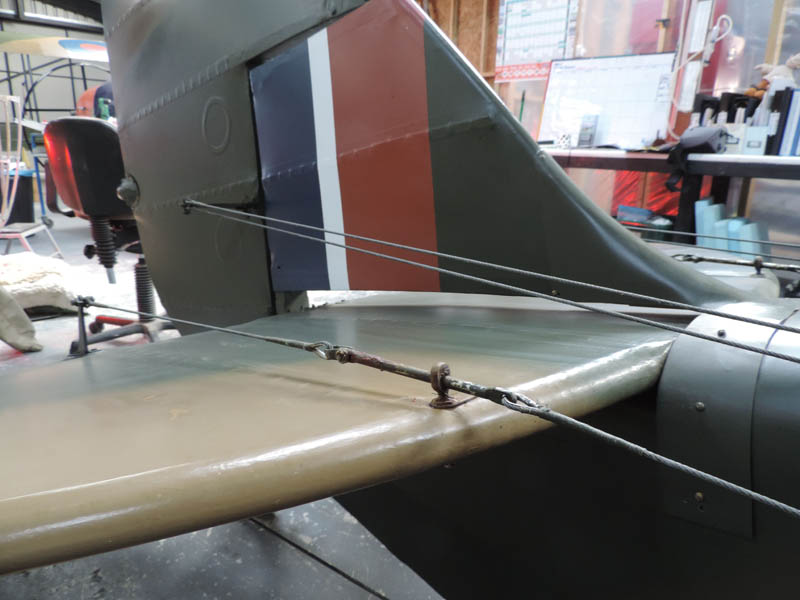
The picture below is a good one to illustrate an issue that nobody covers - look at the leading edge of the horizontal stabiliser - an "eyelet" through which the upper elevator cables run. Without this the cable would of course rub against and ultimately cut through the stabiliser.
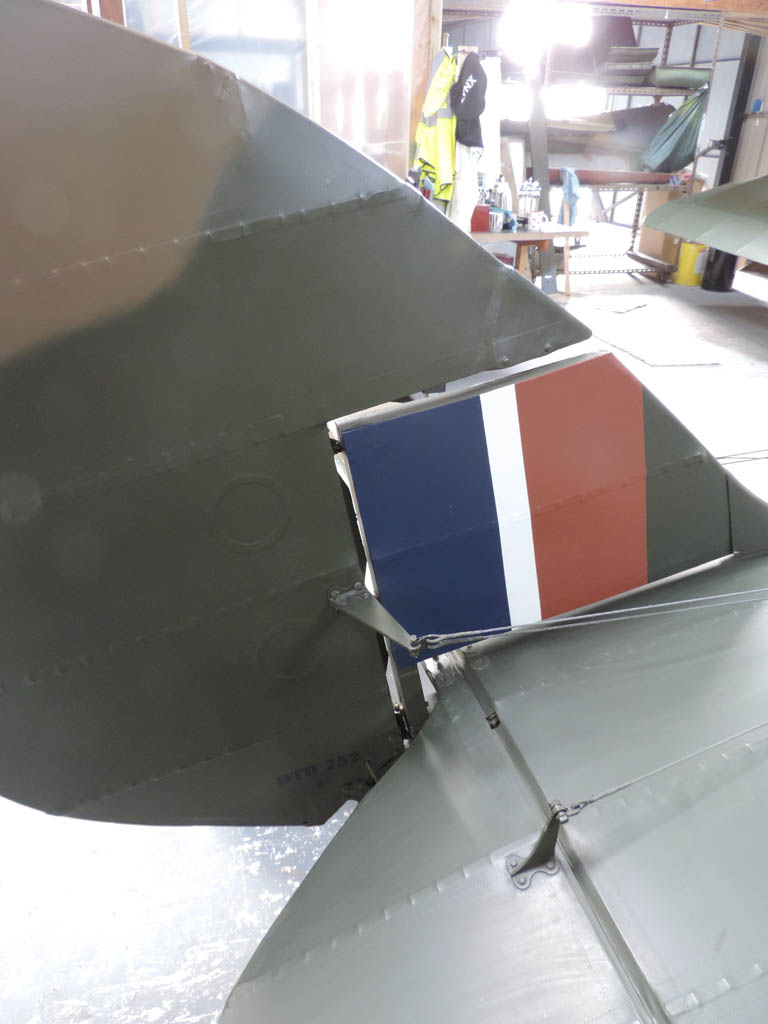
There is another always missed item, though both Silver Wings and ICM make a token gesture towards its existence:
There's a metal fairing which covers the front of the fin, extends forward and wraps down the side of the fuselage. The forward corner of the rudder also has a metal cap which is moulded both by Silver Wings and ICM.
I think that's about it, just a little more eye-candy to finish with!
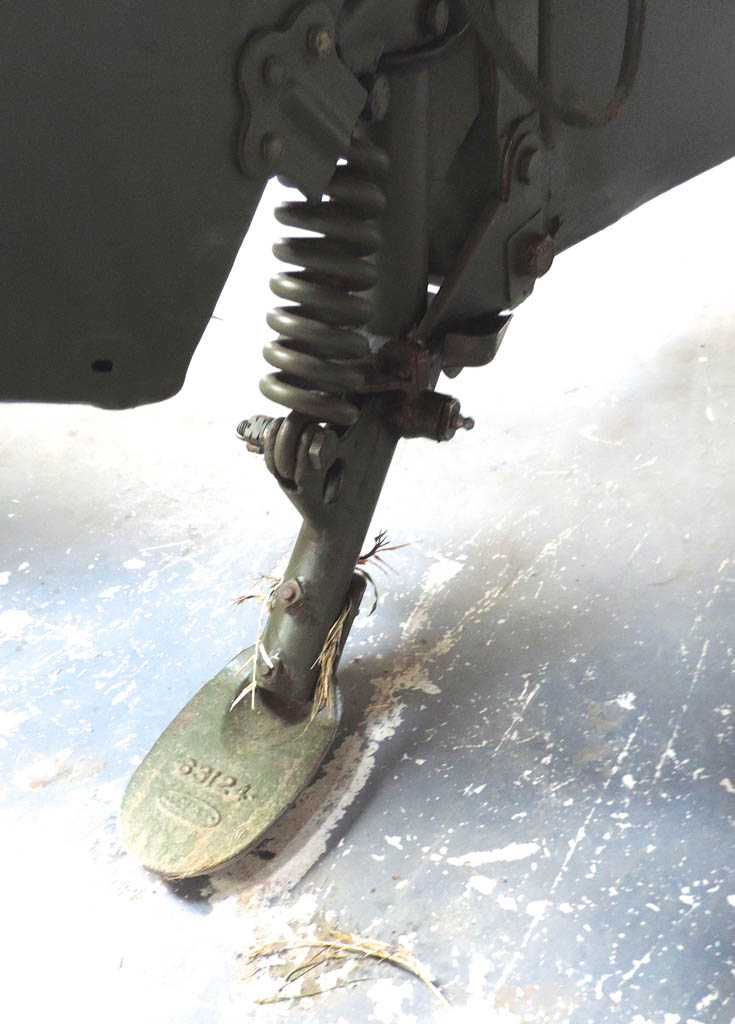
Part 7: Undercarriage
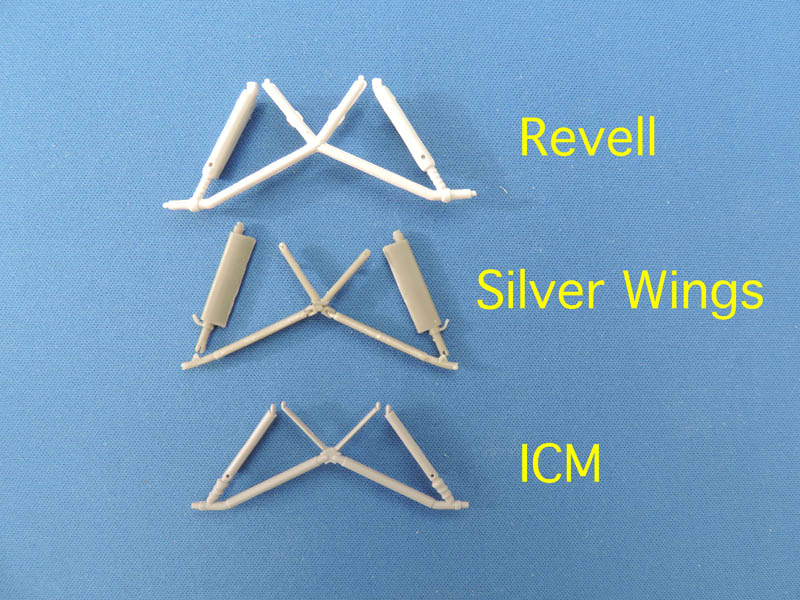
This is another area where Silver Wings differs markedly from Revell and ICM in the complexity and level of detail:
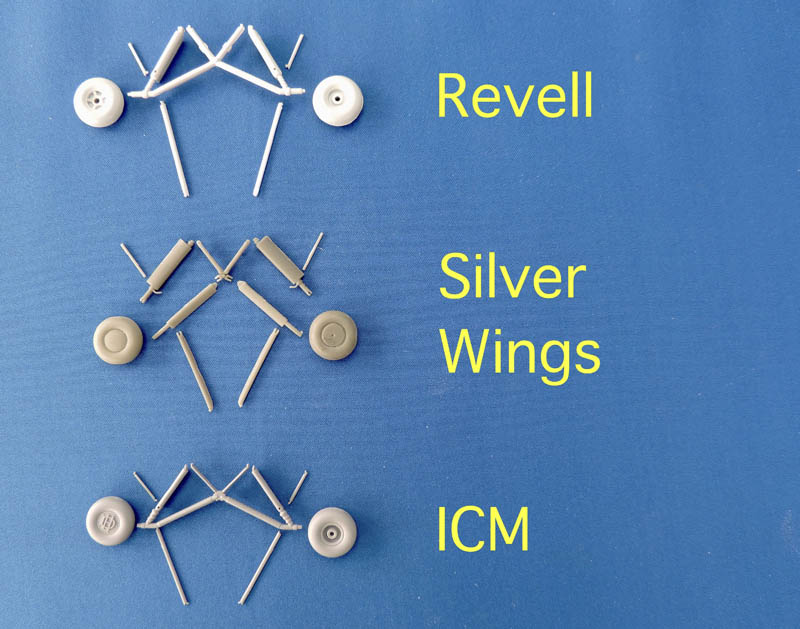
The main "W" structure comprises 5 interlocking parts from Silver Wings whereas the others are one piece.
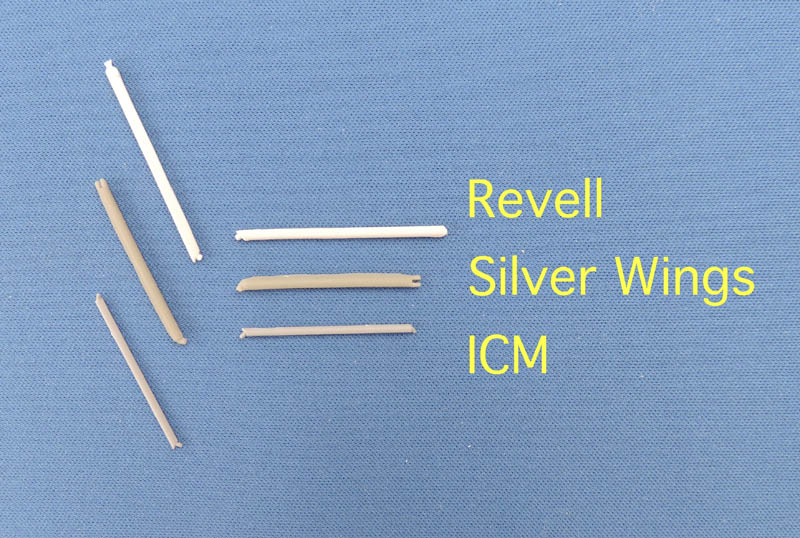
All have longer support struts, shown below which extend towards the nose, and shorter thinner ones adding strength at the back. The Revell strut is noticeably longer than the other two, the ICM one being particularly thin. The Silver Wings front struts fit very nicely over the "ears" which stick out on the main oleos.
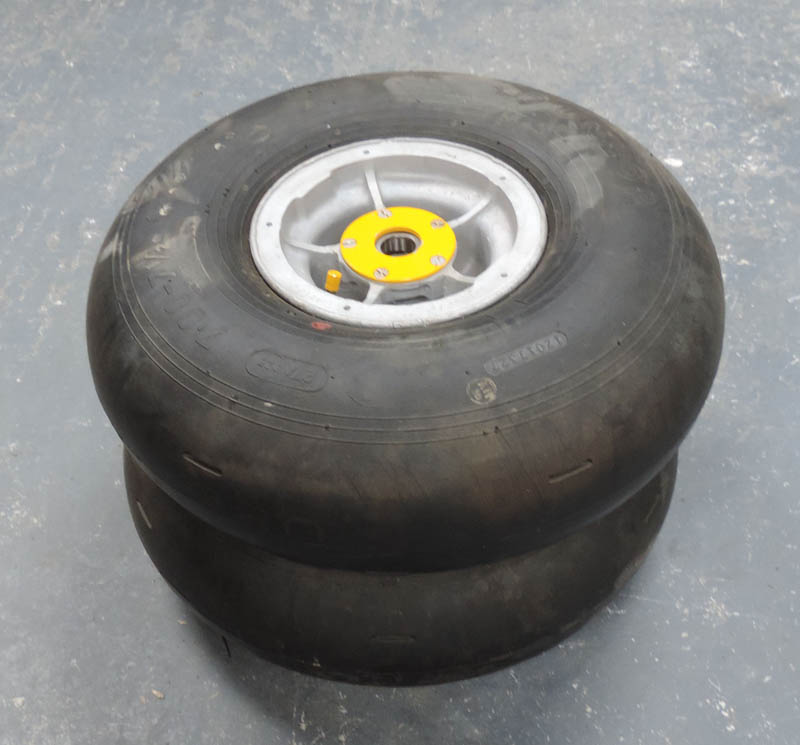
If you buy a real set, this is what you get:
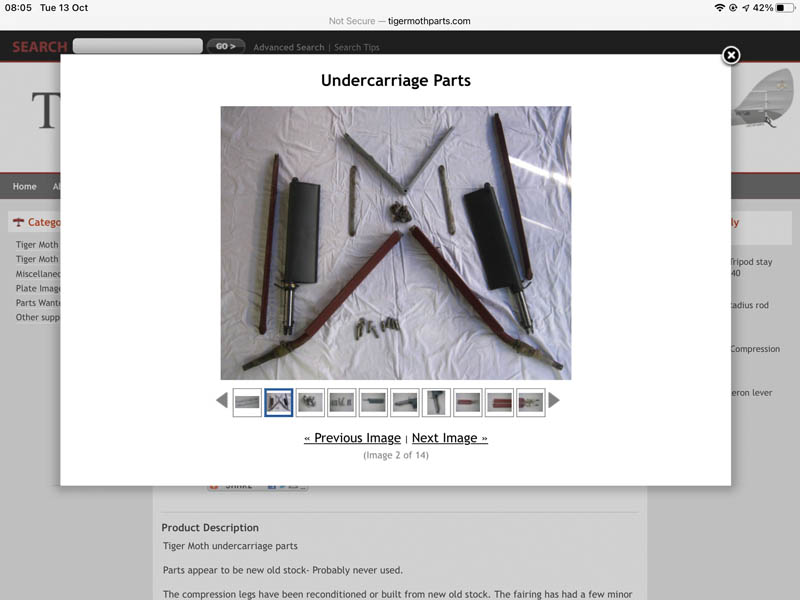
Not too dissimilar to the Silver Wings bits! Therein to my mind is Silver Wings' strength and weakness: all the parts provided in the whole kit are very detailed, very accurate and pleasing to the eye (with one exception of which more later) BUT assembling such items is far from easy especially given the lack of guidance within the instructions, not only the location of parts but also the plane in which everything rests.
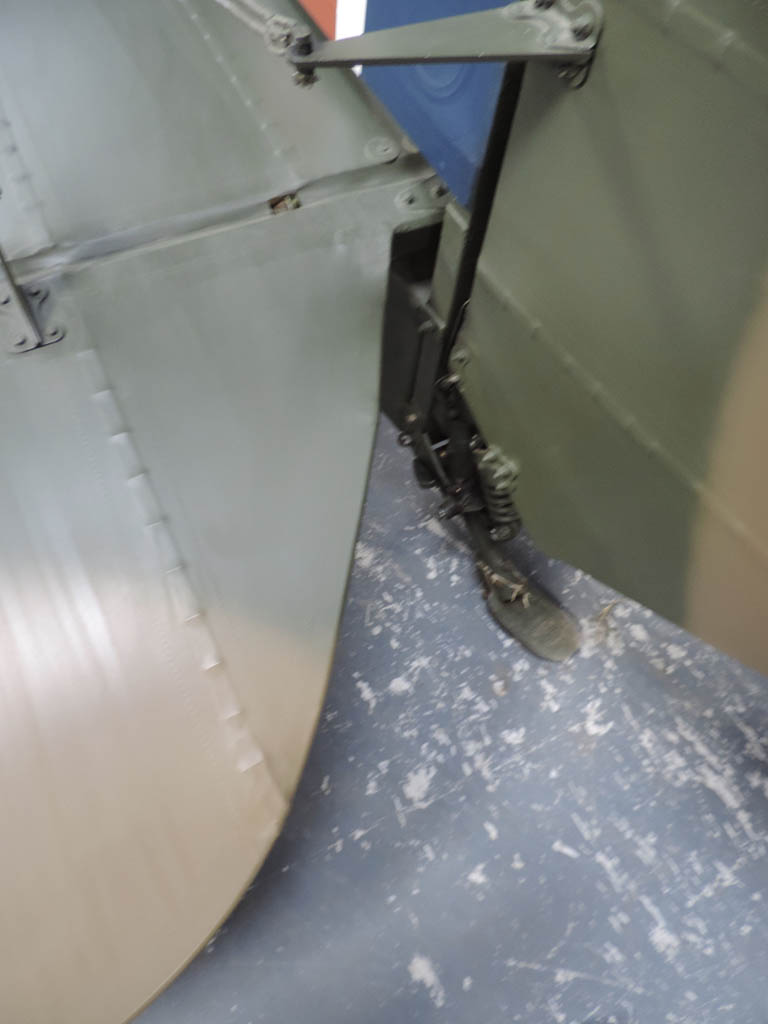
The actual undercarriage:
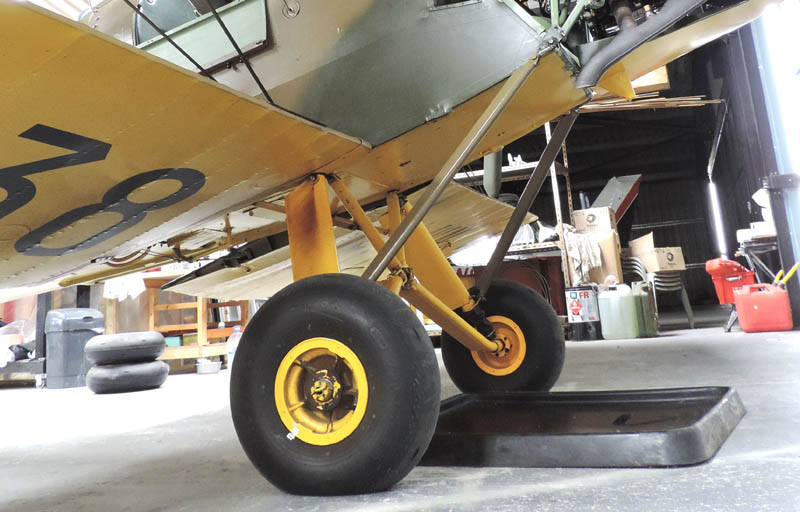
A couple more angles/details:
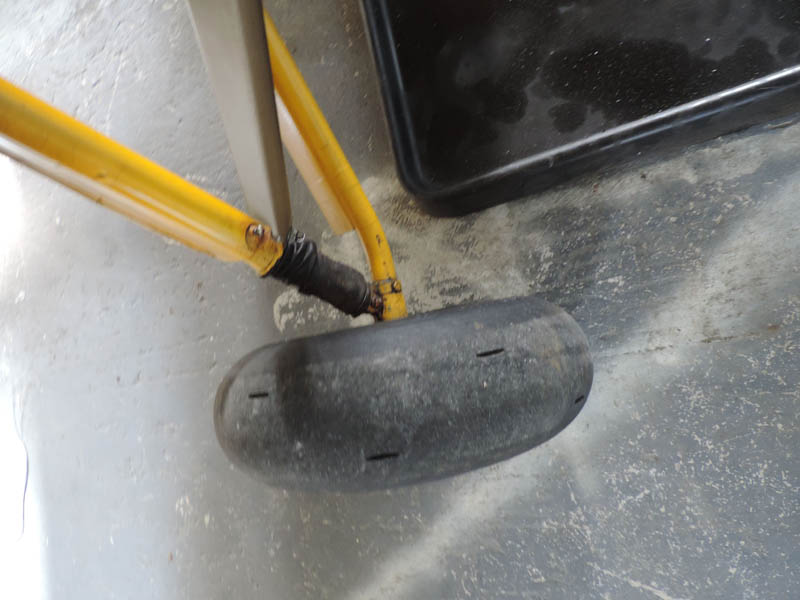
There's a protective gaiter which is present on the Revell and ICM legs but not Silver Wings.
Front from the front looking aft:
The wheels are worth a detailed look:
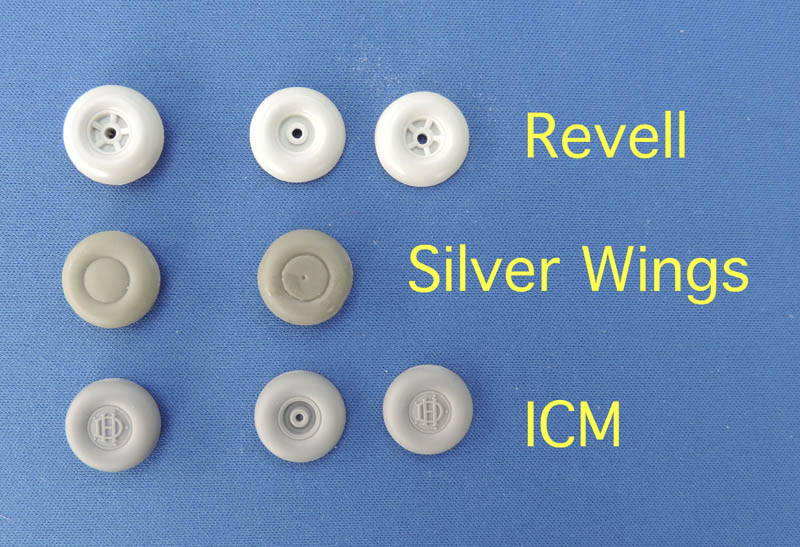
Both the Revell and ICM ones are two piece, the Silver Wings a solid cast. I like and dislike them all for different reasons! I like the Revell ones because they show the centre structure of the wheel hub but no centre cover is provided as an option. In service in WW2 the majority of Tiger Moths dispensed with the covers for ease of access and servicing.
I'm very disappointed with Silver Wings' wheels...full stop! They just don't look good.
The ICM ones are great with the DH logo on the wheel covers, so if you were modelling a 1930s flying club, privately-owned Moth or a lovingly restored post-war one, they are brilliant but I wish ICM had gone down the Revell route and then provided the covers as add-ons.
Size (mm) of all is very consistent:
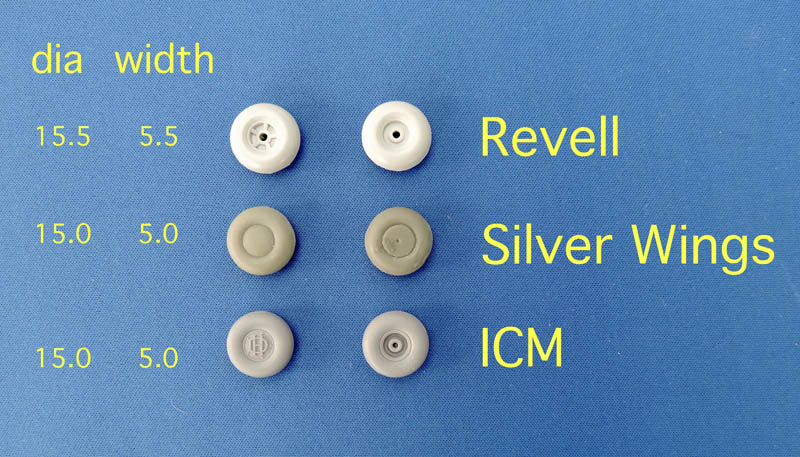
Pre-drilled centres on Revell and ICM, DIY on Silver Wings which like the wings needs to be done with caution to avoid coming out the other side!
The main oleo legs of the Tiger Moth are actually attached "within" the wings, not the fuselage. This I found quite a problem with the Silver Wings kit because there's no cut-out in the wings where the legs fit nor of course guidance in the instructions.
Part 8 - Engine & Related
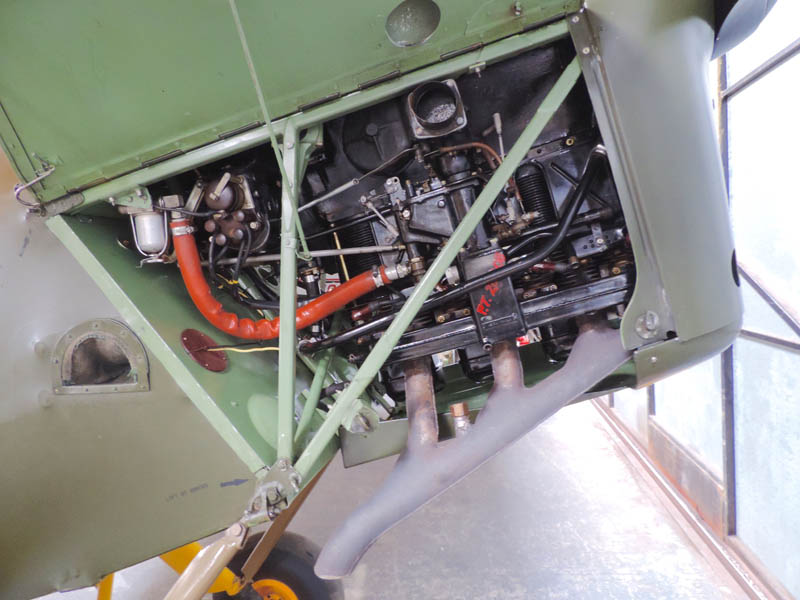
Lots of modellers like to make a feature of the engines so what potential is there with the three Tiger Moth kits? This is what you get:
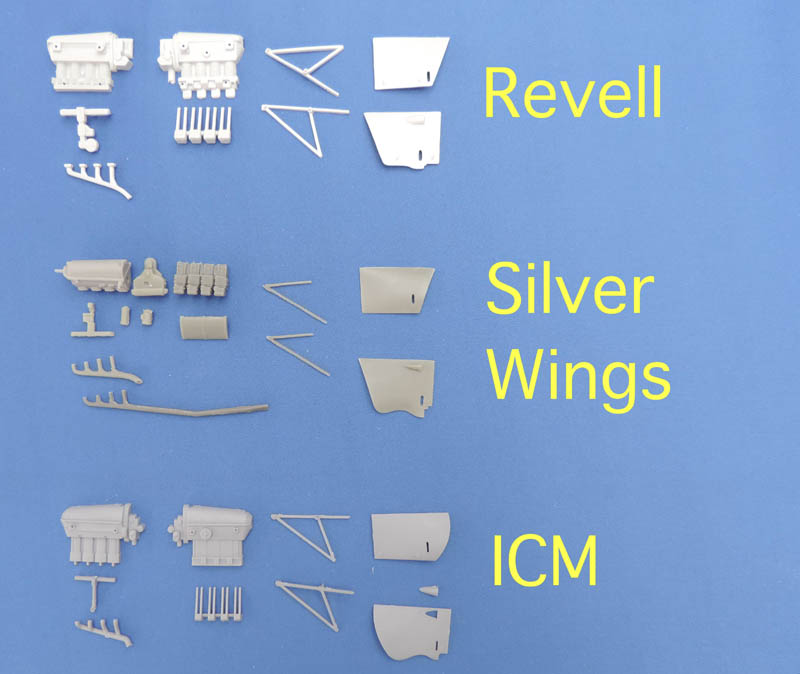
Both the injection moulded kits opt for the two-piece main block whereas Silver Wings is a single. By the way I've got the orientation of the Silver Wings engine bearers the wrong way round in the picture above, but they've opted not to include the main horizontal arm, turn through 90 deg. anti-clockwise! All provide varying degrees of detail with push rods, carburettor etc., so a couple of reference pictures:
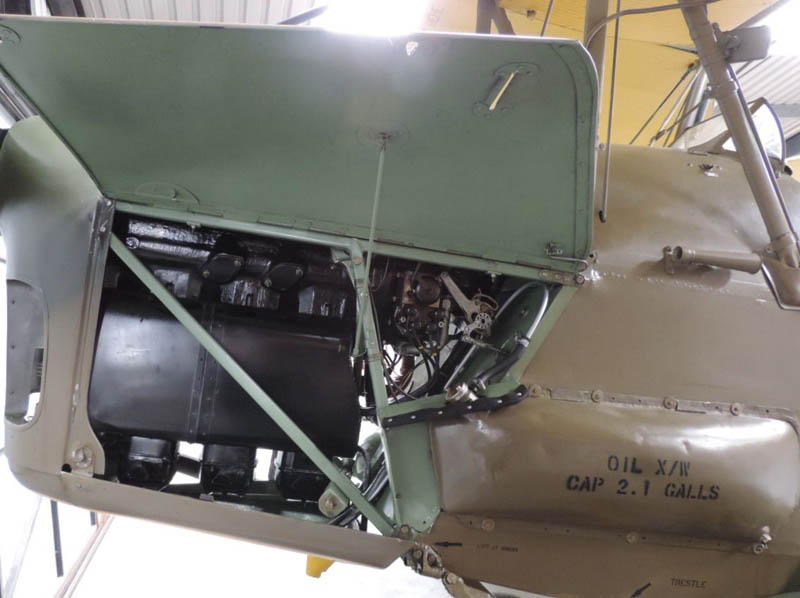
Most of the main bits supplied are readily identifiable but there is scope for more detailing for sure.
The exhausts differ in shape and accuracy:

(switched the image round to get a better idea!)
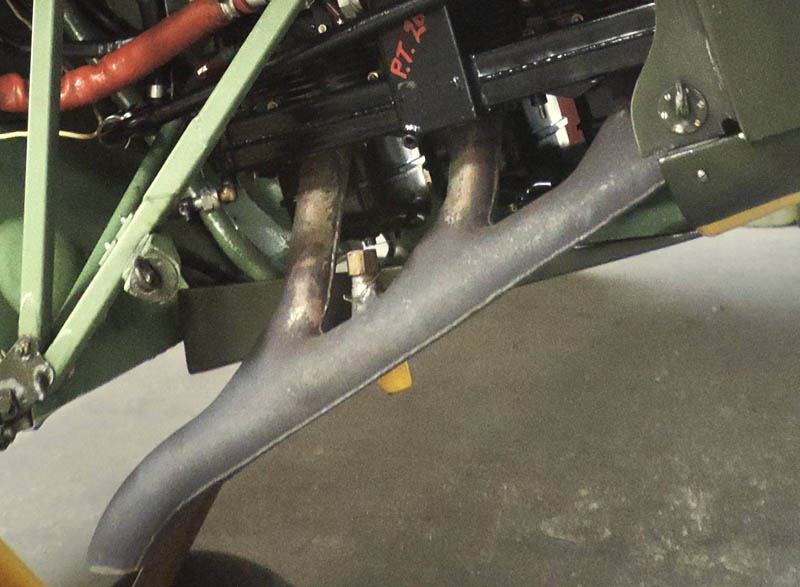
I think the ICM one is the least convincing. Silver wings provide the longer "civilian" version as an option.
If you're going to make a feature of the engine on your model you'll need to consider the engine panels, surprise surprise: more shape differences!
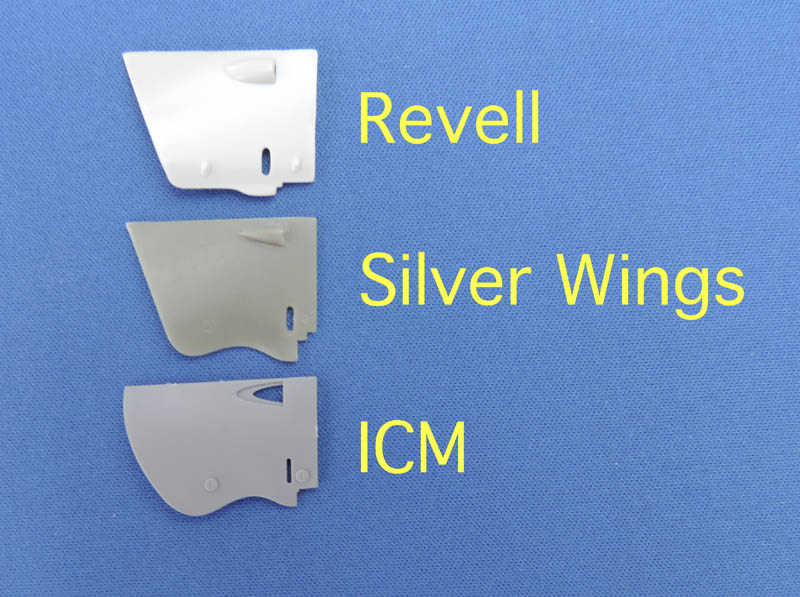
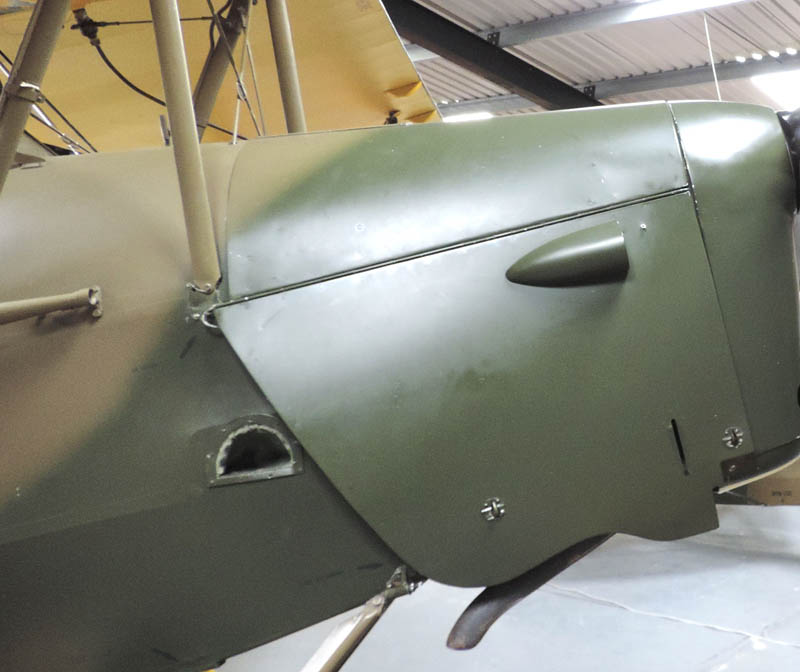
Port side:
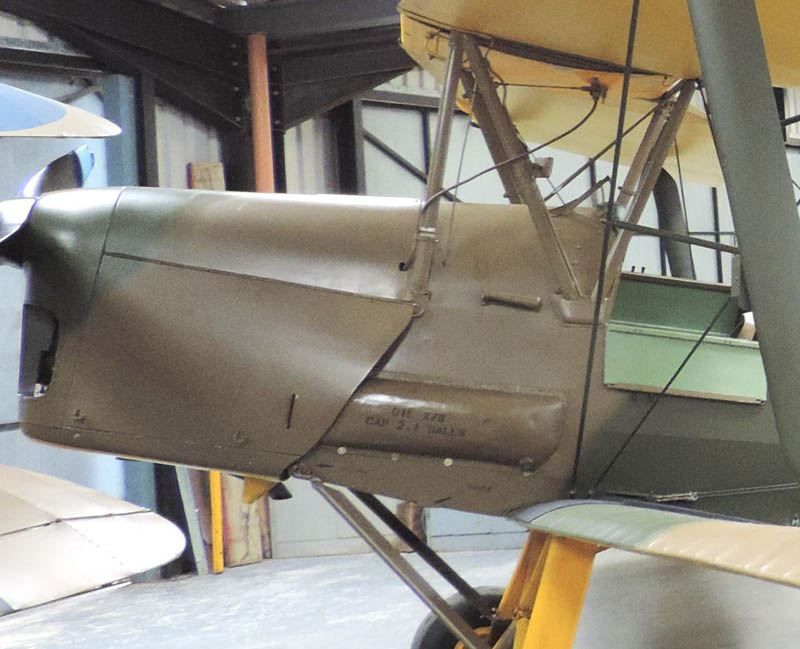
That panel is a complex curve where it goes over the front of the oil tank cover so its shape can be misleading. I think the Revell one is too straight, the ICM one too curved and the Silver Wings one the best of the three.
Starboard side:
The lower edge is definitely a long way out on the Revell kit, again I think the Silver Wings one is the most accurate. In terms of thickness of plastic the Revell panels need lots of sanding and edge thinning to be anything like acceptable. Both the Silver Wings and ICM ones are better but to my mind still need a swipe or two with a sanding stick. ICM have chosen to add that cooling intake as a separate item - rather good because it can be easily thinned a bit more and provides a realistic hole through the panel. I'm not that happy about the fasteners on any of the three, all a bit simplified. Nobody provides the stays for holding the panels open.
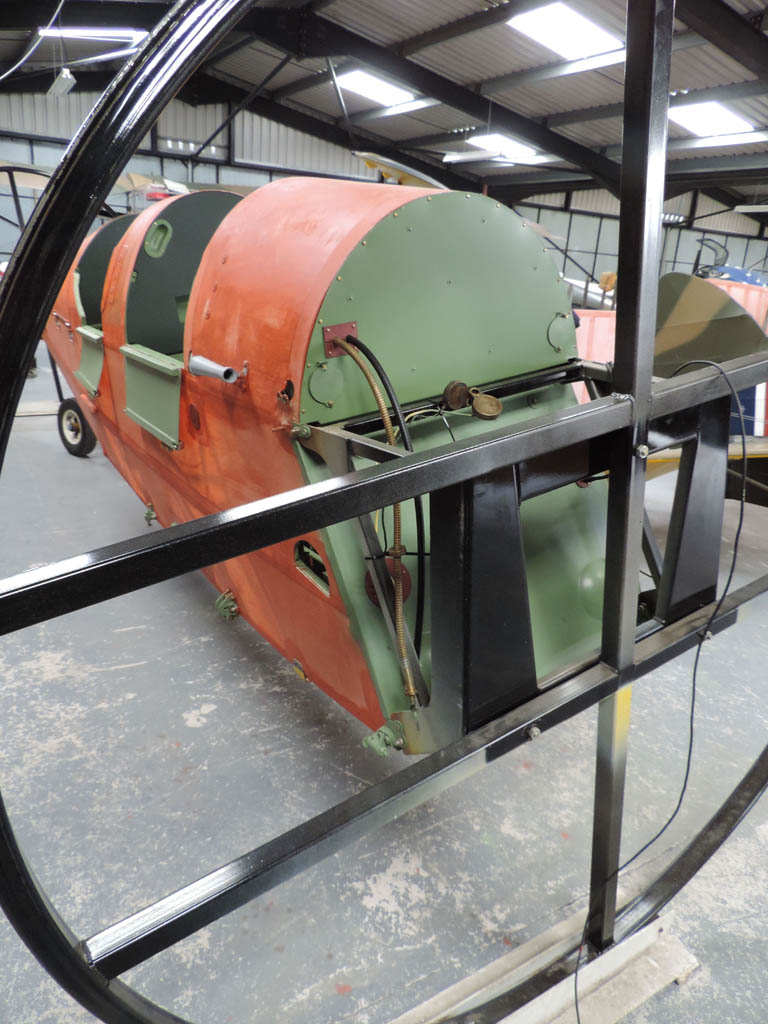
Three others related features to compare, the fire wall, the fuel tank and the oil tank cover:
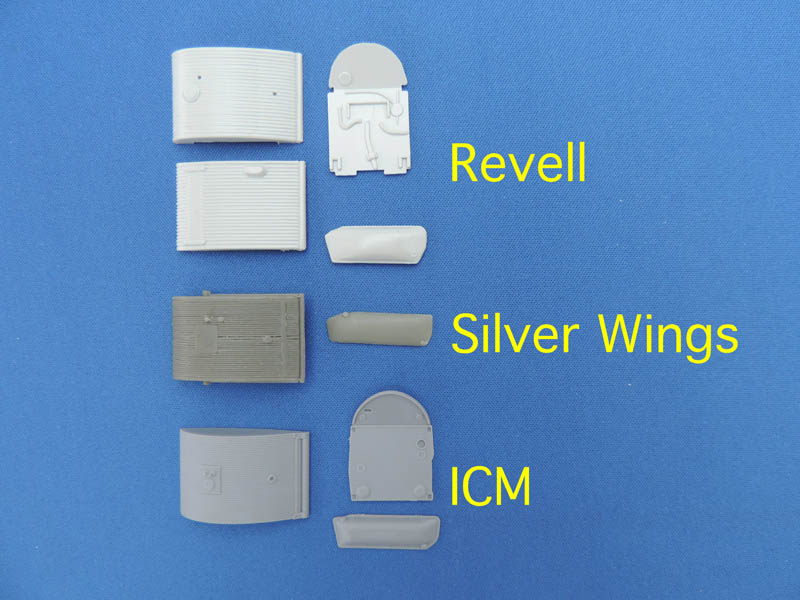
Because of the way Silver Wings have done their fuselage their fire wall is integral. The Revell one has more features moulded in but I think if I'm going to detail I'd probably take those off anyway and go down the ICM route, which is pretty much what the Silver Wings one looks like.
The fuel tank, like the engine, comes in two halves for the IM kits but a solid cast for the resin. The size appears common for all three but Revell and ICM ignore the metal ridges on the sides of the tank:
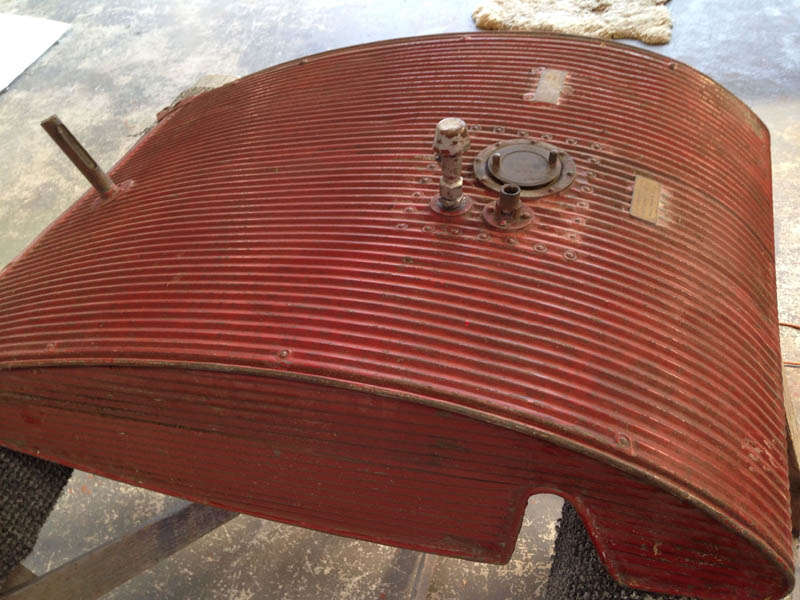
ICM's tank is moulded as part of the upper wing as described earlier in Part 4 so the top half above just fits...on top! The Revell method of construction involves two prominent tabs on the wings which fit into the slots created by forming the two halves of the fuel tank into one. The Silver Wings method remains a bit of a mystery! Given that the dihedral of the wings is critical I'm not happy that the "method" (and I'm not sure what it is) is adequate. Extra support via brass rod bent to the correct angle is vital, I'll certainly be paying a LOT more attention to the fit of both the upper and lower wings on my next SW build!
That gap either side of the fuel tank had me puzzled, but it's accurate!
But on most Tiger Moths it's faired over. The picture above shows well the features on the underside of the tank, none of which are modelled in any detail by any of the three companies. Pretty much can be said of the oil tank cover:
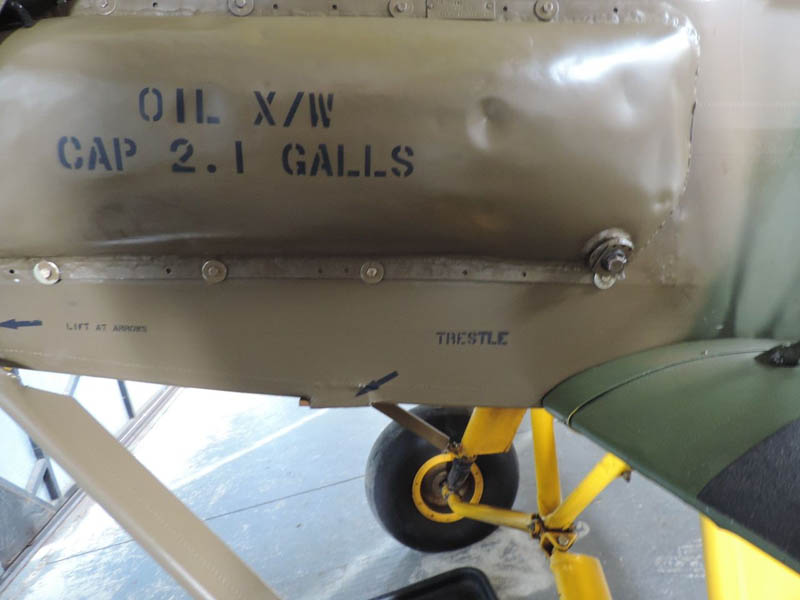
ICM win it by a smidgeon!
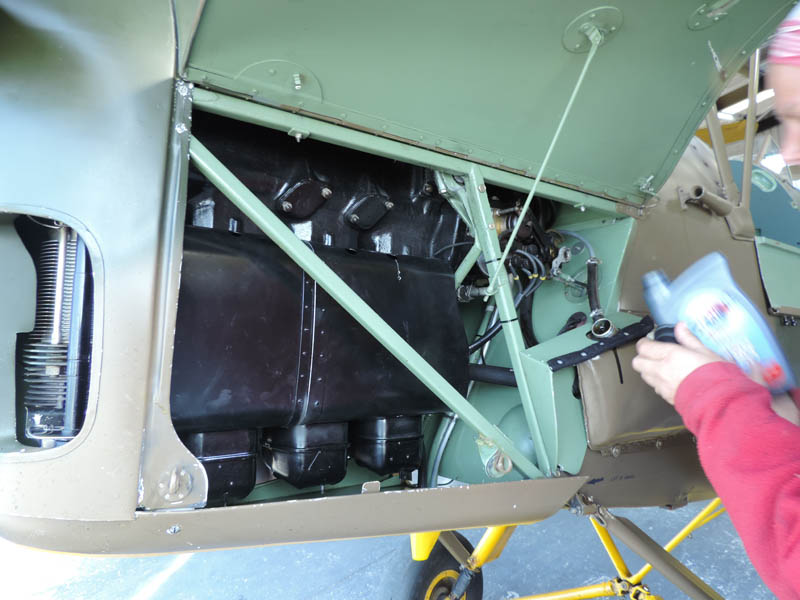
Topping up:
Part 9 - Oodds & Sods
I'm nearing the end of my meanderings through the hills and valleys that comprise the complexities, vagaries and minutiae of the venerable (and venerated) Tiger Moth and her 1/32 scale plastic renditions (to date).
So it's bits and pieces time; we'll start with props and doors. Viewers of a tender disposition might want to look away from one photograph in the next series. The subject matter:
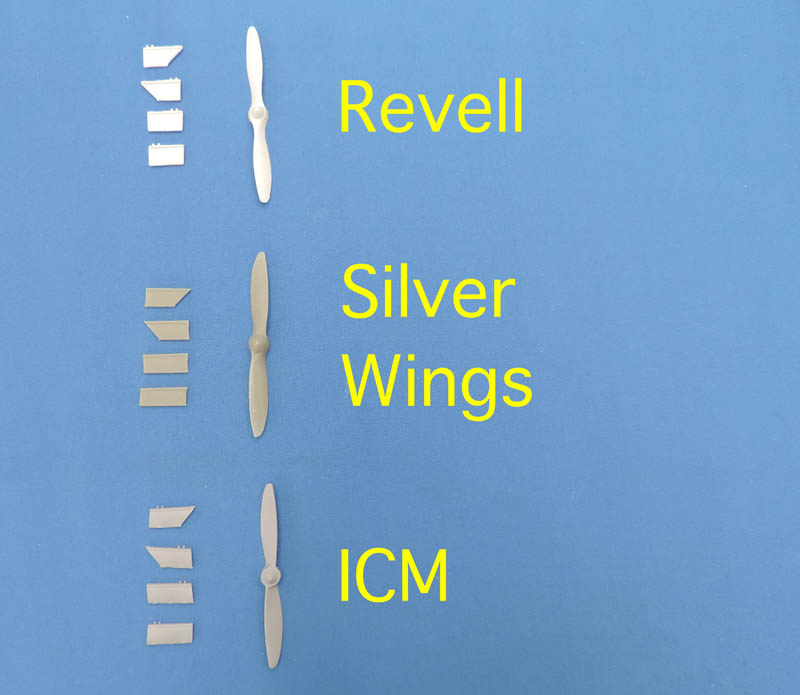
The props are all pretty similar in size, the Revell one differs in shape, narrowing more than the other two along the blade length. I've struggled to find a good photograph of a prop, this is the best I can do; you could say the Beauty and the Beast!
Based on the above I think Silver Wings yet again win it for shape. The Revell one is clearly wrong but the spinner on it, and the ICM one appear too small and pointed.
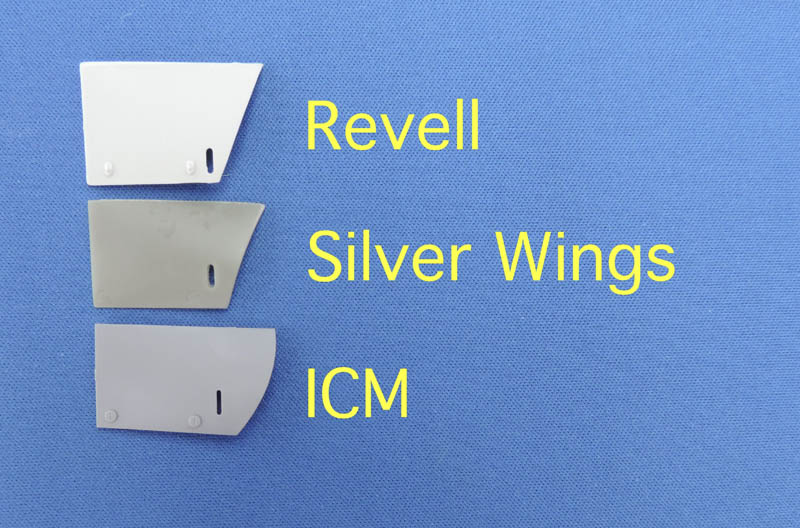
Moving quickly onto the doors (no more shocks!), they are really very thin and are opened and closed by two "toggles" on the top which are squeezed together to release the mechanism:
What's on offer:
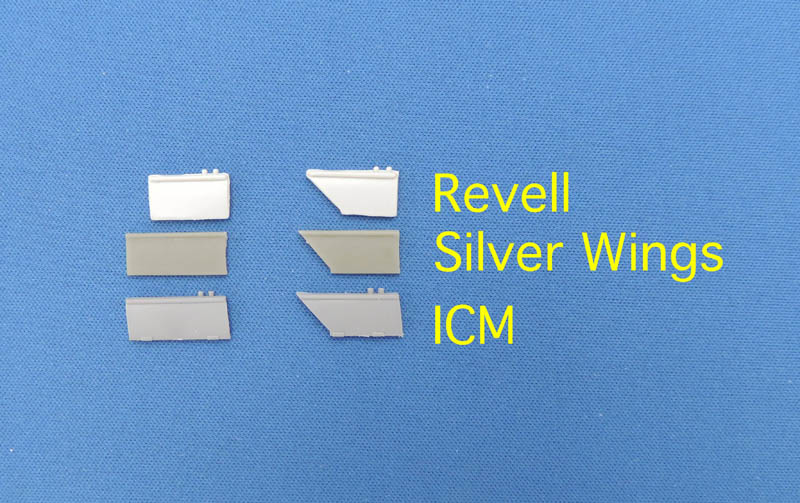
A marked difference in size between Revell's and the other two and in the width dimension, Revell's being about 1mm thick, the others half of that but still not thin enough. ICM have it hands down, they have the toggles for opening and the hinges when closed - Silver Wings have omitted both. I would imagine most models will have at least one door open, so thinning these helps give the right scale effect.
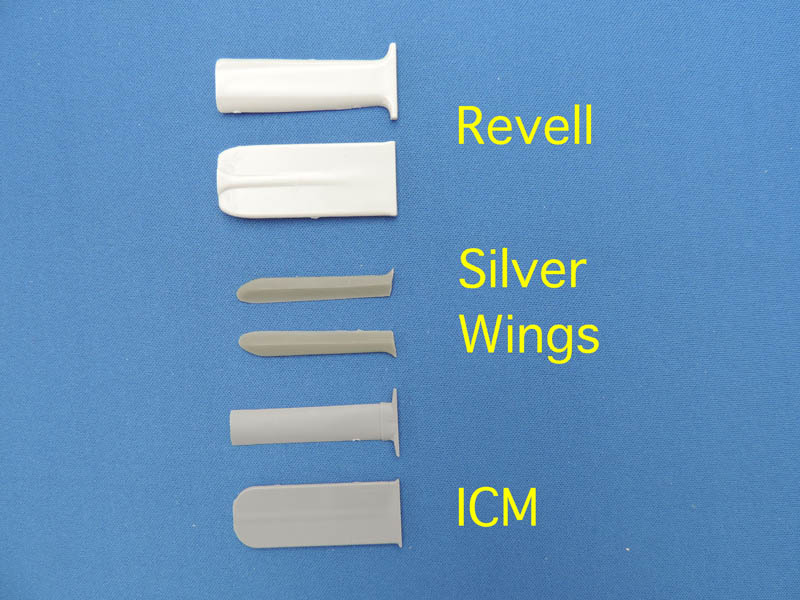
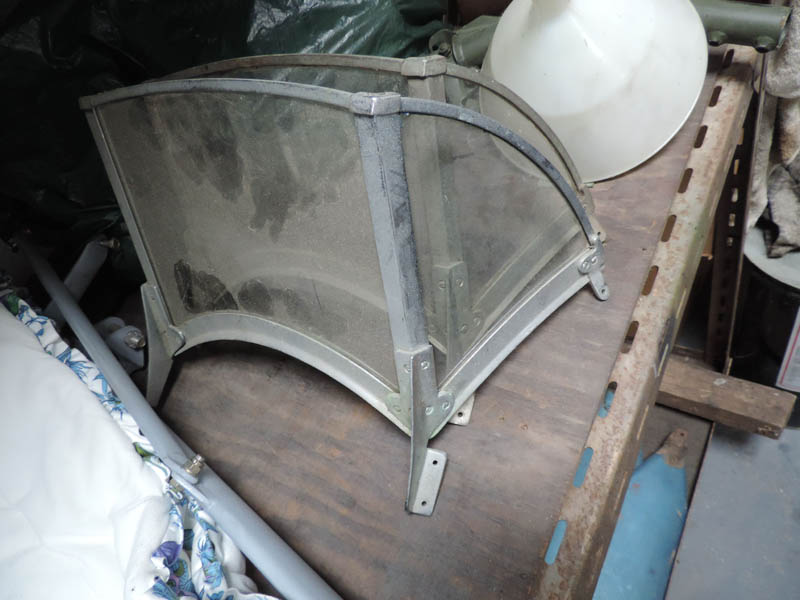
Talking of thickness and shape, the windshields:
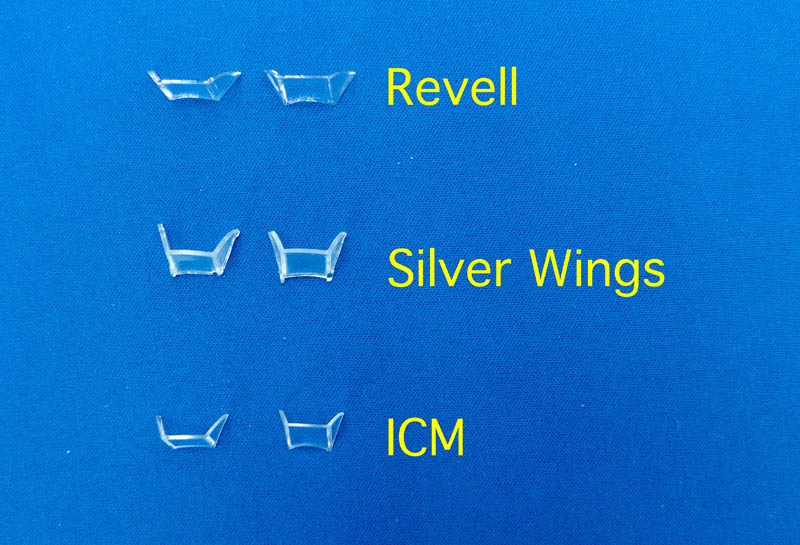
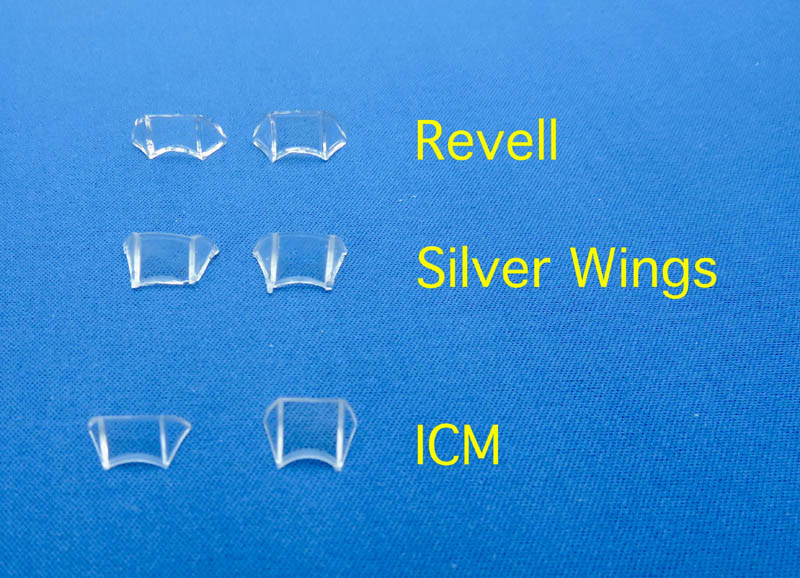
A right mixture here! ICM's are definitely the best for thickness, or should that be thinness? Revell and Silver Wings are very thick and just look wrong. But Revell's seem very shallow, ICM are suggesting that the forward shield is deeper than the aft one (which I've never noticed but who's to say?) and Silver Wings are very brittle and difficult to remove from a thick casting block without damage; ask me how I know!
Exhibits A and B m'lud:

It looks to me on the above as if the forward one maybe shallower!
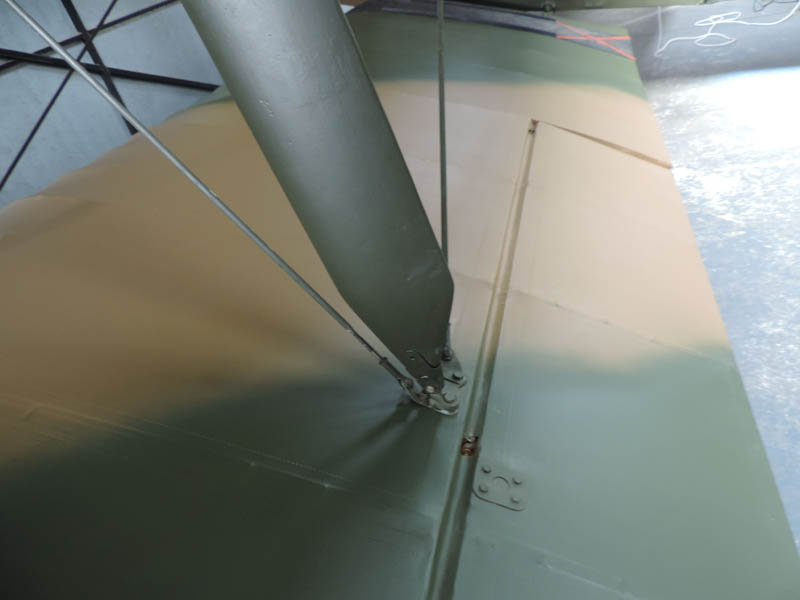
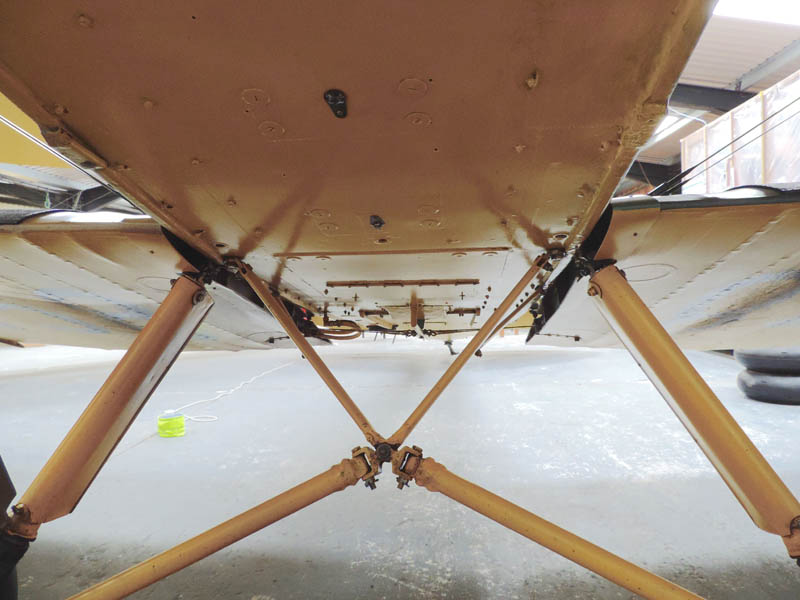
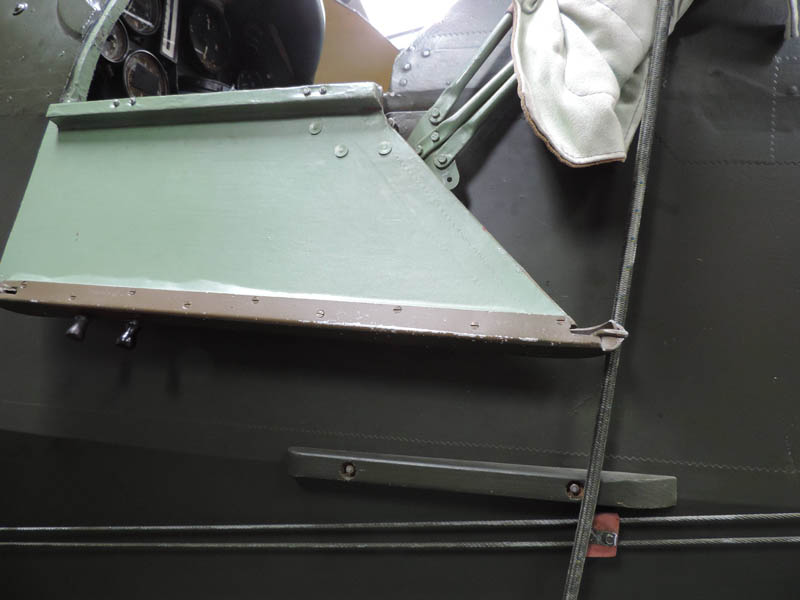
And finally going down below, this is what you see:
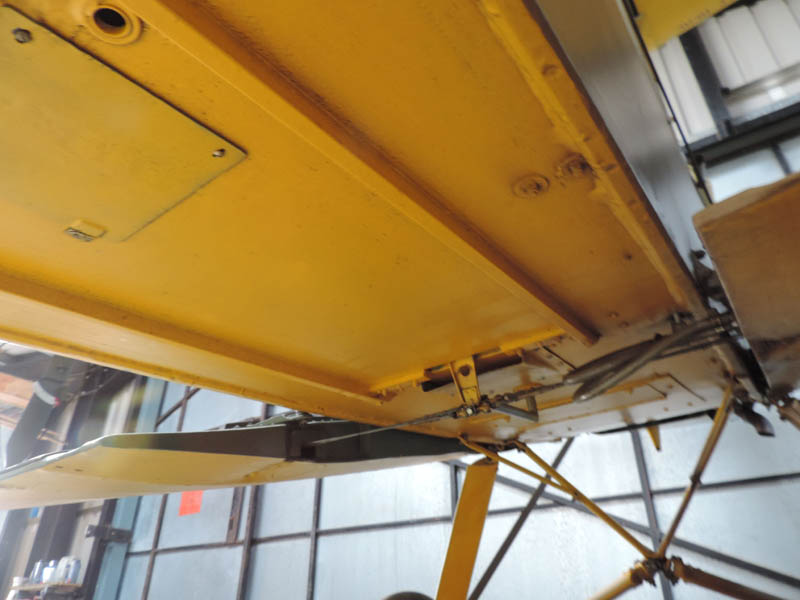
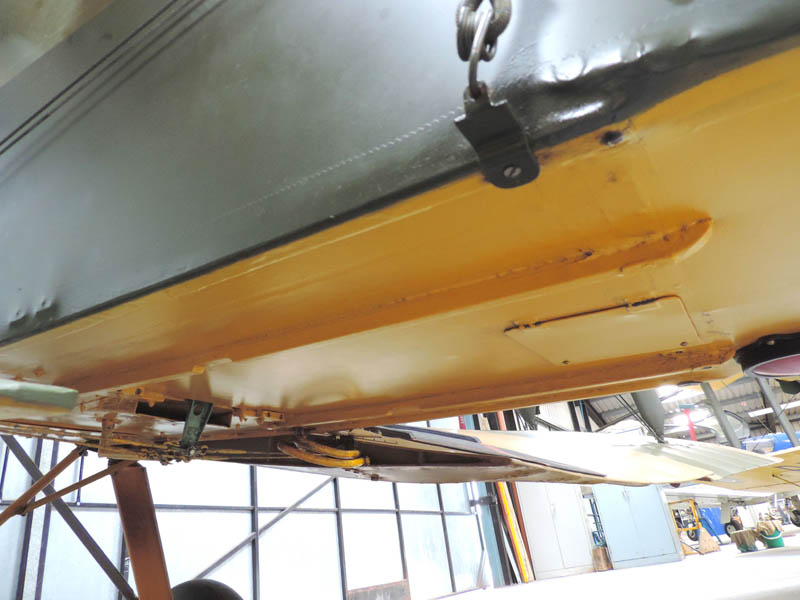
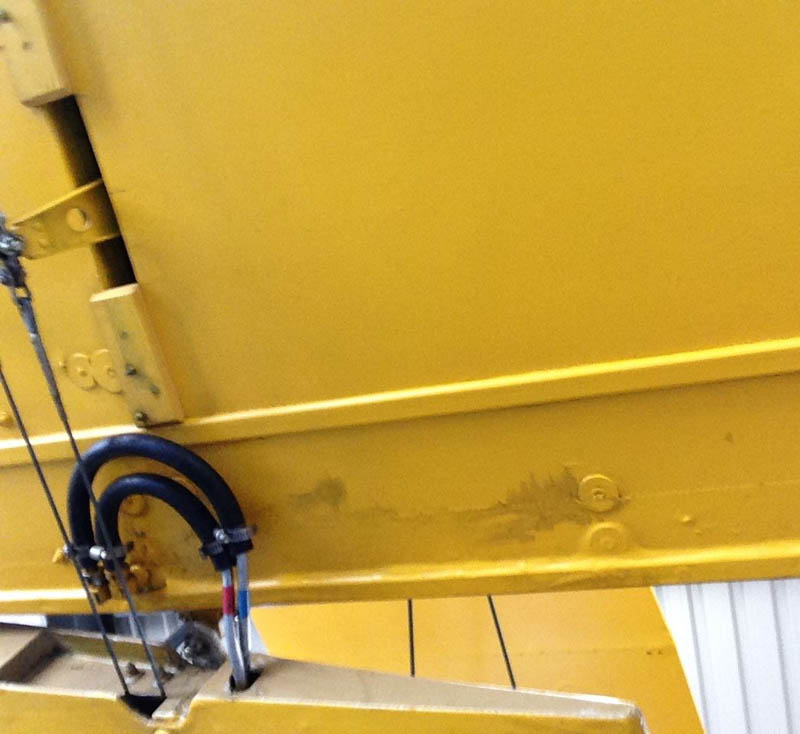
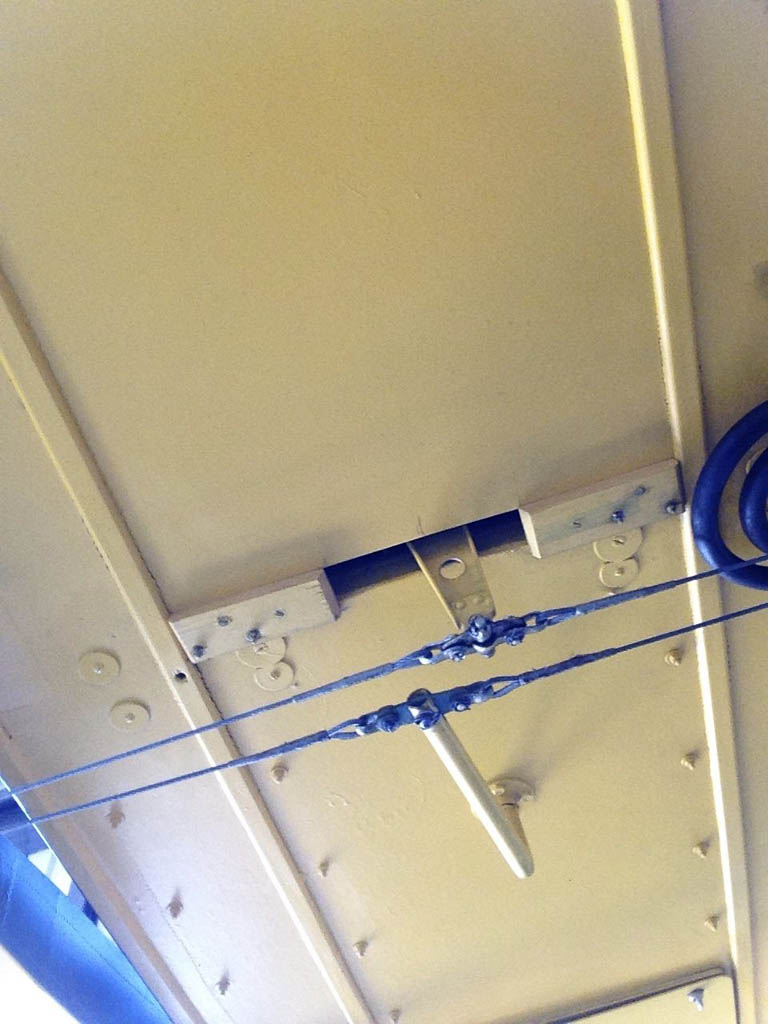
So there are longitudinal strengthening bars, the length of which can vary from Moth to Moth, an access hatch towards the rear and the mechanism for operating the ailerons. Don't quote me but I think the tubing is related to the pitot tube and air pressure readings. What's this like in kit form?
Rudimentary is the most polite comment!
Better, and the hatches shown in PE. But it can be easily improved:
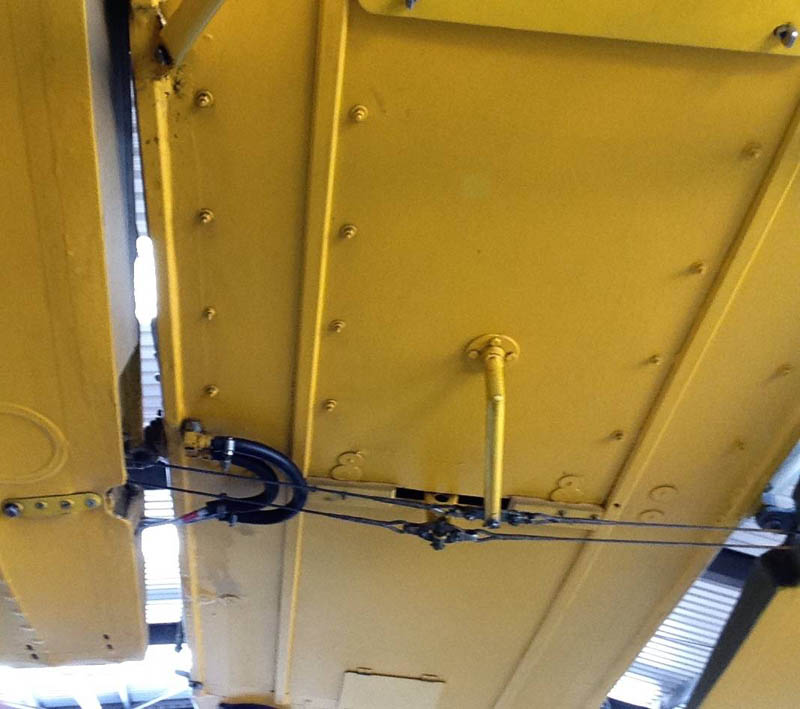
The best? Both Silver Wings and ICM supply the "L" shaped bracket to which the aileron cables are attached, but nothing further.
It may be underneath, it's not easily visible but for the sake of accuracy I think attention to this area is worthwhile.
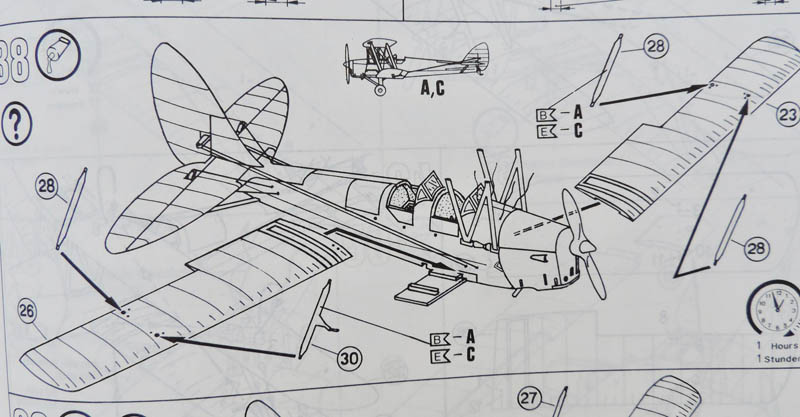
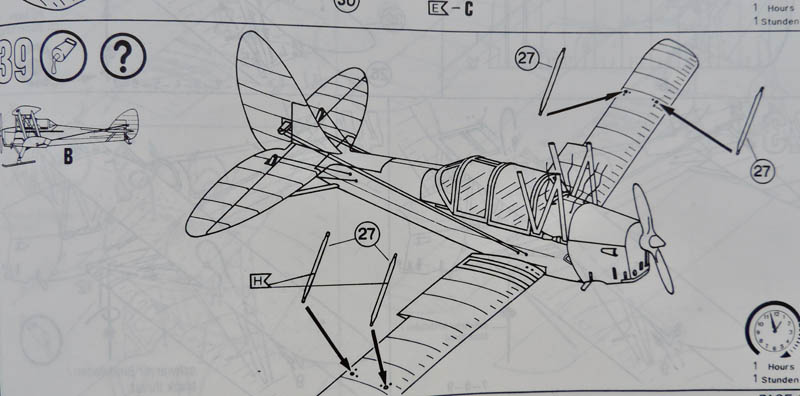
Part 10 - Transfers & Schemes
A brief word about rigging. Revell in a sense cover the subject well, in fact they provide a black cotton thread with the kit which I suspect nobody uses these days with many better options being available, but throughout the detailed instructions you are told where to drill holes for rigging lines and the stages at which to fit the thread should you wish to use it.
Silver Wings is quite disappointingly vague; there are drawings which show rigging positions but like so many aspects of their instructions booklet, not quite precisely enough to my liking.
ICM's instructions are clear, rigging lines are shown in red with appropriate lengths (assuming you are using non-elasticated rigging material), as are drilling points. For the main rigging they would have you fit the rigging whilst the upper half of the lower wing is in place and the lower half of the upper wing, so lines can be pulled through and secured. Only then do you fit the other respective wing halves—a neat solution!
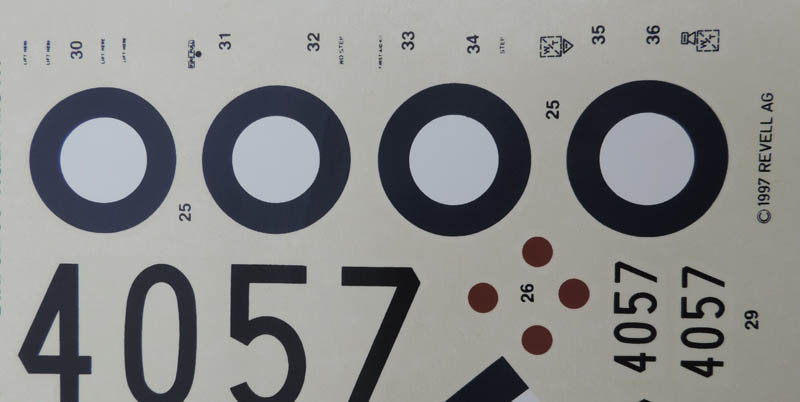
Revell's markings options:
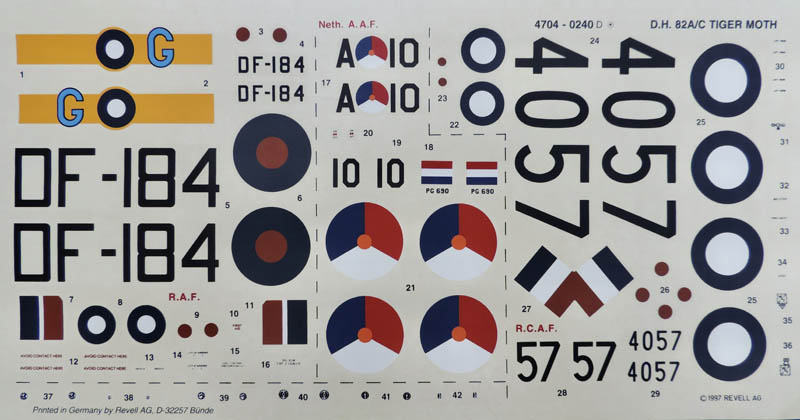
The first point to note is that these transfers were produced in 1997, but look perfectly good and usable, no yellowing at all. I like very much the attention to detail with stencilling. There's not a lot of this on a Tiger Moth, just lifting and trestle positions, places not to step and oil grades etc. All are included here. The finish is matt and all in register, though I do think it's odd where roundels are provided without the centre red disc, these being separate and needing to be added later.

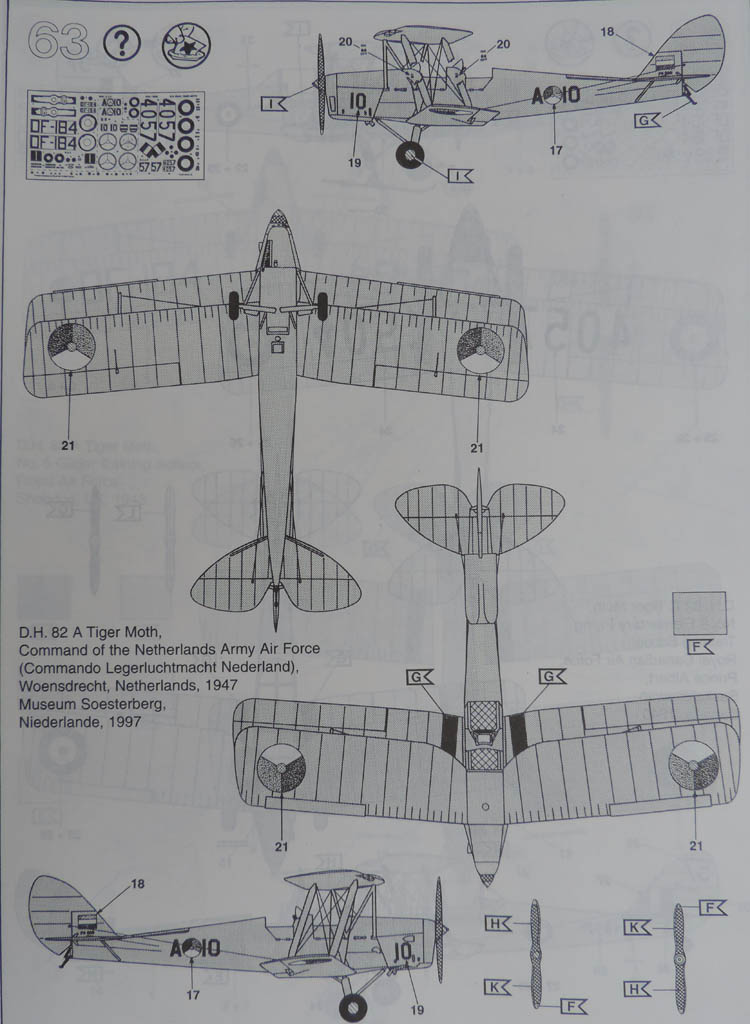
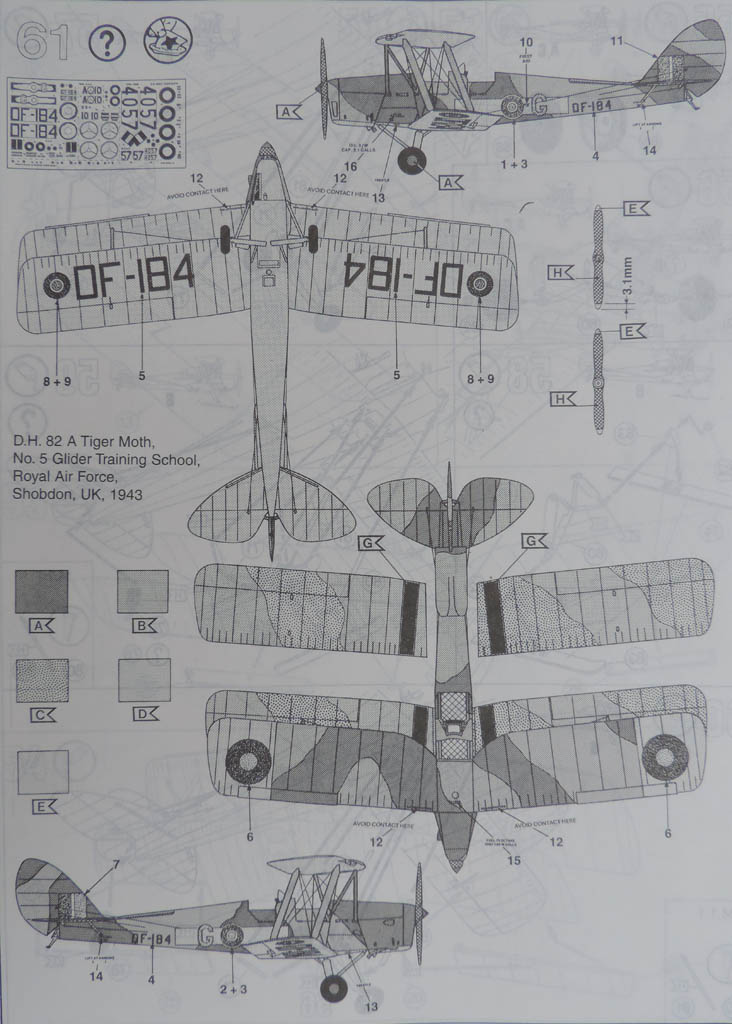
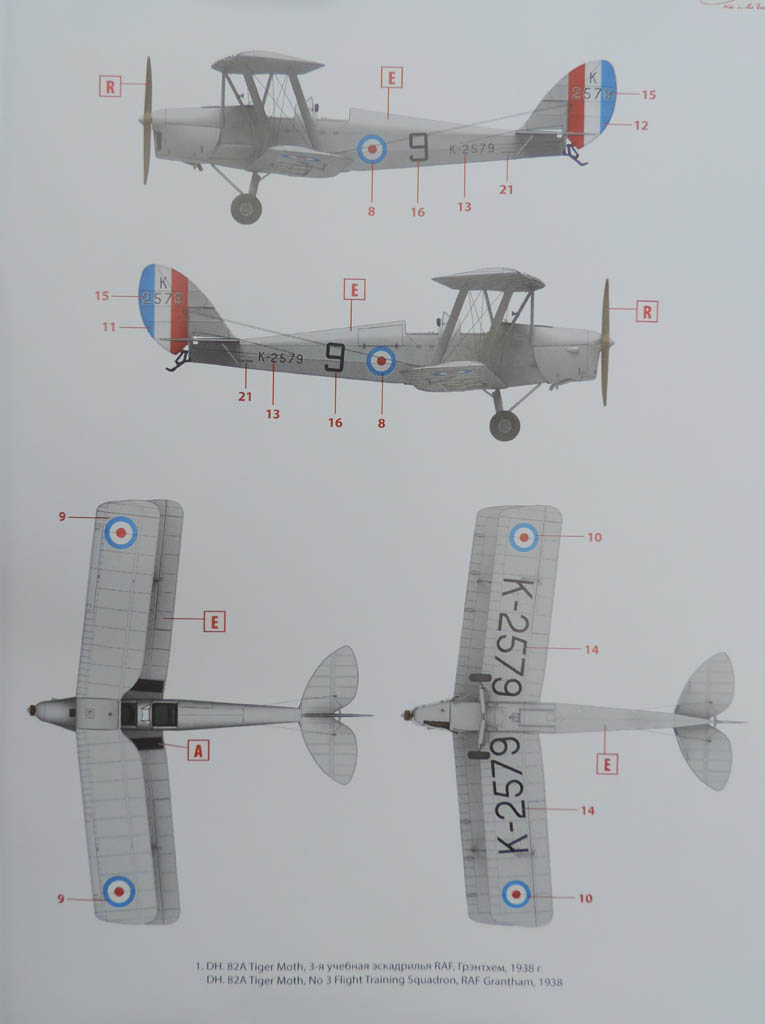
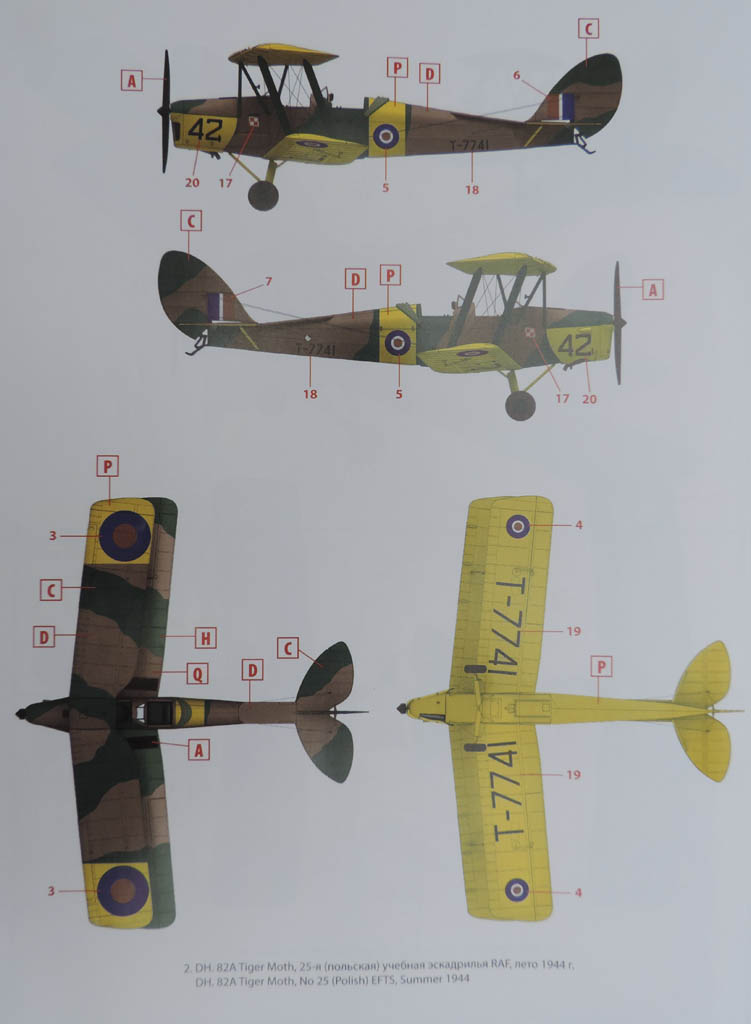
Three schemes are available:
It's slightly odd that floats are provided as well as skis for a build option but no markings are included for this.
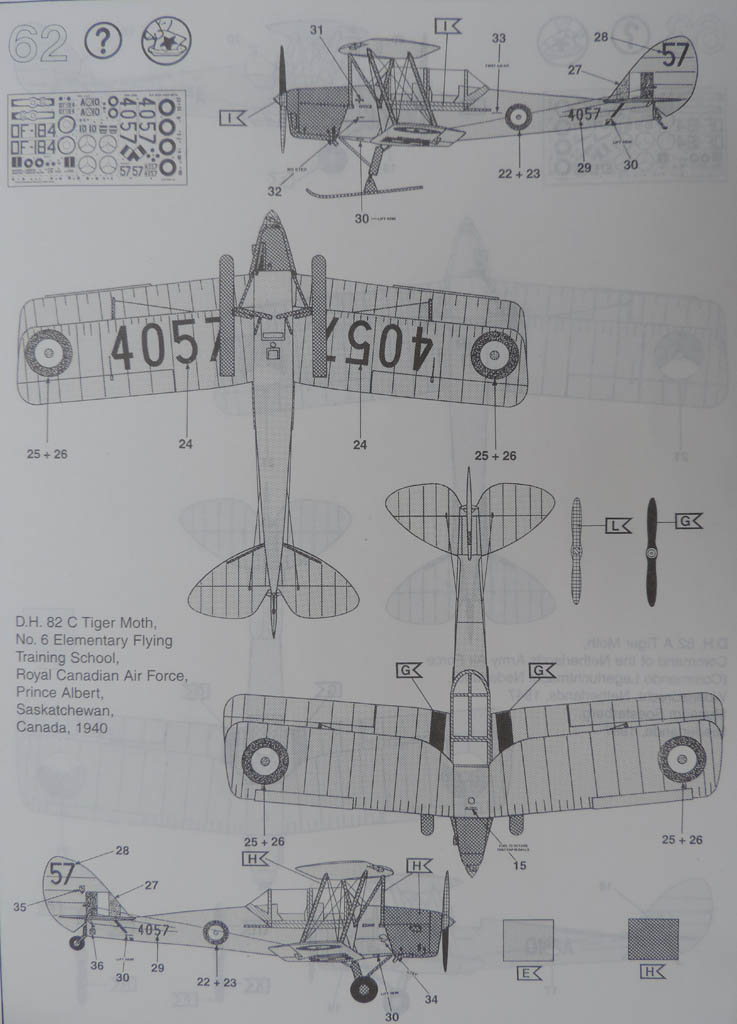
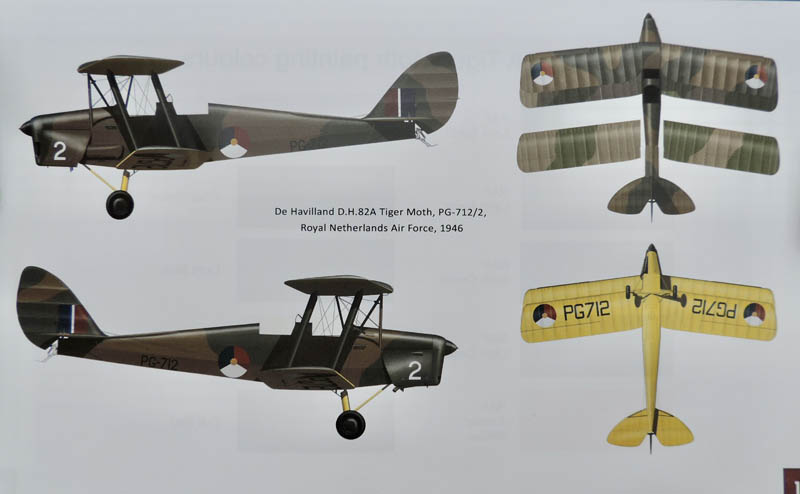
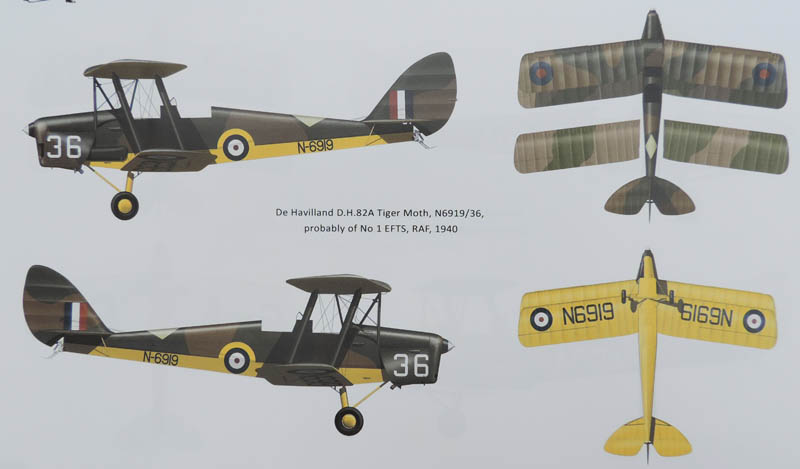
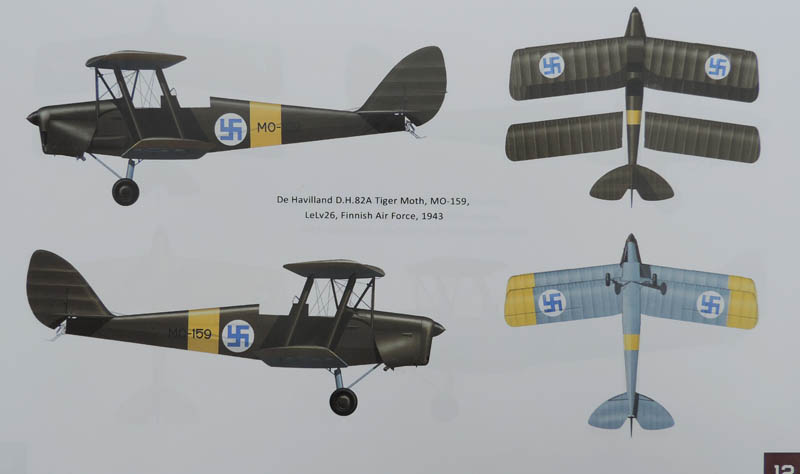
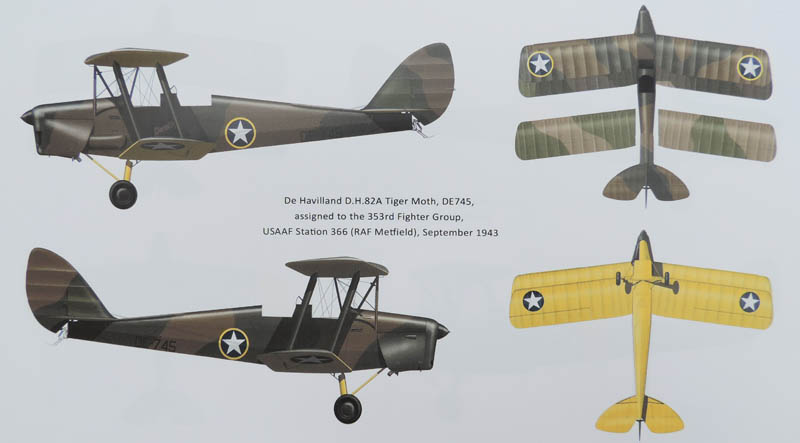
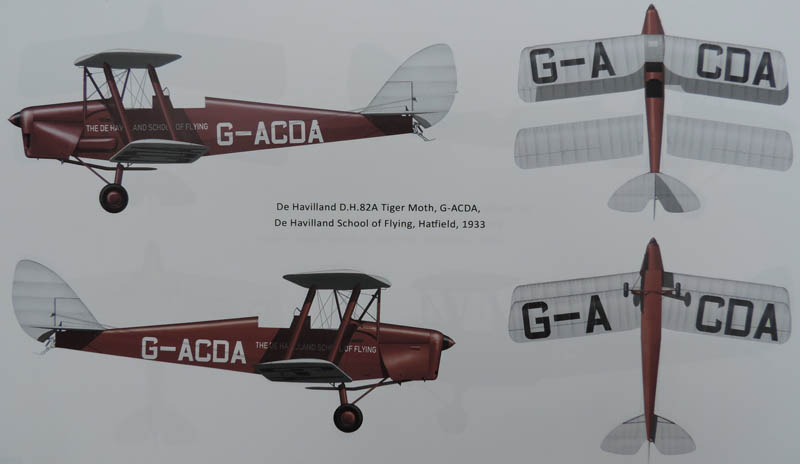
Silver Wings markings options:
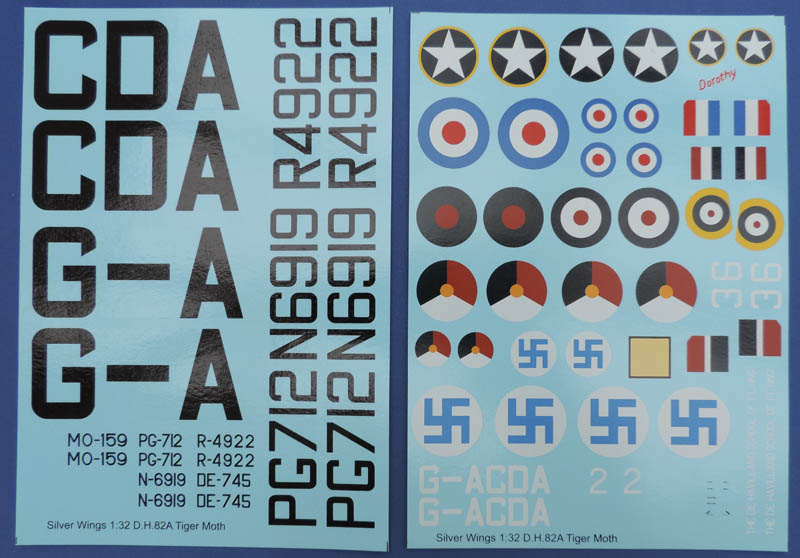
The finish is shiny which doesn't make a lot of sense for the wartime schemes but is OK for other periods. All are in good register. Several schemes on offer:
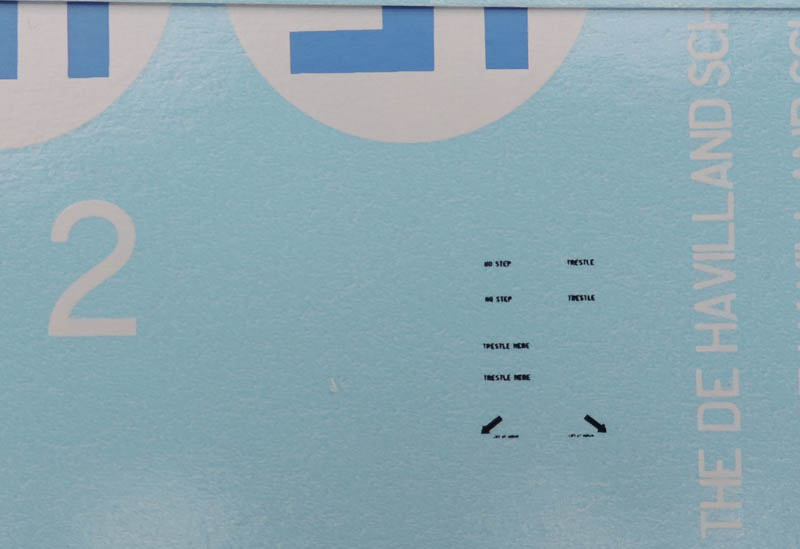
Unlike the Revell kit, there is a bare minimum of stencils provided, and these too small I think:
And quite a glaring omission for the de Havilland Training School aircraft G-ACDA, no de Havilland logo on the tail fin!
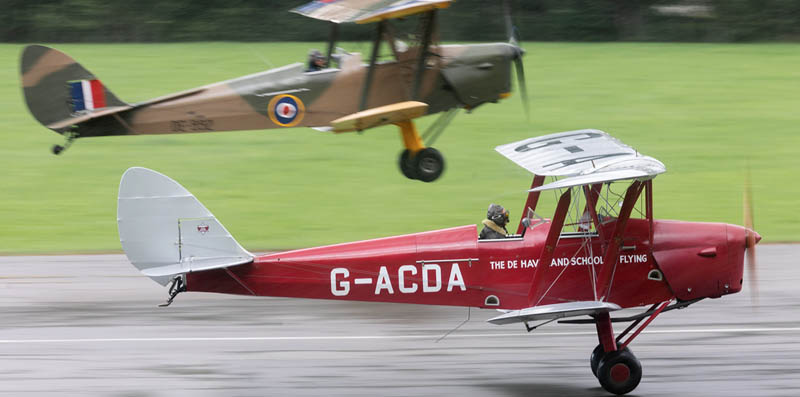
You'll also note that G-ACDA has the extra footwell below the rear cockpit, so a little whittling required with the kit here!
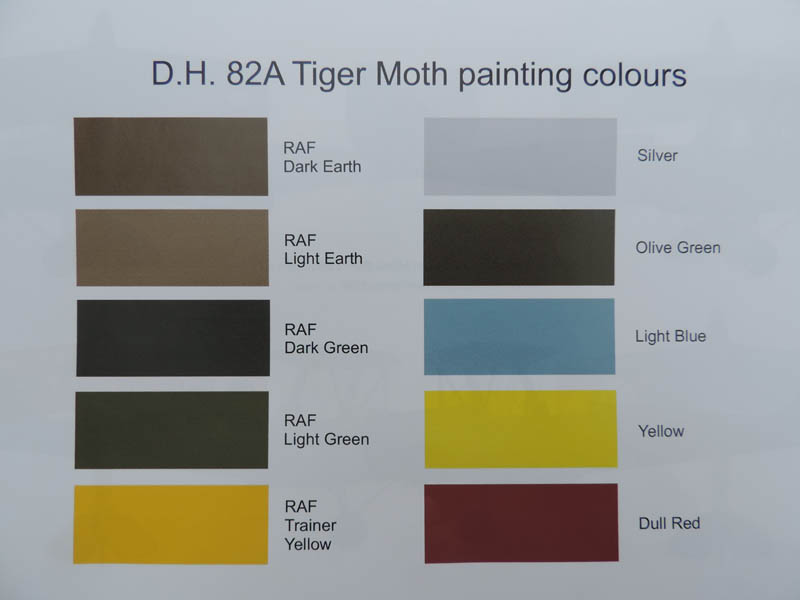
A colour guide is included but no cross references to any particular paint brand:
ICM marking options:
Pretty disappointing I feel, possibly trying to keep costs down - just two not very inspiring options.

And just a "LIFT HERE" stencil. The finish is shiny but all in register.
Conclusion
And that's about it for the comparison exercise. Which kit is best? Well I think that depends on several factors such as skill level, material preferences, budget, accuracy expectations, etc.
Each have their strengths and each their weaknesses. For detail and accuracy I think Silver Wings wins it, but it's resin, expensive and their instructions leave a lot to be desired. The old Revell kit should not be discounted because of its antiquity, it can still be made into a very presentable and accurate model but it clearly needs more work to achieve this than the other two. Being so new, the ICM is an unknown quantity build-wise, but I think it has been well thought out and engineered and will prove to be the model of choice for many and I like ICM's policy of bringing out figures which fit with the kit, some trainee pilots are planned for later this year. I think it will look good built OOB but has the potential for adding extra detail if required.
If you decide to build a Tiger Moth, whichever kit you choose, have fun!
© Max Williams 2021
This article was published on Saturday, April 17 2021; Last modified on Saturday, April 17 2021