
Revell 1/32 He 219 A-7
By Kevin Weiche
I have always liked the lines of the Heinkel He 219. Maybe I was influenced by the somewhat poetic description given it by Captain Eric Brown, who actually flew captured examples to England at the end of the war. Regardless, I decided to build Revell’s 1/32 scale A-7 and “won” a kit on eBay early this year. When I received it, however, a serious issue became apparent – it lacked decals! The seller honestly did not realize this and without decals, I could not build it. Eventually he was able to procure Revell decals for the current-production A-0/A-2 kit. I could use most of these decals and with a sheet of insignia from EagleCals, I was off to the races.
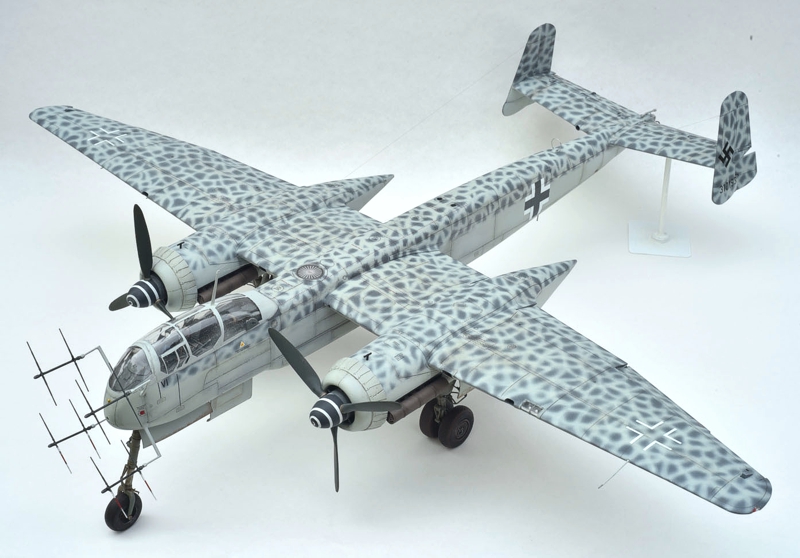
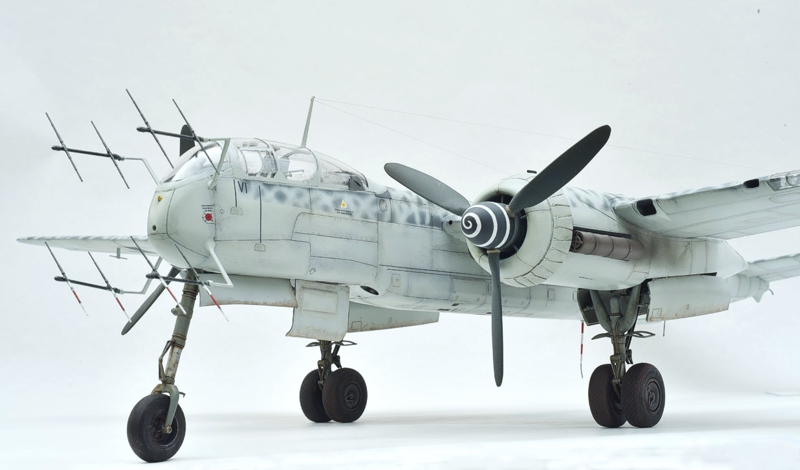
Rather than a detailed account of the build, I would just like to offer a few impressions and commentary. This was a very challenging kit for me; easily the most difficult I have built. The detail is excellent, and overall the shape looks good to my eye. I did address some of the main complaints other builders have noted, such as the misshapen prop blades and incorrect cross-section of the rudders. I used Milliput to reshape these parts. I should mention that I did not insert weights into the kit to keep the nose down for display. I thought that the excess weight would eventually warp or break the landing gear. As for aftermarket parts, I mentioned the decals already but also used resin wheels, a brass FuG 220 radar array, and resin open cowlings. The build was fairly straightforward.

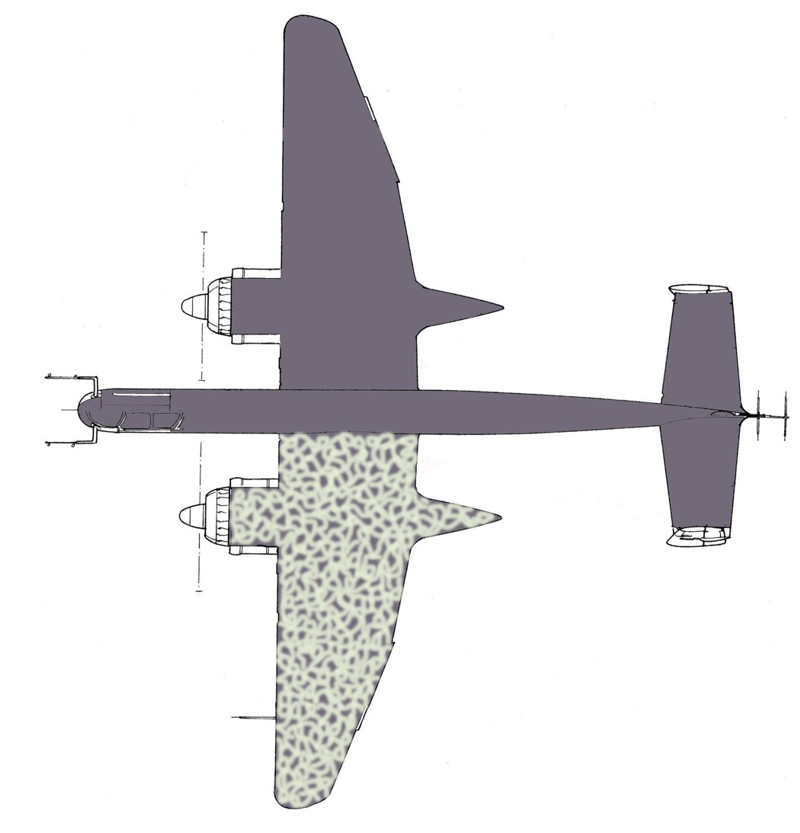
What caused me the most anxiety was the complicated paint scheme, what Captain Brown described as “their sombre grey dapple night fighting finish”. did not have the ability to paint this like the masterful Chris Wauchop had done. This accomplished modeler describes the He 219 mottle scheme as a “lattice pattern.” I can agree with that. It is known as a “reverse mottle” in which RLM 76 is sprayed over RLM 75 in a squiggle pattern, the resulting effect looking like a dark mottling. I researched this extensively and learned that it is also called wallenmuster in German. I would describe it as a mosaic or voronoi pattern. Regardless of semantics, it is unusual, though seen in nature in the reticulation of a giraffe’s coat, or in the cellular structure of a leaf. The Smithsonian attempted to replicate it on the only existing example of the aircraft. I think they got it about 85% correct. Anyway, I realized that I would have to practice with the airbrush extensively before I would attempt painting.
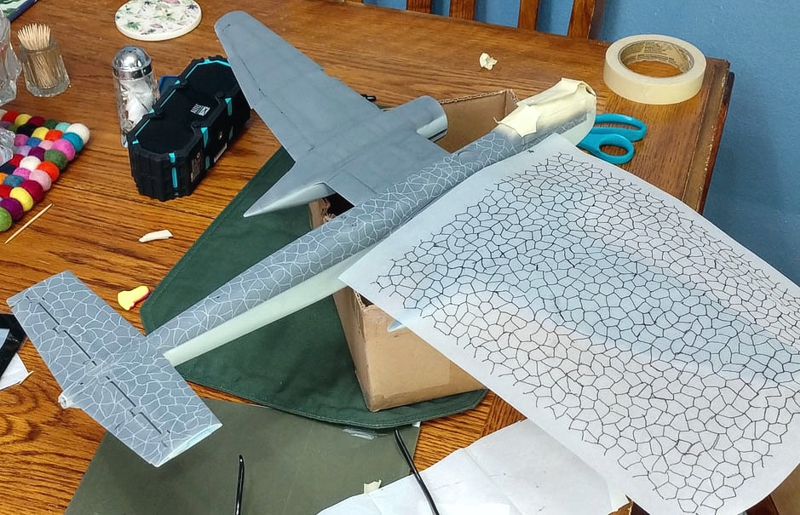
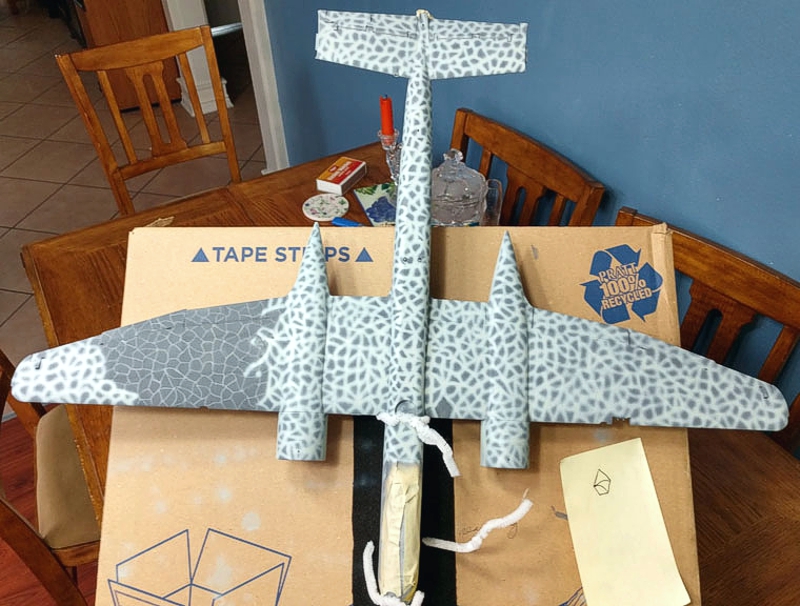
I actually used Photoshop on the computer airbrush tool to freehand samples of this paint scheme. After initially awkward attempts, I mastered it and was able to freehand a mockup in just a few minutes that looked acceptable. But the 2-dimensional computer screen is not the actual 3-dimensional model. How I decided to tackle the actual painting was to create, in Photoshop, a mosaic pattern that simulated the RLM 76 lines. I copied the pattern to tracing paper which I then placed over white graphite paper (sort of like the old carbon copy paper for those old enough to remember) and taped it to part of the upper surface of the model. I then, using a burnishing tool, followed along the lines, thus transferring a faint pattern on the RLM 75 I had painted over the entire upper surface. I used a white pencil to further lighten the lines so I could better see them. Once the entire upper surface was covered with the transferred pattern, it was a matter of following it with my .2mm gravity-fed airbrush. I made a custom holder for the model from a cardboard box so that I could better airbrush it. A few times I made mistakes and had to recover the section with RLM 75 and redo it. Because I have had bad luck with acrylics sputtering and drying, I opted for Model Master enamel RLM 76 paints, mixing white, grey, and green to match the tint I envision of this elusive color. I thinned it at approximately 1:1.
There is some variability in the photos of aircraft depicting wallenmuster on He 219s. My pattern matches the Smithsonian style a bit more than the pattern of a photo of the actual aircraft I built (310193). Regardless, I think I captured the essence of the pattern, if not exactingly so.
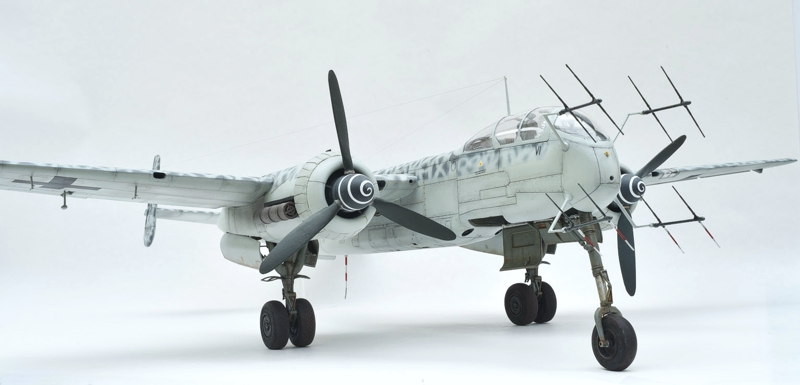
There are certainly imperfections in the final product, but it was difficult and contained many small and fragile parts. I sometimes wished for a simpler and more robustly-engineered kit, as I have already broken several parts with my clumsy handling. This kit will require an investment in time, but its unique subject is well worth the effort and the kit of excellent value.
© Kevin Weiche 2021
This article was published on Saturday, July 31 2021; Last modified on Sunday, August 01 2021