
Hasegawa’s 1/32 Bf 109G-6 Natural Metal “Mosquito-chaser”
By Ian Robertson
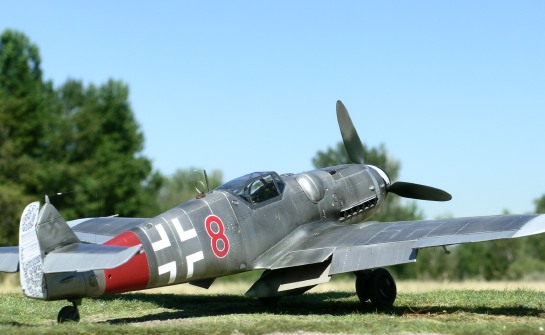
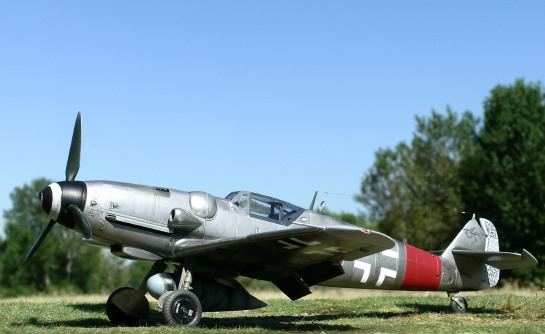
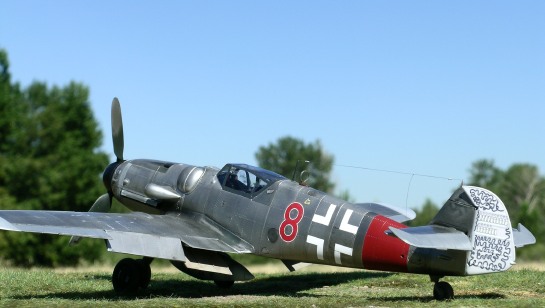
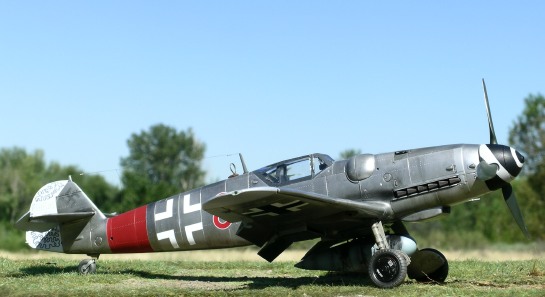
One does not usually associate bare metal finishes with Luftwaffe fighters, yet here is a Bf 109G-6 from III./JG300 (July 1944) that was stripped of its camouflage to increase speed while intercepting RAF Mosquitos. Quite a unique scheme for an operational Bf 109!
Photographs of “Red 8”, along with a color profile by Tom Tullis, appear in the new Eagle Editions’ publication, “Jagdeschwader 300, Volume 1” by Jean-Yves Lorant and Richard Goyat. From photographs in the book, traces of paint are visible on the wing root and base of the elevators, and the swastika has been almost completely sanded away. Note that the gun troughs and various access panels appear darker than the rest of the aircraft because they are composed of darker metals (e.g., the gun troughs were iron). This same effect is seen in photographs of a sanded down Bf 109G belonging to the National Air and Space Museum (NASM), adding support to the claim that “Red 8” was natural metal rather than light grey.
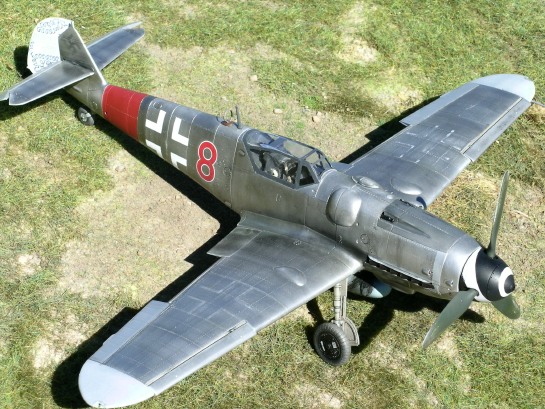
I used the standard Hasegawa 1/32 Bf 109G-6 kit for this model. Rivet details were added with a “Rosie the Riveter” tool because one of the consequences of sanding down the aircraft was that its rivets were more visible than usual. Another unique feature of the aircraft was its retrofitted erla haube canopy, which required me to steal one from a Bf 109G-14 kit. Luckily, some Bf 109G-14s wore the early-style canopy, so my G-14 kit won’t have to be relegated to the spares box.
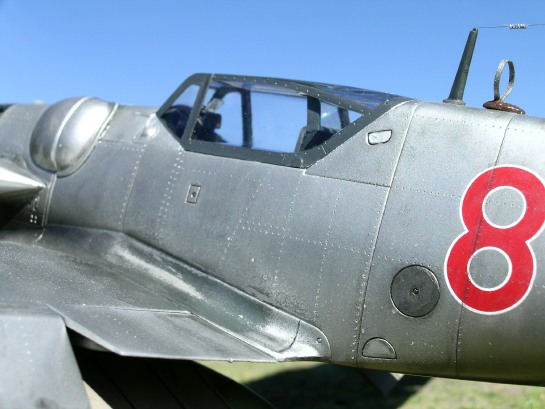
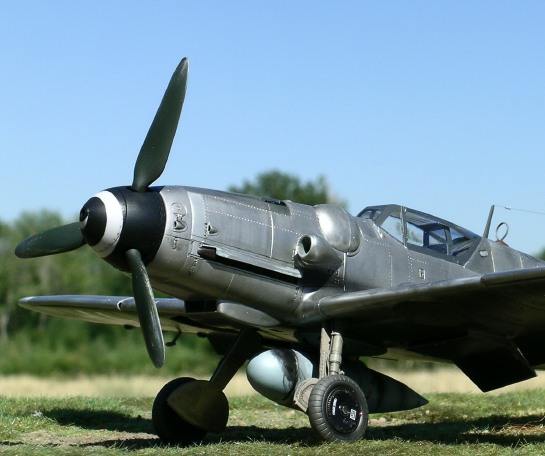
Seatbelts were made from lead foil and buckles are from MDC. The spinner and drop tank are resin replacements from Eagle Editions (Eagle Parts 20-32 and 21-32, respectively). Control surfaces on the tail were repositioned to match photographs in the book. The antenna wire was made from stretched sprue with pieces of light bulb filament for the tension springs.
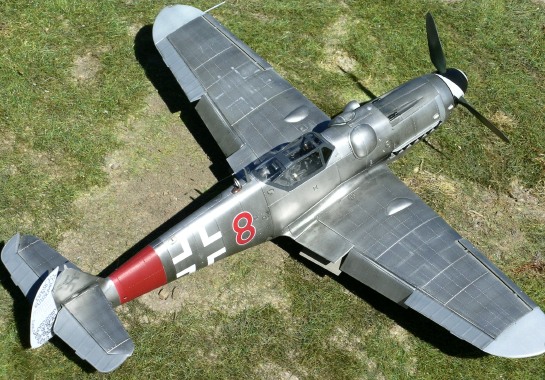
The model was primed with Tamiya Fine Surface Primer and then polished smooth with a micromesh sanding cloth. The fuselage band (50% Polly Scale oxide red and 50% RLM23) was sprayed and masked until the natural metal finish had been applied.
Alclad II lacquers were used for the natural metal finish. I used a combination of Alclad duraluminum (the primary color), aluminum, dark aluminum, semi-matte aluminum, and polished aluminum. Once the Alclad had dried, I applied numerous washes of Tamiya black acrylic over the entire model with a soft brush. I find this wash is an excellent way to pick out details and create a realistically weathered natural metal finish. Alclad can always be reapplied to areas that receive too much wash, or these areas can be lightly sanded with a micromesh cloth.
The color on the fabric surfaces was a tough call. From photographs these surfaces appear shiny and similar in shade to the natural metal surfaces. I opted to use a glossy medium grey (lightened RLM75) in the absence of better information.
To simulate the faded swastikas I cut a template from Tamiya tape and then sprayed Polly Scale black on both sides of the tail. After a few minutes (Polly Scale dries fast) I rubbed the swastikas down with a slightly wetted micromesh sanding cloth to replicate their appearance in photos. A similar technique was used for the upper wing crosses, although in photos these crosses are not visible, perhaps owing to glare or because they were in fact completely removed. I also used the technique to replicate a sanded-down fuel triangle on the port fuselage. No stenciling is visible on the aircraft.
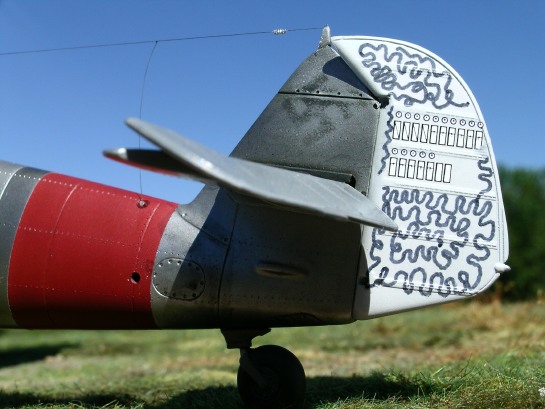
The tail was painted white (with a touch of grey) using Tamiya acrylic. I used a lead pencil to draw the convoluted squiggle pattern as close as possible to the pattern in photos. I then used a dark grey Gundam marker from Gunze Sangyo (available at Hobbylink Japan) to make the squiggles permanent. Afterward I simply erased the pencil marks. Worked like a charm – a big thanks to Kent Eckhart for the idea and for lending me the marker.
Traces of RLM 74 were added to the wing roots, elevator roots, and various patches on the wings. These areas were sanded down as described for the swastikas, leaving only faint areas of paint.
The wingtips on “Red 8” are either white or a lightly-colored metal. I opted for lightly-colored metal, as this was responsible for the light wingtips on the sanded down NASM aircraft.
The canopy frame and interior of the cockpit were painted RLM66. The drop tank and rack were painted RLM76. Oil streaks were added to the drop tank by spraying thinned black paint over the surface.
EagleCals decals (#32-88) for “Red 8” will be available in time for the IPMS Nationals in Atlanta. I used these decals for all markings except the spiral on the spinner, which I masked and painted since the decals were not ready when I was at this stage of building the model. A spiral decal is included on the “Red 8” decal sheet.
Images were taken with a Nikon Coolpix 5400 digital camera. The “unsharp mask” tool of Adobe Photoshop was used to restore some of the clarity and crispness lost during image compression.
© 2005 Ian Robertson
This article was published on Wednesday, July 20 2011; Last modified on Saturday, May 14 2016