
Hasegawa 1/32 P-51 Mustang
By Mark Proulx
The subject of this article is the excellent offering by Hasegawa of the definitive Mustang in 1/32 scale.
This kit has been released in North America in four different variations. The first kit released by Minicraft included markings for 3 aircraft. The first aircraft is the famous Millie G flown by Major Ed Giller of the 55th Fighter Group. The next aircraft is an olive drab and natural metal aircraft from the 361st Fighter Group and finally a British sharkmouth aircraft. The second release by Hasegawa is identical except for the decals. These markings are for Major Pierce McKennon's Ridge Runner III and Colonel Clairborne Kinnard's Man O' War. The third and fourth release are in Hasegawa's popular Nose Art series.
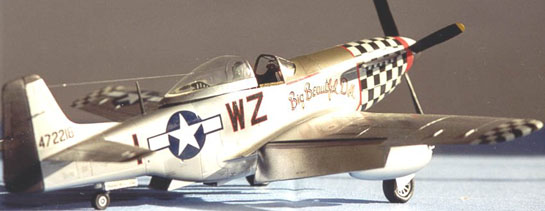
The kit used in this article is the P-51D Mustang Nose Art Part 1. Both Part 1 and 2 include markings for four different aircraft. The obvious choice to me was the well known P-51D of John Landers, Big Beautiful Doll of the 78th Fighter Group.
Upon opening the box I found the usual high Hasegawa standard. The surface detail consists of a combination of raised and scribed panel lines. Subtle fabric control surfaces are also nicely represented. Options include paper or metal drop tanks and 500lb bombs. A fully detailed engine is included for the optional open engine compartment. The wings have optional position gun access hatches. The major shortcoming of the kit is the poorly detailed cockpit and with that large bubble canopy this has to be rectified.
As with all my 1/32 scale kits, the first order of business is to sand off all surface detail and rescribe the kit. There is a multitude of references for this task. Remember to sand the fabric detail off the elevators as Mustangs had metal ailerons and elevators. Flaps were cut out from the wings to be dropped later on in construction.
The next item to focus attention on is the cockpit. Two aftermarket sets are available. Paragon or Verlinden. Both sets have their pros and cons. For this task I chose to use the Verlinden set. This set comes with nice photoetch and resin components. Its failing is that the area behind the seat is poorly done. As per Verlinden's insructions, the cockpit was completed, painted interior green and weathered. For the seat belt harness, paper is used by cutting it to the proper width and then sliding on the Verlinden buckles. A map taken from a Verlinden detail set was then folded and added to the glareshield. This area is truly outstanding and shows up well in that large cockpit.
The next item to be addressed is the area behind the seat. A new floorboard was made from .020 card and a resin fuselage tank was cast and added using a Monogram fuselage tank from their visible P-51D interior as a master. This tank was then glued onto the newly built rear floor section. A new fuselage tank fill tube was made from styrene tubing and added to the top of the fuselage tank. New radios are made from card and detailed by adding wiring to them. A new radio rack was then built using .020 styrene strip. The rack is then added to the top of the fuel tank. This area was also painted interior green to match the front half of the cockpit. On top of this assembly now attach the completed radios which have been painted flat black. Please take note that the Paragon set does have parts included to fix this area of the cockpit but doesn't supply any photoetch. The choice is yours.
The kit then was completed as per the kit instructions. The model fits together very well overall. Before closing up the wings, brass tubing was cut to length and attached to the gun bay. This is to represent the machine guns that would be visible at the leading edge. I chose to close up the engine and gun bay compartments as I prefer to have a relatively clean model that picks up the Mustangs' sleek lines. New flaps were made from card and styrene tubing. The tubing will form the leading edge of the flap assembly. It is then just a simple matter of gluing the newly cutout flap upper and lower surfaces to the tube. Styrene sheet .010 was used for the flap surfaces.
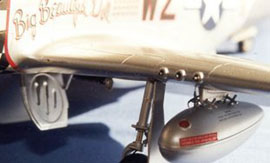
The rudder was covered in tissue. This will give the rudder a course finish that will be easier to see under the black paint. Plastic rod is then used to form the trim tab actuator. True Details supplied the wheels for this kit in 1/32 scale and are very nicely done. Brake lines are added to the landing gear made from wire. Also from wire and using available references, fuel lines are added to the 75 gal drop tanks. My references showed that this aircraft was equipped with a Radar Warning Receiver. This was also made from wire and added to the vertical tail. A model railroad lens fills in for the landing light that is to be installed in the left gear well.
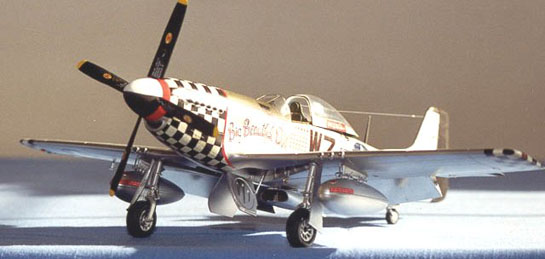
Now comes the time to paint. First polish the model to remove any scratches from the sanding process. Any little imperfection will show up later. Next, spray the olive drab glareshield and mask it off. Now using SNJ paints spray the model. I misted the paint on in four coats as recommended by the manufacturer with 15 minutes drying time between coats. Once the paint is dry pick-off various panels to highlight. Mask the panels off then use the polishing powder to shine them up. The propellor blades and rudder, to be painted flat black, are now masked off and sprayed. A silver pencil is used to scratch up the various access panels that are visible on the glareshield. Finally, the spinner is masked off and sprayed red aft of the propellor. Ahead of the propellor the spinner is sectioned into two pieces then sprayed black and white.
The canopy is now polished to a high sheen and framing added using Bare Metal foil. To decal the model the kit supplied items were used throughout. They were no problem at all and reacted well to decal setting solution. Colored model railroad lenses act as the recognition lights on the wing underside. Finally, add the antenna wire which I make from invisible thread for scale effect.
Overall, this kit was a joy to build and that impressive paint scheme sure does catch the eye!
© Mark Proulx
This article was published on Wednesday, July 20 2011; Last modified on Saturday, May 14 2016