
The "Edmonton Special" in 1/32 Scale
By Randy Lutz
Background
It is not a commonly known fact that 442 Squadron RCAF flew one of the last operational missions in the European theatre of the Second World War. It was on May 9, 1945, the day after VE day. To add an even more unique flavour to the mission, it was to provide top cover during the liberation of the Channel Islands which were the only British territories to be occupied by the Germans in World War II.
The Channel Islands fell under German occupation in 1940 and were overlooked during the Normandy Invasion. 442 Squadron had been notified on May 7, 1945 of the German surrender, and had celebrated almost to excess. May 8th, was spent relaxing in preparation for the mission scheduled for the following day. On the 9th, 442 squadron provided an escort for the naval force which had been en route to liberate the Islands since the previous day. Rumours had been circulating that the German Commandant was going to blow the destroyers out of the water and it was 442 Squadron's job to ensure the landings were unopposed.
A total of 14 Mustang Mk IVs set out from RAF Station Hunsdon, Hertfordshire, with three aircraft returning due to mechanical difficulties. The Squadron, led by Wing Commander J.A.S. Storar encountered no opposition and the entire mission could be described as uneventful.
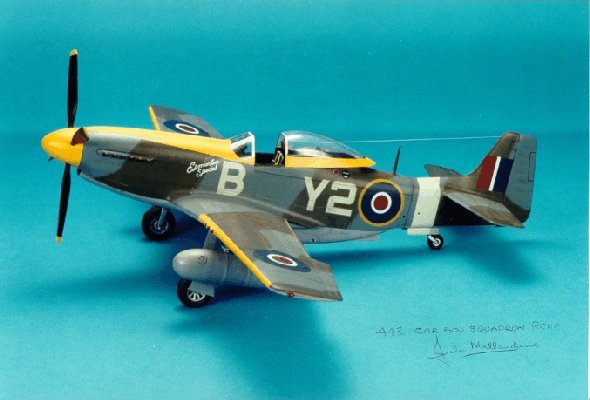
The Mustang I built for this review was flown by Pilot Officer John Mallandaine and is depicted as it was on May 9, 1945. The name "Edmonton Special" was applied in recognition of Mallandaine's birth place, and John has since stated "I never thought my artistic endeavour would ever become so well known." It seems appropriate to model the aircraft which participated in one of the final operational missions of the European theatre in World War II.
The Model
The kit used in this article is the Hasegawa 1/32nd scale P-51D Mustang. I had originally intended to produce a natural metal Mustang, but this was an old model that I had picked up at a swap meet and had been banged around. As a result, a lot of the parts were scratched and scuffed. As I am insufferably lazy, I felt it would have been too much work to prepare the surface for silver paint. Luckily, Arrow Graphics released a new sheet of decals which had enough visual impact for a camouflaged Mustang. With a scheme in mind, all that remained was to try and locate photographs of this subject. As in most cases, I like to bounce ideas off my modelling colleagues and hope that they can provide some much needed information. This model was no exception, as a friend, Steve Sauvé provided numerous large photos of 442 squadron Mustangs, including three nice shots of the "Edmonton Special". With a model and references, I was now ready to proceed.
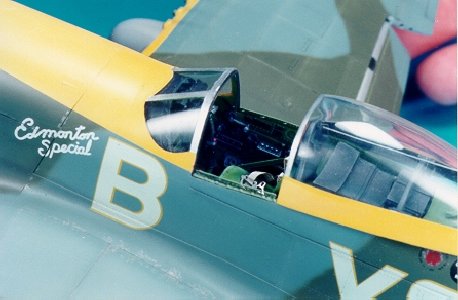
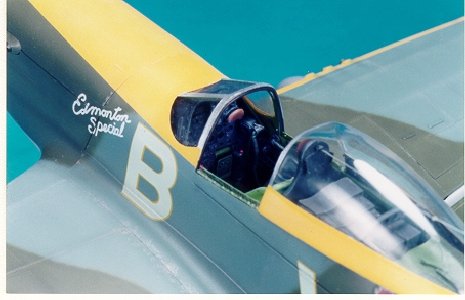
As good as the Hasegawa Mustang is, it does not hold a candle to the latest P-51Ds released by Tamiya or Hasegawa in 1/48th scale. Keeping this in mind, I decided that if this model was to compete on equal ground with these newer releases it would need some help. So I elected to utilise the Verlinden Mustang cockpit update set, some Xtra-part dropped flaps cast in resin and True Details bulged wheels. First up was the cockpit area. In case you are not familiar with the Verlinden set, it contains one comprehensive sheet of photo-etched copper parts, an assortment of resin pieces and some wire. Everything in it is for the cockpit, unlike their Bf 109E update set which covers other additional sections of the aircraft. Following the Verlinden instructions, all moulded in detail was removed from the insides of the fuselage and the instrument panel coaming was cut back to accommodate the new photo-etched part. Some of the photo-etched parts were super-glued to the fuselage and it was then given a coat of Testors Model Master Interior Green FS35141. This model was something of a departure from my normal building practices as I decided that it would be weathered from the outset. If it is to be weathered on the outside, logic would dictate that the interior should receive equal time. This is where my good friend Sid Arnold came to my rescue. He taught me the secrets to the "black art" of washes, dry brushing and pasteling. Sid is a master and under his tutorage, I could see the model come to life. It is now my duty to pass these secrets along to you. After the interior was painted Interior Green, it was given a coat of Testors Acrylic Clear Flat. The reason acrylic was chosen is to provide a dissimilar finish which will be impervious to the wash which will follow.
The wash consists of the base colour, in this case Interior Green, some black oil paint, I used Windsor and Newton Ivory Black with just enough turpentine to thin this mixture. Some people may omit the Green, but it will produce a wash composed entirely of black which will create too much contrast with the green areas. Washes are intended to produce shadows, and shadows are merely the base colour in the absence of direct light. When applying the wash, dab the brush in cracks and crevices and allow the capillary action to draw the liquid. Do not attempt to paint the wash in place, it will not work! Sometimes you may find it necessary to repeat the wash until you have the desired depth. The advantage of applying the wash over an acrylic flat is that it eliminates the excessive staining that results if a wash is applied directly on flat paint.
Let the wash dry for at least 24 hours before attempting the dry brushing. When dry brushing, I again used the Interior Green, but it was lightened with Windsor and Newton Titanium White oil paint. Some readers may prefer to dry brush with a generic light grey as many modellers do, but I can tell you that the results are far superior using a lightened version of the base colour. You may be wondering why it was lightened with oil paints instead of white enamel. The oil paint does not allow the mixture to dry as quickly, giving you much more time to work with the paint and preventing the brush from drying out. Work the dry brushing over areas that have been washed and it will tone down the dark washed look, gently blending all areas together. Let this dry overnight before moving on to any further washes or dry brushing in alternate colours. The wash and dry brushing routine was applied to various cockpit components, each time respecting the base colour.
The instrument panel and various boxes were airbrushed using Testors Model Master Black Chrome. This was followed by subsequent dry brushing starting with a dark grey and finishing with a light grey. This process imparts a greater depth to the finish and is more realistic than a one colour dry brushing.
The floor area was first brush painted with Testors Flat Tan, streaked with a darker brown and then given a dark brownish green wash. When almost dry, a brush slightly dampened with turpentine was used to remove any excess wash. A dust boot was made for the base of the control column using a small piece of facial tissue soaked in a mixture of white glue and water. It can be shaped and when dry, painted as per normal.
Verlinden supplies metal seat belts but I elected to replace them with thin strips of masking tape which were painted a pale linen shade. The buckles were airbrushed with Testors Metalizer Steel and the assemblies fastened to the seat. In retrospect, I feel the Verlinden buckles are oversize, and would be best replaced with Eduard or Model Technologies buckles. Note that the seat is finished in Chromate Green and not Interior Green. This is clearly shown in the Mustang in Color by Squadron Publications. The gun sight was painted Black Chrome and the two small circular lenses were picked out using Kristal Klear. Verlinden supplies a nice sun shade for the gun sight which really finishes off this piece. All the cockpit components except the seat, radio gear and headrest were glued in place. These items were left out as they are higher than the cockpit sill and would interfere with masking later on.
Prior to joining the fuselage halves, the tail wheel well and inside face of the doors were airbrushed with Testors Pla Chromate Yellow. This is the paint in the small square jars and sprays beautifully. A dark wash was applied to the inside face of the doors and then dry brushed with a lighter shade. The tail wheel strut was finished in Metalizer Steel and given a dark wash. Testors Rubber was used for the tail wheel after it had been flattened on the bottom.
The fuselage was assembled using liquid cement, and it was now time to tackle one of the areas that makes this Mustang different from most. This was the louvred cowl vent panels. On almost all P-51D's, North American utilized perforated panels. However for some reason, many of Mustangs supplied to Commonwealth squadrons had louvred vent panels. The first step was to sand off the kit panels and open up the area. Next, I used a photo-etched vent panel from Eduard sheet No. 32-010 as a template to create replacement panels from thin styrene. With the outline defined, a chisel edged X-acto blade was hammered into the panels in four parallel lines. The design of the blade's bevelled edge allows one side of each cut to be more recessed than its opposite side. This aids in creating the shape of the louvres. A simple prying motion with the blade while it is in the cuts will finalize the shape. The panels were cut out of the styrene, the edges sanded to reduce the thickness, and they were glued in place.
As I have stated previously, this was an old model and as a result the engine was missing, but I was fortunate that the exhaust manifolds were still there. They were drilled out and super-glued in place. As there was no engine to support them, and to ensure that they would not be pushed inside the nose at a later date, a cross brace was inserted between the two manifolds. The top of the engine cowl and windscreen were glued in place, and the cockpit was masked over to protect the insides.
Prior to fastening the wings, the landing flaps were removed using an OLFA plastic cutter. The wing fillets were thinned to a more scale appearance and then the top surfaces of the wings were glued to the fuselage. From time to time I use this method when attaching the wings as I find it produces a better wing to fuselage joint. It does not work with all models but will work quite well with this kit. Once the tops had set, the bottom of the wing was glued in place and any seams were smoothed over. I prepared the Xtra-parts dropped flaps and much to my concern, found they are about 1/8" too short in span. While I cannot factually state why, I believe it is because they took measurements from the top of the model only. However, the flaps on a Mustang go under the wing root fillet. If measurements had been taken from the bottom they would have been the correct size. Consequently, I had to add extra plastic to the ends to compensate for the large gap. The flaps were not added at this time, merely modified so they would fit properly. The tail planes were fastened, and all joints smoothed over using Tamiya putty.
While the putty was curing, the landing gear was cleaned up. One of the first steps was to drill out the torque links and thin them down a little. Some tie down rings were added and then the landing gear was painted in Steel and given a black wash. Aluminium foil was applied to the shock portion to produce a more realistic oleo strut. The True Details wheels were first painted Metalizer Steel. This area was then masked off, and the wheels were sprayed with Testors Rubber followed by a dry brushing with a dark grey and then dry brushed with lightened rubber. The wheels were not fastened to the struts until one of the final steps as I wanted to ensure they rested on the flat spots.
The radiator inlet lacked any visual interest, so I added an inlet screen from the Eduard detail set on the P-51D. This same sheet also provided the radiator screen visible when looking into the rear of the radiator outlet. They are hard to see, but I know they are there. I was proceeding with the model and at this time I still had not decided how I was going to model the Aeroproducts propeller. I looked through my spares and could not come up with anything. I am not aware of any after market accessories which deal with this area, and the kit blades do not readily lend themselves to modification. Finally I called Revell/Monogram models asking if I could buy the necessary parts from the newly re-issued Phantom Mustang. I was open and above board, explaining that I did not have the Phantom Mustang, but merely wished to purchase the parts. I must have found a sympathetic ear in Debbie Hunter at Monogram, as she understood what it means to modellers to have the correct parts and assured me the parts would be forthcoming. A few weeks later I had the correct propeller blades along with the spinner assembly. Thanks Debbie, you are a life saver! All the new blades needed was a minor reshaping and they were ready for paint.
The first painting steps involved the Sky fuselage band and the Identification Yellow anti-glare panel and leading edge to the wings. As usual, Xtra-color is my paint of choice, with X7 RAF Sky BS210 and X106 Insignia Yellow, FS13530 being used respectively. Once these areas were dry, they were masked off and the underside was finished in X3 Medium Sea Grey BS637. This was followed by the upper surface camouflage pattern applied freehand using X6 Ocean Grey, followed by X1 Dark Green BS641. All airbrushing was accomplished with a Paasche "V" dual action, set at 30 psi., with the paints thinned with lacquer thinner. Once all the basic camouflage was completed the rear main spar in the wheel wells was painted Testors Chromate Yellow, masked over and then the remainder of the wheel well finished in Testors Non-Buffing Aluminium Metalizer. This was followed by a darkened wash, and subsequent dry brushing.
All masking was removed and the model inspected for any necessary touch-ups. Luckily, none were needed, which is not always the case. Arrow Graphics decal sheet number G-9-32 was used for the markings. If you are not familiar with Arrow Graphics, they offer an extensive line of RCAF markings, mostly post war, but recently have expanded to include numerous World War II subjects. The good thing about their products is that they are usually offered in all scales if a model is available. To ensure perfect registration of the roundels, they are printed as separate colours, leaving it up to the builder to align the circles. The first to be applied were the yellow backgrounds to the fuselage type "C1" roundels. Once this position was determined, the yellow background to the squadron codes could be applied, followed by the remaining overlays. The decals respond well to Solvaset if not applied too heavily. Using multi-part decals slows down the process, but I feel the final results far outweigh the extra time required. Overall, these decals rank as some of the finest I have used. They snuggled into, and hugged every contour of the model. If they could cook dinner I would marry them! It is interesting to note that the upper wing roundel is of the 40" "C" type, as opposed to the more common "B" style. The white ring was introduced in early January 1945 under an order from the 2nd Tactical Air Force.
Once the decals had dried, it was time to try something new, mainly duplicating the chipped paint look. For this step I remembered something Jamie Leggo had once told me. This was to mix silver paint with Raw Umber oil paint. It changes the tonal value slightly while eliminating the garish look of bright silver. This mixture was discreetly applied to wing roots, the leading edge of the wings and around some of the cowl panels. Stop when you think you do not have enough, as in all probability it is the right amount, or almost to too much. Once it had dried the entire model was over-sprayed with Floquil Flat Finish. While this was setting, I airbrushed the drop tanks with a slightly darkened mix of Medium Sea Grey. The tanks were them given a dark grey wash around the filler caps and retaining straps. This was all followed by Floquil Flat. No chipping was applied to the drop tanks as the units selected are the 110 gallon compressed paper type.
Pastelling was next, which was something new for me. Fortunately, Sid was available for guidance, as well as providing the pastels. For the underside, a slightly darker shade of grey was applied to all panel lines, while the upper surface panels were accented with a very dark grey. The topsides were then pasteled using lighter shades of grey and green to simulate fading and streaking as a result of airflow. The yellow areas benefitted from shades of brown in any recesses and white for highlights. The tires were pasteled with a desert tan colour to simulate dust and the drop tanks were finished with three shades of grey working from lightest to darkest. Overall, the application of the pastels encompassed over 5 hours and numerous bottles of beer while finishing in the wee hours of the morning.
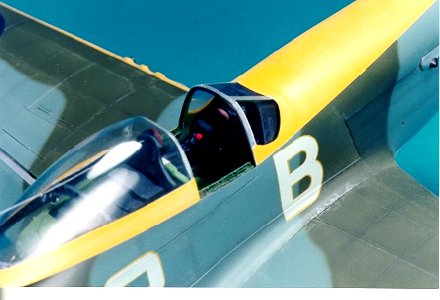
The drop tanks were installed, with the fuel lines fabricated from black telephone wire which had portions of the insulation stripped away. Fortunately, I had extra telephone wire in all my wall outlets. The bare parts of the wire were sprayed with silver and installed using super glue. Final detailing consisted of the antenna wire which passes through a hole drilled in the sliding section of the canopy. Humbrol enamels were used for the navigation lights, while the underwing formation lights were made by spraying Testors Turn Signal Amber, and Gunze Sangyo Transparent red and green over small disks of decal film and applied in the conventional manner. A regular HB pencil was sharpened and rubbed on selected high points in the cockpit to show areas of wear.
The finished model has been competing very well at recent model conventions and various interpretations of this scheme have been showing up at all the shows I have attended. My only complaint with the finished product relates to the size of the decals. The "Edmonton Special" logo and squadron codes are far too large for this scale. While not 100% positive, I feel that the markings from the 1/48 sheet would be a better size. But c'est la vie, the model is finished and regardless of the size of the decals, it still looks good to me.
A special thank you goes out to Steve Sauvé for supplying the reference material, Sid Arnold for giving me the courage to try weathering and Jamie Leggo for taking the photographs.
References
- Camouflage and Markings No. 2 N A Mustang RAF Northern Europe 1936-45. Ducimus Books
- Mustang in Color, Squadron Publications
- 442 Squadron History, by Captain Grant MacDonald & Captain Terry Strocel
- Model Art No.401, North American P-51 Mustang. Model Art Co., Tokyo Japan
- Photographs of the actual aircraft
© Randy Lutz
This article was published on Wednesday, July 20 2011; Last modified on Saturday, May 14 2016