
Building the Revell Republic P-47 Thunderbolt
By Randy Lutz
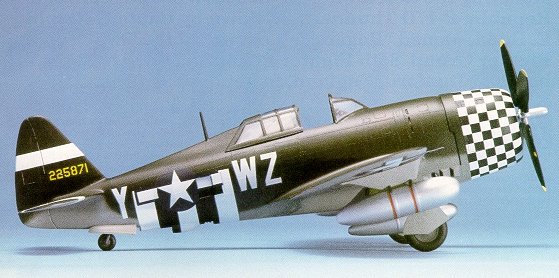
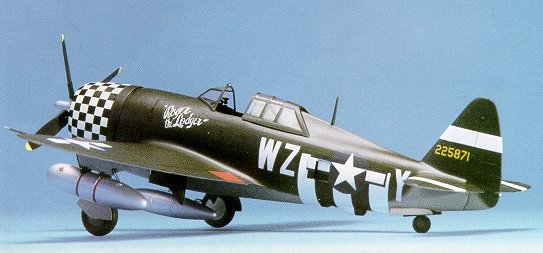
To represent Captain Gerald E. Budd's "Roger the Lodger" of the 78th Fighter Group, 84th Fighter Squadron, 8th Air Force based at Duxford, England in September 1944.
BACKGROUND
As the largest and heaviest single seat fighter of the Second World War, the Republic P-47 Thunderbolt, or the "Jug" as it was affectionately known to the pilots who flew it could function in the capacity of a fighter, or a ground attack aircraft. Between the years 1942 and 1945 more than 15,000 Thunderbolts were produced, which was the highest production run of any American fighter during the Second World War. After the war many P-47's ended up serving with the National Guard, and soldiering on in European and Latin American Air Forces.
The roots of the Thunderbolt can be traced back to the Seversky P-35 which was the product of Soviet aircraft designer Alexander Kartveli. The lineage was clearly evident in the P-35, followed by the P-43 Lancer and finally culminating in the P-47.
The P-47 was designed in response to a USAAC technical authorities request for a large, powerful fighter. Kartveli realized the limitations of the Allison in-line engine specified by the USAAC, and offered in his proposal the Pratt and Whitney R-2800 Double Wasp radial engine which at the time was producing 2000 hp.
Essentially, the aircraft was designed around the engine and its turbocharger feeding system. In June of 1940, the USAAC accepted the proposal and an order was placed for close to 800 of the newly designated P-47Bs. The Thunderbolt passed all flying tests and was placed into service with the 8th Air Force based in England at the beginning of 1943.
With the advent of the P-47D, the aircraft was fitted with a more powerful engine and had provisions for carrying a larger bomb load.
Once placed in operational service the Thunderbolt with its huge slab sided cowling was a natural for various forms of nose art and unit markings. Perhaps one of the most visibly marked units was the 78th Fighter Group of the 8th Air Force based at Duxford, England. Initially, the group markings consisted merely of a white nose painted halfway back on the cowling. But this was soon expanded to encompass the entire cowl, to which a black checkerboard pattern was superimposed.
THE MODEL
Upon opening the box, the first thing that strikes you is the size of the kit. This thing is huge! I was building five P-47s at the same time, and had to move to a larger house. And how about those rivets. If this thing were actual size I don't think it would fly.
My sample was one from the Lone Eagles series, and it was evident that the moulds were starting to show their age. I compared this recent release to my unbuilt original issue Thunderbolt in SEAC markings of the Royal Air Force, and was able to spot where the quality has deteriorated. It was most evident on the undercarriage doors which have thinned noticeably and now suffer from major mould ejector pin marks. Also the instrument panel was literally devoid of detail. The decals however are of good quality with markings for Major Bill Dunham's "Bonnie" of 348th Fighter Group in the Pacific. I did notice the decals do emit a milky white substance when they are transferred to the model, but it is not a real problem if you rinse it away after application. This is a symptom common to the new decals by Revell. If you should aspire to build a Razorback in markings other than what is provided in the kit, Superscale offers decals for no less than 11 different aircraft.
The model is afflicted with some glaring inaccuracies which should be corrected, and some minor omissions and faults which may be passable. By my estimation, the most obvious error is in the stance of the completed model, as the undercarriage is moulded such that the model should be suspended from the ceiling if the landing gear is down. This was rectified by removing 1/4" of the landing gear struts. This allows for the upper gear door to overlap the lower door as per the actual aircraft. The other major error is the length of the chord on the vertical fin, as it is too short. I did not attempt to correct this as I am insufferably lazy and it would have meant correcting the other four Thunderbolts as well.
Minor faults with the kit consist of the tail wheel strut being moulded on the wrong side, the engine crankcase protrudes slightly from the cowling, the wing guns should run parallel to the ground and not in line with the dihedral and the inboard landing gear door struts are absent. There are other things I could mention but it would be nit-picking and the web sight is not big enough to list them all.
As is my usual practice, construction started with the engine which is composed of seven pieces. The front and rear banks of cylinders were assembled and brush painted with Humbrol Gunmetal. After which, a wash of black was applied to pick out the cooling fins. The intake manifold was omitted as it is not visible from the front of the engine, and I elected to glue the removable cowl panel in place as it is incorrectly reproduced. The kit provides a single square panel while on the original aircraft the removable panels are more of the clamshell variety, encompassing the nose ring. The engine crankcase was brush painted with Humbrol gloss Dark Gray, while the ignition harness and pushrods were done in silver. The magnetos are finished in a gloss dark brown, and as a final detail a Waldron engine serial number plate was glued on. This I.D. plate is included with their placard set for the P-47. Once completed the engine was set aside for installation later. As a point of interest, all steps mentioned in this article should be multiplied by five as I really was building five at the same time.
This brings me to the cockpit which was moulded in six pieces. These consist of the instrument panel, two side panels, the back, the floor and the control column. In my opinion, the detail on these parts leaves a lot to be desired. Hence my desire to use the Waldron detail set. Before adding any detail parts, the majority of the kit provided details were sanded smooth and clear photo references were consulted. This is a must as the Waldron instructions are of a rather poor quality and quite small. Also there exists confusion between the part numbers on the metal parts and the instruction sheets. Prior to painting, the large gap which results from the assembly of the seat back to the floor was filled with Zap-A-Gap and sanded smooth. The instrument panel had all scribed instruments drilled out in preparation for the installation of Waldron instruments.
Once all parts were cleaned up they were airbrushed with Testors Interior Green (FS35141). Afterwards, the various consoles and the instrument panel were painted with Testors Black Chrome. I have found that this black has the right amount of sheen to accurately replicate cockpit interiors. The instruments were then added, and the multitude of metal foil placards were super glued in place.
The kit provided oxygen hose was somewhat anemic in appearance, so a new one was fabricated from wire stock over which was slipped a spring from a Honeywell terminal. This spring resembles one commonly found in ball point pens only much longer. This assembly was then painted with Humbrol Medium Green and installed. Other details were added such as various levers and cables, the gunsight mount and rudder pedals were drilled out and a set of Model Technologies photo-etched buckles and masking tape seat belts were glued into position. Once complete, the cockpit interior contained a total of 68 individual pieces as opposed to the original six.
The fuselage was assembled and the cowling nose ring and panels were filled and sanded smooth. There should not be any prominent gaps on the cowling. All the flying surfaces were assembled and attached to the fuselage, and then it was time for sanding. Every seam on the model requires some form of filling and sanding. All seams were filled with Zap-A-Gap and then smoothed over using progressively finer grades of carbon paper. While I was in the sanding mode I also sanded the entire model to tone down the rivets. I found the fit on the bottom of the fuselage near the engine left a lot to be desired as the firewall seems to be a little oversize and must be shaved down.
After all the body work was completed the model was prepared for the application of the invasion stripes, and white identification stripes and nose. My personal preference for painting invasion stripes is to use Tamiya TS-27 Flat White spray lacquer. It does not cover quickly but does dry fast and withstands numerous attempts at masking. The black portion of the stripes was sprayed with Tamiya TS-6 Flat Black lacquer. It is quick and easy and saves digging out the airbrush.
After all the stripes and cowl were masked off and the basic camouflage was applied using Tamiya acrylic colors. The undersides were airbrushed with XF-20 Medium Gray, and the upper surfaces were airbrushed with XF-62 Olive Drab. With the basic colors. having been applied, the wheel wells, and the inside faces of the gear doors were sprayed with Testors Interior Green as well as the side panels behind the sliding canopy.
Once all the masking was removed, a few coats of Future Floor Wax were airbrushed overall to prepare the surface for the application of decals. The decals are combination of Superscale, and the kit supplied markings. The national insignia are Revell, while the checkerboard is from the Superscale sheet No. 32-13 and all decals unique to "Roger the Lodger" are from Superscale sheet No. 32.23. The checkerboard decal comes in two halves, and while superficially it appears a simple set to apply, in reality it proved to be more trouble than I had anticipated. The decals are thin, and you must cut between the first three rows of squares back from the nose. This is to allow the decal to conform to the curvature of the cowling, but it all leads towards more edges to line up. Solvaset was sparingly applied to get all decals to snuggle down into position over the rivets and panel lines. Once all the decals were completed the model was again given a few coats of Future floor wax with the airbrush. It has been my experience that if this step is overlooked the sheen will appear different in the decalled areas once the flat finish is applied. To arrive at the desired flat finish I sprayed Testors Dullcoat overall using light mist coats.
The aircraft stores were assembled with the underwing drop tanks being salvaged from a Hasegawa P-51D Mustang and the center line drop tank coming from the P-47. The existing moulded in bombs were cut away from the wing pylons, and the fuel line access holes were drilled out in the pylons and drop tanks. The drop tanks were sprayed with Testors Metallic Silver and then red stripes were cut from decal material and installed. Bomb shackles were fabricated from scrap plastic and then the drop tanks were installed. All fuel lines were duplicated with .025 Teflon electrical wire. The same wire was used for the brake lines which were added later.
As stated earlier, the main undercarriage had to be shortened about a 1/4", and then the oleo scissors were drilled out. Afterwards the undercarriage was painted with Humbrol Gunmetal and aluminum foil was used to represent the oleos. With the modified landing gear installed the Jug had the correct stance and the gear doors now overlapped as per photographs.
Essentially all that remained was to add small details such as the inboard gear door retraction arms, the clear gunsight lens and the propeller. The propeller should be a Hamilton Standard and not the kit provided Curtiss, however I was not able to locate a substitute. Since the model has been finished I have encountered a company called Roberts Model which supplies the correct type of propeller. The wing guns were brush painted with Testors Gunmetal which is a totally different color from the Humbrol and the navigation lights were detailed with Humbrol gloss dark red and dark green. As a final step all control surfaces, cowl flap detail and the various vents on the model were picked out using a Rapid-o-graph technical pen and black India ink.
REFERENCE
- Aircam Aviation Series No.2, Thunderbolt in USAAF, RAF & Foreign Service. Osprey Publishing
- P-47 Thunderbolt in Action, No. 67, Squadron/Signal Publications
- Thunderbolt in Action, No. 18, Squadron/Signal Publications
- Camouflage and Markings, P-47 Thunderbolt ETO & MTO, Ducimus Publications
© 2000 Randy Lutz
This article was published on Wednesday, July 20 2011; Last modified on Saturday, May 14 2016