
Airshow Models | Jim LeRoy's Pitts S-2S Bulldog in 1/32nd scale
Reviewed by Brad Hagen
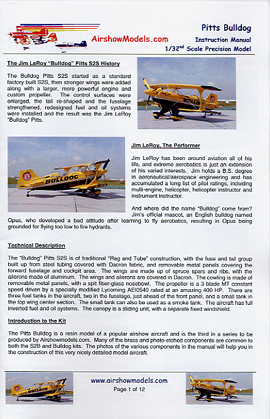
History
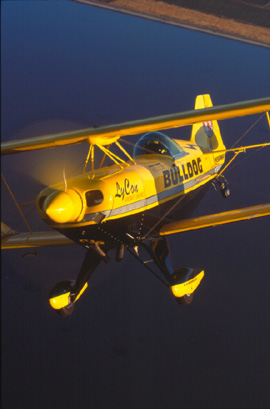
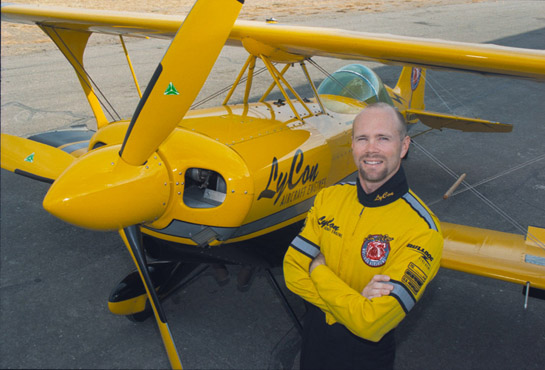
Jim LeRoy is a third generation pilot and has been around aviation all of his life. As for his interest in aerobatics - "I've always been an extremist" admits Jim, "when you say boat, I think hydroplane, when you say automobile, I think Indy 500, and when you say aircraft, I think low level aerobatics - airshow flying is a natural for me".
Jim's professional background is as colorful as his airshow routine. Jim's wide and diverse occupational history includes titles such as USMC Scout/Sniper, jet engine designer, flight instructor, and power station manager.
Jim holds a B.S. degree in aeronautical/aerospace engineering and has accumulated a long list of pilot ratings as well, including multi-engine, helicopter, helicopter instructor, and instrument instructor. Because of his dedication and commitment to excellence, Jim has established himself as "the one to watch".
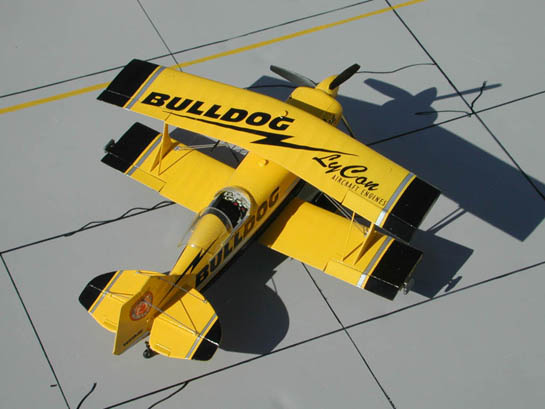
Jim's Pitts isn't any ordinary S2S, stronger spar material is used, less space between ribs, both the top and bottom wings have a longer chord and a different airfoil on the top wing, the ailerons are 50% longer with a 1 inch wider chord. The wings were designed by Steve Wolf who built the Pitts Sampson replica and helped design and build the Gee Bee R-2 replica.
The fuselage was reinforced inside and out as was the tail. The elevator and rudder areas were increased by 10% and changed from round in shape to angled. The landing gear was strengthened and the cowling was modified to fit the souped up motor.
The engine is a Lycoming AEIO-540-D4A5 that has been modified by LyCon to produce 400 horsepower (stock motor is rated at 260hp). These modifications are classified at the request of LyCon.
What do all these modifications mean? Not only does his Bulldog stand out in a crowd, but he can literally turn his Pitts inside out during his routine. Jims website has a video section which bears it out, the video of his take off that goes straight up has to be seen to be believed!!

Instructions
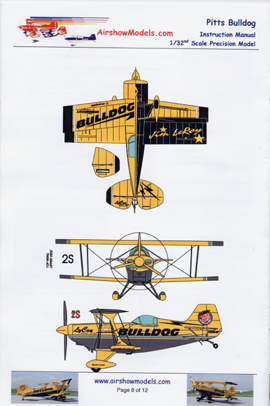
The instruction booklet was written by Barney Dunlevy and is one of the best I've seen in any kit. It has a 2 page parts breakdown, then goes on to a step by step build of the model with color pictures throughout with a nice 3 view to aid in decal placement. Barney continued with colored boxes to give tips in building and things to watch out for that he found while building the prototype.
Fuselage and wings
The Bulldog kit only has a few parts in common with Airshow Models Pitts S2B kit reviewed here, otherwise this is a whole new kit.
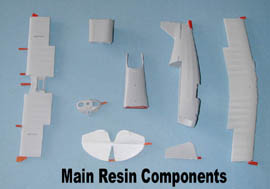
The first parts that are noticeably different are the wings with their squared off wing tips. The ailerons have recessed areas where they fit in that look just like photos I've seen.
The fuselage is different by having a squared off tail and while the real plane is a single seater and the model has the interior of the 2 seater, the model accomplishes the look of the single seater by having a new top for the fuselage and using the front seat as a "bulkhead" of sorts that the radio is attached to.
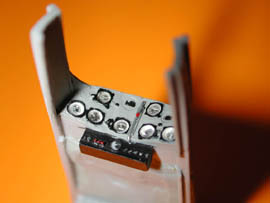
I haven't been able to find any pictures of the real Bulldogs cockpit or instrument panel, so I can't comment on it's accuracy, but Airshow Models has done a good job of representing the detailed, but yet sparse look of a Pitts cockpit. The detail level molded in is excellent, it looks as if you could flip the toggle switches. They don't include any instrument decals so you will need to supply your own, hopefully they will be included on future kits as the rest of their decals are of high quality and then everything you would need to build the kit would be included. There are recesses where the instrument decals go.

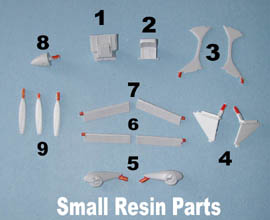
The cowl is solid with the engine cylinders halves molded in, after the front of the cowl is glued on, there's not much to see, so a little careful painting will bring out what you can see of the cylinders.
The three bladed prop is nicely detailed and crisply molded in resin. The other small parts are crisply molded as well and I could find virtually no flash on my kit, the tiny bit there was can be easily removed with a sanding stick. The pour stubs on all parts are very small and easily removed.
Barney has included some photos of his Bulldog under construction and finished which help bring out the details. This photo shows the pinking tape detail on the tail and the photo etch braces and elevator tab control. The rudder is a separate item on the kit, but the stab/elevator is one piece, the elevators are molded in a slight down position with the tabs being molded in a slight up position which the photo shows.
Brass Parts
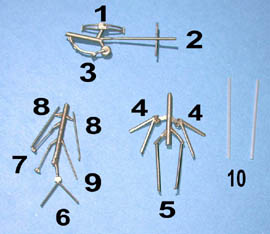
The brass parts are the same as in the Pitts S2B and are of very good quality with almost no flash. The cabine struts have small alignment tabs to insure they line up and fit the model correctly.
Photo-etch
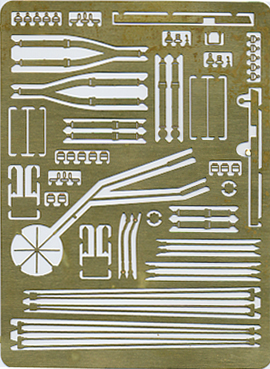
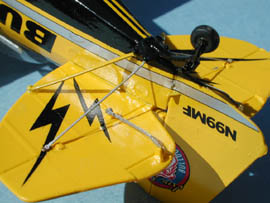
The kit comes with two photo etch sheets, the first is the same as the Pitts S2B kit and includes ites such as the floor boards, sighting device, ect. Photo etch sheet #2 has the stabilizer brace wires, canopy frames, and the pyro mounting plates that are unique to the Bulldog. The flying wires will fit OOB making these the easiest biplanes to rig. Being photo etch, they're flat and may not be to the liking of some, other alternatives would be music wire, fishing line, stretched spue, but none of these would be accurate either. Until someone releases airfoil shaped rigging, it's up to your tastes, the PE does give a nice looking result and its quick and painless compared to the other alternatives.
Clear Parts
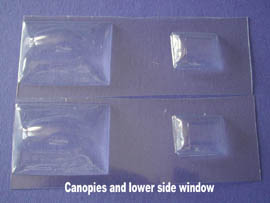
There are two identical vac clear parts which include the canopy and lower fuselage window. They are thin and crystal clear. There is no plug to aid in cutting, so care will be needed in removing the parts, but, you have a spare if you screw up.
Decals
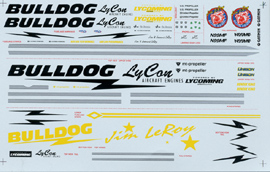
The decals are by Microscale and are very detailed. They are in perfect registry and even the tiniest lettering is readable. Jim added "Marines" in red in front of the cockpit on the top of the fuselage, but these decals were produced before he did that. As with all airshow planes, the markings change from year to year.
Conclusion
This is a very nice kit that will be an easy and quick build OOB and with it's bright yellow/black scheme, it will stand out amongst the military planes on your shelf and on the contest table. This is a small model and will take up very little room on your shelf, even in 1/32nd scale, but the cockpit is still large enough for you to super detail if you'd like.
If you like civilian/airshow planes, this kit is a must. If you build military models and are looking for something different, or want to get over AMS from your last build, this would be a good choice, a quick, easy build, and no worry about weathering (highly polished).
Thanks to Barney Dunlevy (Barney's Air Force) and Jim LeRoy (Jim LeRoy's Bulldog homepage) for the use of their photos!! Jim's site has photos of his plane in various schemes, as well as movies and a Bulldog you can download for use in Microsoft's flight sim. Check out Airshow Models site for this and their other models.
© Brad Hagen 2003
This review was published on Saturday, July 02 2011; Last modified on Wednesday, May 18 2016