
Hobby Boss | Il-2 Sturmovik on Skis
Reviewed by Jason Moore
I will not go over step by step how to build this kit as it looks to be a relatively easy build straight out of the box, due to the good fit and clear instructions, and certainly nothing beyond the ability of any competent modeller, despite its considerable size. The following is a general overview of the kit and how to make an impressive kit into an even more impressive model, including correcting some inaccuracies and omissions.
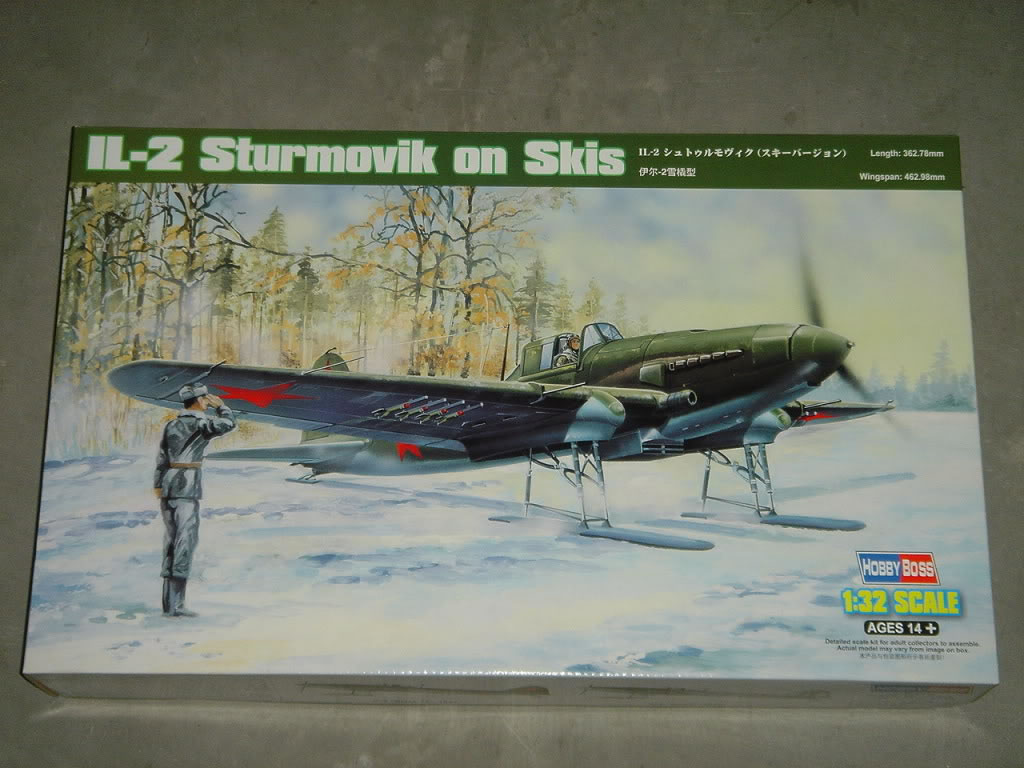
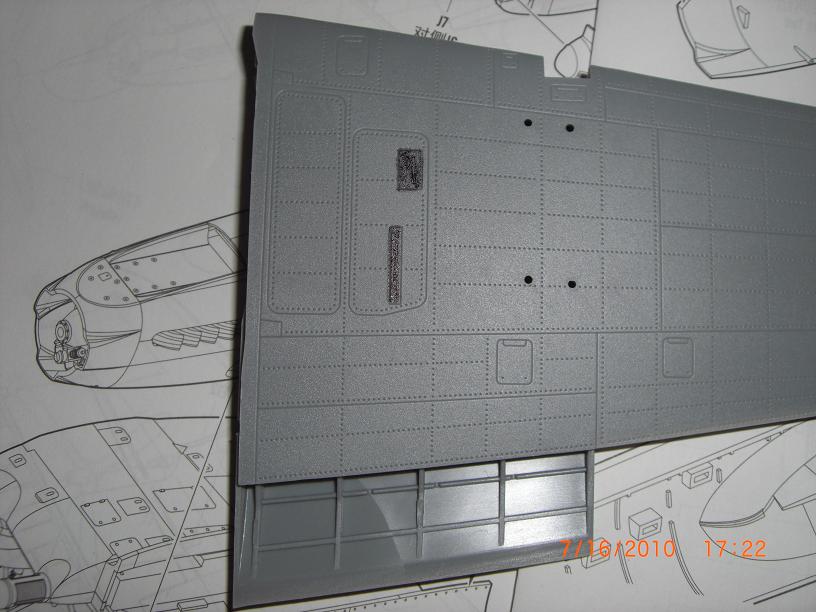
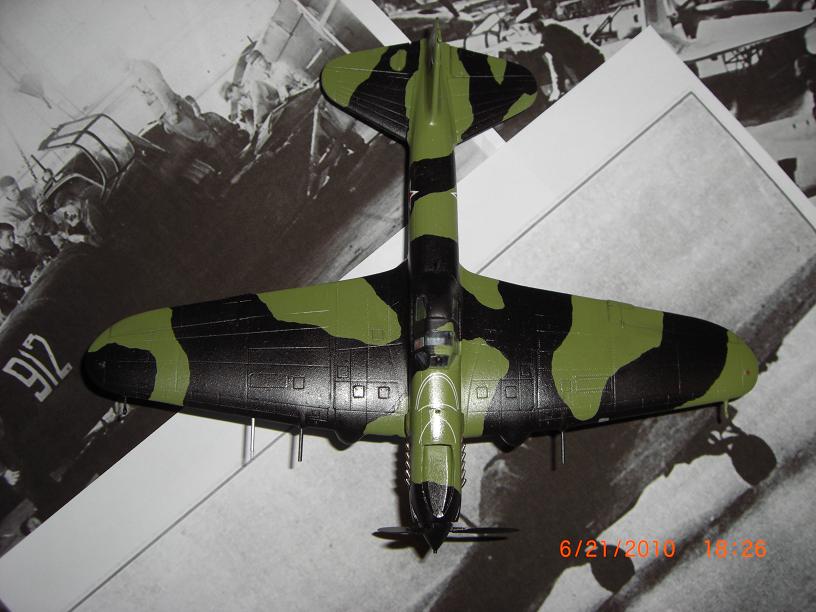
The first thing you will notice about this kit is the large size of the box. There is a good reason for this - the kit itself is large. Remember that the actual plane was a surprisingly large craft for a single-engined aeroplane, bigger than a P-47 Thunderbolt, with a length of over 38 feet and a wingspan of over 47 feet. Upon opening the box, you will see 11 sets of sprues, moulded in a medium-grey plastic and packaged in clear plastic. The canopy parts, the rubber ammunition belts (a nice touch), the photo-etched parts for the seatbelts and plastic bomb bays (and including the strap for the rear-gunner, clear evidence of two-seaters to come) are included in a small box inside the main box and are also individually wrapped in plastic. The clear parts are well done, except for the sighting lines missing from the windscreen (more on that below), and these include clear cowling parts to show off the engine detail. As the cowling panels that normally opened up for engine maintenance on the actual Il-2 were relatively small (possibly a result of the armour plate also having to double as the front fuselage structure), the clear parts are a nice way to see the entire engine, if you wish to display it that way. The decals are nicely printed and are also wrapped in plastic. All in all, everything is well-packaged. To top things off, there is a colour painting guide (unfortunately inaccurate - more on that below), and there is a well-illustrated instruction sheet. Below are photographs of the kit parts:
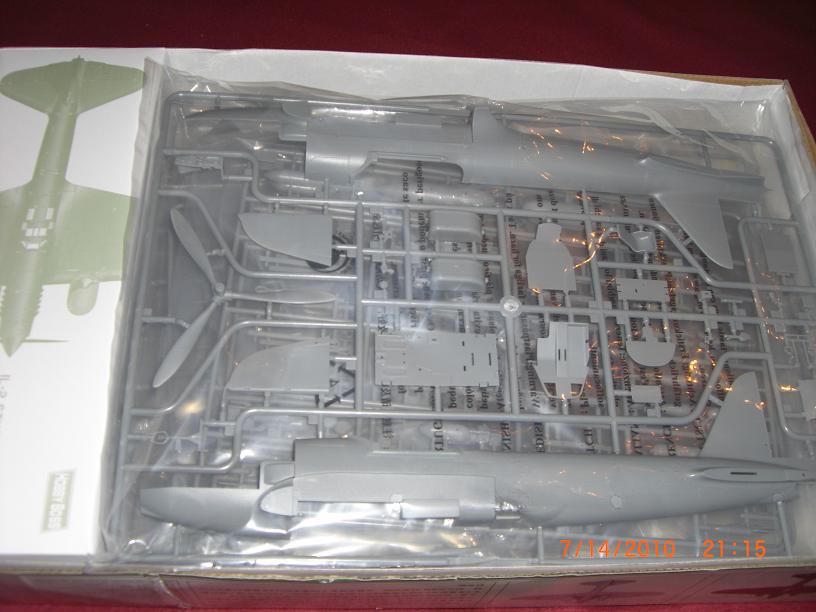
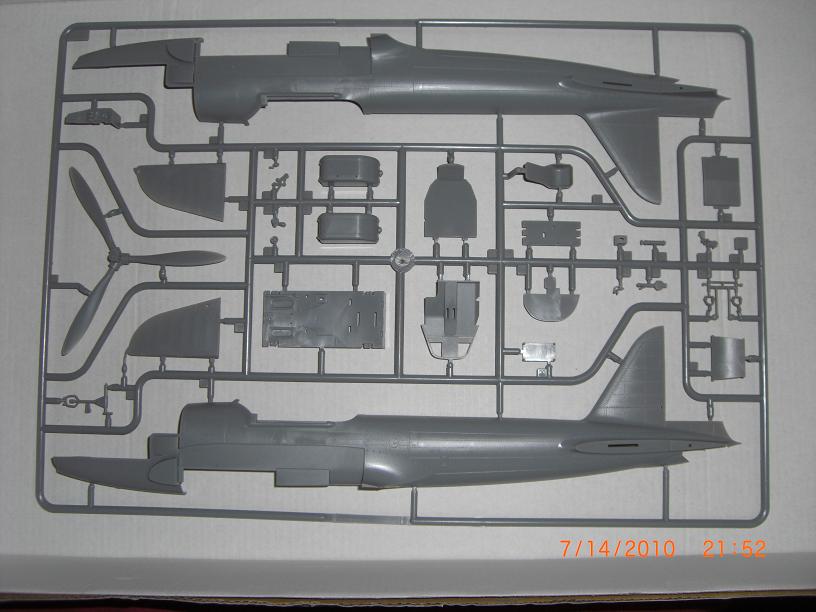

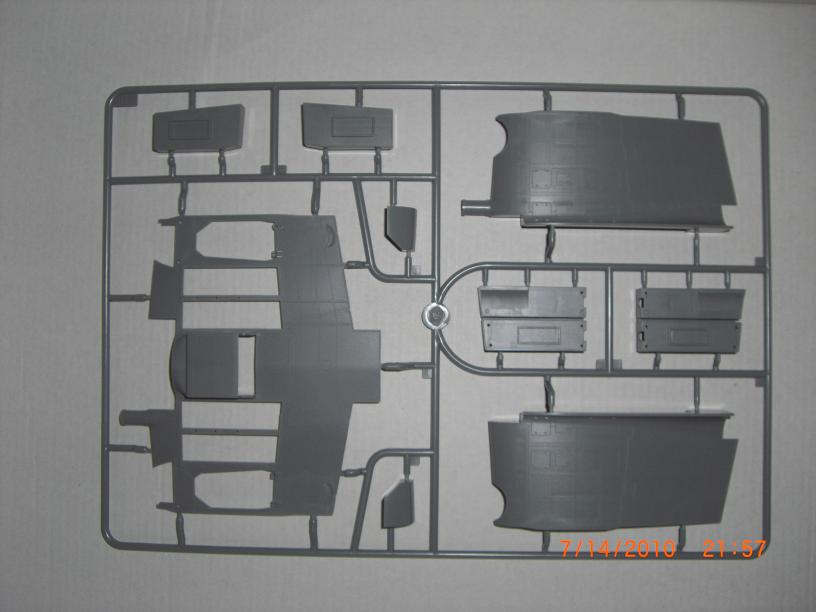
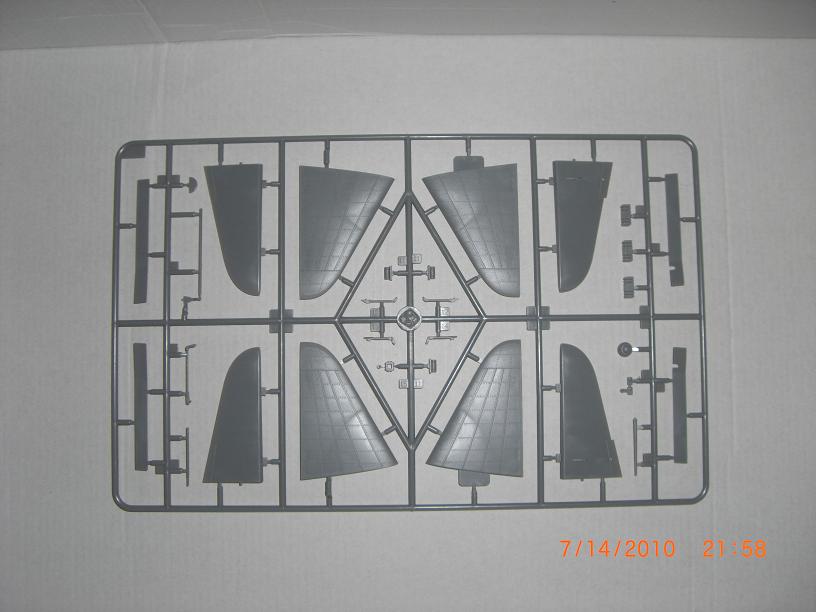
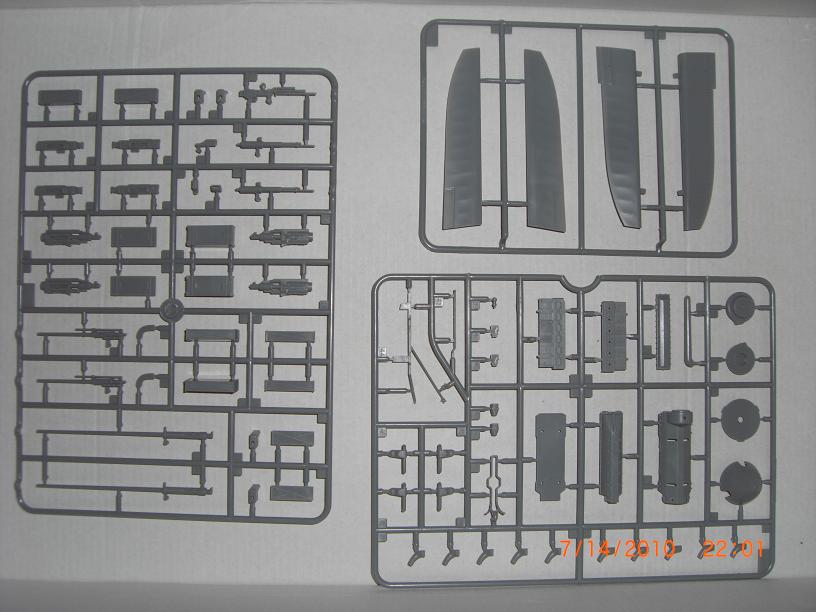
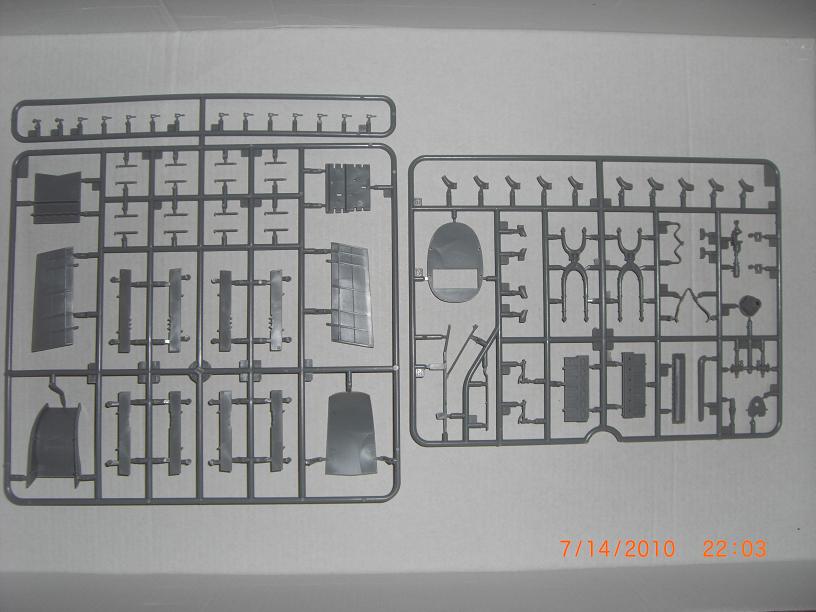
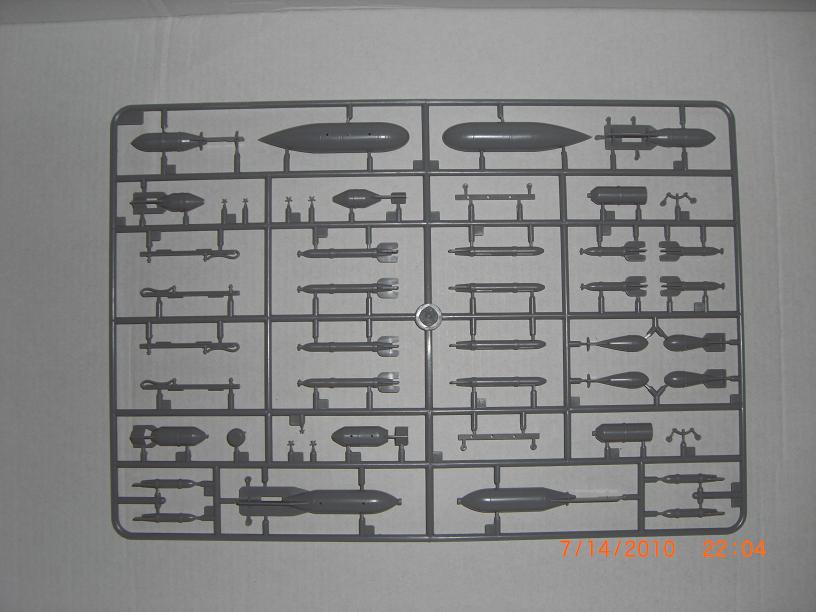
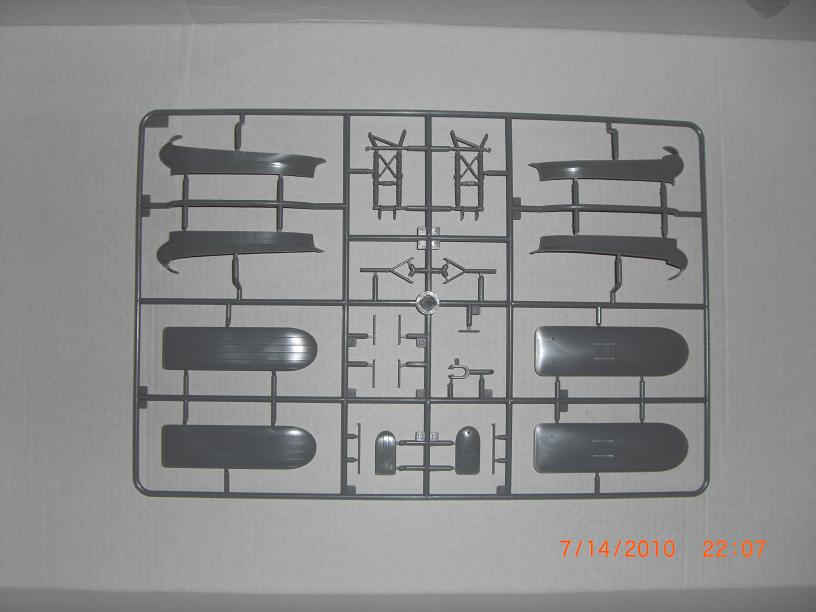
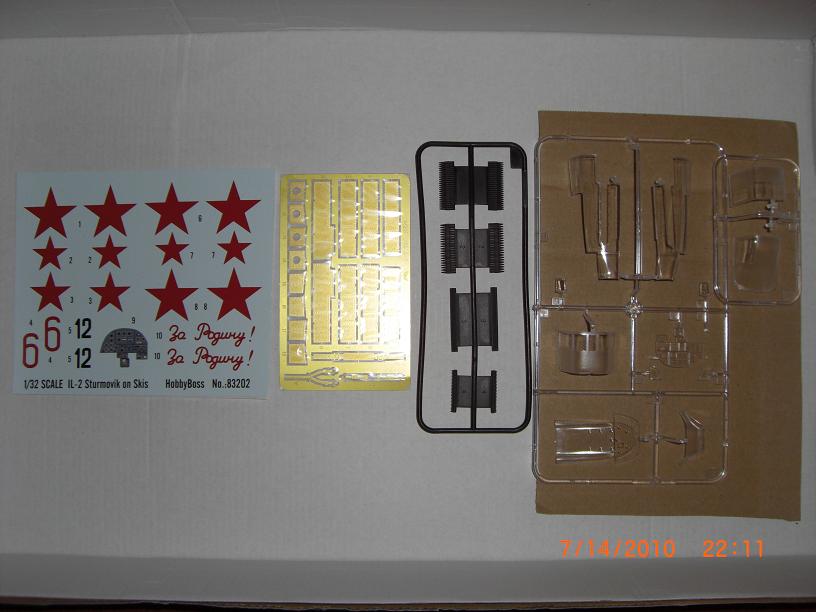
All photographs of kit parts from author's private collection.
One point to remember is that this kit will no doubt attract aftermarket add-ons, so some of the do-it-yourself suggestions I have provided below will probably be covered by these add-ons/corrections. They will also add to the already considerable cost of this kit (I've seen anywhere from $83USD to over $150USD), so you may just wish to do any corrections or super-detailing yourself. I would imagine that anyone who buys this kit is at least a reasonably competent modeller, and capable of the fixes I mention below. However, if you choose to buy the kit and then set it aside for awhile, I'm sure someone like Eduard will come out with a detail set(s) extensive enough to satisfy (all but) the most demanding modeller.
I am not by inclination a rivet counter. I generally go by if it looks like the plane it's supposed to represent, then that's good enough. However, in this case I have to go a little bit against my grain because I feel that this a fundamentally good kit of an extremely important aeroplane that can be made into a brilliant model, even a competition winner with a little bit of work. You will notice that I don't compare the kit parts to drawings for the simple reason that I have seen so many obvious inaccuracies in various drawings of the Il-2 that frankly, I don't trust them. I compare parts with photographs, and if they look like what's in the photographs, I consider them to be accurate.
For whatever reason, model companies seem fixated on moulding single-seaters with metal rear fuselages (Academy, Accurate Miniatures, Toko, etc. ) and surprisingly, the Hobby Boss kit is no exception. Unless you wish to do a representation of one of the 200 or so single-seaters that actually had the metal fuselage, and can find a suitable and reliable paint scheme for your model, you are left with the job of either filling in the incorrect panel lines and rivet holes, or sanding them off. Given the expense of this kit, this is an unfortunate and unnecessary inaccuracy, but the good news is that it is correctable with some effort. In case you didn't notice, I hate metal rear fuselages on Il-2s.
Nonetheless, the kit is very well-moulded and very detailed, complete with cannons, wing machine guns, and a very well-detailed Mikulin AM-38 engine, and of course a detailed cockpit. In addition, test fitting of the parts shows a very good fit, with little or no gaps between the parts. The way the fuselage and wings are engineered is reminiscent of the way the Accurate Miniatures kits (and their smaller cousin, the Academy kit) are engineered, with a centre lower wing section that fits onto the bottom of the fuselage, but it is different from Accurate Miniatures in that the upper and lower wing halves are the same size and butt join against the centre section, although it is strengthened by spars as in the Accurate Miniatures kits. I found that this general arrangement worked nicely on my Academy kit so I have no reason to think that it won't work on this kit as well, especially as the test fit is good.
One of the nice features about this kit is that the moveable control surfaces are moulded separately (with a nice understated fabric appearance), so if you cut off the tabs that attach them to the fixed surfaces, you may pose them any way you want to. The flaps are also moulded separately, and may be constructed in the down position. If you wish to fix the ailerons in anything other than the neutral position, please note that you will have to close off the ends, as these are open.
As mentioned above, the kit does have inaccurate painting instructions for the exterior (as every Shturmovik kit I've ever seen has). The wings are missing the outer aileron/anti-flutter balances, which were present on all metal-winged single-seaters, and there are some other small inaccuracies, which I will address how to correct below. There doesn't appear to be any thing that can't be fixed, although adding the aileron/anti-flutter balances will entail building them from scratch, which shouldn't be too difficult. Still and all, it's a very impressive kit and Hobby Boss are to be congratulated for having the intestinal fortitude to provide a kit of this very important aeroplane in 1/32nd scale, and I look forward to their future Il-2 releases. Now how to improve the kit:
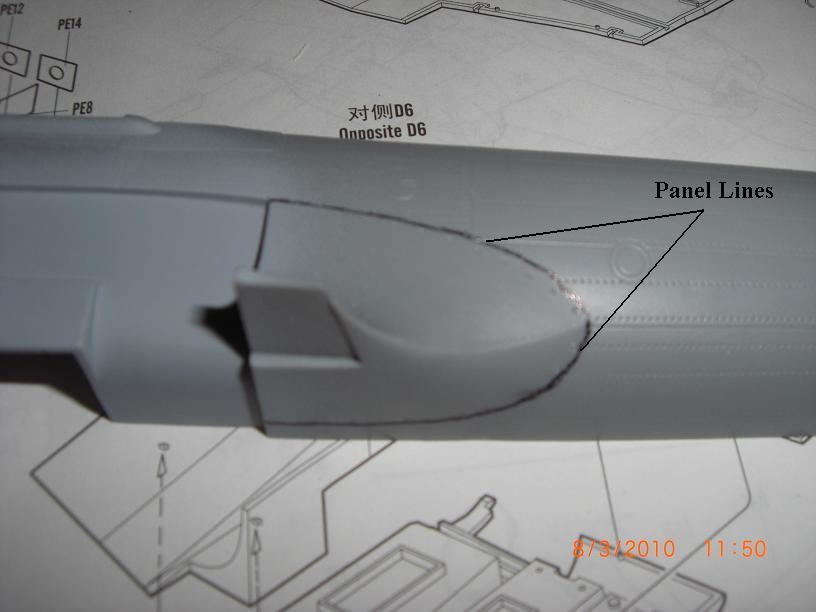
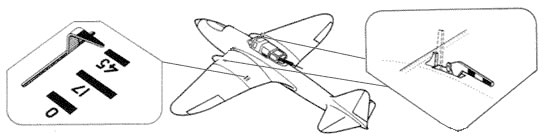
First thing I would tackle on the kit is sanding off (or filling in) the panel lines and rivet holes on the rear fuselage area marked in tan per the drawings below (you may wish to do this after you glue the fuselage halves together; it is, of course, up to you. I do this first because I want to get the "fun" part out of the way. ):

Drawings from Voiyna V Vozdukhe Magazine, with additions by this author.
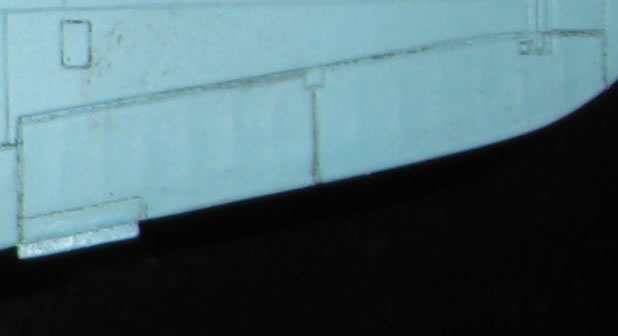
The aft part of the wing root in the kit has the rivets, but not the panel lines scribed in. These lines will need to be added and should be scribed immediately outside of the rivets, as shown outlined in black in the photograph below:
Photograph from author's private collection.
The wings will need to have the aileron/anti-flutter balances added. These can be made up from plastic rod and glued to the undersurface of the wings following the positions shown in the photographs below.
Photograph from author's private collection. Second photograph excerpt of actual balance on ski-equipped Il-2.
One problem with the ailerons is that they are not split in half, with a line down the middle of each aileron, on both sides of the aileron. They should look like the photograph below:
Photograph from author's private collection.
Below is a photograph of the aileron/anti-flutter balances from the Accurate Miniatures kit. These can serve as a template for scratchbuilding a pair for your Hobby Boss Il-2.
Photograph from author's private collection.
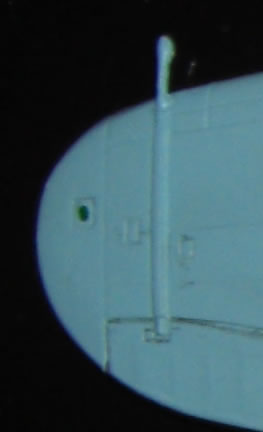
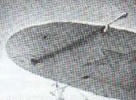
The port and starboard navigation lights should be more prominent, as they are flush with the wing surface in the kit, and should have raised, tear drop shaped coverings over the lights, as in the photographs below:
There isn't a part for the splitter plate vertical support for the radiator intake on the upper cowling. There also isn't a part for the rotating protective armour cover for the front or the back of the radiator on the bottom of the fuselage.
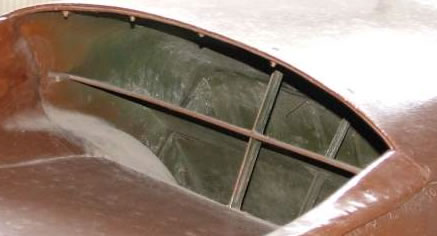
Photograph of upper cowling intake with splitter plate vertical support.
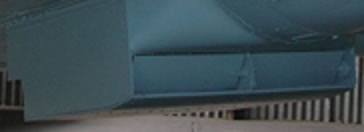
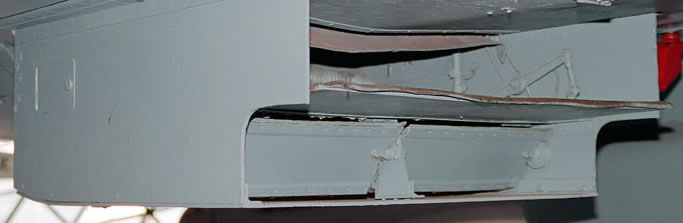
Photograph of rotating protective armour on front of under fuselage radiator. There is a similar plate in the back of the radiator that also needs to be added as shown in the second photograph.
Below is a picture of the AM-38F engine. I can't vouch for the colours, but the parts are all there. This will be useful to check against the accuracy of the kit engine, if you keep in mind that this is an AM-38F, not the earlier AM-38 installed in the single-seaters, so there might have been some external differences on the full-sized items:
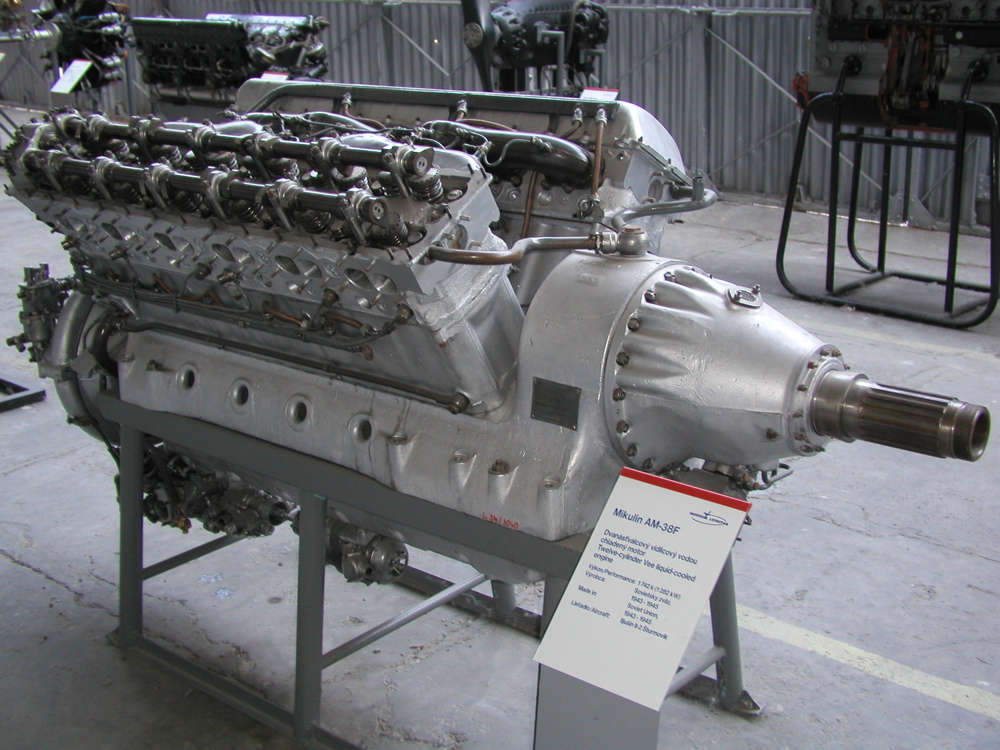
Photograph from Wikimedia.
There aren't parts for the landing gear indicators, which were placed on both wings in the actual aircraft, nor is there the flap position indicator on the port wing as illustrated in the drawing below:
Drawing from ScaleModels.ru site.
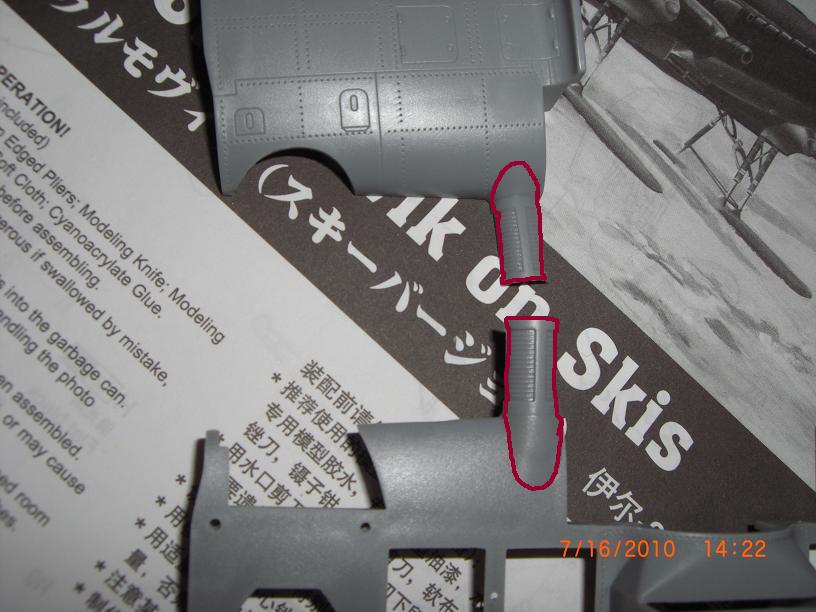
The tail wheel fairing is correct for an arrow (at least some of them), but is too long for the single-seater and will need to have the aft section trimmed off. See the photograph below to see where the section, marked in red lines, needs to be removed (note the panel lines and rivets which also need to be removed, as detailed above):
Photograph from author's private collection. Compare the above fairing with the correctly shaped (for a single-seater) fairing below, from the Accurate Miniatures kit:
Photograph from author's private collection.
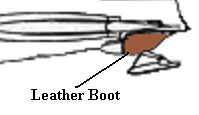
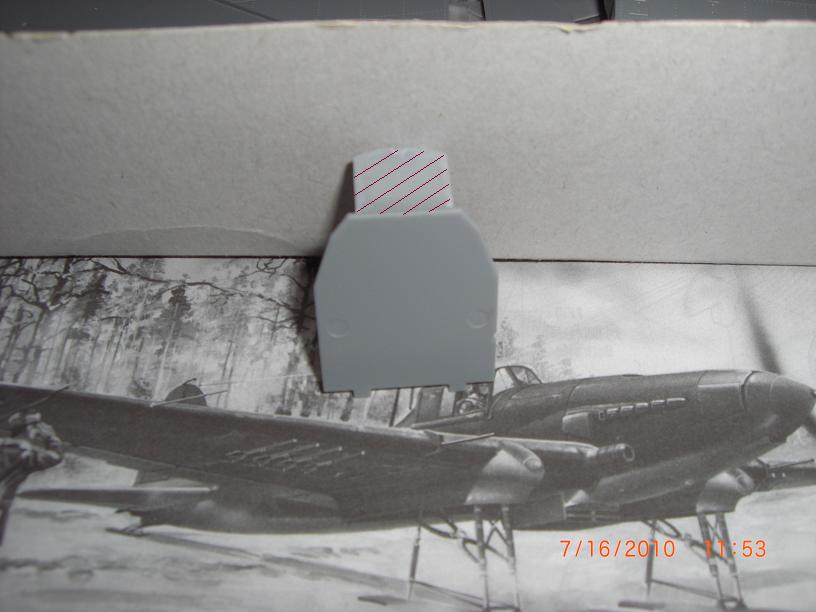
A leather boot needs to be added to cover up the tail wheel strut where it exits the fuselage. This can be made with putty, creased to appear like leather and painted accordingly. This is actually fortunate, as the tailwheel is missing struts to attach to the small bulkhead in the fuselage (which is provided). With the leather boot added, the struts would have been covered up anyway, so their absence won't be missed.
There is an actuating rod missing from the landing gear. This can be replicated by using plastic tubes and rods. This rod was on the inner part of the landing gear nacelles (the portion facing the under fuselage radiator).
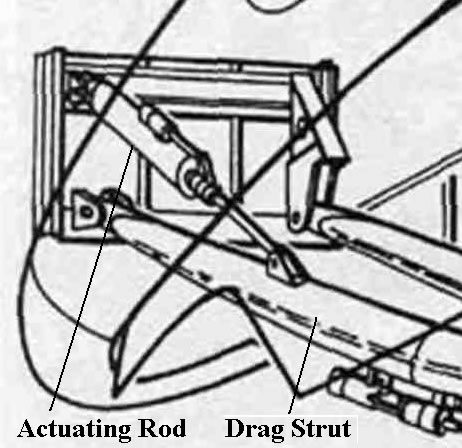
There is also another actuating rod missing from the drag struts of the landing gear. This actuating rod was on the starboard side on each landing gear.
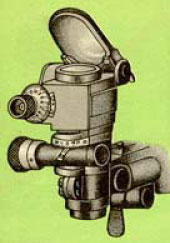
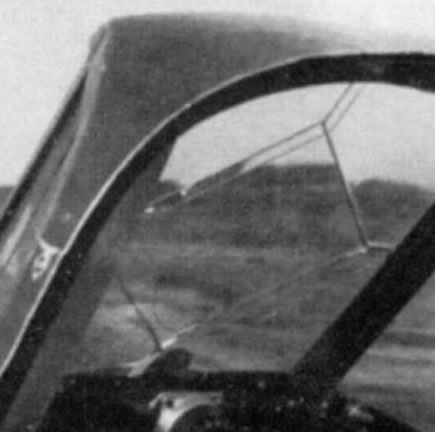
In addition to adding lines on the windscreen, it may be necessary to scratchbuild a VV-1 gunsight for mounting on the forward cowling. The absence of the lines on the windscreen is puzzling, as I've even seen these done on the windscreens of 1/72nd scale kits. However, the lines on the windscreen can be reproduced by scribing lines on the outside and inside of the windscreen in the proper pattern. As you can see in two of the photographs below, the lines are on both the outside and inside of the windscreen. The VV-1 gunsight can be cut or carved from any appropriately sized piece of plastic (or eventually obtained from the inevitable aftermarket detail set).
Photograph of VV-1 gunsight from the front. Second photograph shows the general shape from the side.
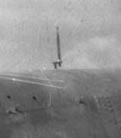
Below is a photograph of the upper cowling of a Shturmovik in flight which shows the sighting lines on the cowling, the placement and size of the VV-1 gunsight, and the sighting lines on the port side of the windscreen:
Excerpt of photograph of Il-2 being test flown.
It is possible that the ski-equipped Il-2 did not have the VV-1 gunsight, but the internal PBP-1 reflector gunsight instead. If you wish to add this instead of the VV-1 gunsight you will need to scratchbuild this using the drawing below as a guide:
Drawing from 1942 Il-2 Manual.
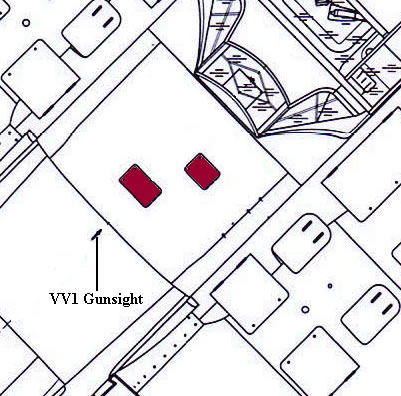
The cowling panel just in front of the windscreen is missing two access panels as marked in red in the drawing below. These should be scribed in. Also note the placement of the VV-1 gunsight.
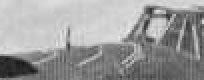
Below is a photograph showing the sighting lines (note how the lines appear both on the outside and inside of the front part of the windscreen):
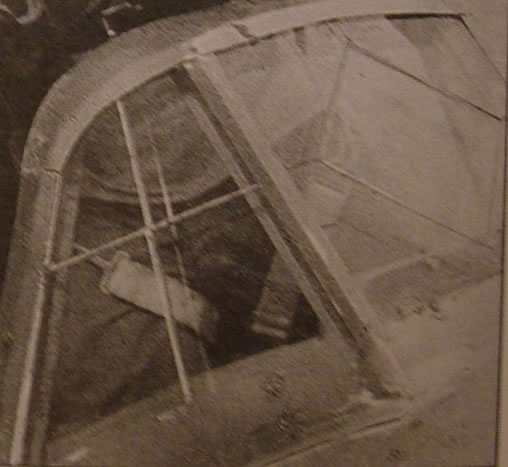
Below is a photograph of the sighting lines on the starboard side of the windscreen (these lines are also on the port side and again note how they appear on both the outside and the inside and this does not seem to the result of a reflection[?]):
The exhausts are individually moulded in two parts, which enables them to be moulded as hollow. Don't completely sand down the join line between the parts as there was a fairly prominent welding ridge on the actual aircraft, as below:
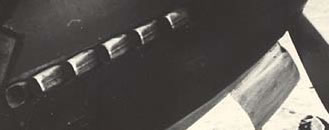
Excerpt from photograph from unknown Internet source.
Interestingly, in addition to providing parts for the VYa-23 23mm cannons, the kit also provides parts for the 37mm cannons, although the ski-equipped versions only used the VYa-23 cannons, at least according to the photographs that I have seen. It appears that a 37mm armed two-seater is "in the works. The cannons and machine guns are nicely done, down to having the front of the barrels "drilled out". (The kit also includes a 12.7mm [.50 calibre] UBT Berezin machine gun, as used by a rear gunner, further evidence for future two-seaters). Although there are ammunition belts, ammunition boxes, and guns and cannons provided, strangely there are no access panels already cut out to view them, so if you wish to show off this detail, you will have to do the cutting yourself. You can do this by scribing deeply into the ammunition covers on the top of the wing (as marked in red below) until you cut through, as these are already scribed in, then cleaning up the edges of the openings and the covers. Nothing that any reasonably competent modeller can't do. I also wouldn't be surprised if some aftermarket company such as Eduard don't eventually supply some suitably thin photo-etched covers to replace the plastic covers you have cut out, otherwise you will need to thin the cut out plastic covers to give them a more scale appearance (you don't want them looking like boilerplate!).
Photograph from author's private collection.
The cartridge and link ejection chutes in the bottom of the wing need to be cut out. These are marked in black in the photo below (there may well have been some internal chutes which directed the spent cartridges and links to their respective chutes, but it's hard to tell from the available photographs and data. Note the moulded in detail in the upper half of the wing which will be visible with the flaps in the open position):
Photograph from author's private collection.
Although a carburetor intake filter is moulded integrally with the inner starboard wing halves, this needs to be removed as photographs I've seen of the ski-equipped versions show them without this. There should just be a hole flush with the wing, backed by a screen inside. Remove the parts outlined in red in the photo below (you will have to fill in where you cut out the fairings for the filter on the upper and lower wings):
Photograph from author's private collection.
The aft armour plate in the cockpit, as provided in the kit, needs to be modified to make it correct for the single-seater. You can do this easily by cutting off the upper flange as marked in red lines in the photo below and sanding down the resulting rough edge:
Photograph from author's private collection.
The seat, although accurate in shape, should have lightening holes drilled into it as per the photograph below:
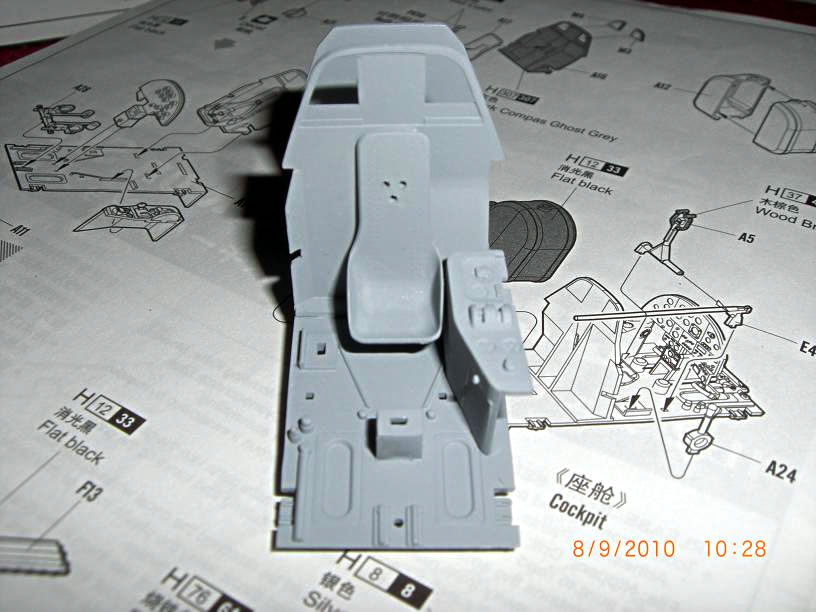
Photograph from author's private collection.
Most of the interior, with a few exceptions noted in the instructions, should be painted in a medium grey colour – the instructions mention a Testors Dark Compass Ghost Gray, which colour I am not familiar with. There is some argument (as with seemingly everything on the Il-2) about which parts were painted which colour. With the exception of the weapon release boxes (part number 22 in the kit), which were painted as in the picture below, you are pretty much on your own when painting the fiddly bits, using the kit instructions as a guide – grey, black, silver, purple (well, probably not purple). For the interior colour I use Testors Light Ghost Gray, which to me is a reasonable equivalent to the A-14 Steel Grey that the Shturmovik interiors were probably painted in. You may notice that the interior walls are devoid of stringers and formers. This is not a mistake on Hobby Boss's part as the cockpit interior was formed from the insides of the armour plates, which composed the structure in the front fuselage and didn't use stringers and formers.
Drawing from original 1942 Il-2 Manual.
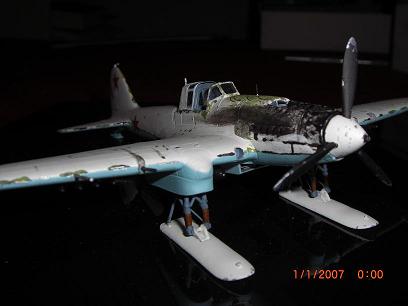
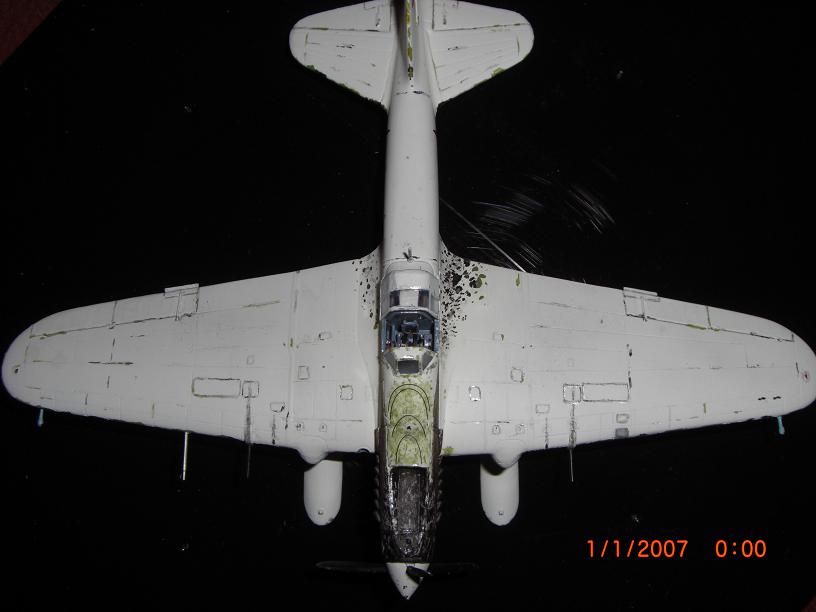
The colour painting guide, which covers the exterior, is incorrect, as the summer camouflage should be in black and green bands topsides over a blue undersides, oversprayed with white for the winter camouflage. The undersides of the skis should be painted blue, and although it is unclear what colour the topsides of the skis were, I would go with white. The tail ski I would paint overall blue as in my 1/72nd scale model below of the Smer kit (note the flush-fitting hole where the carburetor intake filter would be on the Hobby Boss model, the splitter plate partially visible in the upper cowling intake, the FAB-100 bombs mounted underneath the wings, and the correct green and black of the summer camouflage showing through the weathered white winter camouflage. Although the interior and the landing gear on this model are painted a greyish-blue colour, they should be a medium grey. Also note the cowling sighting lines in black that appear on the overhead photograph of this model; these lines are missing from the Hobby Boss kit decals, – however, if you've ever made your own decals, these probably wouldn't be that hard to replicate. ):
Photographs from author's private collection.
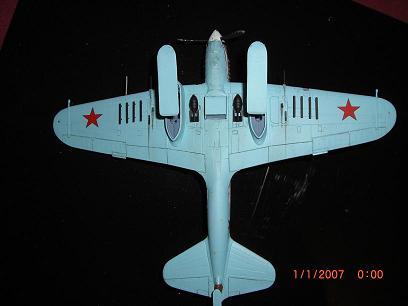
I generally use Testors Model Master flat enamel paints as I've found they work well with my airbrush. The colours I use are Light Ghost Gray for the interior (as mentioned above), the camouflage colours being Green for the Soviet AMT-4 Green, Black for the Soviet AMT-6 Black, Russian Topside Blue for the Soviet AMT-7 Blue, and Flat White for the Soviet MK-7. These are the colours I use, although if you wish to research the whole vexed question of Soviet WWII colours, I would suggest you visit the website www.sovietwarplanes.com, where this rather contentious subject is described in considerable detail. I can't (and won't) vouch for the absolute accuracy of the colours I've chosen. In painting my winter-camouflaged models, I paint the white on first, then use the summer camouflage colours where I think they would have weathered through, such as the wing leading edges, around access panels, etc. Below is my model of the Toko single-seater with one variation of the black-green camouflage schemes, although this variation is certainly not representative of all Il-2's with the black-green camouflage (note the white sighting lines on the cowling):
Photograph from author's private collection.
The ordnance set is very comprehensive and nicely done, with rockets, various-sized bombs, and even drop tanks(!), although be forewarned that the drop tanks provided, labelled as PLBG-150 on the instruction sheet, were apparently very rarely fitted to the Shturmovik. I've personally examined hundreds of photographs of Il-2's but I have yet to see one with these drop tanks. This doesn't mean that they weren't used, just that they were a very non-standard installation, at least on the frontlines. Perhaps they were used on ferry flights from the factories to the frontline units. In that case, if you use them on your Il-2, your model should appear factory-fresh, probably without the white winter camouflage.
The arming devices on the noses of the rockets are simple circles, whereas they should be vane-like in appearance as you can see below. No doubt someone will come out with replacement parts in photo-etch, otherwise you are in for some cutting if you wish to improve their appearance or, since the bombs have these arming vanes separately provided in plastic, you might use some of the bombs' unused vanes to replace the circles on the rockets. The number of vanes is probably too few, so if you are an absolute stickler, you might want to wait for that inevitable photo-etched set. To mount all eight rockets you will need to drill out four more holes per wing, but as these holes are already moulding on the insides of the wing, this will be easy to do.
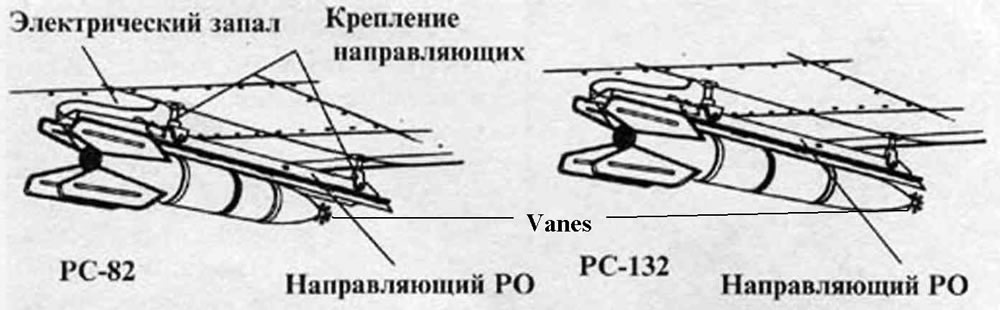
Drawing from Voiyna V Vozdukhe Magazine with addition by this author.
With all of the above corrections and additions, you might possibly think that this Il-2 kit isn't worth purchasing. Nothing could be further from the truth. It is definitely not my intention to dissuade anyone from purchasing this fine kit. Out of the box, it will make a good and extremely impressive representation of the Il-2 Shturmovik (even if the only thing you do is sand down that pesky metal rear fuselage, which I insist that you do!). With a little bit of work, you can have a competition winner on your hand. I would urge anyone who has an interest in the Il-2, VVS aircraft, or WWII aircraft in general to purchase this kit.
© Jason Moore 2010
This review was published on Saturday, July 02 2011; Last modified on Thursday, August 18 2016