
Jerry Rutman | Brewster Buffalo B239 Finnish Export
Reviewed by Ray Peterson
Part 1: Pre-Assembly Parts Preview
History
The Buffalo was designed and built by the Brewster Aeronautical Corporation, first prototype taking flight in December of 1937 as part of a Naval contract to replace the F3F biplane fighter. The Navy accepted the XF2A-1 during June of 1938 and ordered 54 F2A-1 fighters that same month. Unfortunately, Brewster did not have the production facilities to mass produce fighters for both the Navy and foreign contracts, and with events clearing brewing toward World War II, this severely handicapped Brewster in the Navy's eyes. And to make matters worse, politics kept intercepting Buffalos from making their way to the Navy. First, the 54 F2A-1 fighters were promised to Finland as the B239. Then, the first F2A-2s were sent to Belgium. It wasn't until September of 1940 that Navy F2A-2s finally began to emerge from Brewster's Newark assembly Plant. In January of 1941 the Navy placed its final order for the Buffalo. 108 F2A-3s were ordered. The Navy lost faith with Brewster as much for political reasons as technical problems. By late 1940 Navy officials had become increasingly disenchanted with Brewster's management and Brewster's sales team had become a public relations nightmare when they were charged with profiteering. Not to mention Brewster's erratic production schedules.
When Navy squadrons re-equipped with F4F Wildcats, the Buffaloes were transferred to the Marine Corps. The first American Buffalo victory was scored by VMF-221 near Midway on 10 March 1942. Next action for the Buffalo was the battle for Midway. VMF-221 lost 13 Buffalos and two Wildcats. It was this action which led Capt. P.R. White to report, "It is my belief that any commander that orders pilots out for combat in an F2A-3 should consider the pilot as lost before leaving the ground!" Needless to say, this about did it for the Buffalo in Naval Aviation. The fact that one third of the Marine pilots were fresh from flight school and were part of a force tasked to defend against a far superior Japanese force with better trained and experienced pilots seems to have been lost in the equation. After Midway, all Buffalos were withdrawn from frontline squadrons and sent to training command.
Meanwhile, on the Eastern front…The Finnish, grateful to have any kind of plane at all, and with a far better trained cadre of pilots, enjoyed much success with the Buffalo. The B239 varied from the standard F2A-1 by removal of the tailhook, life raft, and catapult equipment. The large Navy RDF antenna was replaced with a simplified loop style. Later, the Finns made additional revisions including a new reflector sight, addition of an armored headrest and seat back, and the .30 cal fuselage gun was replaced with a 12.7mm (0.50 cal) LKK 42 machine gun. The Finns loved the Buffalo, calling it the Taivann Helmi - 'Sky Pearl.' Many Finnish aces were made in the Buffalo and it soldiered on throughout WWII, even scoring several kills against the retreating Germans after the armistice ended the Continuation War in 1944. During its combat career in Finland the Buffalo is credited with 496 enemy aircraft destroyed against the loss of nineteen Buffalos, for a victory ratio of 26:1. After 5 years of attrition and combat only eight Buffalos remained in the Finnish inventory at the end of the war. These were used in the training role until late 1948, more than ten years after the XF2A-1's first flight!
The Kit
Once again, Jerry Rutman comes to the rescue for the 1/32nd scale modeler. He has produced what I believe is one of his finest models to date in the new B239 Finnish Export Buffalo. It comes in his usual cream-colored resin along with some photo-etch, white metal landing gear, plus a few odds and ends including metal tubing, rod and strips. Some small drops of colored resin are also included for running lights. Four pages of instructions and some nice decals by Mike Grant round out the package. I plan on building this one right away so hopefully this will be part 1 in a series.
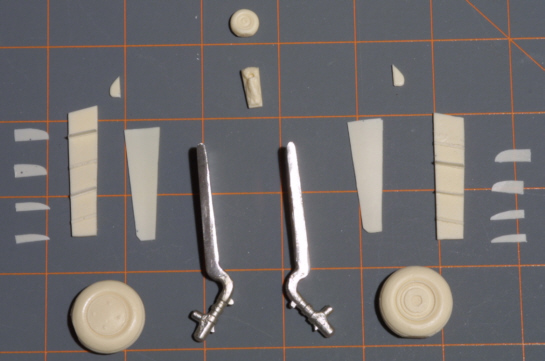
I should mention first that the pictures show all the parts after cleanup. I have spent about 4-5 hours cleaning up the parts and removing resin flash and pour stubs. I have not filled any air bubbles or done any assembly at this point. I don't usually review a kit this way, but the method Jerry uses to cast his parts leaves a paper thin flash around most of them. It is not much of a hassle at all to remove, but would make the parts very hard to see in photos.
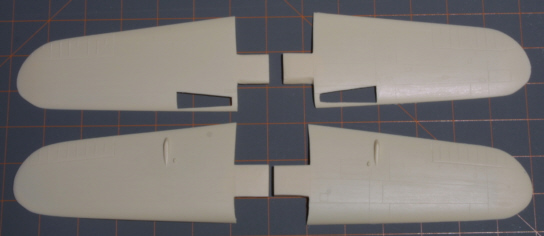
The fuselage looks very nice. No defects could be found and the parts include nicely done recessed panel lines. There is interior former detail in the area of the cockpit. I matched the fuselage and wings to the drawings in the Squadron Signal book, F2A Buffalo in Action. It compares quite well, the major differences being the kit is about a 1/16th of an inch too long at the very tip of the fuselage's tail, about a 1/16th shallowness in the fuselage at the very front of the windscreen, and some variance in the shape of the wingtip. Most panel lines are very close, and as I do not know how accurate the plans really are, I am more than satisfied. About the worst thing I noticed during this observation is that the right wing appears to be about 1/16th to 3/32nd of an inch longer than the left wing, the increased length occurring between the inside edge of the aileron and the fairing behind the wing MG. It isn't really noticeable unless you bring the wings together and I do not plan on fixing it.
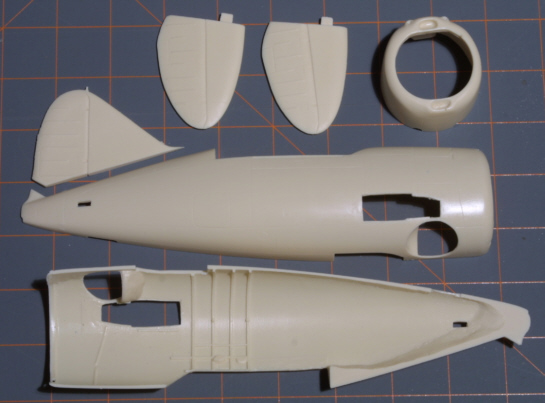
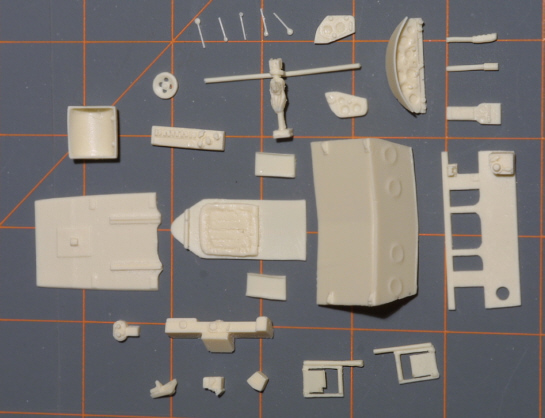
The cockpit appears well detailed and as far as I can tell accurate. At least it is very similar to the pictures in the Squadron Signal books, but they are of B339's which are based on the F2A2 or 3. I could not find any cockpit photos of the earlier B239's. One note, if you have this kit, the detail just to the left of Step Nine(final assembly) showing a frame and the loop antenna, is the back deck assembly. It took me a while to figure that one out as it doesn't say where it goes! There is a little bit of wiring molded into the cockpit area, but you could definitely add some if you want it to look busier. Seat belts are to be made from strips with PE buckles provided.
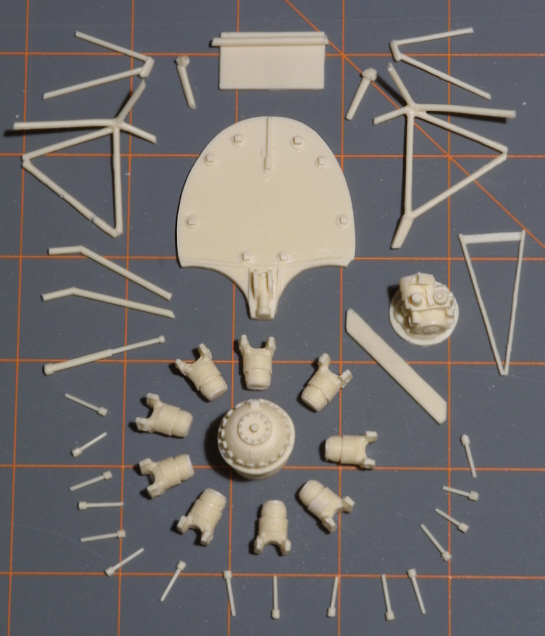
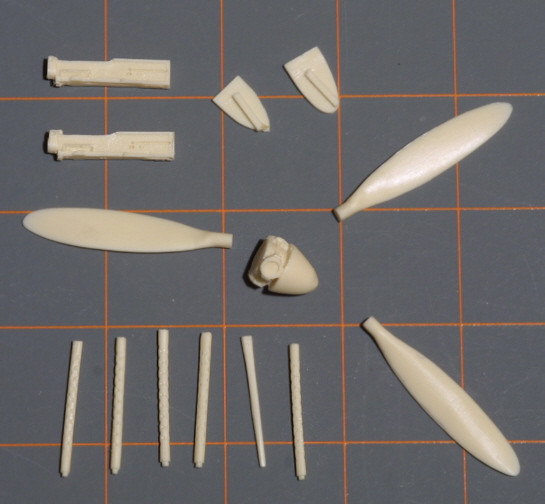
The engine is a pretty darn nice interpretation of the 9-cylinder Wright 1820. Jerry gives you all 9 cylinders separate, along with separate actuators (or whatever they are called). Wiring or wiring diagram is not provided. My kit only came with 16 actuators however there should be 18. No big deal to make my own, just pointing it out. One note: the early Wright 1820 has the actuators in front of the distributor ring, just as Jerry has modeled it. This is correct looking at my resources. The later Wright engines have the ring in front of the actuators, like the Pratt and Whitney engines. (Late Wright engines were also used in the FM-2 - they were more powerful the P&W engine in the F4f). You also get an engine back plus a bunch of framework and a firewall. No plumbing, wiring, or exhaust piping is included so you could add a lot more but I don't know how much is going to be visible from the wheel openings. It will probably look pretty busy with nothing added, but no doubt better if you add a little if just for the dental mirror crowd. There is also a plate to be added near the top of the well area that I believe the 0.50 cal's sit on, but it is not shown in the instructions whether they go there or not. Two 0.50 cal receivers are included, so I may place them there, depending on how things fit. The engine is the only thing I have not removed from the casting block as I will use this block to space the engine properly in the cowling. There are a few air bubbles in my example in some of the tubing which I will fill with superglue. Looking at all those rods makes me nervous as to fit and alignment, but we will see how it goes in Part 2 of this build.
The landing gear look quite good with the main gear struts and tail gear fork in white metal and 3 nice looking resin wheels. The wing gear wells are to be detailed with a inner wall and resin formers. A couple of the formers cast onto the inner wall are missing on my example, but easily replaced with thin plastic sheet. The tail wheel has a nice fabric textured piece that fits into the tail wheel well.
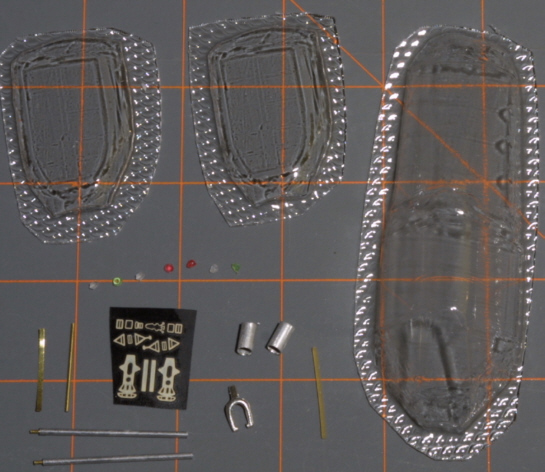
The canopies are vacuformed and look quite transparent with slightly raised frame detail. Jerry gives you two of both the upper canopy and lower ventral window. Note that I have yet to find a picture showing a Finnish plane with this window in use. It appears they were all painted over or possible replaced with a metal panel? With the layer of oil and dirt on the bottom of the Finnish planes in the pictures I have seen(the Finns often operated from pretty rough fields), I don't see how they could ever have seen anything through them anyway.
Other parts include a nice looking prop and hub, plus 5 - 0.50 MG barrels (you only need 4). As you can't see any part of the barrel but the very end, I will probably substitute some short pieces of tubing and put these barrels into the spares box for another project. Note that the Buffalo, including the B239, originally had 3 - 0.50s and 1 0.30 cal MGs, but later on the Finns changed them out to all 0.50s.
The instructions are typical of Jerry's kits, black and white hand-drawn sketches showing assembly with some written notes. They are accurate for the most part, but require careful review. It would be most helpful to have on hand the above-mentioned Squadron Signal book on the Buffalo to help with figuring it all out. Camo schemes are given, though no interior color help is included. The camo sketches and markings are also taken from the Squadron book.
The decals give you three choices of Finnish aircraft. As additional info, "Orange 4" is the craft of Warrant Officer Ilmari Juutilainen, the top ace Finnish ace (94 kills) and one of only 3 to twice receive the Mannerheim Cross award. (His book, Double Fighter Knight is a great read, by the way, if you can find it. I got mine from a member of the virtual Finnish squadron, the 'Icebreakers' at a Warbirds convention.) The second option, "Black 1", flown by Cadet Urho Sarjamo and Capt Iikka Torronen, who was killed in this aircraft. The third choice is "White 7", which was the aircraft of 1st Lt. Hans Wind, CO of 1/LeLv 24. Note that there are a few small errors in the decals. The serial or 'BW' numbers are given as half green, half black. The color switching is not that regimented, rather it is dependent on what the background color is and will vary. For instance, the right side of "Orange 4" only has one number , the 4 in light green with the rest in black. Also, the lynx motif is a little odd compared to photographs, the decal looks more like a greyhound or something. The art did vary a bit so maybe they have a different photo. Also, there should be 18 kill markings on the tail of "White 7", at the time of the winter white wash camo scheme. Again, the Squadron book shows these profiles in better detail and in color.
Summary
Pros: Subject matter, detail, casting quality, decals.
Cons: Complexity(not for a beginner!), somewhat sketchy instructions in places, not much color help except for exterior.
Definitely recommended for those with resin kit experience!!!
© Ray Peterson 2003
This review was published on Saturday, July 02 2011; Last modified on Wednesday, May 18 2016