
Trumpeter | TSM-2255: 1/32 F4F-3 Early Version Wildcat Fighter
Reviewed by Matt Gannon
Introduction
Quite possibly the most prolific kit manufacturer in 1/32 scale ever, Trumpeter gives us kit TSM-2255, The F4F-3 Early Version Wildcat Fighter. Trumpeter has chosen a gloriously colourful plane that captures the look of aircraft from the late 1930's and early 1940's just prior to the US entering WW2. This was a time where racers had branched out beyond streamlined inline engined designs and begun to explore monoplane designs with increasingly powerful radial engines in the quest for speed. A period of constant innovation and developments in technology and metallurgy that were harnessed by the aviation industry for that combat edge to ensure victory. It was also the time when that magic combination of robust construction, monoplane design with a classic radial engine began to characterize the Grumman family of 'Cats' that progressively dominated the Pacific Theatre of Operations and became famous forever.
The F4F-3 was designed and manufactured before the US went to war. When the US finally became embroiled in full scale combat operations, the F4F-3 served in diverse locations and environments for the allies across the globe. Trumpeter has provided in this F4F-3 kit the perfect palette to allow the modeler to experiment with: the many colour schemes; individual cowls variations; different engine installations; alternative propeller and spinner shape; machine gun installations and gun-sights to create exactly the F4F-3 or other foreign variant that he/she wants.
History
The birth of the Wildcat began in earnest in 1936 as the US Navy sought a new all metal monoplane. The prototype XF4F-2 Wildcat failed to win a contract and lost out to the Brewster companies' prototype (The F2A Buffalo). However, despite reliability and flight stability issues the obvious potential in the XF4F-2 led the US Navy to fund its development. The culmination of that development was the F4F-3 which this Trumpeter kit represents. When the F4F-3 first flew in 1939 at a top speed of 333mph, its performance and operational capability created a path for it to be the primary fighter plane in the US Navy/Marine Corps. Its potential also attracted interest from several foreign nations. All of this occurred, quite possibly in a nick of time, as the WW2 became a global conflict.
The final prototype of F4F-3 had modified wings, horizontal and vertical tail, wing-mounted machine guns. This prototype actually formulated the layout of almost all Wildcat versions to follow. It was a sound design that lasted in service the entire war.
Wildcat F4F-3 First Production Picture (from F4F Wildcat in Action 84 - Squadron Signal)
Versions
There were several versions of the F4F-3. They are recognizable predominantly by changes to the cowl necessitated by variations in the type of engine installation. The Trumpeter kit conforms to the F4F-3 initial or early production runs of the Wildcat with a Pratt & Whitney 1830-76 two-stage supercharged engine. Apparently during the early 1940's, Pratt and Whitney 1830 engines had experienced reliability problems, especially with the 1830-66 engine that had been installed in some of the F4F-3 prototypes. Concerns over reliability and delays in production of 1830-76 engines resulted in the US Navy also ordering F4F-3s with a single-stage supercharger P&W 1830-90 installation. These became known as the F4F-3A. However, once the development of the P&W 1830-76 had progressed enough, subsequent orders centered on the F4F-3 (late variant) with the P&W 1830-86 engine. This is also the engine that powered the F4F-4 Wildcat and which is provided for modelers to use in this boxing of the F4F-3 kit. Its two prominent magnetos atop the engine crankcase are a distinguishing feature.
Foriegn Nations
As mentioned, the F4F-3 Wildcat had attracted interest from foreign nations. In May of 1940, a number of F4F-3's ordered by the French as the G-36A were redirected to the UK following the fall of France. These aircraft were installed with a Wright 1820 single row radial engine instead of the P&W double row 1830 and were distinguished mainly by having a shorter modified cowl and the Hamilton standard instead of the Curtiss Cuffed propellers. Whilst in service with the Royal Navy as Martlet I's these planes had the distinction of being the first Grumman built plane to shoot down a German aircraft in WW2 ( A Ju88 in Dec 1940 over Scapa Flow).
Further foreign nation F4F-3A orders were redirected from Greece when it came under axis control. These were impressed into British service. When installed with the P&W 1830-90 single-stage supercharger engine and in service with the Royal Navy these F4F-3As were renamed Martlet IIIs.
F4F-3 In Summary
By the end of 1941 nearly 200 F4F-3's and F4F-3A's were in service with the USN and the Marines. The potential colour schemes and countless historic examples from notable campaigns fires the imagination.
The F4F-3 represents the typical Wildcat in its earliest and most varied form. It was one of the fastest Wildcats with plenty of punch from four .50cal machine guns with a huge ammo load. For some pilots it was their preferred version of the Wildcat. Unfortunately, with its fixed wings hogging up precious space inside a carrier, its days were truly numbered. The F4F-3 Wildcat endured the trial by fire of Pearl Harbour and Wake Island, created aces like Butch O'Hare and paved the way for future…much…much more standardized Wildcats in the F4F-4 and FM versions which served the entire war. The F4F-3 is essentially where that story began.
The Kit
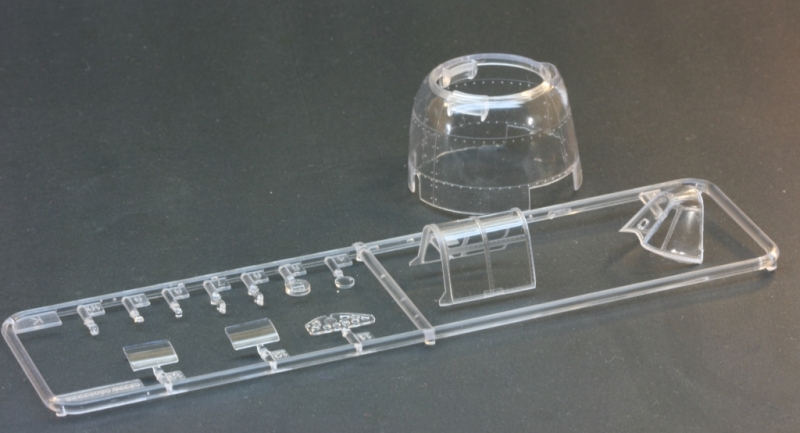
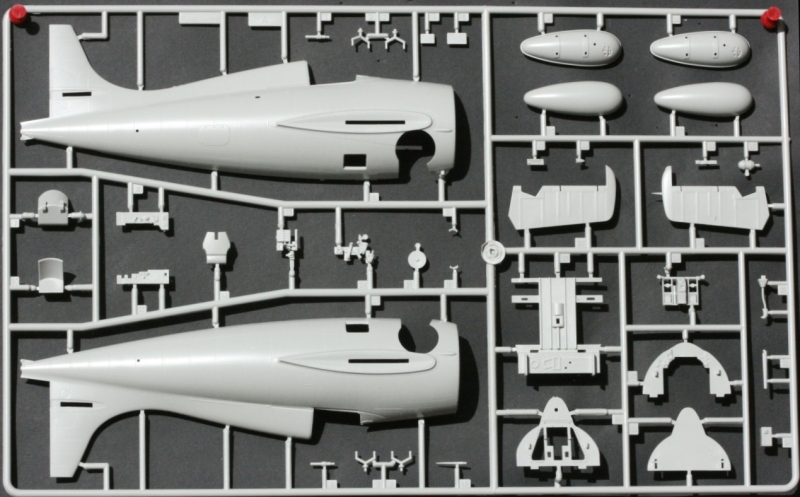
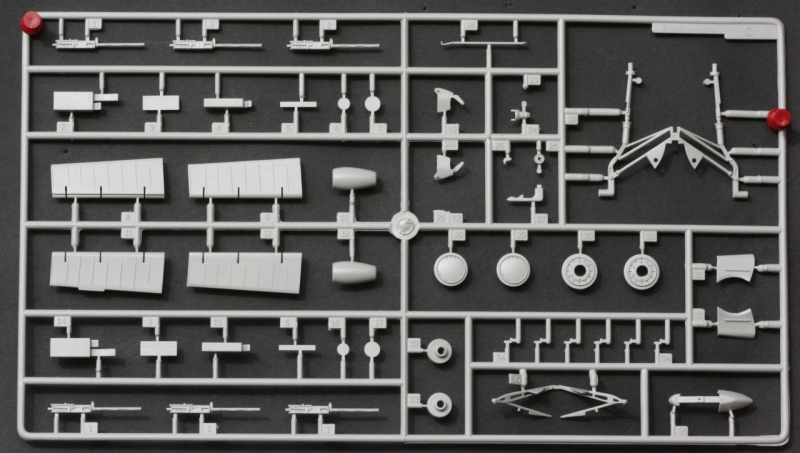
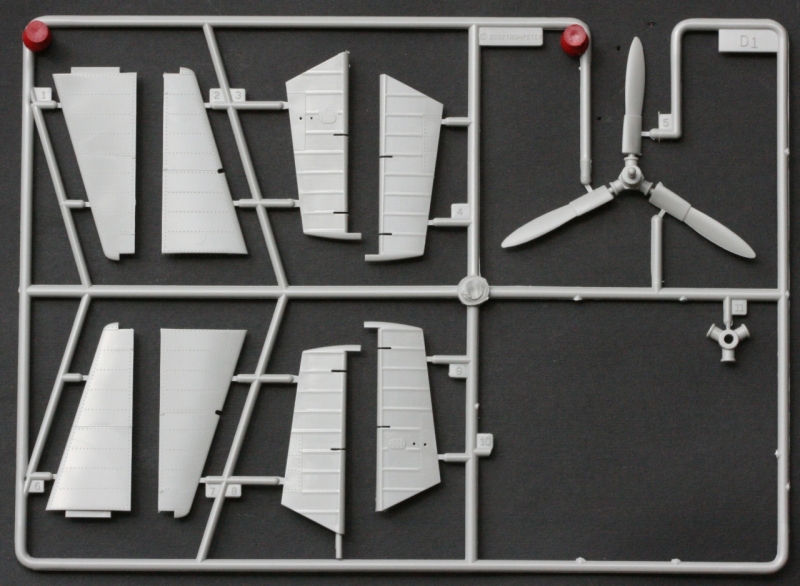
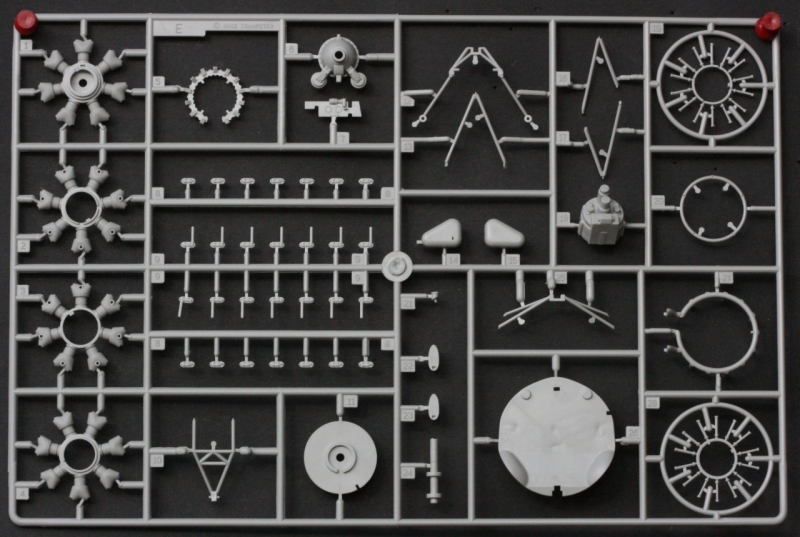
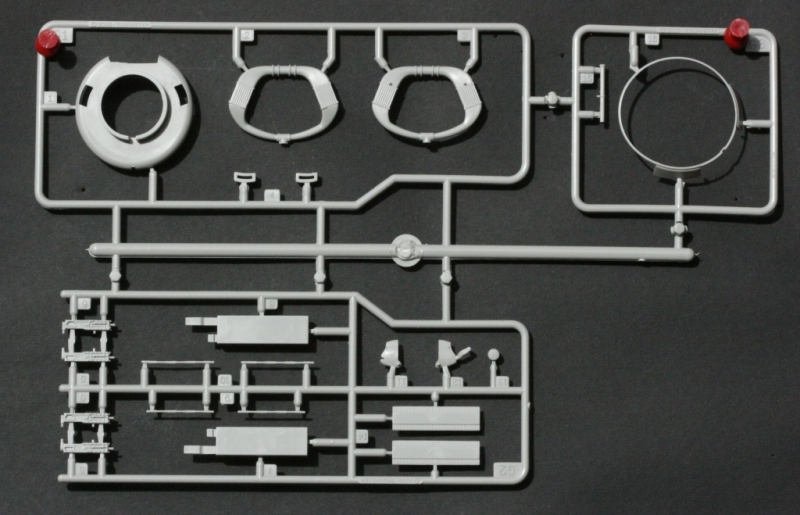
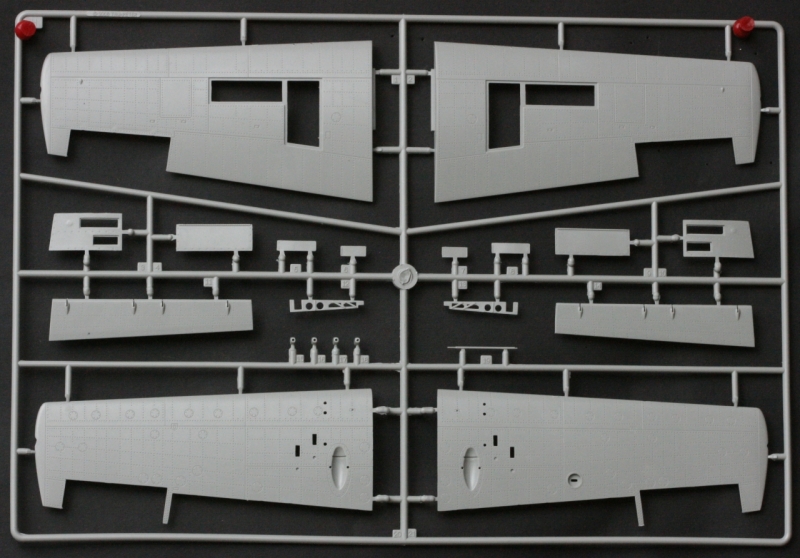
The model is 277mm long with a wingspan of 360mm. There are 267 parts on seven sprues with one photo-etched fret that comes in a typically indestructible Trumpeter cardboard box. There is: a one piece cowl provided in clear plastic; photo-etched pieces forming linkages for the moveable control surfaces; an instruction booklet; a colour profile sheet in A3 size and decal sheet with two options. The kit I have is virtually devoid of flash and snipping parts from the trees looks to be a breeze. Close inspection of the parts reveals many details are represented with reasonable accuracy and in proportion.
As many will notice, there are a number of sprues with parts specific to the F4F-4 Wildcat kit released a few years ago. This Wildcat version has already been reviewed already on LSP. (http://www.largescaleplanes.com/reviews/Trumpeter/f4f4/f4f4.php). The extra parts in this F4F-3 boxing are listed in a perfectly clear instruction booklet whose clarity promises an enjoyable build. Remember, if you keep those parts some may be used (along with a cowl and cowl flaps from a F4F-4 kit) to build other later variants of the F4F-3 or Martlets. This kit creates the potential for some serious Wildcat-itis.
But lets face it. This kit is essentially a sensible modification of the F4F-4 kit (No 2223) rather than a ridiculously expensive re-tool to get a new version. Like many modelers have expressed on the forums, this is a really smart thing to do. Given this kit is a modification of the F4F-4 kit, and considering the variants of F4F-3's that were made, there are a few parts that will require modification or at the very least a close check of the reference material in order to accurise the plane to the specific build number you want.
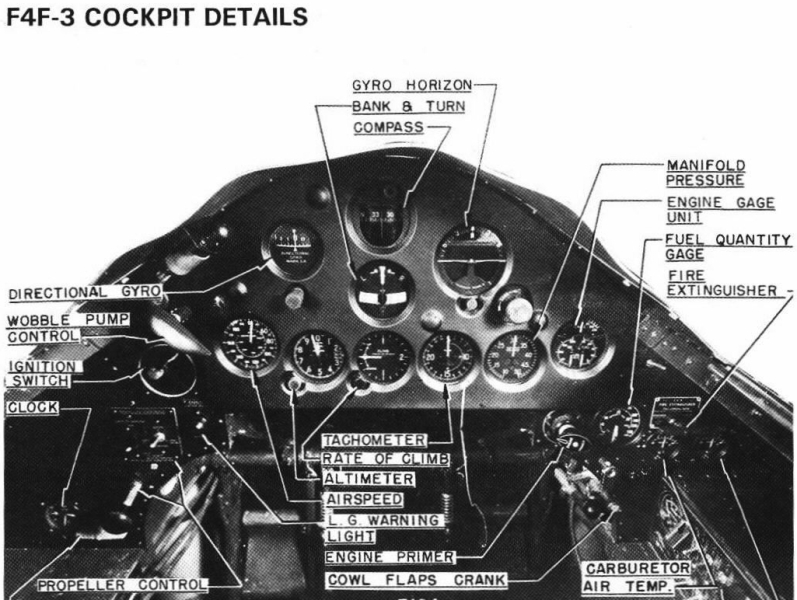
The Cockpit
I was generally surprised at the detail captured in the kit supplied cockpit. Some of it is really pretty spot on. By taking the time to enhance the kit supplied parts one could build a very accurate and interesting looking pit. The riveting is a little 'loud' for my taste but it will make dry-brushing a breeze. Some of the levers and throttle quadrants are bulky and could do with thinning down.
I scoured my references and found that the console detail on the port and starboard side largely conformed to that found in the early F4F-3s. Colour call outs aren't quite right as the consoles were apparently painted black and not interior green as suggested. In order to have the consoles meet flush against the front instrument panel you'll need to shim them with about 2mm of styrene.
The detail on the control column and floor is faithfully represented. Rudder pedals and connectors are very well represented. The cockpit floor in the Wildcat allowed a clear view of the structures below and out the observation windows in the fuselage. I added an additional cross-member to my floor to try and represent that which appears on the real aircraft. It fills in the view a little but also serves to help secure the wing.
The seat is typical for any model in this scale…it seems overly thick and could be thinned or replaced to look 'right'. (NB : I said thinned and not binned). The rear bulkhead on which this seat mounts appears to model a FM-2 Wildcat rather than this early version, so removing the shoulder strap bar behind the pilots' seat would be good idea. Apparently early F4F-3's didn't have shoulder straps anyway with the Grumman designers relying on the conical shape of the telescopic gun sight to stop any forward bodily movement of the pilots head. Incidentally, does anyone else find the sighting of four .50cal machine guns via a telescopic gun sight a little surreal?
The instrument panel film and the plastic parts that sandwich it are for a F4F-4. It's pretty close to the F4F-3's instrument panel no cigar. The F4F-3 had additional instrumentation below the gun sight which can be seen in the picture.
With some spare instrument decals, a punch n die, drill bit and about 5 minutes, that little inaccuracy will be sorted in a flash. The telescopic sight that is supplied is correct for the early version F4F-3 although the kit is missing the back up ring and bead sight which sat beside it on a lot of production aircraft…a PE gunsight here would look really great. Incidentally this PE sight is an inclusion in Eduard's Wildcat F4F-4 PE set (32-109).
Incidentally, later versions of F4F-3's had a reflector gun sight but retained the modified windscreen supplied in the kit. The reflector gun sight included in the boxing is the correct one for a late version F4F-3 or F4F-4 but not a typical, early to mid-production F4F-3 or F4F-3A. Check your references if you plan on one of these earlier variants with this early type reflector sight. At this scale scratch-building one of them shouldn't be any hardship as the design and shape was very simple.
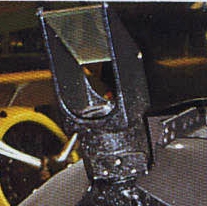
Early Gun Sight from (F4F Wildcat In Detail and Scale-Squadron Signal pg 40)
The Engine
The engine supplied in the kit is the one used in the F4F-4 and not in this early version of the F4F-3. They are similar, but again, no cigar. With modification of the kit supplied crankcase and its magnetos you'll be on the right track to improving the accuracy of your engine to the P&W 1830-76 installation typical of the F4F-3 early version Wildcat. However, despite the understandable manufacturing constraints it's a pretty decent little engine. I found mine went together very nicely except for the connecting rod tubes which seemed to be too short to meet the rocker covers. I removed mine, painted a length of styrene tube and used sections of that as an alternative.
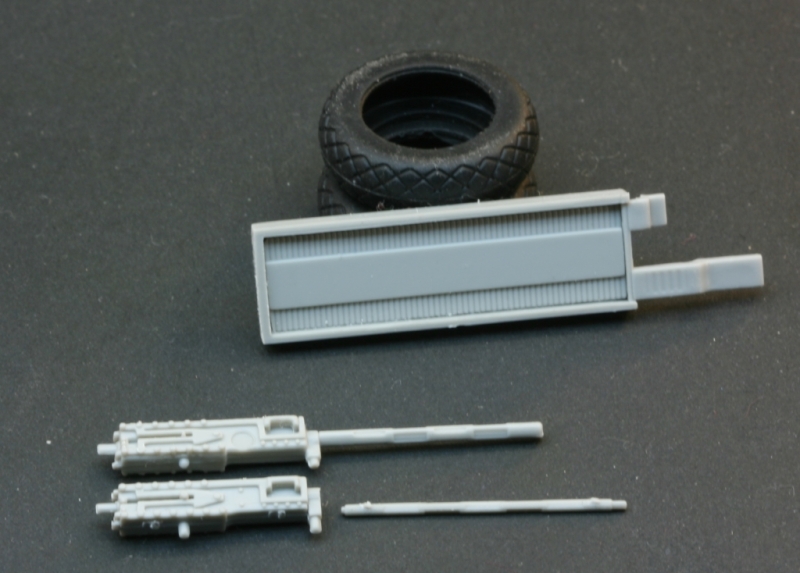
The intercoolers and ducting are supplied in the F4F-3 kit (unlike the F4F-4 kit) to attach to the engine. These are very prominent in the landing gear bay and will really help fill out the view. Be careful to consider which engine installation you're modeling as not all engines had intercoolers, especially the foreign orders. An ignition ring is supplied so adding your own harness in silver wire will enhance the detail if desired. Colour call outs in the instructions are again dubious as my references cite natural metal finish for cylinders, silver ignition harness, pushrod housings gloss black and crankcase engine gray.
Fuselage and Control Surfaces
Checking against plans from AJ Press's Wildcat ML 20 the fuselage shape conforms very nicely. Apart from being a little tight around the nose, the fuselage taped up after a tweak without any gaps at all. Of note is that the fuselage retains the panel lines of the originally mounted .30cal cowl guns in the G-36A French ordered version and in the prototypes. This makes conversion of this kit to an earlier armament configuration just that little bit easier. All other major features of the fuselage appear to be present. Some features such as the fuselage lift point are already drilled out but to a degree I feel the fidelity of hinges and interior cockpit ribbing could be improved as they seem a little simplistic in this larger scale.
The engine cowl that is supplied is a clear version for the double width single cowl flap system. It has the air intake for the carburetor on centre-top and the two side ducts for the intercooler. What struck me was the obvious potential to remove these features and obtain a nice cowl for other versions including Martlets. Indeed, it would seem that removing the section containing the cowl flap and installing a single row radial engine would go along way towards a Martlet conversion.
I confess to becoming confused as to where the panel lines on the cowl of the early F4F-3's should run. Of the four or five references I used 'none' were absolutely convincing and some outright contradicted each other. Some left me dubious as to the credibility of their diagrams. I then researched some photos but they also seemed of limited reliability given the painting lines sometimes overlaid the panel lines but also the prolific in-service and post-war modifications. So, if Trumpeter has managed to get the odd panel line wrong on a part as critical as the cowl…well, its not I feel its through laziness…the data isn't really as clear as you could expect.
Overall, the control surfaces appear to also conform to available plans and are very crispy moulded. They tape together with consummate ease. Some nasty ejector pin marks will need attending to if you plan on posing the flaps down but the effort will be rewarded given the extra detail offered by the manufacturer. Elevators and rudder appear to have the right shape and detail. The PE and rod method which some modelers detest is supplied to secure the control surfaces. The PE is especially well shaped to represent more faithfully in scale the prominent linkages connecting the control surfaces found on the real plane. Fabric control surfaces look a little proud although how it is represented in this scale is always going to be a matter of taste. I'd recommend you sand and or detail as you think is fit.
Landing Gear
The landing gear in the review kit is flash free and is a nicely detailed representation. Colour call outs again appear incorrect as the F4F-3 early Wildcat apparently had silver coloured wheel wells and landing gear. In addition, whilst the ventilation slots on the innermost aspect of the inside wheel rims are faithfully replicated, the outermost ones are incorrect. The ventilation slots are meant to be horizontally rather vertically orientated. Hydraulic line addition on the main landing gear would enhance any kit build. Rubber tyres are provided and given the lack of inherent weighting and the error on the inner wheel rim, hopefully Mastercasters will come to the rescue. Then again, I 'was' looking 'really' hard for arcane details.
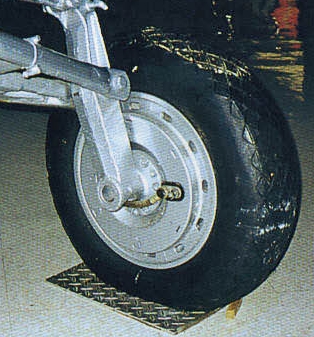
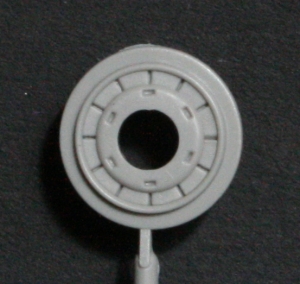
Inner wheel hub from kit / inner wheel hub from real plane (F4F Wildcat In Detail and Scale-Squadron Signal pg39)
Interestingly, the tail wheel and pneumatic tyre that is supplied is correct for later land and carrier based aircraft (including the F4F-4) but is not quite right for the early F4F-3's that served on carriers. These aircraft had a solid rubber tyres and a different aerodynamic shroud that extended further than the one supplied in the kit. Again, if you're after accuracy this part will need attending to or replacement.
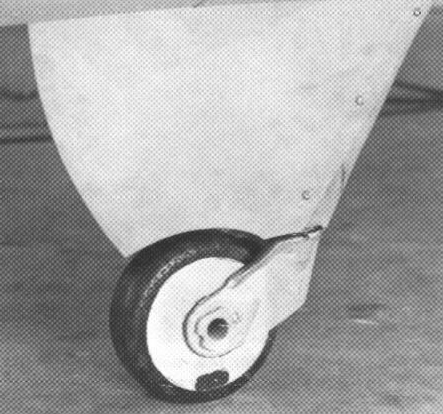
F4F-3 Tailwheel (F4F Wildcat In Detail and Scale-Squadron Signal pg 32)
Wings
The wings in the review kit look lovely and indeed they taped up without a gap in sight. Truly beautiful injection moulding. The upper surfaces seem to have the major panel lines correct and offer the option of displaying the MG and ammo access panels open. Ejector pin marks on the inside of the inspection panels will require attention if you do decide to display the panels open.
Wing undersurface detail is rich and very crisp. The details conformed to all but one of the plans I could obtain. In general they look accurate and replicate the retractable landing gear light, underwing oil coolers and a well shaped gun camera port. I am not sure if there should be underwing ammo access panels scribed in beside the ejection ports. These are not present on the kit. I also have two sets of plans, one with them present, the other without. More intel is required to be definitive about this minor detail.
The wing fit to the fuselage is tricky if you follow the instruction. The upper and lower wings mate against the fuselage at a very precise angle to maintain the dihedral and keep the wing root gap sealed. The engineering at this major joint is soft with a paltry 2mm deep tongue and groove that lacks of a lot of retention/resistance form. Added to that quandary is the concave shape of the fuselage at the wing root. When the wings are placed against it, there is a varying gap of 0.5 -1mm along a large amount of the wing root surface area. It will require some thought and effort during construction to minmise final finishing tasks.
Although the wing halves ( when upper and lower were mated) didn't fit all that positively, the fit is very neat when they are correctly aligned. If you secure the upper wing surface to the fuselage first, let it set, and then attach the lower you'll have no join at all to fill. It fits pretty much perfectly. The upper wing is secured first as the tongue that fits into the fuselage is located on this part. Securing the first half of the wing really allows close checking of the fit with fine tuning as your adhesive sets. Whilst half the wing is on you could also backfill the gaps created by the fuselage concavity and thus obtain a stronger joint but I don't think it will be needed. Of course this is a deviation from the plans and will require you place your MG barrels into the MG's after the wings are attached to the aircraft.
The four machine guns themselves are really nicely detailed but the ammo belts are very basic indeed. I also found the .50cal barrels for the F4F-3 kit were surprisingly quite a lot smaller than the six MGs on another sprue meant for a F4F-4 build. When installed, the guns are staggered correctly but appear to be missing the protruding blast tube found on the inboard guns. The kit does have an option for some shrouds that go over the barrels and sit against the wing leading edge. These will look nice but I could find no reference to their installation on a F4F-3.
Canopy
The canopy supplied has all of the major features of the F4F-3 range. It is crystal clear and sealed in a bag with all the other landing lights, windows and navigation lights. The support in the front canopy for the telescopic sight is well rendered. It's worth remembering some versions of F4F-3s left this support in place long after the telescopic sight had been replaced with a reflector sight.
In this boxing the front canopy even has the additional frame on the side of the front panel. Whilst some F4F-3's had this feature, unfortunately my research suggests that both planes for which decals are supplied didn't have this frame. Again, rather than moan it's a five minute job with some Mastercasters sanding sticks. Look here for a how to do it simply and effectively.
Decals and Markings
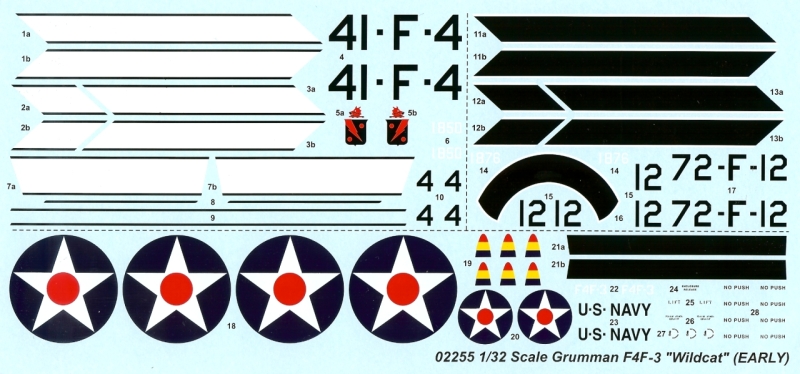
The decal sheet comes with a row of generic markings, including the Neutrality Patrol Star and the options for modeling two different planes from the Atlantic Carrier cruises of 1941. To me the general colour of the decals look fine and in perfect register. Red, White and Blue…good guys. For some, poor old Trumpeter cops a hiding over their colours and attention to detail. I'm going to use the kit decals myself but I'd recommend you make up your own mind based on how you strongly feel and if you were genetically fortunate enough to be born both male and devoid of colour-blindness.
As I've mentioned a few times I'd check references for painting instructions. I'm not sure where Trumpeter was getting its intel on these call outs but they conflict with the reference sources I have. An example of a confusing call is for the wings to be painted Orange-Yellow and yet, the F4F-3's prior to full scale combat operations were painted Lemon Yellow.
Basically, the profile sheet you get with the kit is a lovely piece of artwork. I'd use it as that, forget the colour callouts and check the reference material. To a large degree we're lucky because White Ensign Models paints has all the necessary colours for the squadrons involved in the Atlantic Patrol F4F-3's. They look spot on and combined with some creativity in your decal sheet (juggling some numbers around)...you can even choose to model planes from other squadrons planes on the same Atlantic cruise's. Very cool and easy at the same time eh?
A few notes on the schemes in the profiles. In the profile of option A (VF-41 plane number 4) you may need to modify the front canopy by removing the additional frame. Other than that, this profile looks spot on. It appears in a number of the references, especially in a number of pictures in the book, F4F Wildcat in Action 84 - Squadron Signal.
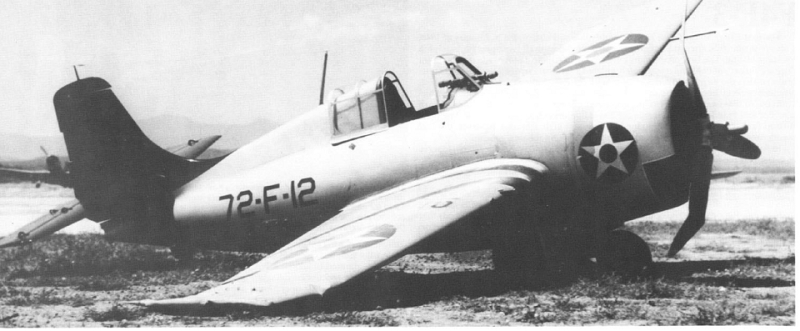
On Option B (VF-72 plane 12), again you'll need to perform a canopy modification and place the neutrality patrol star in the correct position…not where the profile says.
Summary
With its earlier F4F-4 release Trumpeter had produced the best 1/32 Wildcat to date. We already have a late version Wildcat and with this release now a colourful F4F-3 Early version. Not surprisingly, in an effort to be fiscally responsible and reinvigorate sales of this older kit, Trumpeter hasn't tooled an entirely new kit…only the major features of the F4F-3. These major features have been captured well but as I've indicated, there are some areas where modelers will have to research and tweak their kit to obtain a really accurate representation of the variant of F4F-3. That's of course if they can be bothered or they want to. As an exciting conversion opportunity that probably wasn't intentional the provision of a modified cowl, canopy and non-folding wings will allow minor work to produce a very accurate Martlet I or even a G-36A.
I really like this kit and I'm sure I'll have a blast building it. I love the colours and the period of aviation it represents so even just gluing it together and sticking on the decals should be fun. My mind is already spinning though on some wild cowl tweaks to really shake up the Martlet fans. The 'suggested' retail price from the US distributor of the kit is $69.95 US.
Recommended.
Many thanks to Stevens International for the review sample.
References
- F4F Wildcat in Action 84 - Squadron Signal
Authors : Don Lin
ISBN : 0-89747-200-4 - F4F Wildcat in Action 191-Squadron Signal
Authors: Richard S Dan
ISBN : 0-89747-469-4 - F4F Wildcat Walk Around-Squadron Signal
Authors : Richard Dan
ISBN : 0-89747-347-7 - F4F Wildcat - Monografie Lotnicze No 20
Author : Adam Jarski
ISBN : 83-86208-29-5 - F4F Wildcat In Detail and Scale-Squadron Signal
Author : Bert Kinzey
ISBN : 1-888974-06-0
Additional Images
© Matt Gannon 2007
This review was published on Saturday, July 02 2011; Last modified on Wednesday, May 18 2016