
Teknics | TK32018: 1/32 Pratt & Whitney R-2800 Engine
Reviewed by Rato Marczak
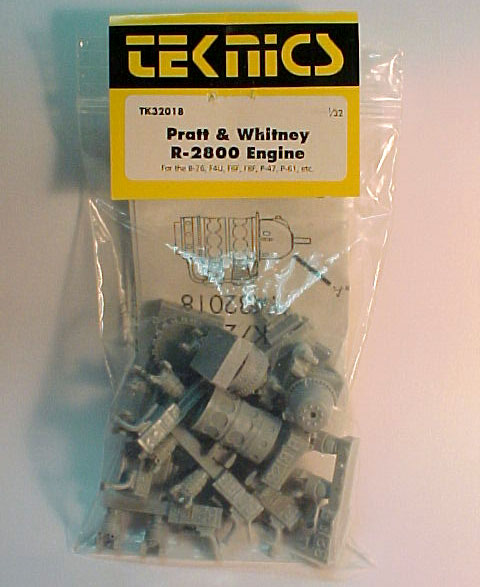
The product package.
A MUCH NEEDED ACCESSORY
You probably have already read in several modeling articles about people using the Teknics P&W R-2800 engine. That's the subject of this review. Since we are still relying on many old models, don't expect the kits to bring really good engines with them. And the R-2800 was the heart of many WWII designs. Among the injected kits that will welcome this Teknics product one may cite the Revell's F4U Corsair and P-47 Thunderbolt, and the Hasegawa's offering of the F6F Hellcat. If you are in the vacuum formed road, planes like the the F7F Tigercat, the F8F Bearcat, P-61 Black Widow and the B-26 Marauder will benefit from it, to cite the most famous.
Teknics resin set is a kit in itself, and that's the way you should built it. Released in the 1990s, it is a marvelous product, virtually without any air bubble or mold seams. I don't have any idea of the kind of resin Teknics use in their sets, but it doesn't behave like other resin products. This one is not of the very brittle type. Instead, it is reasonably ductile, almost like a high impact styrene. That means easy cutting and sanding... with much less dangerous dust.
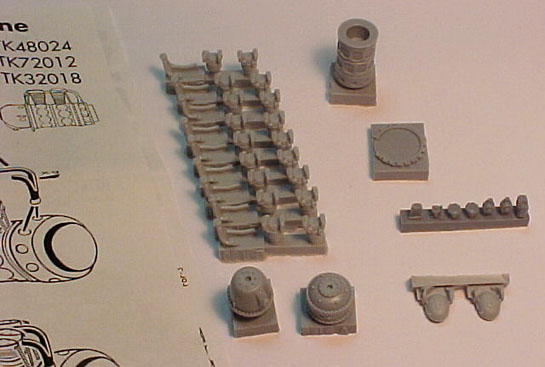
The set contents.
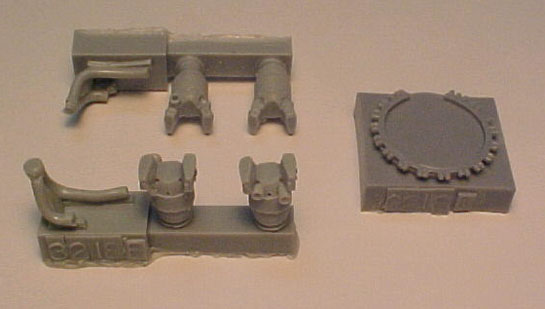
The set comes in a plastic bag, containing 40 parts molded in a gray resin. A one page, exploded view type instruction sheet accompanies the set.
You get all the 18 cylinders, admission stacks, an engine block, the ignition ring, accessories (propeller governor, etc.), and three types of magnetos. You also have the two most common types of reduction case so that it is possible model both early and late versions of the P&W R-2800.
The quality of the moldings must be stressed. However, my sample had several marks of mold failure in some parts, indicating that the molds were probably at the end of their life. Just my bad luck...
ENGINE BLOCK AND REDUCTION CASE
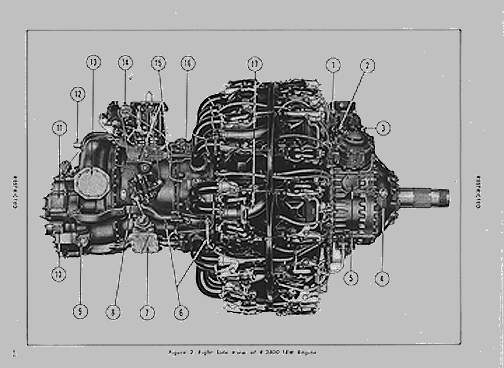
The engine block is simply a well molded resin chunk around what everything goes. The recesses where the cylinders and the stacks are attached are well done and make alignment of the parts easier. The block ends just aft the stacks insertion points, so if you want to built the rear area of the engine (carburetor, turbo-charger etc.) you have to scratchbuild everything from that point back. This is not an easy task, as shown by the pictures below. These pictures came from the Maintenance Manual, in case you need a place to start.
The set comes with two reduction cases: the one piece cast type and the flanged type. This is enough to depict most WWII versions of the R-2800. My parts didn't miss a single bolt, and the texture of the cast parts is beautifully captured. You even have a small disk to put your own Pratt & Whitney logo on. A brownish wash will make all these details pop out.
The engine block.

The two types of reduction case.
Side view (from the Maintenance Manual).
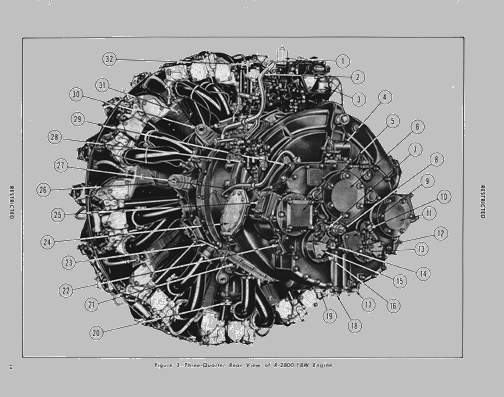
Rear view (from the Maintenance Manual).
CYLINDERS
All 18 cylinders come each one in a single piece. Note the differences between the front and rear cylinders before you start gluing them on the engine block. Both come in the same resin block, along with the intake stacks. There are no exhaust stacks, since each aircraft had its unique exhaust stacks layout. Do yours according to the bird you are building.
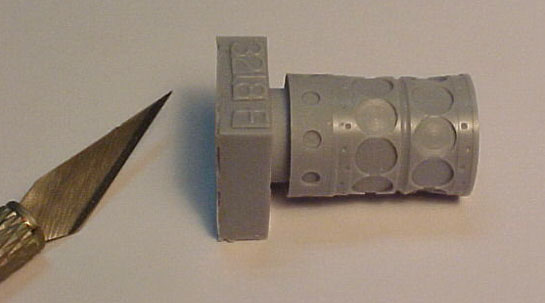
The cooling fins are very well molded, as are the rock cases on top of each cylinder. The ignition ring is molded in a way that will deserve your attention to be removed (see picture below). The best way to remove this type of molding is to score repeatedly around the cut line with a hobby knife until the part is free from the cast block. Then sand the ring on a piece of sandpaper laid on a flat surface to remove the scratches.
You have to add the push rods. Correct... 36 push rods. Measure the correct size from the base of the engine block (the push rods locations are marked there) until the base of the rocks case. I recommend you to use plastic rods. Nothing against metal rods, but you have to cut quite a few of these, huh? After installed, the cylinders will need the ignition wires. Yep... another 36. This can be accomplished with fine lead wire, soldering wire, sprue or whatever is your favorite method. Again, do some try-outs to find the proper lengths and copy them. Because each cylinder has a front and a back spark plug, and the wires come from the same ignition ring for both rows of cylinders, there are four lengths to work with. After all this work, you also have yet to add a scratchbuild U-shaped clamp on top of each cylinder (see the instructions).
Cylinders, intake stacks and the ignition distributor ring.
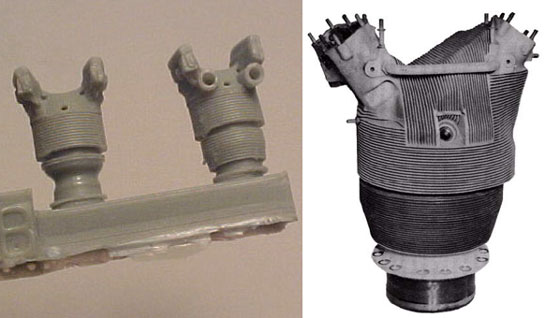
A closer look on the cylinders. Note the well molded cooling fins. On the right, a photo of the real part.
MAGNETOS AND ACCESSORIES
There is also a set of smaller accessories. I was able to identify the propeller governor and three styles of magnetos. Two of them are of the short type, typical of R2800 block 8/8W (F4U) or 10/10W (F6F). Another pair (molded in a lighter gray resin than the rest of my sample) are the well known bulged (General Electric) magnetos, easily recognizable in mid-production P-47s and on.
One thing that is missing is the ring installed between the cylinder rows. Its shape is very complex to be made from scratch. Better to stolen it from a Revell F4U or P-47 in 1/32. After Scott Murphy, this recipe works ok.
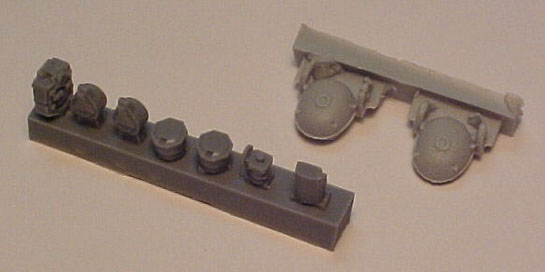
Smaller parts.
PAINTING
There has been a lot of discussion about how these 2000 hp beasts were painted. The Teknics instructions are mostly wrong. The correct painting scheme for this engine is as follows:
- Push rods: Black (FS37038)
- Crankcase and engine block: Engine gray (this is a medium gray with a slight blue hue. The FS36270 is a good match)
- Cylinders: Natural metal
However, this is the factory scheme applied on the R-2800 after the initial batches. In early models this may vary. For instance, very early R-2800 had factory painted black cylinders. The ignition ring was generally painted black too, but natural metal was not uncommon. Another important point: short magnetos are normally engine gray (just as the crankcase) while the GE magnetos are black.
The picture below shows a P&W R-2800-20 found in the National Museum of Naval Aviation, Pensacola, FL.I'm sure this photo speaks for itself, you won't find better painting guide. And to prove that the colors of this restoration are reliable, we also included a wartime photo of a A-26 under maintenance.
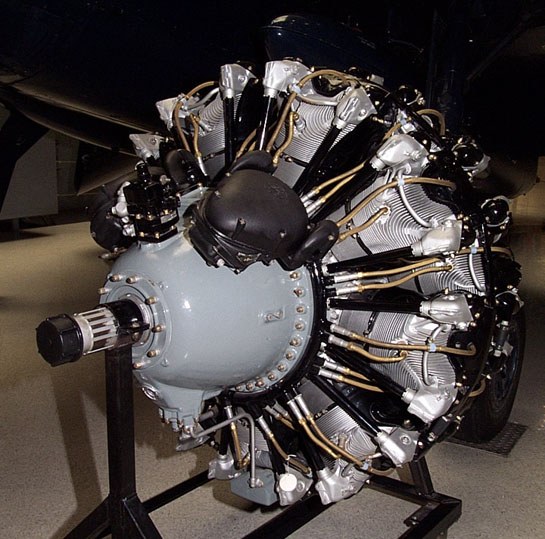
A R-2800 at NMNA. Note the black GE magnetos and the color of the ignition wires (photo courtesy Scott Murphy).
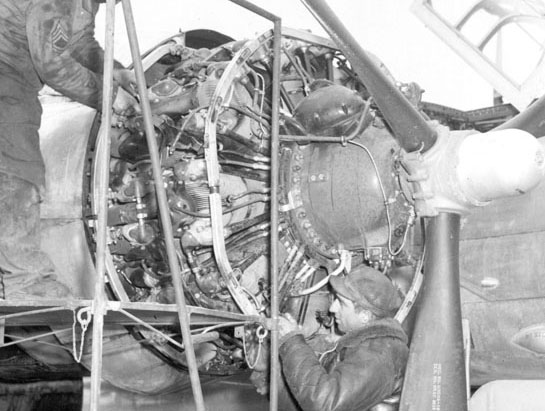
Ground crew working on an A-26's R-2800 engine.
FINAL COMMENTS
Although I have taken many photos of this engine from museums, I've never measured one. Then, I can't comment much as far as accuracy is concerned. However, many modelers have reported it fits in Corsairs, Hellcats and Thunderbolts cowlings quite well, so it is possibly very accurate.
This accessory is a very welcome product, and will add a lot of realism to your models with no more work than the kit's engine. Spectacular results can be obtained with a careful alignment and a good paint job. The pictures below show two samples of this accessory as they turned out in the hands of Scott Murphy for some of his masterpieces. The first one is the R-2800 used on the Revell Corsair, while the others show the engine of Scott's Revell P-47 (he has scratchbuilt the rear area).
If you want specific references about this engine (other than the manuals), here are two good ones:
[1] - Graham White, R-2800: Pratt & Whitney's Dependable Masterpiece, Society of Automotive Engineers, 2001, ISBN Number: 0-7680-0272-9
[2] - Graham White, Allied Aircraft Piston Engines of World War II, Society of Automotive Engineers, 1995, ISBN Number: 1-56091-655-9

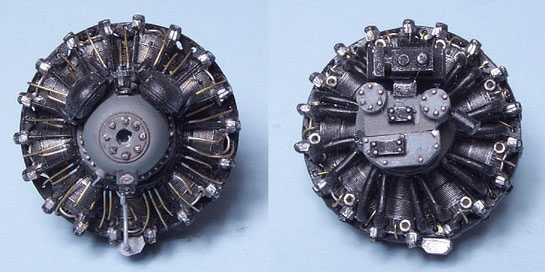
Scott's Teknics R-2800 ready to be installed in the Revell F4U Corsair. The kit's engine is shown on the right side (photo courtesy Scott Murphy).
Front and back views of Scott's Teknics R-2800 before being mounted on his Revell P-47. The rear area was scratchbuilt (photo courtesy Scott Murphy).

Side view of Scott's Teknics R-2800 before being mounted on his Revell P-47. The rear area was scratchbuilt (photo courtesy Scott Murphy).
SUMMARY
This engine is a simple, yet well detailed accessory that will find its way to engine cowlings of many serious modelers. And it is head and shoulders ahead of the Engines & Things offering. It is readily available for around $16 USD. Worth every cent.
Highly recommended.
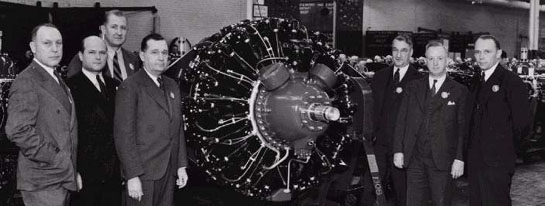
Historical photo of the first production R-2800 (Pratt & Whitney photo). I hope it puts an end to the discussion about early R-2800 having or not having its cylinders painted black. Also note the unpainted nuts.
© Rato Marczak 2002
This review was published on Saturday, July 02 2011; Last modified on Wednesday, May 18 2016