
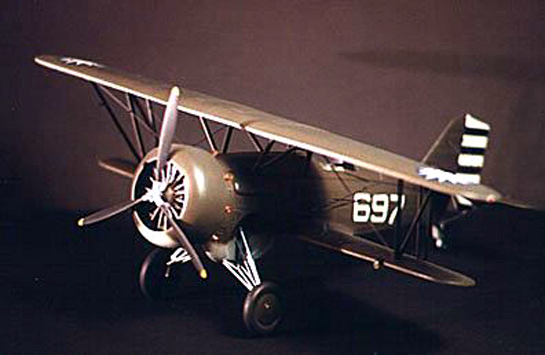
Converting Hasegawa's 1/32 BF2-C to a Hawk III
By Scott Head
Covers Lost-Foam Fiberglass Casting and Simple Scratch Building
Hawk III Background
The Curtiss Hawk III was one of the many Curtiss Hawk biplane fighters to find that fame is hard to come by. Developed from the Curtiss BF2C naval fighter, the Hawk III was an export version of a not so successful effort. It nevertheless performed admirably in the hands of China, Thailand, and Argentina. Despite the efforts of Curtiss, the BF2C Navy Fighter was not to become a success in US hands due to a design flaw that caused excessive vibration in its all metal upper wing. It was rejected from service after only a year in fleet service aboard the carrier USS Ranger. To meet the quickly expanding export market, Curtiss redesigned the wing to an all wood structure, and re-engined and re-armed the BF2C (a number of minor variations between export orders existed, but the airframe was basically the same). The resulting aircraft was the Hawk III.
In service, 60 Hawk IIIs were to form a large part of the Chinese fight against the Japanese onslaught in the late '30s and into the '40s. Quickly outclassed by Japanese monoplanes, it was to find a niche as a ground attack plane and an advanced trainer. Curtiss Hawk IIIs were excellent aircraft, loved by pilots, and deserve more credit than is given to them.
Kit Options
In looking for a model of the Hawk III, I had three options: In 1/72 scale, MPM makes a decent limited run kit, though the engine is a bit difficult to deal with (It's closer to a US version BF2C engine and cowl arrangement anyway, so it isn't entirely accurate for the paint scheme on the box). In 1/48 scale, Sierra had just released a beautiful vacuformed kit of the Hawk III, but I had not ordered one at the time. My third option was to convert the 1/32 scale Hasegawa BF2C-1 into a Hawk III. I chose this route, since I wanted to try a simple fiberglass casting skill I had just learned.
The Hasegawa BF2C kit is a relatively old kit, and may usually be found at swap meets or via old kit dealers. Many hobby shops still have some of these kits, since they are not uncommon or rare. Its a nice kit in itself, and it bulds up with very little trouble. The conversion to a Chinese Hawk III is simple too, if you are willing to do a bit of simple scratchbuilding. The major changes are in the engine cowl, and if you build a Thai or Argentine version, some weapons fairings on the forward fuselage sides need attention too. Other changes include minor cockpit details, canopy changes, and minor changes to the rear landing gear.
I began by acquiring scale drawings, very important since there are many variations among Hawk IIIs. I selcted the Chinese version powered by a Wright Cyclone engine, which required a deeper, more enclosed cowl than the BF2Cs narrow cowl. Making a new cowl was the most challenging part of this conversion, but not difficult if planned properly. I used a method called lost foam casting, and here's how:

Casting a New Engine Cowl
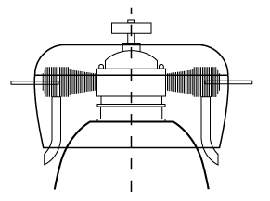
Taking a three view of the cowl, I constructed a master form out of Dow Corning blue insulation foam (a dense sheet of styrofoam used by home builders). This is not as difficult as it sounds, simply cut a rough cylinder from two sheets that have been sandwiched together with white glue and then sand to shape. Use templates as you go, or simply judge using the trusty Mk.I Eyeball. Don't worry about the front opening or hollowing it out, we'll do that later. Just a solid form is all that is needed. Important to keep in mind is to sand the entire form 1/16² or so smaller than needed, as the fiberglass resin we'll be using will make this up with its thickness. Create your master with about 1/2" of additional length in the rear of the cowl, as it will be easier to cut it off to the proper length later. Once the foam master has been completed, mount it on a wood dowel or brass rod (8" long or so) by creating a hole in the rear center. White glue it in place to keep it secure while handling.
As fiberglass resin is to be used as a casting material, the foam must be protected so that it does not melt away when exposed to the fiberglass. I used white glue diluted with water (1:1 ratio) and painted the foam master with two coats, allowing the first coat to dry thoroughly before painting on the second. The glue is impervious to the resin and forms a barrier that protects the foam while the casting cures.
When dry, obtain some very fine fiberglass cloth (RC section of the hobby shop should have some) and a suitable amount of two part fiberglass resin. Mix the fiberglass resin to manufacturer's instructions, too much is better than not enough. (NOTE: If you've never worked with fiberglass, be sure to practice a few simple techniques. Check the RC department of the hobby shop for books that describe in detail the process. It is important to work with proper ventilation and a mask, as fiberglass resin fumes and glass fibers can pose a serious health risk) With a disposable dope brush (also available at the hobby shop), cover the foam master with resin. The back of the cowl can be left uncovered as it would need to be opened on the final piece, so save yourself some work. Cover the front of the cowl fully to provide strength during the final sanding and shaping process. With the resin still "wet", lay up some strips of the cloth to provide strength, overlapping them and working them into the resin until the entire casting is covered in a thin layer of resin and cloth. Work quickly as the resin is curing, and get those air bubbles out if possible! The ideal casting will be a thin layer of resin and cloth, about 1/16" to 3/32" average thickness. Don't worry about lumps as these can be sanded off later.
Finishing the Rough
When the cowl casting has cured, remove the dowel and get some very coarse sandpaper mounted on a comfortable wood block. Use the scale drawings and cardstock templates as a guide and sand, refining the basic shape to an accurate outline. Fiberglass is very hard, so vigorous sanding will be necessary if your casting has lots of bumps or needs a lot of refining. I used an orbital electric sander with great success. Wear a mask, the dust is dangerous! Gradually, your cowl should become an accurate replica, and finer grades of sandpaper should be used to create a smooth finish. Fill air holes and mistakes with superglue if needed. If you followed you plans and sanded attentively, your finished piece should be geometrically correct: perfectly round and tapered, flat along the top, and properly curved along the forward edge.
Now for the neat part! Take your casting outside, cut into the foam master from behind to open the glue barrier, and pour a small amount of lacquer thinner on the foam master from the rear. The foam will dissolve away. Keep adding lacquer thinner, rinsing the goo from inside. When all of the foam is gone, peel away the glue barrier. Voila! A hollow, one piece casting!
Finishing the casting is tedious, but these steps ought to speed the process along:
The center opening of the cowl front is easy to open. Just mark the absolute center of the cowl opening (where the prop shaft will eventually reside) and using a mathematician's compass trace the opening on the fiberglass. When satisfied with the accuracy of the circle, replace the lead in the compass with a cutting point. I made mine from an old airbrush needle. Using the compass centered in the same spot that was used to trace the opening, scribe along the traced line. Keep scribing a line until the depth is sufficient enough that you can use it as a guide for grinding the center hole opening with a Dremel tool. If your casting is consistently smooth enough, you might be able to scribe right through, but keep in mind that the fiberglass will chip easily if you try to tap the center section out after scribing. Once opened, clean up the cowl opening with files and sanding sticks as needed.
Since the cowl master form was created with about 1/2" additional length in the rear, it is easy to cut the opening in the back accurately. Measure and mark the location of the cut you will need to make at the rear of the cowl. Lay the cowl flat on its front. Use small balsa or wooden blocks and strips to build up a platform that is the same height as your mark. I used balsa, 1/2" thick, 1" wide, and 6" long. I glued these blocks together and then sanded them down so that the final "stick" could hold an Xacto blade on my mark. I then scribed the cowl line by keeping the cowl and the wood block flat on my work table, rotating the cowl as I went around the entire circumference several times. Use the back of the blade as the cutting edge may creep. The resulting scribed line is perfectly the same distance from the front of the cowl. I used a razor saw to finish the cut using the scribed line as a guide. Clean up by sanding the rear opening on a piece of sandpaper taped to a flat surface (vacuform style).
After all this work, you now have a finished Hawk III engine cowl! Whew! And that was just step 1! Never fear, that's the worst of it.
© Scott M. Head
This article was published on Wednesday, July 20 2011; Last modified on Saturday, May 14 2016