
Airshow Models CE2 - Christen Eagle II
By Gene Nollmann
Whenever some aircraft not in the mainstream comes onto the market, instantly my eyes light up and my curiosity is peeked. It might be that after so many years of good intentions (to build the recently purchased model) leads to becoming an unintentional kit collector and that a saturation point is reached with so many P-51s, Bf 109s, and so on, that another one just doesn't have the magic that a totally fresh, heretofore un-attempted kit holds. At any rate, when Peter Groves created his website, Airshowmodels.com, to announce the range of kits he is developing, I was very eager to acquire one of their kits. The first offering was to be the Christen Eagle II.
Not knowing a thing about the plane and I had to do a little research on the net to see what it was all about. Turns out the Eagle II is one of the ultimate developments of several generations of lightweight agile sport biplanes. Introduced in 1977 by Frank Christensen as an unlimited class aerobatic kit plane, it soon became popular with both professional and amateur aerobatic pilots. The plane found that happy combination of attributes that previously could only be found as individual features on several different planes.
In 1979 the Eagles Aerobatic Team switched from a Pitts to the Eagle I (a single seat Eagle II) and continued with the type for nearly 20 years. Airshow Models also offers a conversion set to build the Team's plane.
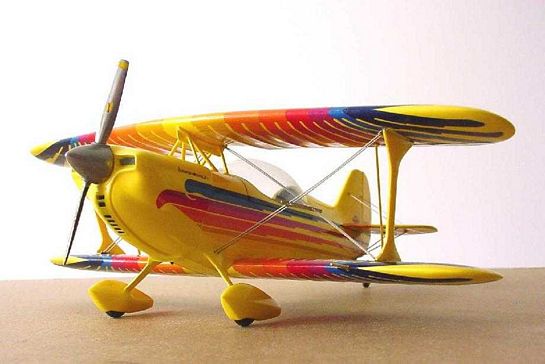
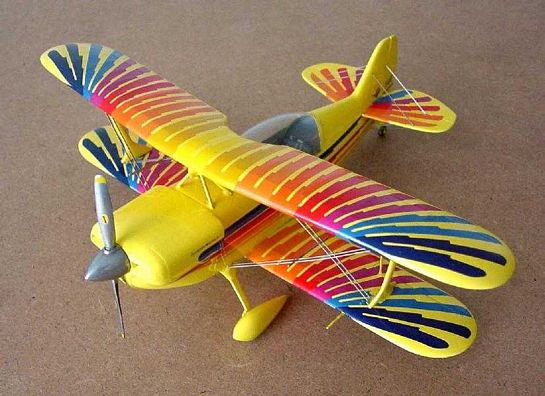
One constant on all the schemes was the 'Eagle' feathers, which really sets the plane (and the kit) apart from the norm. In a visit to one of the annual Oshkosh Fly-Ins one is likely to see a display of a number of these nimble planes.
The Kit
Airshow Models built up some anticipation for the kit on their nicely laid out 'teal' webpage and then in handsome fashion followed through with a kit offering last October 2001 (and has steadily been introducing new models and decals options ever since). When I received my example of the kit, I was impressed with the general presentation, especially considering this was a first-time effort. Peter Groves and the team helping him put this kit together have done a very admirable job.
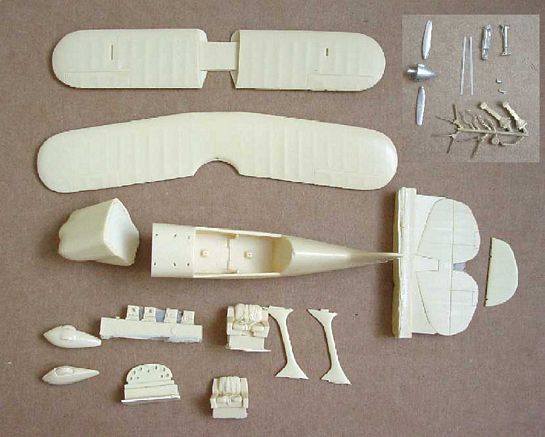
The kit came in a small but sturdy box with 17 resins parts, a tree of 9 cast brass parts, and 16 photo-etched stainless, 9 cast white metal parts, 2 clear vac canopy (kit requires 1 and 1 back-up is provided) and decals for two different feather schemes. An 8-page instruction booklet was included. The resin parts were well formed without noticeable bubbles and because they fit together so well, no deep sanding is required that usually leads to revealing bubbles. The fuselage and cowl are solid resin with an opening for the cockpit. The seats have the belts and buckles molded in; I'm not sure these seats are correct, they seem to be barely high enough to support the small of one's back. The wings are solid resin.
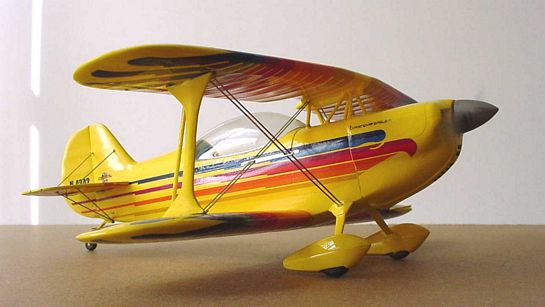
The provision of brass parts for items that might be subject to stress or breakage is very welcome. I was impressed with how well the brass landing gear components fit the fuselage and the faired wheel pants; very well designed.
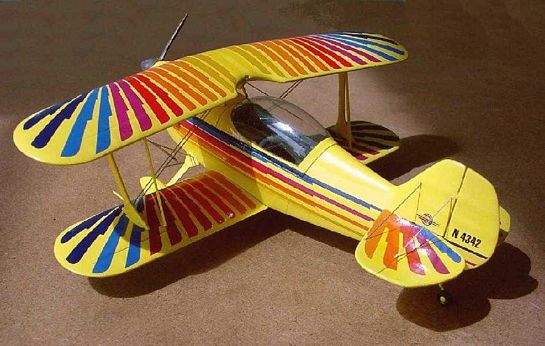
Of course the show-stealer for the kit are the dramatic decals. They come on 5 sheets, a pair for the wings of the 'Standard Full Feather Scheme' and another pair for the wings of the 'Special Tapered Feather Scheme', and one sheet for the fuselage feathers of both schemes and some nicely done very small Christen logos, limited registration numbers, product sponsor logos, Hartzell prop logo and 2 instrument panels. The decals were in excellent register.
The Model
After a long delay, so long in fact that 5 months after purchase I was surprised to receive an unsolicited revised and improved instruction booklet (containing more assembly information), I finally started the model. My delay was in deciding what I wanted to do with the model. So many kits were done in the standard white with the colorful feathers that I just didn't want to see another one sitting on my shelf. The search was on for a different base color that could still be used with the rainbow colors of the kit decals.
In researching on the web, there were several Eagle IIs in different base colors but usually some form of monochromatic feather scheme. If only the feather graphics were 'express masks', a whole new world would open up.
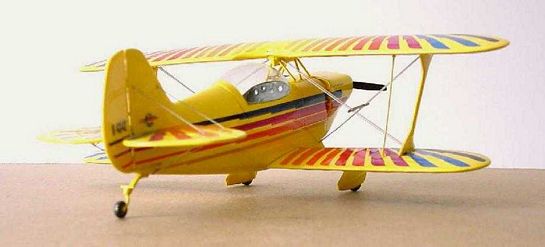
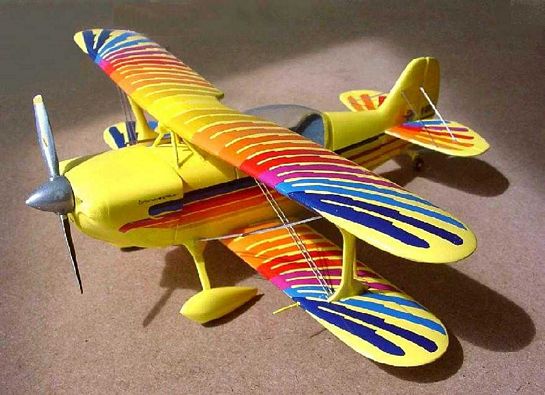
I finally decided that some shade of yellow might work. Using Tamiya acrylics, I finally settled on a mix of 1 part X- 8 Lemon Yellow and 2 parts X-2 White. More white could have been better, but certainly not any more yellow.
Different color schemes were tried for the interior, but the best seemed to be a more neutral grey that did not 'play' with the exterior-the exterior was busy enough with color to speak for the whole plane! Cockpit assembly was pretty straight-forward. This is one area that could use a little more help in the instruction manual; the other builds on the web or full size reference on the web were pretty weak in this area.
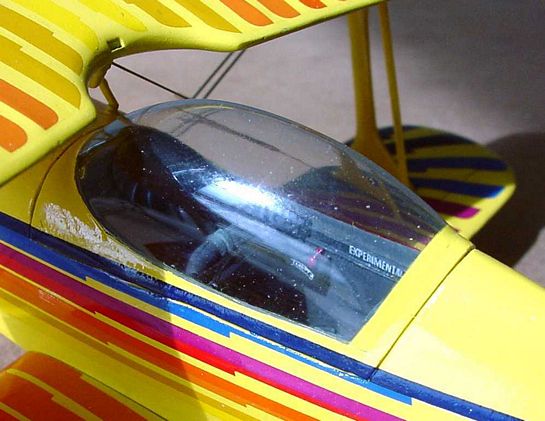
Fitting the canopy surprised me for the amount of trouble I had in getting a fit directly after carefully trimming the vac piece supplied. Obviously I was not careful enough by not being able to cut the first one correctly and then, with the experience behind me, not being able to cut the second one correctly. In any event, I had to add sprue pieces and filler to complete the fit.
One experiment that went well on this canopy was with the interior finish. Some of the inside surfaces required paint or else the exterior paint color would show through. Rather than attempt to mask and paint, I cut pieces of dark grey decal and applied to the inside which had been pre-treated with Future and dried 48 hours before the decaling. The decal was applied and allowed to set enough so I could lift some of the decal without moving it and lightly brushed Future under the decal. The reason for the caution was to avoid marring the canopy clear coat with uneven double coats of Future. The decal would wrinkle slightly, as it would with a setting solution, but would flatten out as it dried. When the decals were all applied and dried, I dipped the whole canopy in a small bath of Future, being careful to not to dissolve the Future/decal bond.
In prep to paint the canopy exterior, two coats of Elmer's White Glue were applied, allowed to dry, and then with a sharp blade, trimmed to match the decal line visible on the interior. The moisture of the White Glue did not effect the Future treated canopy and after the final paint coat, a light blade cut at the mask parting line allowed the mask to be removed without lifting paint or Future. This model was my first attempt at this method, but with patience, I feel some good results can be achieved.
My work method is perhaps backward in that I applied the decals to the wings and fuselage before their final assembly. The decals went down with great ease; leading edge alignment was precise. Using MicroScale Micro Set the decals settled down snugly to reveal any and all surface detail (both meaningful detail and errors!). The decals were just the right thickness and opacity. After decals were dried for at least 48 hrs., the surface was sealed with Future, covered and allowed to set at least 72 hrs.. The final assembly stage was going to involve some handling, so the surface had to be thoroughly set. I would recommend creating a jig to precisely prefit all of the biplane wing supports. Of course the other extreme is to assemble the fuselage/wing before painting and work out all the minor fit issues then. For me, gloss finishes with so many surfaces running in different directions is a nightmare so I opted for the paint, decal, assemble route.
Although Airshow Models offer a sheet of registration numbers allowing the modeler to create any registration wanted, I opted to combine some of the numbers on the stock decal sheet by combining the N43 with 42 and coming up with N4342. A few days after committing this decision to sealer, I began to feel guilty using some number that might be some other aircraft in reality. A quick web check revealed that the number was indeed used on some real airplane, sort-of! Back in 1976 the NTSB carried a 'non-fatal' accident report where a "Krzycki 4XP-3" suffered substantial damage in a take-off stall from a farm strip in Nebraska. The pilot had 0 hours in type. Perhaps this was the inaugural flight of a home-built. Haven't been able to find any more information on the plane. Isn't it fitting to use the number on another 'experimental'?
On the shelf, the diminutive size of the plane suggests it is more of a canary or "Tweetie" bird than an "Eagle", so my pet name for it is 'Tweetie Too'. But then on the other hand, it seems a bit more tropical, perhaps 'Periquito' would be more appropriate.
Conclusion
Airshow Models Christen Eagle II is a very well thought out multi-media kit and as a first effort it is amazing. With the exception of my canopy difficulties, this is a very easy kit to build, and with some digging into research, a hyper-detailer could have a blast with this kit. Having seen their Pitts S2B, it is clear that Airshow Models is learning from their efforts and advancing the potential of their kits. I can hardly wait for their 'Stearman'.
References
© 2001 Gene Nollmann
This article was published on Wednesday, July 20 2011; Last modified on Saturday, May 14 2016