
Trumpeter 1/32 TBM-3 Avenger Part 2
By Gene Nollmann
Somehow getting to this stage in the kit feels like a special accomplishment; the sequence of sub-assemblies and time on the workbench with each step creates a good, rewarding pace. If this is by design, it is clever; if not, it is worth learning. This kit might seem daunting to an inexperienced modeler, but not only is it a kit of a neat plane, it is a lesson in how to compartmentalize one's work, add the compartments and then be amazed at the sum total of your work. There are still 24 steps to go, so it is really only the halfway point and there are some unusual complications to follow.
Steps 37-50 - wing assembly
The next time I tackle this kit I will defer adding the brass PE until the wing with hinge is assembled so that all can be aligned a one time.
The hinge pin provided by the kit in steps 43/44 are far too loose in the hinge holes and will allow the wing to rock in the mounting and hence sag in the open and closed positions. The hinges are cast in a black plastic that behaves more like nylon than styrene and actually does not glue to the surrounding pieces. Using a piece of brass tube (1/16" dia.) as reference, I drilled out the hinge holes slightly so that the brass tube was a snug press fit.
The danger here is weakening the hinge; the damage may not show up today but several weeks or months from now, finally giving way to the light pressures involved. Guess at that time, I will glue the wings in a fixed position.
The brass tubes were cut to protrude slightly from the hinge and then were joined by a smaller brass rod. Almost all the movement is with the black hinge rotating around the brass tube. Okay, I'm nuts, but the simple geometry of the wing fold fascinates me and I would like to see the up and down options available (for the time being).
Even with this mod, the assembly is still not inherently strong enough to keep the outer wing at the correct angle although its swing is consistent and it looks similar to the actual hinge. Something is needed to make the wing rest in the same position each time the wing is deployed.
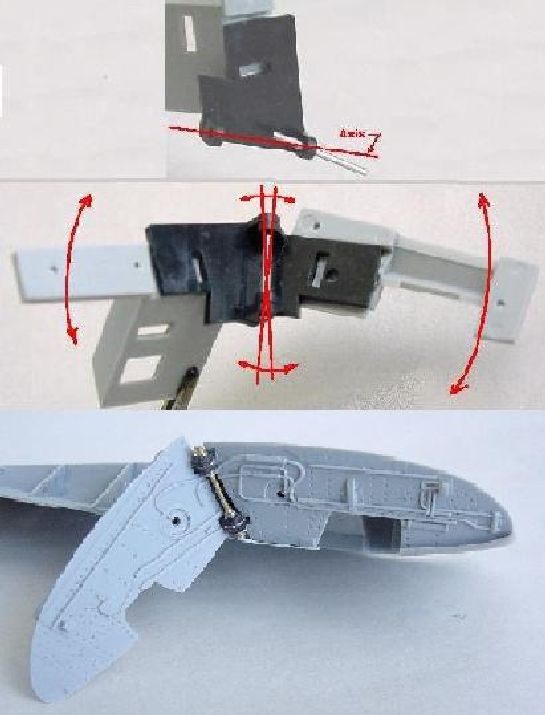
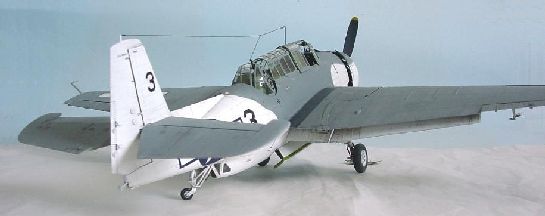
With the introduction of a pin and tube set at a 'right angle' to the hinge axis, I was able to get a consistent 'lowered wing alignment'. At the trailing edge of the wing just before the flaps, a small piece of brass PE is attached (kit provided PE34 and PE14) which forms a very important seat for the lowered wing. With that ledge and with the pin and tube (placed virtually were the actual aircraft secures the wing in place), the lowered wing seems to behave, pretty much. The dark gray goop is some epoxy that I've added to thoroughly encapsulate the 'black nylon' hinge material. So now I have the continued option of folding or deploying the wing (I have to apply all this to the other wing now!). What I've done is probably not acceptable for any club judging, but then that wasn't where this was destined anyway. When doing this again, I would not apply the wing PE pieces (except the one mentioned above) until after the wing alignment has been made satisfactory; the instructions have one applying these pieces far too early.
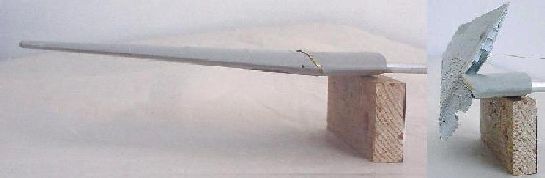
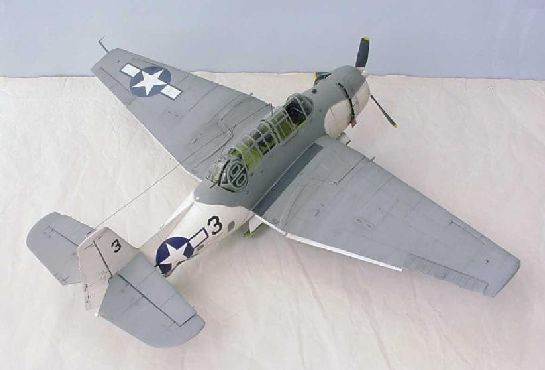
Should one want the wings fixed down, the wing will certainly glue together in fine shape with no problem. The photo I posted is a little elevated and off to one side and makes the dihedral bend a little exaggerated.
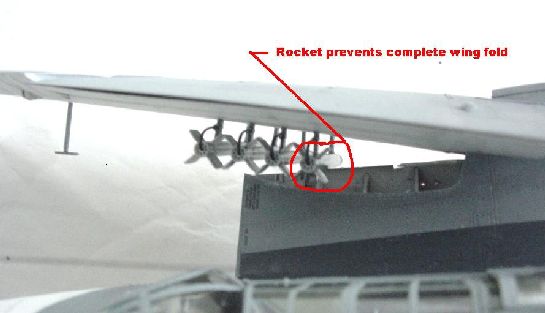
This is more of a postscript, but shame on me; all through the build I had been checking this and that for fit down the road, but overlooked if the wings can fold with the rockets on. They come close; with a little adjustment in their height of the 'zero length rocket launchers' and in the brass strip on the wing, the wing could fold back to the 'hook' in its proper position.
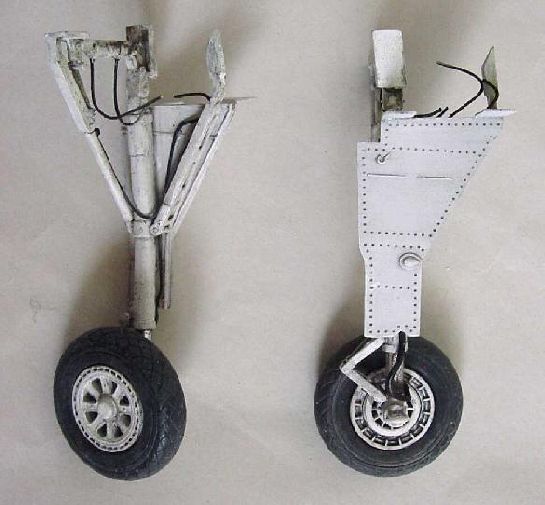
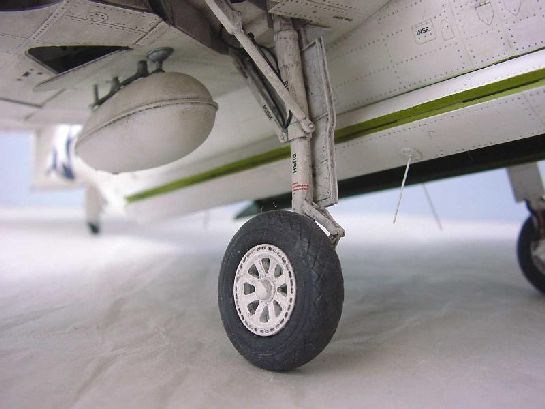
Step 52-54 - main landing gear
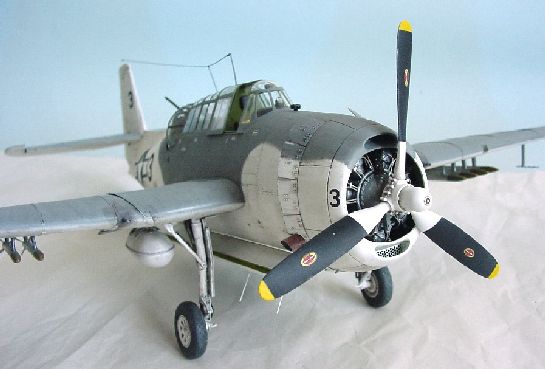
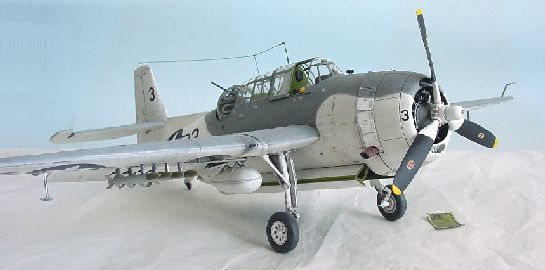
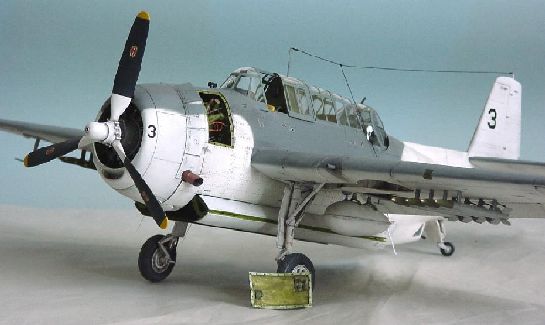
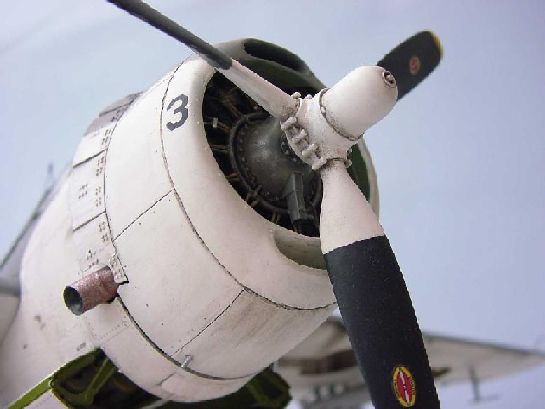
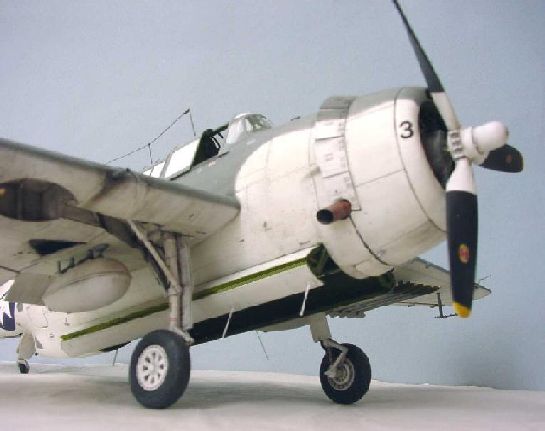
Each main gear is made up of a very hard vinyl tire and a 3-piece hub attached to the main strut made up of 7 pieces. The instructions do not indicate this, but the tire has an inside and an outside face and the wheel fits one way quite comfortably and the other way, not. There is an after-market resin tire/wheel available, but the kit parts seem quite acceptable. A few bits of plumbing, some weathering and then it's on to the final laps! Weathering was done using pastels rubbed down to powders and then 'worked' onto the surface in an alcohol solution and pushed around adding more alcohol or wicking up excess with a brush until the desired effect was achieved. The finished job seems to be quite stable, but as a final bit, a light coat of a 'workable fixative' can be oversprayed or some other clear matt overcoat. The base coat was Model Master's Flat White FS37875, which has a pretty good 'tooth' for receiving the pastels.
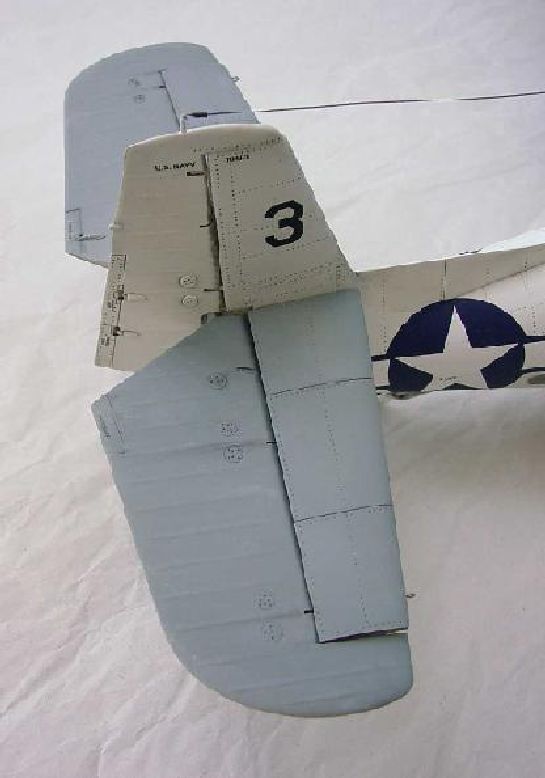
Step 56 - horizontal tail
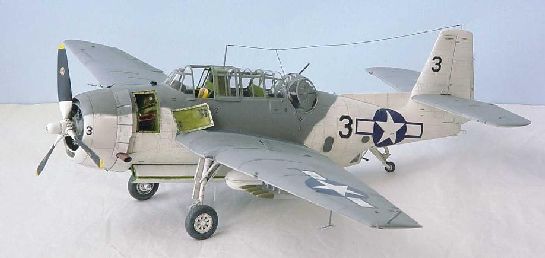
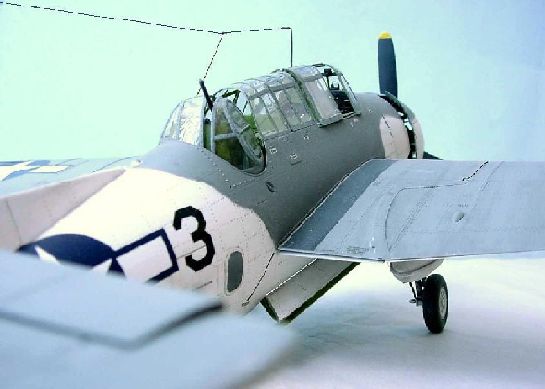
The elevator hangs off the horizontal stabilizer with the use of the Trumpeter devised pin and PE plate system to create a life-like elevator rotation. The system works fine, but it obligates one to complete the assembly before painting. A minor issue. The test fit of the horizontal tail to the vertical tail was so snug that I was encouraged to go ahead and paint the horizontal tail before mounting it to the fuselage. (The wings also fit so well I have decided to paint the fuselage and wings separately - with a model this large it is a distinct advantage to do this; when all is assembled, a final weathering tie-in will take place). The camouflage I have selected to do is the Atlantic Anti-Submarine Scheme II used on the TBM-3s that made it to the CVE action in the Battle of the Atlantic. The top surface is Model Master Dark Gull Gray FS36231. It has been weathered with pastels to accent some recesses and to add some of the top-surface sunlight bleaching in the salt air that seems to be in evidence in some of the photo-refs.
Step 58 - underwing bits and pieces
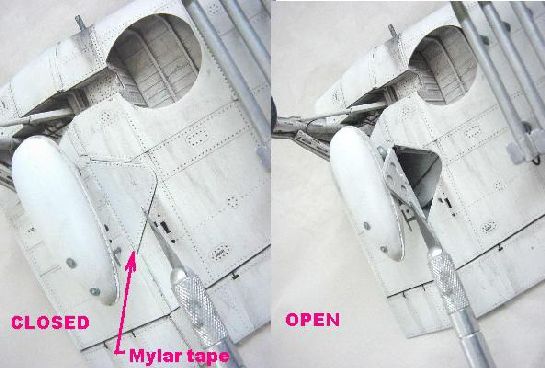
Most items at this stage are pretty straight-forward. I've opted to carry the eight 5" HVARs and two underwing fuel tanks. I'm still clinging to the notion of swinging the wings, but one problem had me stumped for awhile; that is, part B4/B7, a triangular flap that closes-up when the wing is down and hinges away when the wing is folded up. I had nightmares of sub-miniature piano hinges, micro hairpin springs, etc. Then I settled on something too simple to mention. But I will. Considering that I am not aiming for high cycle numbers, I figured that a narrow piece of clear Mylar tape in the position of where a piano hinge should be could do the trick. Over-sprayed with some Dull Coat, it is scarcely noticeable. I'll need to add a little sticky substance on the lip to keep the flap closed with the wings down, but the fit is good and low tack should not be a problem.
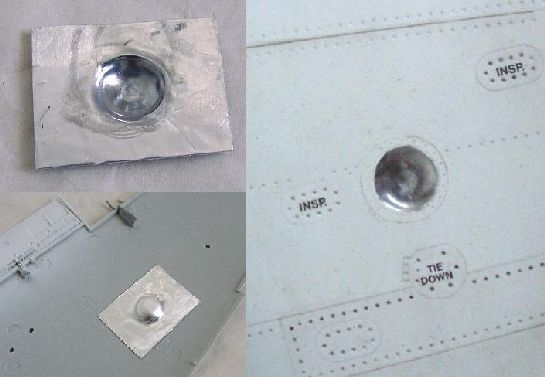
Also under the wing is a large circular clear piece (K4). Once applied, it becomes a window into the black void of the wing. One of my refs indicated it is a landing light that swings down - seems odd because there is also a light in the wing leading edge. At any rate, both need back up with some detail, which I did using a piece of aluminum and burnishing until a lamp shape was created. Adding some clear rod in the center and then floating some Future in the cavity, I was ready to accept it as a lamp.
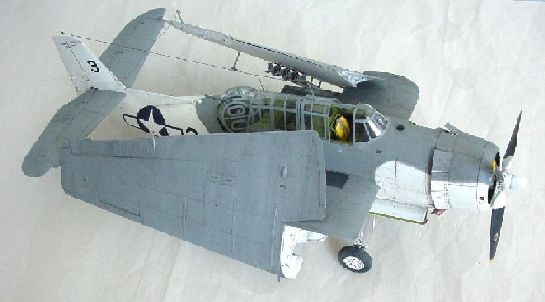
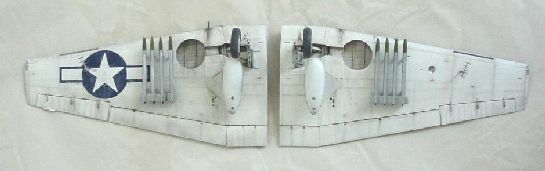
Wings ready to mount:
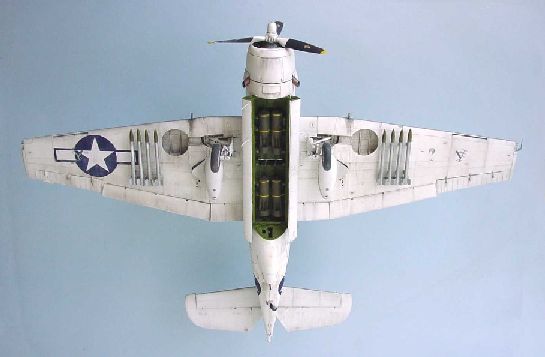
Step 60 - Finishing-up, wings down
Turning the plane over and mounting the wings and horizontal tail really puts a second wind into the project. Trick is to add all the little bits in such a manner that fewer are broken off that added - then the plane can be finished!
Paint and markings
Pretty much all the base paintwork was enamel. The interiors of most TBM-3s were Interior Green according to 'In Detail & Scale' so I used Model Master Interior Green FS34151. In doing some brush touch up with some thinned Interior Green I discovered this paint had a strange behavior in that it dries a much more vibrant green (apparently some lighter pigments float to the top). Most of the interior received a Flat Black acrylic wash and some dusting of Black pastels and SnJ Aluminum powder for accents.
The exterior is Model Master Dark Gull Gray FS36231 and Model Master Flat White FS37875 (ref. calls for FS37855). On the white I used a medium warm grey pastel (Nupastel) ground to a powder and applied as a dust with a brush. That was further manipulated with rubbing with a piece of flat paper, if I wanted to accent a cavity, or rubbing with a tissue wet with alcohol to move in streaks. Sometimes I would mix some of the powder with alcohol and apply with a small brush to accent a particular area. On the Dark Gull Gray areas I used a darker pastel.
The flat paints are very porous which helps in absorbing the pastel powders, but when sealing with Future in prep for a decal application, the flat paint requires too much build up for my comfort. The unfortunate result is most of the 'data' decals on clear carrier did their 'silvering' effect. On the landing gear I tried a different way of decal application. I floated the dry decal off the paper backing in a bath of 80% Future/20%Windex (there is nothing special about that ratio, but is my starting point). The Windex was used for its ammonia content. The Future soaked decal was applied directly to the unsealed flat painted surface of the landing gear. The way I understand the 'silvering' is the decal carrier film, rather than sinking down into the microscopic pores of the paint, will tend to bridge the tops of 'micro-mountains' and then refract the light in such a way that you can see the film. The object of the glossy clear coats (or the slipping of Future under the decal) is to fill the 'micro-mountains' up to a nearly flat plain and then the clear carrier will have contact throughout and much less ability to refract the light. This was oversprayed with Model Master Flat Clear Lacquer Finish, as was the whole plane. I look forward to trying this method on a dark surface someday.
Since my ordeal, fellow LSP modeler D. Bellis suggests that in the case of flat Model Master enamels a silvering-free decaling of small stencils with lots of carrier film can be done without a gloss clear coat. He uses a mixture of Future 50/50 with a strong setting solution (Solv-A-Set, MicroSol, etc...) instead of Windex. He applies the solution to the area to be decaled with a small brush and then immediately lays the decal in place. With the decal correctly positioned, he applies a small drop of straight MicroSol and leaves it to dry while applying the next decal (stubborn decals may need a second or third drop of MicroSol).
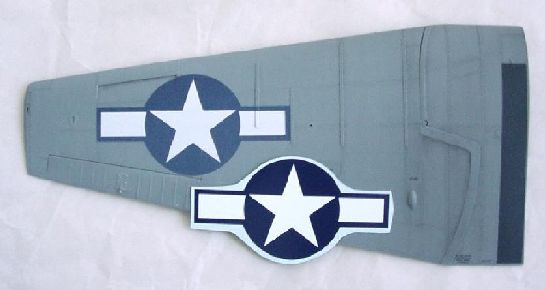
One other thing, new to me, was to mix some light grey pastel powder in with the Flat Clear Lacquer and oversprayed some areas in the hopes of creating an overall lightening of an area. The 'bleached' wing with the insignia was of particular concern to me. Here is a comparison of the decal on the wing with this mix oversprayed and the fresh kit decal:
All the decals were from the kit except for the '3', which of the small and medium size are from Eagle Strike 480048 - US 45 Degree ID Numbers and the large '3' is hand cut from a sheet of Tauro's black decal film.
Conclusions
A Great Kit!!

References
Essential photo/info publications:
- TBM/TBF Avenger In Detail (Wings & Wheels #4)
Frantisek Koran & Michael Ovcacik
Wings & Wheels. Prague. 1998
ISSN 1211-0671 - TBF/TBM Avenger - Walk Around No. 25
Lou Drendel
Squadron/Signal. Carrollton, TX. 2001
ISBN 0-89747-424-4 - TBF & TBM Avenger In Detail & Scale
Bert Kinzey
Squadron/Signal. Carrollton, TX. 1997
ISBN 1-888974-06-0
Avengers at war:
Hunter-Killer: US Escort Carriers in the Battle of the Atlantic
William T Y'Blood
Naval Institute Press. Annapolis. 1983
ISBN 0-87021-286-9 (also a paperback edition is available)
A very well written account of the longest battle fought in World War II - the Battle of the Atlantic and the struggle between German U-boats and the coordinated hunt and kill tactics of the US Navy's Carrier Escorts, Destroyers, Destroyer Escorts, TBF/TBM Avengers and F4F Wildcats, decoding, radio-wave sourcing, radar, and sonar.
TBF/TBM Avenger Units of World War 2
Barrett Tillman
Osprey. Oxford. 1999
ISBN 1-85532-902-6
And if you just have to have more information:
TBF/TBM Avenger In Action (No. 82)
Don Greer
Squadron/Signal. Carrollton, TX. 1987
ISBN 0-89747-197-0
Grumman/Eastern TBF/TBM Avenger Cz. 1 (monograph 80)
Krzysztof Krzysztofowicz & Adam Jarski
A.J. Press. Gdansk, Poland. 2001
ISBN 83- 7237-090-7
Grumman/Eastern TBF/TBM Avenger Cz. 2 (monograph 81)
Krzysztof Krzysztofowicz
A.J. Press. Gdansk, Poland. 2003
ISBN 83- 7237-122-9
TBF/TFM Avenger
Famous Aircraft of the World #42
Bunrin-do. Tokyo. 1973
Websites:
Reports and photos of some of the Atlantic action http://uboatarchive.net
The Battle of the Atlantic: Allied Naval Intelligence in World War II http://www.mariner.org/atlantic/index.htm
© Gene Nollmann 2005
This article was published on Wednesday, July 20 2011; Last modified on Saturday, May 14 2016