
Hasegawa 1/32 Ju-87G-2 Stuka KanonenVogel
By Jay Laverty
Off to a Good Start
Granted it wasn't the all new all singing and dancing Ki-61 "Tony" I was hoping for, but you could not say I was disappointed to see this kit make an appearance from Hasegawa. A Stuka fits into my "ugly enough to be cool" category of airframe design, and having build the respectable yet unspectacular Revell "B" I was pleased to see a new version of this cranked wing classic.
Hasegawa have not disappointed with the detail and the moulding of this model, a fact that is immediately apparent when we look in the box. Always managing a successful balance between detail and simplicity, Hasegawa have built their reputation on giving the modeller near perfect kits. While some parts of the model are simplistic in their detail, the kit provides an excellent base from which to work from and should the modeller decide to build this model as it comes with no additional work, an excellent result will also be achieved. Keeping this in mind, a close examination reveals a few points that will be the prime candidates for improvement on my model.
The gun pods for the 37 mm cannon are excellently done, and capture the basic look of the real thing perfectly, yet with some additional wiring and detailing, can be brought to a new level. The muzzle break and flash supressors are very nicely done at first glance, however further study reveals that they too could do with some improving.
The cockpit is much the same in the sense that the basic details are there, yet some add on work will enhance things immensely, without a great amount of effort.
The outline and exterior detail is excellent and the addition of rivet detail to this release from a normally restrained Hasegawa, shows both a willingness to listen to the requests of modellers, as well as the fact that the Japanese manufacturers are willing to respond to the inroads made by newcomers Trumpeter into the Large Scale market. Normally a Hasegawa kit can be counted on for some very clever engineering and an excellent fit, so now it is time to put that hallmark to the test.
Just a Little Detail
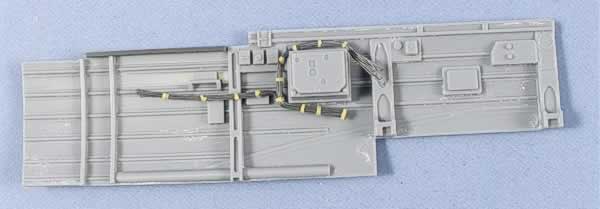
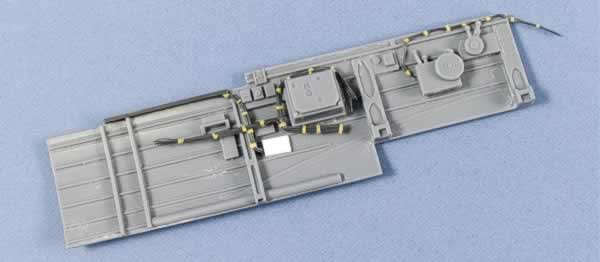
The cockpit is as good a place as any to start with and considering it is where the instructions begin, it seems the most logical choice. As mentioned already, the basics are here so it will only be a matter of adding enough detail to catch the eye for me. While the cockpit is not without it's small errors and simplified detail, I generally choose to only correct the glaring issues, and add detail that will enhance as opposed to replace in order to keep up the pace of my build.

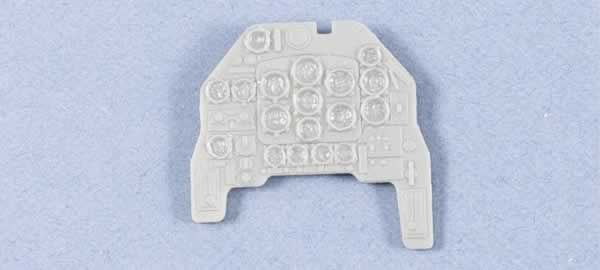
I've decided to add details like the wiring, ammunition, and enhance the kit seat, as well as find a way to use the dials and instrumentation from the instrument panel decal without actually using the whole thing.

Basically this means cutting each dial out of the decal individually and placing them into ground out bezels on the kit panel, a process that took several hours and a multitude of patience to complete.


Eduard pre-painted colour seat belts were just the trick for the seats and despite the fact that I added some lead foil to represent the cushioning, these were the stand out feature on the seat.

Again Eduard came to the rescue, this time with some 35th scale pre-painted ammunition belts, although I cheated heavily in using these as they are actually U.S. Browning belts with a red tip, but I can live with it if you can.
As far as the exterior goes there is little extra work that needs doing, and personally the gun pods were the only aspect to receive and additional attention. By adding some fuse wires, some Calibre 35 rivets, and originally drilling and boring the muzzle break/flash supressors the barrels were a home-grown enhancement.


While pleased with the result, it was hard to accept the limitations of the crude work executed on the barrels, so in the end an after-market set was used produced by Steve Nuttal.

These were splendidly turned with a CNC lathe and the level of detail on them is astonishing. To order the barrels Steve can be contacted here:
www.modelbarrels.com
The wings are a very clever feat of engineering, and their modular design means that we will definitely see several variants come from this one mould, and by mixing and matching the components around the internal frame, I can foresee all makes of Stuka, including the deeper span earlier variants. The only drawback to this format is the fact that the joint at the seam of the dip in the wing is a bit tricky and requires some coaxing and filling to fit properly. Nothing beyond the means of all but the most basic of modellers mind you, so it cannot be considered a serious issue.

The fit for the rest of the kit follows much the standard Hasegawa programme, in the fact that it is flawless. Considering the amount of interchangeable components and the intention of maximising the sub variants achievable from the mould, I think it is some very impressive engineering.
With the basic construction complete it is time to move onto the painting.
Putting a Coat On
After applying a few good coats of the faithful and reliable Alclad Grey Micro primer we can begin with the application of paint. I invariable use either White Ensign Models or Extracolor enamels, supplanted with Humbrol colours for lightening or shading, as well as details and steps that need a faster drying time, such as the exhausts.

The method I use for shading my models hinges on the drying times of enamel paints and in particular the extended times of both White Ensign and Xtracolor. I can easily manipulate these curing periods with the use of Rustin's Terebene driers, however I still like to have plenty of time to blend colours in. With the application of the base colour the stage is set for the low lights.
These are achieved by mixing a small amount of Humbrol black into the base colour along with a slightly larger amount of white spirit, and this mixture is then sprayed along the edges, panel lines and rivet patterns.
Immediately, the highlights are done, after disposing of the darkened mixture, a lightened mixture is created to the same recipe, substituting Humbrol white for black.
This mixture is then sprayed into the centre of panes or on areas that would get bleached out, starting lightly at the edges and getting heavier towards the centre. This is where the fact that the base coat has not fully dried yet becomes a serious bonus. With the increased increments of thinner in the highlight and low light coats, the shades blend into the still malleable base coat, thus softening the edges and creating a much more convincing shading effect. This is then enhanced further with the final blending coat, of a heavily thinned and carefully sprayed unaltered base colour.
After a night of drying time, the model can receive a coat of gloss acrylic varnish in readiness for the decals and weathering.
Sticking on the Stickers
I decided I would use some aftermarket decals on this one for a couple of reasons. Primarily I am a huge fan of Eagle Editions decals, and secondly as there is a quick build of the Stuka appearing in MAI this month I needed something different than the kit marking to keep from being repetitive!

Luckily the Eagle Editions decals live up to their reputation and my previous experiences and they go on extremely well. I liked the dirtiness of T6 + NU od the sheet and as Rudels mount was one of the options in the Hasegawa kit the descision was academic. Long having been a devotee of Micro set and Sol from Microscale, it wasn't until recently that I discovered Gunze Sangyo's Mr. Mark Setter and Mr. Mark Softer imported into the UK by Model Design Construction. Basically they are similar to Microscales' decal setting solutions, although they are a lot more effective. Where Micro set and sol are effective on thinner decals they are much more difficult to use on the thicker decals common in Japanese kits. This is where the Gunze stuff comes in handy. Equally effective on both thinner and thicker decals I found them to be the perfect solution and while I strongly advise not touching them while they are wet, the following day a perfectly set decal that looks painted on is the result.
Wrapping it up
Not bothering to add a coat of varnish after the decals, the wash of Winsor and Newton's Paynes Gray and Raw Umber is applied to the model ,and the excess subsequently removed with the use of several dozen cotton buds.

After this is complete the matte varnish can be applied in the form of Poly-S flat finish. Once this is on and dry the canopy can be added, the formation lights painted and the Lycra thread aerial line added. Of course the very last detail to be added is the painted pitot tube as these are prone to being knocked off, and despite the precaution of adding it last, I still managed to knock it off. Don't ask me how.

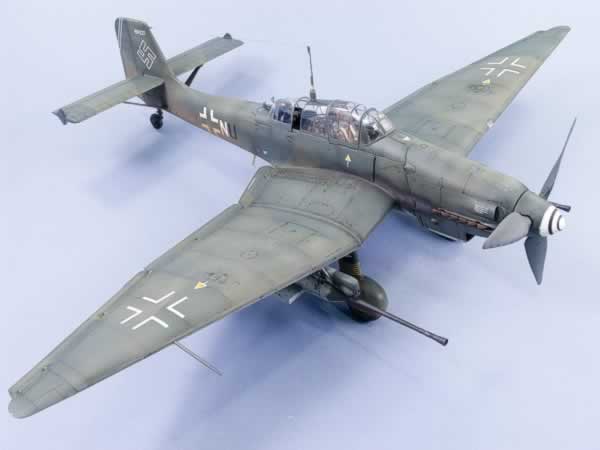
The Overall Impression
To say that the project was enjoyable would be a massive understatement. I loved it. The kit is a spectacular model, easy to build and with all of the basics that make a convincing kit with the minimal amount of effort, all I could ask for would be an instrument panel with a photo-ecthed face, clear plastic dial covers, and a bog standard plastic back plate. Never mind a clear panel with holes ( what the hell is the point of that?!!!! You have to paint it any ways so what does it matter if it is grey or clear?!! ) The dial covers need to be clear!

Back to the Subject
Hasegawa score highly for this one as the fit and accuracy are very good and aside from a couple of small issues that others have already mentioned (the propellor bades for one, which if I understand correctly Eagle Editions will be releasing replacement parts for in the near future thankfully!). I rate this kit as one of the best I have built in a long time. I can highly recommend it to any and all level of model builder.

My kit came courtesy of a friend in Japan, but the Hasegawa Stuka will be available just about anywhere plastic models are sold.
White Ensign Models paints are available from White Ensign Models(surprisingly enough ) and Xtracolor are available from Hannants.
A large part of the Gunze paints and accessories (including Mr Set and Sol) range are available fromModel Design Construction.
For a full description of this build along with an in depth description of the shading technique employed for the camouflage pattern pick up issue 10 of Model Airplane International published on the 23rd of March.


© Jay Laverty 2006
This article was published on Wednesday, July 20 2011; Last modified on Saturday, June 03 2017