
Revell 1/32 KI-61 IIc
By Rick Cotton
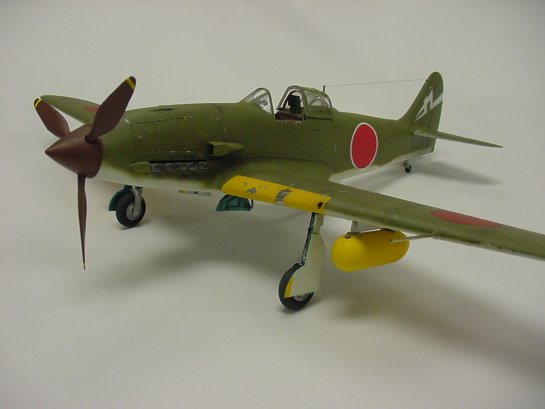
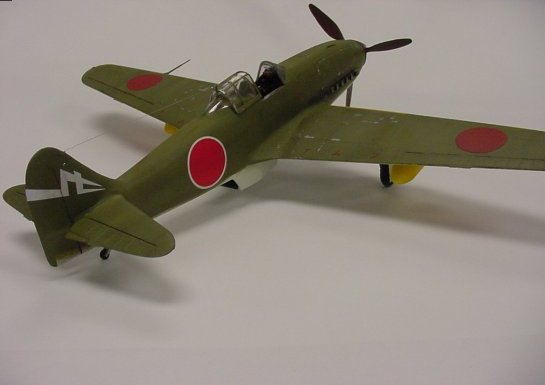
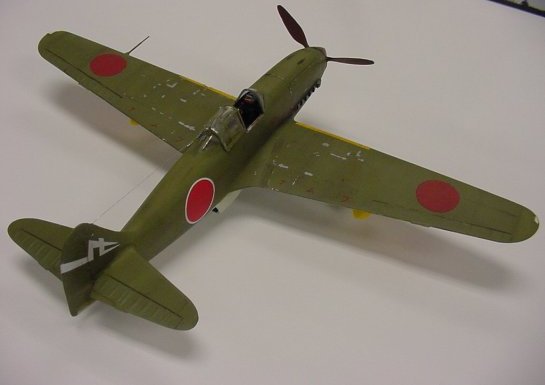
The Ki-61 Hien or Tony has long been a favorite of aircraft modelers, mainly due to its pleasing lines and graceful shape, as well as a plethora of colorful marKing schemes available. The 1/32 Revell issue is, of course, an expensive collector's item now. When I got hold of one that had been partially assembled (none too well), and a Modeler's Weapon's Shop conversion set for this Kit, I decided to model the Ki-61 IIc, the rarest of the Tony series. This version featured the cut-down rear fuselage, all-round vision canopy, and a longer nose to accommodate the larger HA-140 inline engine. Only about 99 of these were completed, the remaining airframes of this type being finished as Ki-100 fighters with radial engines.
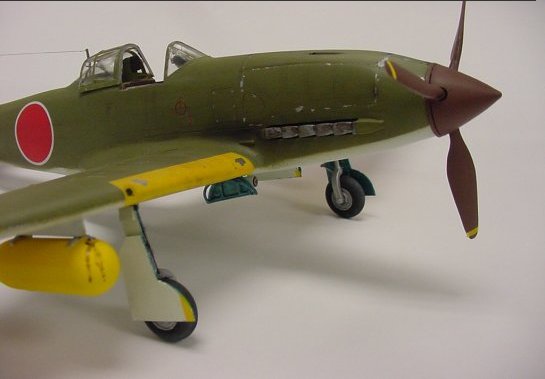
The previous owner of the Kit had glued the engine and some of the cockpit together, and had also neatly cut the bottom wing section into two halves. Wing top and bottom halves had also been glued. He had also glued the engine access panels in place. These didn't fit well, and there were large gaps of daylight in these parts, so I filled them in and cleaned up the nose.
The major surgery came first. Using the diagram that came with the Modeler's Weapons Shop set, I removed the razorback spine of the fuselage with a razor saw ( I can hear the Kit collectors who never build gasping for breath about now). The resin replacement part fit pretty well, but of course required some putty to fair it in perfectly to the Kit fuselage.
I used the Kit floor as a pattern for a new one cut from styrene sheet. I used the Kit front and rear cockpit bulkheads and the Kit control stick, but scratchbuilt or parts boxed scavenged pretty much all the rest. The seat is thin brass sheet, cut and bent to fit, with Eduard belts and buckles. The instrument panel is a three layer sandwich of Kit panel (sanded smooth), Cutting Edge instrument dials, and a drilled external panel. The "glass" is a layer of Future dropped into each hole. The foot retaining straps on the rudder pedals are painted masKing tape.
Late war Japanese army aircraft interior colors are a source of intense speculation, even among those who build nothing but Japanese aircraft. Ask five people what color the interior of a late-war Tony was, and chances are you'd get five answers, ranging from aotake blue green to KawasaKi interior green to clear lacquer over aluminum to brown primer, or a combination of any of these. I chose to go with the brown primer, mainly due to color illustrations from an old issue of Maru Mechanic showing the interior of a Tony in this color. My thanks to the many modelers on the 'net who supplied suggestions on the correct color. I hope I was right, but, who knows? Considering the state of the late-war Japanese aircraft industry, I doubt that there was much standardization….they're probably ALL right!
The tail was enlarged by sandwiching .010" styrene sheet between the halves of the tail, cutting them to the correct outline per the conversion set's diagram, and filling them with putty. Take care, there is fabric detail on the rudder you'd like to save as much of as possible.

I cut four 27/32" discs from styrene sheet and sandwiched them together, then attached them to the nose of the assembled fuselage, faired them in with putty, and sanded them smooth, thus lengthening the nose by about ¼". The larger and more squared-off intake scoop was built from sheet styrene.
Since the previous owner had glued the wing halves together, rebuilding the kit's wheel wells would not be an option. I added some plumbing and details where I could to dress up this area, and hide some of the Kit's inaccuracies. There are some major pin ejector marks on the inside of the gear doors, which would be difficult to remove by sanding without destroying the detail on the interior of the door. I took plain household aluminum foil, pressed it with my thumb against the inside of the gear door, and then cut the indented foil to form nice little templates from which to cut .010" inserts to cover the ejector marks. Neat, huh?
After basic assembly and priming to reveal seam flaws, I reworked the seams until they were gone. I polished the entire model with fine sandpaper and automotive rubbing compound, until I had a relatively smooth overall finish. I then sprayed Testors Metalizer Aluminum paint on the model, and followed the directions for polishing it to a high sheen. After allowing the paint to cure for 24 hours, I took a toothpick and dropped tiny bits and patches of Elmer's White Glue on areas where I wanted to show wear and tear on the paint. These spots were allowed to dry thoroughly before going on to the next step…..color coating.
The few existing photographs of this particular version of the Tony invariably show overall topside JAAF green over grey or silver undersides, I'm not sure which. None of the photos I've seen show operational aircraft…every photo I could find was either a wreck or captured in disrepair, with very heavily weathered finish. I used Pollyscale Acrylic JAAF green over JAAF Grey, and various aftermarket scrounged decals. The yellow wing bands were painted with Pollyscale JAAF Yellow. Pollyscale, when thinned with its own brand of thinner, airbrushes on very smoothly, and results in a dead flat finish. Good stuff!
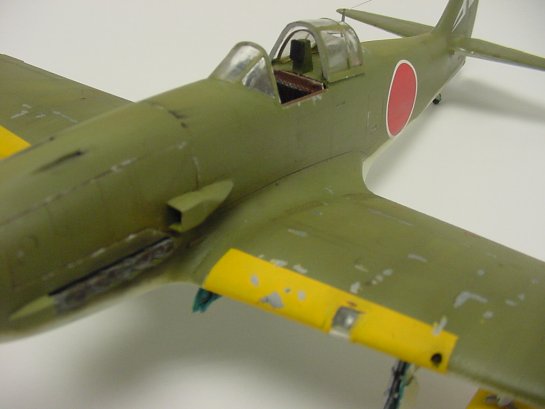
Weathering is, in this order, lightened patches of the base color, followed by a dark Brown watercolor/detergent wash, followed by Testor's Clear Flat Acrylic, followed by pastel chalks, and smeared ink "oil" stains, followed by a final coat of clear flat acrylic. When everything was bone dry, I took a toothpick and began chipping off the tiny blobs of dried Elmer's glue, revealing the aluminum color underneath. This results in a three-dimensional chipping effect, which contest judges never fail to notice. Just don't overdo it!
The final addition was 1 lb. .fly line for the aerial, and this rare version of the Tony was complete. My thanks to the many modelers on the Internet, especially the LSP and Hyperscale readers, who were Kind enough to send me information, color copies of magazine articles, and drawings that helped finish this project. A big "BANZAI!" to all of you!
This article was published on Wednesday, July 20 2011; Last modified on Saturday, May 14 2016