
Williams Bros. 1/32 Seversky P-35/SEV S-2
By Gene Nollmann
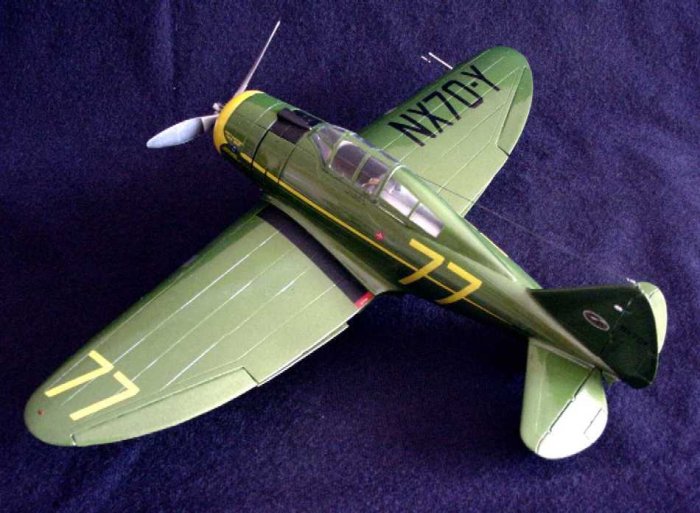
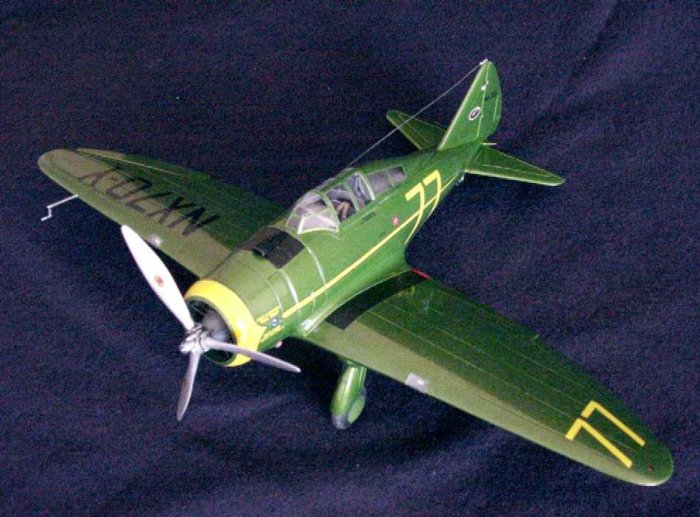
1939 Seversky SEV S-2
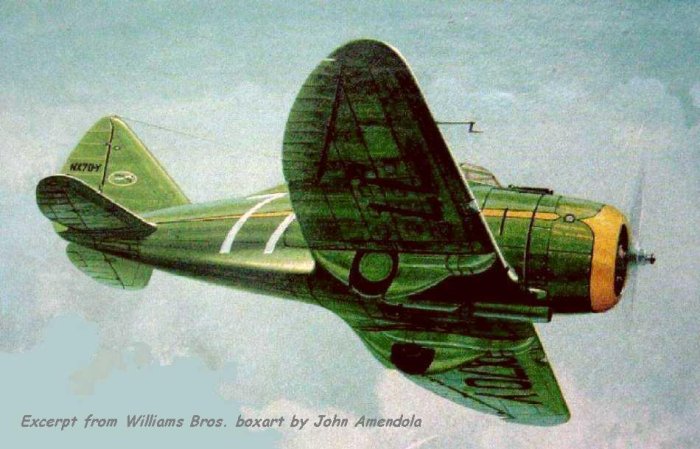
This venerable old kit from Williams Bros. of the Seversky P-35 pursuit fighter also contains the fixings for the alternate SEV S-2 racer. See Rogerio "Rato" Marczak's review on LSP for more details of the kit contents. The beautiful boxtop art by John Amendola snared me into this kit originally; the almost faded away view of a number 77 green racer was to be my ghostly lure into the past.
Background
While piloted by Frank Fuller Jr., president of the Fuller Paint Company of California, this alternate represented the Seversky SEV S-2 that won the 1939 Bendix Trophy Race on 2 Sep 1939. Flying from Burbank, California to Cleveland, Ohio in 7 hours 14 minutes 19 seconds, Fuller set a new Bendix record with the average speed of 282.1 mph and since Germany had invaded Poland the day before, it turned out to be the last Bendix race till 1946.
(An interesting comparison, the year-old Hughes H-1 Long Wing departed Los Angeles, California 19 Jan 1937 and landed in Newark, New Jersey 7 hours 28 minutes 25 seconds later covering the 2490 miles with an average speed of 327.1mph).
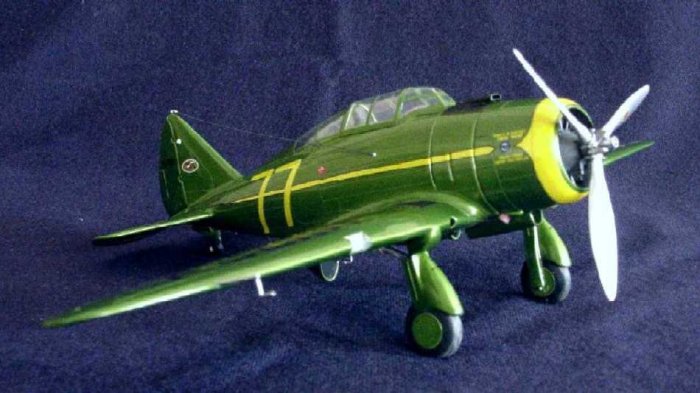
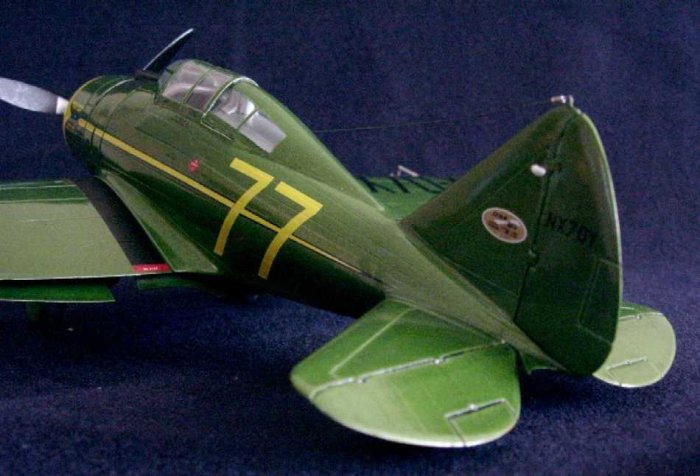
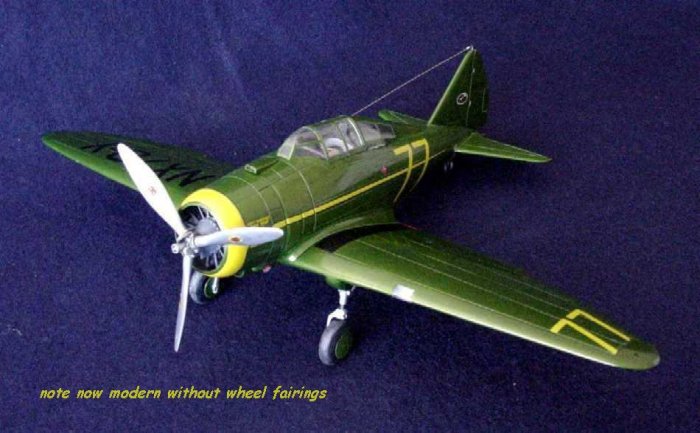
Frank Fuller had previously won the Bendix Race in 1937 in the same plane, appearing as race number 23 with an overall natural metal finish, and then finished second to Jacquelin Cochran's Seversky AP-7 in 1938, Fuller again in the same plane but with black race number 77 also in NMF. For the 1939 race, the SEV S-2 was repainted metallic green, featuring one of the new lines of metallic Fuller Paints.
The story of Frank Fuller acquiring the ‘latest' military pursuit aircraft, the P-35, as his own race mount also carries a kernel of Seversky ultimately loosing control of his aircraft company.
Born 1894 in Russia, Alexander de Seversky, as a Russian Naval Aviator, became an Ace during World War I with 13 victories. In the aftermath of the Russian Revolution and its economic upheaval, Seversky offered his services to the US and was appointed an aeronautical engineer and test pilot. In 1921 Seversky was an advisor to Gen. ‘Billy' Mitchell during the battleship sinking demonstrations. By 1927 Seversky became a US citizen and later received a commission as Major in the US Army Air Corps Reserves.
In 1931 Alexander de Seversky formed the Seversky Aircraft Company, serving as founder, president, designer, chief test pilot and with Alexander Kartveli chief engineer (and who was to continue on after the 1939 restructuring as Republic Aviation Corporation and be instrumental in the design of the P-47). By 1933 they flew their first creation, the SEV-3 Amphibian. In 1934 this plane was converted to a landplane and designated SEV-3XAR (Experimental/Army). Seversky's second plane was a short lived SEV-3M seaplane, which was quickly converted to the landplane SEV-2XP (two place experimental pursuit).
An accident on the way to an Army Pursuit Competition allowed Seversky to realize what the Army required was a single-seat pursuit plane and the SEV-2XP was converted to SEV-1XP. Finally, in April 1936, the SEV-1XP was demonstrated to the Army in their Pursuit Competition at Wright Field. Seversky was awarded a contract for the SEV-1XP now designated by the Army as the P-35. A contract followed for 70 planes. Curtiss was to also win an award for its P-36, which would eventually blossom into an order for 200 planes.
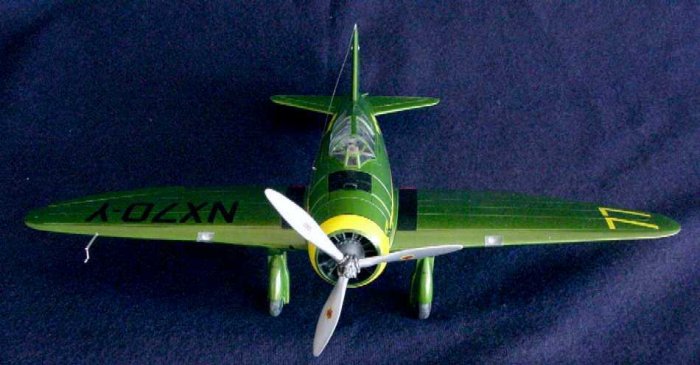
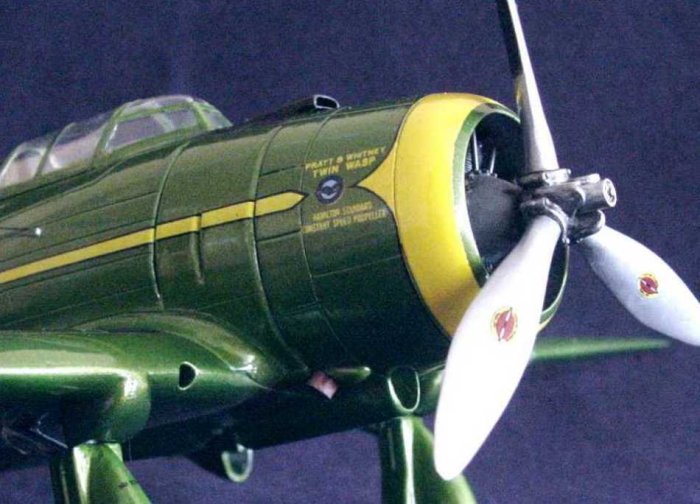
Seversky wanted to fly the P-35 prototype, the SEV-1XP, in the 1936 Bendix Trophy Race, but the US Army would not give him permission. Seversky thereafter, in 1937, arranged to sell a civilianized version of the P-35 to Frank Fuller to race, now designated the SEV S-2, and the Army consented. Powered by a Pratt & Whitney R-1830 Twin Wasp of 1200-hp, the S-2 went on to perform very well in the next three Bendix Trophy Races.
Reading between the lines, Seversky must have been something of a razzle-dazzle man, being vocal in his opinions and bizarre in his actions. In 1939, Seversky sold 20 two place Seversky SEV-2PA-B3 to the Imperial Japanese Navy without US Government approval, reasoning that if the US didnt want to buy his planes, he should be free to find other customers. He was in Sweden arranging the sale of P-35As when the board of directors of the company he founded voted him out of the company and changed the name to Republic Aviation Corp. Undaunted Seversky went on to make significant contributions to aviation and invented some significant ecological innovations.
It may be fitting that the Seversky SEV S-2, with all its Art Deco style razzle-dazzle in metallic green paint and bright yellow flash would win the last long distance air race of the Golden Era of aviation.
Construction
All the parts needed to make the conversion of the P-35 to the SEV S-2 are contained in the kit. To civilize the P-35, the following feature changes are required:
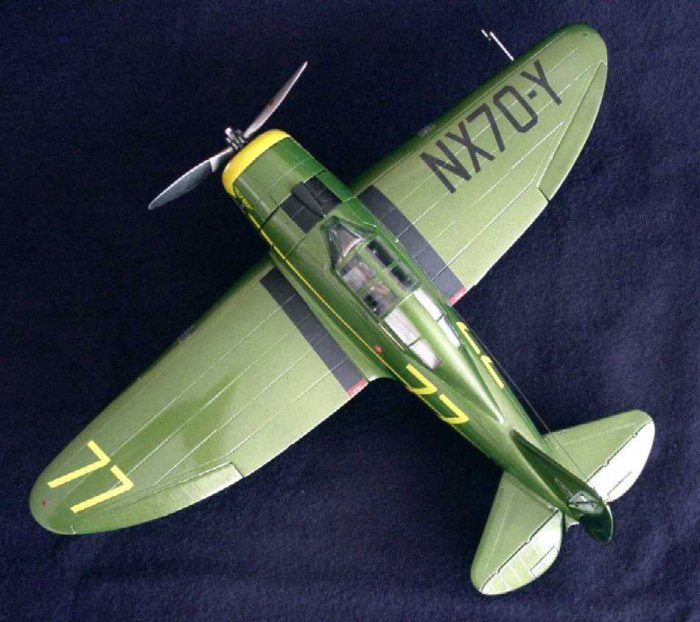
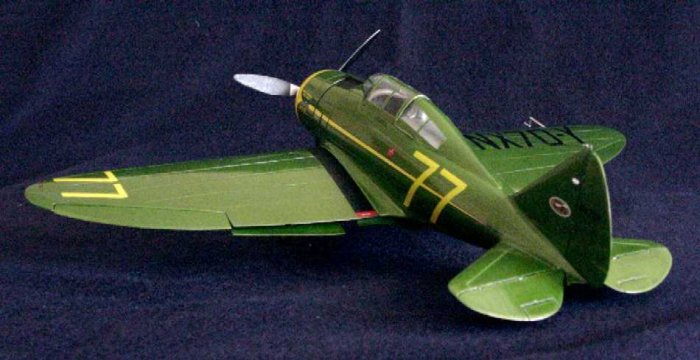
- Straight wing with a small dihedral breaking at the centerline (the P-35 has a second dihedral break just outboard of the landing gear)
- Landing lights in wing leading edge (port & starboard)
- Airscoop on top of cowling with external gauge on starboard
- Cowl flaps continue down to exhaust blister
- Larger exhaust pipe than with P-35
- Large opening in ventral oil cooler fairing
- No cowl gun ports (if you were doing a P-35, youd have to drill this in)
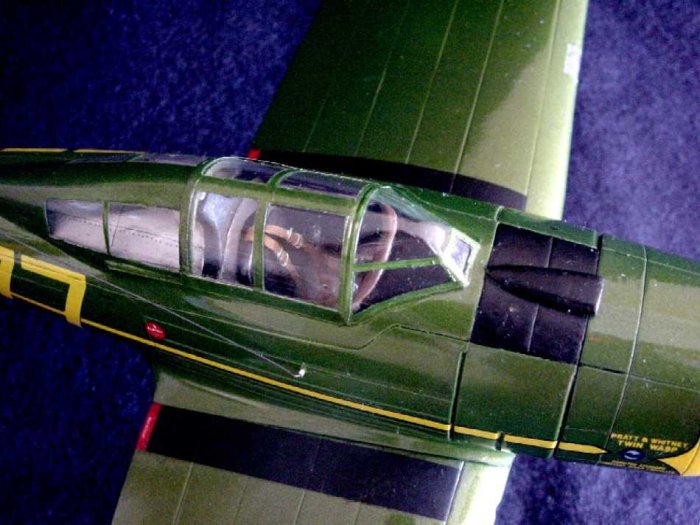
- Lower pilot headrest
- Lower canopy and turtledeck fairing
- Civilian instrument panel
- Single antenna wire
The Williams kit has all panel lines raised and no rivet detail. I chose to score the panel lines and omit rivet detail. (I didnt want to carry this unfinished kit into the afterlife - it has already taken 9 years!).
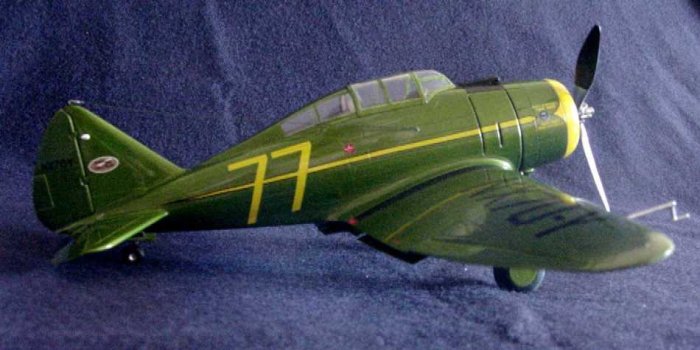
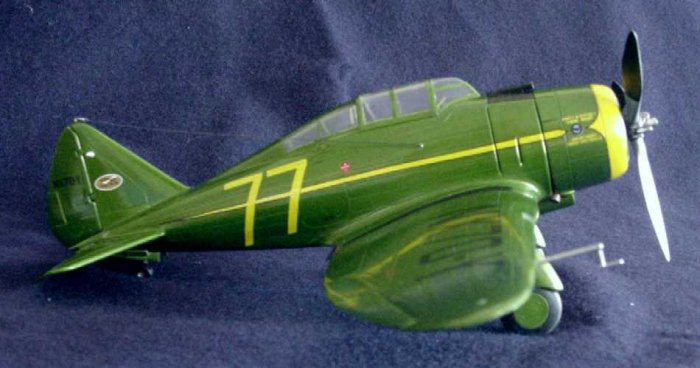
The control surfaces were cut apart and repositioned. Most notable in the photo-ref was the droop of the elevators.
The kit provides wing center flaps as separate parts, but the wing also has raised lines outboard of the wheel fairings and these would have to be cut out to match the position of the center flaps. Seeing the USAF Museums P-35 with all flaps dropped, I decided to show the same; however, the wing was painted so I just cut out some flat aluminum and attached to line up with the already dropped center flaps. Theres no substitute for research except the joy of moving a project along without it!
At first look the clear canopy pieces look a bit distressing to deal with; they appear foggy and just not typical of an injection kit. After using a Kiss 4-way Ultra Shiner #F222 (a polishing stick for creating ultra shiny nails) and then dipping the pieces in Future, the results startled me. The clarity rivaled a nicely done vac-canopy - then I messed it up a bit along the way, but pressed on regardless.
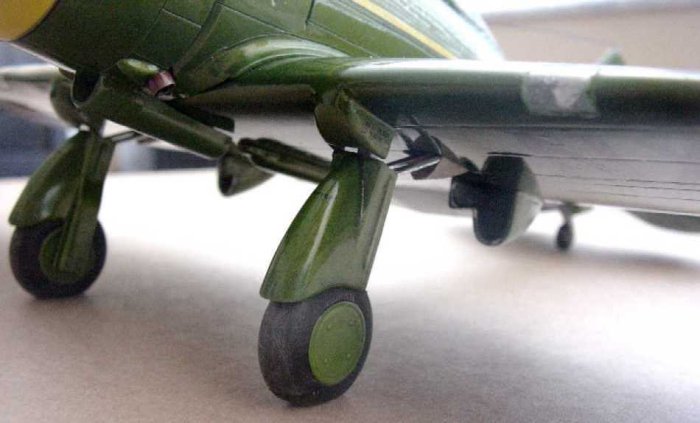
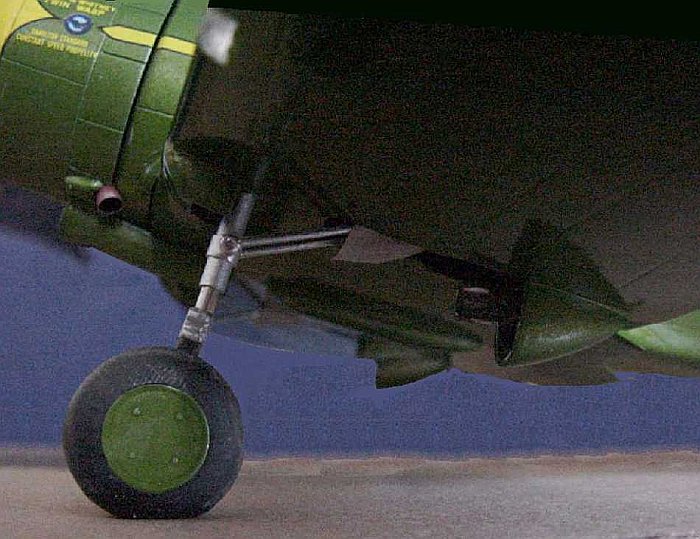
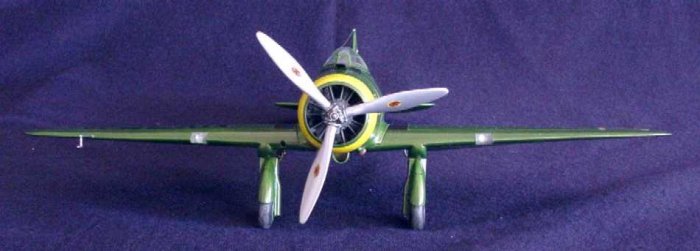
The kit comes with the option of vinyl tires and separate hub halves or injected wheel hub/tire halves. The margin for painting the wheel hub was quite nearly flush with the tire and would require a very, very good perfect circle masking job, so I opted to use the vinyl tire. I scuffed them up to remove the centerline molding seam and painted some dirt on the contact area.

The kits plastic main struts were replaced with a series of metal tubes. More of an exercise for me to learn a new technique, but not really necessary. What I wanted to explore was the marriage of the plastic wheel yoke with a stainless steel tube slipped into a series of aluminum tubes. The stainless steel tube made a nice seamless polished oleo strut and worked just fine, so Ill try it again in a more visible main wheel situation.
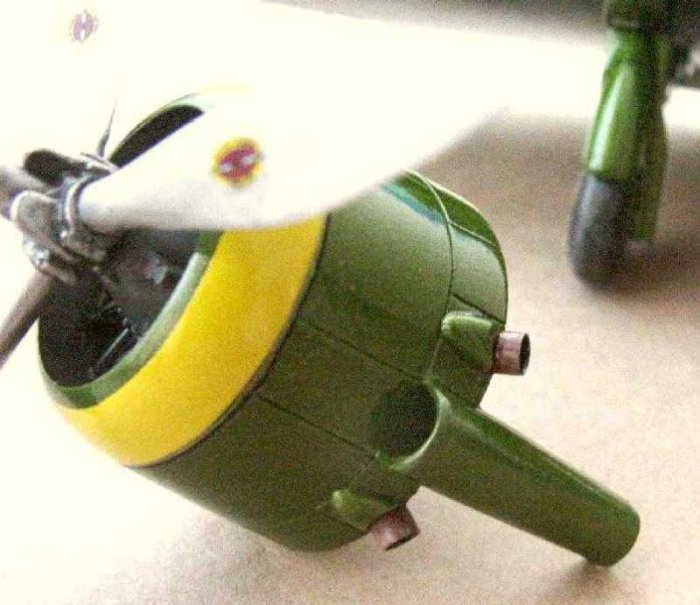
The Williams Bros. engine is quite nice and would look like a jewel with a bit of wiring and other attentions. In this case I just went for the assemble and paint solution. It gives a good impression of itself, but cannot survive close scrutiny (and that is in keeping with my rendition of the model).
Painting & Markings
The Williams Bros. instructions simply call out the fuselage color as Medium Metallic Green. Some sources say Metallic Blue, but Ill follow the instructions and John Amendolas boxart as my inspiration.
Most of the metallics I saw in the hobby shop were a dark bluish green, but Testors had paint geared toward the custom car crowd that seemed to come close to John Amendolas boxart. It was Testors 52907 Colors by Boyd Lime Pearl enamel, but was only available in a rattle-can. Not my favorite painting method, but I decided to make it a go. It is a gloss paint and performs that old problem of running up to the edge of an object or score-line but not quite rounding the edge; flat paints dont seem to have this problem. Spraying thin coats and being patient with achieving a gloss helps, however, the Testors rattle-can seemed to have more gloss binder than pigment making it a bit difficult to find a happy compromise.
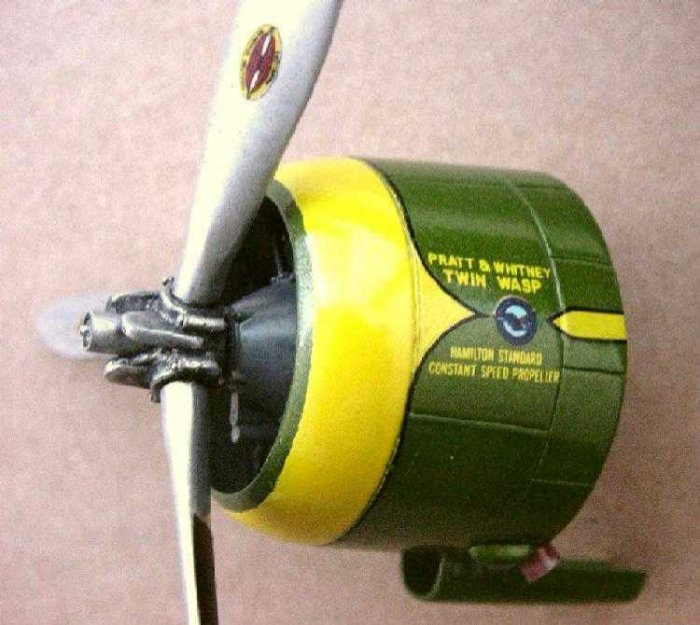
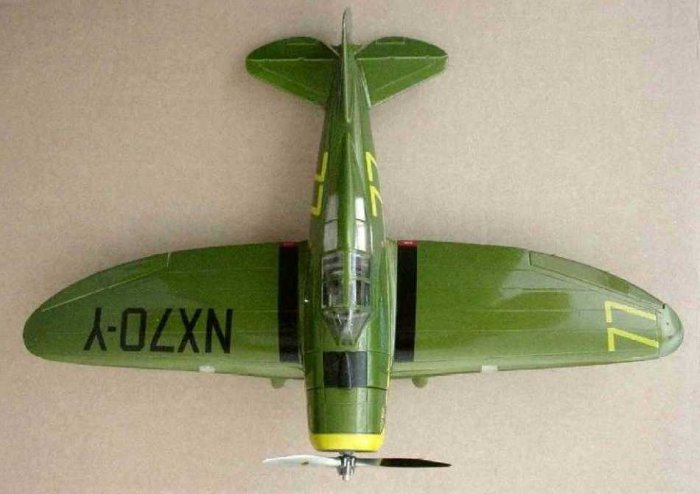
The instructions indicate that at the time John Amendola did the boxart, it was thought that the numeral 77 on the fuselage was white, but by the time the decals were designed, new information indicated that the numerals should be the same color as the spear and cowl ring Yellow.
The other color question was painting the cowl ring to match the Yellow in the decals (the cowl graphic that comes to a yellow point bordered by a black pin stripe is a decal and butts directly to the painted cowl ring). Tamiya X-8 Lemon Yellow acrylic was perfect (and if I had not painted it on to full density, it would have matched the decal with no visible difference!!). I like using Gunzes Mr. Color Thinner with the Tamiya gloss - it seems to dry more evenly than with Tamiyas thinner.
The kit I built was purchased 9 years ago (partially built and then stored to make room for real life), so the decals were old. The first thing I applied was the cowl pin stripe and engine logo. The pin stripe broke into several pieces, but with patience, the pieces were moved around and aligned. Then the long yellow spear with the number 77 - no problem. On the other side I painted a single coat of Microscale Industries (MI-12) Liquid Decal Film over the pin stripe. After drying, the decal went on without a hitch.
Think I learned anything? NO. Now I applied the yellow spear and number 77 on the other side assuming that the big decals would have no problem since the other side was no problem. But towards the end it also broke into several pieces and was quite difficult to move the pieces into alignment. A little prep with Decal Film would have been smart.
After the decaling was finished I brushed on a coat of Future acrylic floor finish to seal the decals and give the race-plane an air-drag cheating gloss finish (I know, it is a bit much, but its fun for now). This finish takes awhile to dry so must be covered to ward off dust collection, but the advantage is it will flow out nicely with no evidence of brushing.
The decals were printed by Scale-Master and were in reasonably good register. They were very, very thin decals than lay on giving the impression of being painted on - nice. I think the old decals may have dried out a bit causing my problems. Also, the yellow could stand to be a bit more dense, but overall, they look nice on the model.
Final Touches
A few bits and pieces were added that were not in the kit.
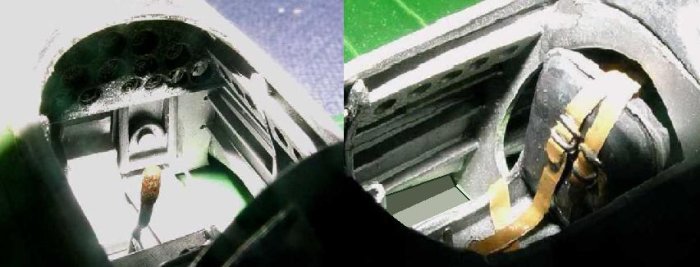
Seat belts were made from aluminum sheet with belt hardware bent from thin gauge wire. Some of the cockpit sidewall details were built out, the instrument panel drilled and the decal placed behind, and a piece of sprue was bent and carved to sit as padding over the instrument panel.
Very small gauge stainless steel tubes were glued in the fuselage and vertical tail to accept an even smaller gauge necklace beading wire to represent the antenna. Using a Black Sharpie pen the wire was blacken (it is a very thin and opaque ink that seems to stick very well).
The kits drawings show a profile only of a fabric cover (not furnished) that appears to cover the landing gear brace tubes. I assume the braces slide on a track to raise and lower the landing gear and the fabric covers are intended to keep the spinning main wheels from splattering dirt on the mechanism as they retract. Using one of the landing gear covers as a mold, I impregnated a couple layers of tissue paper with white glue. When dry, they were removed, trimmed, dry-fit, and then painted.
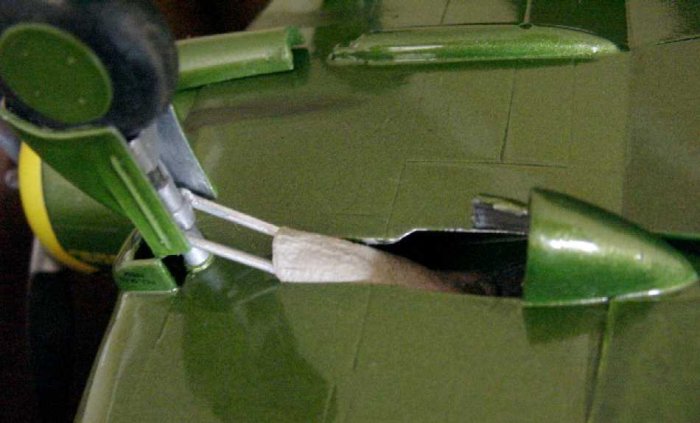
The modeler is required to cut the wing leading edge for installation of the landing lights to make the S-2; the kit provides clear landing lights, but they are a solid chunk of plastic to be inserted in the cutout. At first I tried drilling the chunk of plastic from the backside thinking a lamp simulation could be made. Didnt work well at all, so I pulled some Squadron clear plastic over the wing leading edge and trimmed to the clear cover to size. Into the cutout for the landing light, a box with landing light was added and the clear leading edge glued in place. If only I were a little more patient, the detail would have turned out okay.
Conclusions
This version of the kit surprised me. The P-35, with its high canopy and clunky looking landing gear fairings, all go to really date the plane. Seeing it with the lower canopy and without the landing gear covers, it all goes to support how modern and advanced this aircraft really was. Being a contemporary to the P-36, which begat the P-40, the Seversky P-35 seems to have been over-shadowed and its link with the P-47 is not clear till one reads the history. The racing version, a significant aircraft in its own right in the history of Golden Age racing, is a fun way to appreciate a few pages of Alexander de Severskys legacy.
Although this kit is out of production, Daniel J. Brett, president of Brett Industries in Taylor, Texas, plans to revive many of the Williams Brothers kits. Included in the announced future releases is the Williams Brothers Model Products 32135 Seversky P-35 (1:32) msrp $19.95. Hopefully for race fans, plans include the SEV S-2 option.
Paints & Products Used
- Testors 52907 Colors by Boyd Lime Pearl enamel (rattle-can)
- Tamiya X-8 Lemon Yellow acrylic
- Microscale Industries (MI-12) Liquid Decal Film
- Kiss 4-way Ultra Shiner #F222
References
- Williams Brothers Seversky P-35 / S2 Racer
Review and photos by Rogerio "Rato" Marczak
LSP Review - Sever The Sky: Evolution of Seversky Aircraft
Edward T Maloney
Planes of Fame. Corona Del Mar Calif. © 1979
ISBN 0-915464-0102 - Seversky SEV S-2
http://www.airracinghistory.freeola.com/aircraft/Seversky%20S-2.htm - Civilianized Seversky P-35 Made An Ideal Bendix Racer
(Air Classics, Oct 2003)
by Michael OLeary
Frank's Seversky - Seversky P-35 in Detail [Seversky EP-1 (P-35 A)]
by Martin Waligorski, article and walkaround photos
Seversky P-35 in Detail
© 2003 Gene Nollmann
This article was published on Wednesday, July 20 2011; Last modified on Saturday, May 14 2016