
Two Spitfires in 1/32 Scale
By Brian Cauchi
Introduction
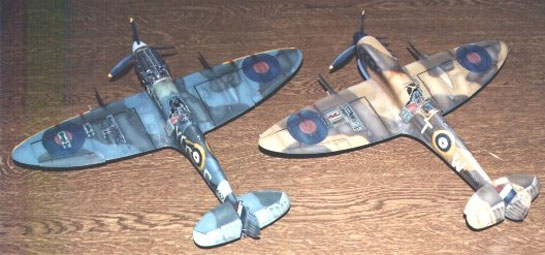
The Hasegawa kit of the Spitfire Mk V in this scale is considered to be the best model available and the starting point for many conversions. I have built both the Hasegawa and the Revell Seafire Mk 1. The former kit was highly detailed whilst the latter was converted into a Spitfire Mk VC. In order to bring the Revell kit up to the required standard, the fuselage was heavily modified in some areas where even the basic element of contour is completely wrong. Having both kits at hand, I decided to take up the challenge and complete both models such that the difference between them when complete would not be evident. Both kits were built together. Scratch built parts common to both were simultaneously produced.
In both cases, the construction procedure listed below was followed:
- Detailed Rolls Royce Merlin 45.
- Internal detail such as cockpit, radio and battery compartment and detail on fuselage sides.
- Gluing fuselage sides together.
- Installation of tail planes.
- Construction of wings including all details.
- Removal and construction of flaps.
- Installation of wings onto the fuselage.
Powerplant
Construction
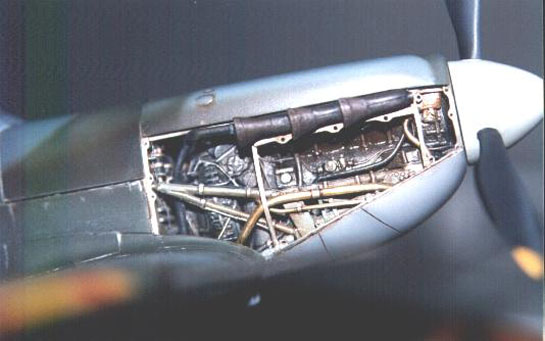
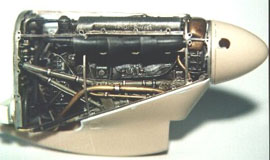
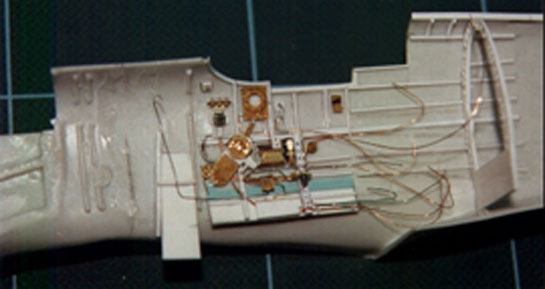
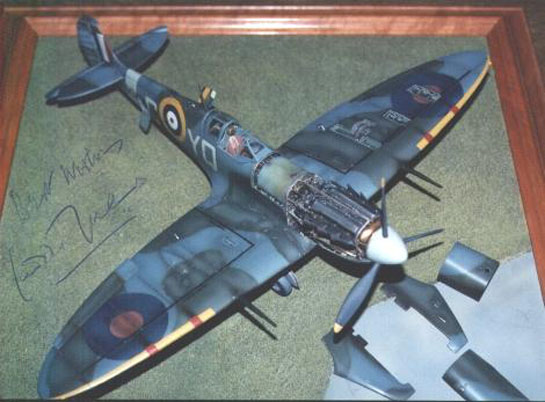
I had already decided that one of the spitfires would be modelled with an exposed engine. The top and sides of the engine would be exposed. The bottom part including the air intake and the propellor spinner would be retained so as not to spoil the beautiful shape of the Spitfire's streamlined nose section.
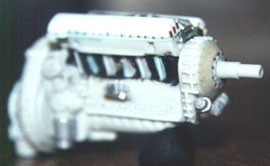
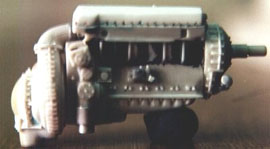

The engine of sorts supplied with the Revell kit was used as a basic starting point for the Merlin. Many parts were removed from it and the basic block retained. Excess plastic had to shaved off from particular areas to conform to the proper engine dimensions since the kit part was grossly misshapen and oversized. The resultant shape was then gradually detailed. This process can be closely followed from the photos. Up to this time, only large items of equipment and pipes were attached to the engine.
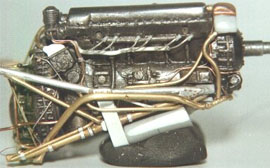
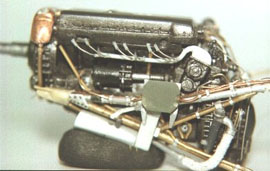
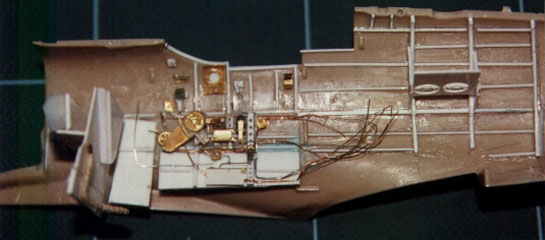
After studying photos of the Merlin, I decided that I would paint it before going on to attach wires and pipes since detailing and painting these would be impossible at a later stage. The engine was painted using Testors Metalizer paints and buffed. The fact that no wires and similar details were attached to the engine made this possible. Successive layers of wiring and piping were then added on, painting them as I went along. The engine bearers were made from copper tubing and attached to the engine.
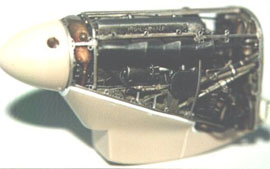
The firewall behind the engine was made from plastic card and all details scratchbuilt onto it. Numerous dry fitting runs assured a proper fit. This is a very crucial part of the model since it has to consolidate the front of the model once all the panels are removed to fit the engine.
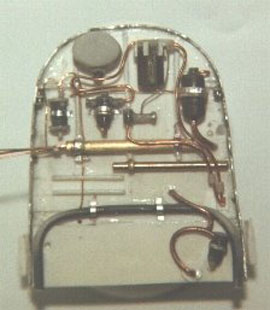
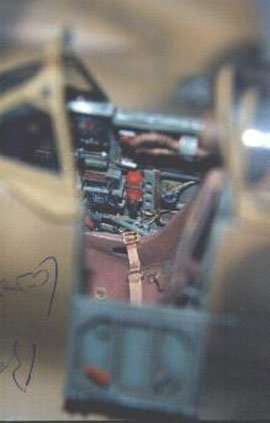
Cockpit
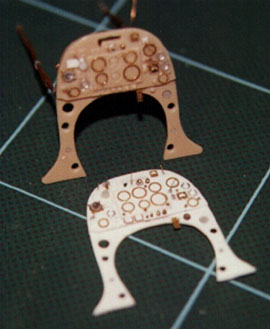
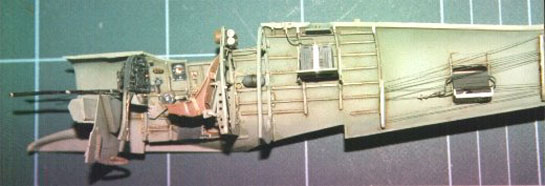
Eduard photo-etched sets were used when detailing the cockpits. The Revell model has a very sparse and inaccurate interior which was totally scrapped. The Hasegawa cockpit floor was modified and then copied to use in the Revell model. The photo-etched instrument panels were not used because the Hasegawa panel is far more accurate and three dimensional. This was copied for the Revell model using plastic card and individual instrument bezels.
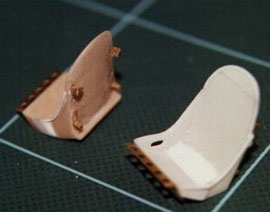

The Eduard seats are grossly oversized and the Hasegawa seat preferred and used. Another was scratchbuilt for the Revell kit. The control column was completely scratchbuilt. The fuselage sides were scraped clean and fresh details included which are a mixture of scratchbuilt and photo-etched parts. Some Eduard parts are too flat to look realistic and were therefore scratchbuilt. The fuel jettison handle which is included in the Eduard set was used on the VC which was in fact equipped with an external fuel tank when ferried to Malta.
One of the instrument panels was also detailed from the backside showing the backs of instruments and their wiring. Since the VB would have its front open to reveal the fuel tank, this detail would show through.
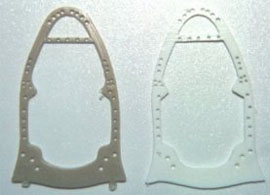
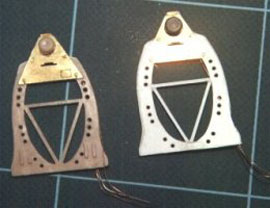
The frames supplied with the Hasegawa kit were duplicated for the Revell model. Seat belts were made from masking tape and photoetched buckles and other fittings. The Radio and battery were scratchbuilt. The radio details were taken off an original manual loaned from the Aviation Museum. The Battery shape and measurements were taken off an original also found in the same Museum. What really pleased me was that both items fitted perfectly in their intended location proving the accuracy of the Hasegawa kit.
Fuselage
Although pretty obvious, the fuselage of the Hasegawa model was checked for accuracy against scale plans. Unlike this, the Revell fuselage is very narrow behind the cockpit to the tail and a plastic fillet was inserted to correct this. The Hasegawa fuselage was scribed and sanded down. The Revell fuselage was sanded down since the panel lines were already recessed. (amazing for an old Revell model - about the only good point) The curved area under the fuselage where the wings join is non existent in the Revell kit and this is probably the worst defect since it is a characteristic of the aircraft which also adds to its grace. I was not duly worried since I replaced the kit wings with a pair of Warbirds resin wings. This resulted in the removal of most of the centre section on the underside and so with the major surgery, I included some thick chunks of plastic which were later filed and sanded to shape, thus obtaining the right contour which was continuous with the wings.
Canopy
The Revell canopy was obviously discarded. The Hasegawa rear cockpit section was unmodified. To the sliding hood was added a raised oval edge which was a knockout part on the Spitfire hood to be used in case of emergency. The front section was modified to include curved side mouldings which are terribly obvious in photographs. All these parts were used as the male mould. These were filled with Milliput so as not to cave in when put in contact with the hot acetate. Each part (a total of three) was then mounted on a brass rod which set into the Milliput. This would allow these to be held tightly in a vice until the hot clear acetate is stretched over them. Finally, the canopy framing was slightly lowered using 1200 gauge wet or dry sandpaper and the entire canopy polished using a rubbing compound. All clear canopy parts were then moulded.
Gun Bays
Each Spitfire has different gun bays. The VB is equipped with the drum fed 20mm cannon and browning machine guns. All these weapons were scratchbuilt and exposed. In the case for the browning guns, the wing structure shows along the sides of the gun bays. In the case of the VC, it was decided to expose the 20mm Hispano cannon and belt feed. The whole gun bay was exposed but only one gun fitted. I used a bit of imagination as to what would be in the bay when the second cannon was removed since I could not find any reference photos. Again, the cannon and shell feed mechanism were scratchbuilt and the shells were turned from copper wire and just painted in the appropriate colours and given a wash.
Historical Note:
In Malta, the VCs were delivered with two cannon per wing but a pair were soon removed. There is no fixed rule as to which were removed but most photos show the outer pair missing and so I went along with this. The main reasons for removing these guns were:
- To render the aircraft lighter and more maneouverable since its performance was already hampered by the tropical filter.
- Not enough ammo was available in Malta during those terrible days.
Wings
The kit’s wings were used for the VB (Hasegawa). Detailed areas are the wheel wells, machine gun bays, cannon bay and lowered landing lights and flaps. The wing structure was visible in the wheel wells and machine gun bays. This was scratch built as were the machine guns and cannon complete with drum feed. The kit’s flaps were removed and replaced with the Eduard set which are delicate and very well represented. Of course, one must not forget the opening on the wing surface through which protrudes the actuating rod when the flaps are lowered. The cover for this opening is also supplied in the photo-etched set. The kit’s cannon barrels were removed and replaced with a pair of white metal ones supplied by Warbirds. Needless to say, these are beautifully detailed as are all warbird products and beautifully finished requiring only minor cleaning. Another detailed area was the radiator. The rear flap was removed and replaced by the Eduard brass one together with actuating levers and radiator front and rear. Heating ducts were also added which are in fact visible in this area and also in the flaps area.
A pair of solid resin wings were used for the VB again supplied by Warbirds. This is incidentally my first experience with resin and my initial fear was quickly dissipated thanks to the excellent quality of the Warbirds resin. Very light in colour, my wings were perfect with absolutely no pinholes and very finely engraved. I decided to detail one cannon bay (refer to the guns section in part 1) and also to lower the flaps. Here is the proof of the high quality of the resin. With an Xacto set of modelling knives and blades, I hollowed out the gun and ammo bays by cutting along their perimeter and scratching/shaving off the resin till the bottom was so fine it became transparent and still the resin held and was hole free. The flaps were also removed in this manner. The resin set also includes a new radiator. However, the oil cooler had to be scratch built. The radiator and flap areas were detailed and for the VB.
A considerable amount of work was involved when mating these wings to the Revell fuselage. Since these are meant for the Hase kit and the Revell fuselage had the wrong contour, I simply stuck the wings and the right place at the right dihedral aligning only the top surface with the fuselage fairing. The bottom discrepancies were then addressed by filling in the low areas with superglued plastic and filing away the high places till the right shape was achieved. The area was then rescribed.
Wheel doors and Undercarriage
The Hasegawa wheel doors were accurate in shape and used for the VB. A resin set also courtesy of Warbirds was used for the VC. The wheel legs supplied by Hase were used and a fresh set made from copper tubing. Brake lines were obviously added as were the locking lugs supplied with the photo-etched set. The wheels supplied with the Hasegawa kit were used for the VB since they are really nice. Of course, the Revell wheels were only fit for the bin and these were replaced by a Warbirds resin pair. These are however covered and I decided to use these on the VC since many Spits in Malta had covers,. Probably to prevent the entry of dust. The kit tyres were filed down to give a weighted look but the resin pair were already weighted.
Painting
I followed my usual painting habits which you can read in detail in the Me262 article. Basically, I used Humbrol enamels throughout mixed to obtain the right shades. Cellulose thinner was used throughout. I use automotive primer filler as a base coat since this also helps to fill in minor defects and scratches.
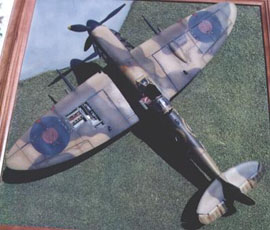
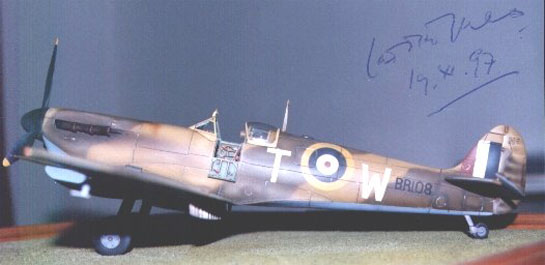
The Spitfire VB was painted in the normal day colours of Grey/Green topsides and Grey underside. The fuselage band and codes are sky. The VC was painted in the desert scheme of Mid Stone/Dark Earth topsides and Azure Blue undersides.
All shades were made lighter for fabric covered areas and more contrast allowed since this resulted in a nicer and better looking fabric effect.
All national insignia on both aircraft were sprayed on the models using the same spraying techniques. Details of spraying these roundels may be found in my previous article for the Typhoon. Only the code letters, fin flashes and serial numbers are decals. The inscription on the fuel tank cover of the VB are rub on letters since I could not find decals.
Details such as aerials, pitot tube and undercarriage are all fixed in place. I like to fix these parts at such a late stage to avoid countless handling accidents since the model is sanded down at least three times in the process described above. One cannot sand the whole model down satisfactorily if certain items are in place.
More weathering in the form of chipping and gun and exhaust stains were put on the model. I normally apply paint chipping and scratching using a 00 brush and Humbrol silver. However, this time I used Testors Metalizer aluminium applied with the brush and this resulted in a better effect.
When this is complete and all defects have been remedied, a couple of coats of thinned matte varnish were sprayed over the models for a good even finish. This time, I wanted to have a marked difference in the finish of the two models. The VB served in the European theatre of operations and the VC in Malta. The VC was subject to extremely high temperatures during the day which diminish considerably at night and is normally dew covered in the morning. The airfield consisted of a dirt/soil stretch of ground and a dust storm was kicked up every time it was windy and on each takeoff. The VB was sprayed with Revell matte varnish since this results in a slight sheen. The VB, however was finished in Revell matte varnish to which I added a small amount of Humbrol matte varnish. The latter results in a dead flat finish but cannot be used on its own since it is not perfectly clear and may result in yellowing.
The final step involves the installation of the clear parts which were hot formed. These were trimmed to shape. It is good to mould a few extra parts since there is always the inevitable scratch or imperfection or one might trim a bit too much. Decal sheet was used to frame the canopy, sprayed in the appropriate colours.
Spitfire ramblings
Apart from being (in my opinion) one of the most beautiful aircraft of the Second World War, the Spitfire played a major role in defending Britain and Malta at the worst time of the battle and later on to help take the war to the enemy. I had been wanting to build a Spitfire for a very long time. But which Spitfire variant? These are many and all are beautiful and significant in their own way.
A number of years back, I had the great fortune of making the acquaintance of the late wing commander P.B. ’Laddie’ Lucas at a book signing session. This led to a unique friendship which resulted in regular correspondence and even meetings. A perfect gentleman and always willing to help, ‘Laddie’ was a mine of information and through him, I also got to correspond with ‘Johnnie’ Johnson. Since then, I was in regular contact with these two famous pilots and so the choice of which aircraft to model became very simple. I would model a Spitfire which each of them flew.
‘Laddie’ Lucas was the author of quite a number of books, the most popular in Malta being ‘Malta - A thorn in Rommel’s side’. This is a detailed account of the terrible summer of 1942 when the battle was at the very worst and Malta was on the verge of capitulating due to a dire lack of food, fuel, ammunition and constant bombing. He was then Squadron Leader of the famous 249 Squadron based at Ta’ Qali airfield. This airfield was no more than that - an open field. The dust surface resulted in much wear on the aircraft and hence my extensive weathering of the model. When consulting Laddie on which aircraft I should model, he instantly mentioned a VC coded T-R which he flew most frequently and in one particular instance was involved in action against three Italian SM84’s which were all shot down. However, after much consideration, I opted for BR108, another VC coded T-W. The remains of this aircraft are now located at the National War Museum in Malta.
Apart from ‘Laddie’, other famous pilots like Buck McNair, Stan Grant and Paul Brennan flew this machine. In the short span of 3 months, no fewer than 4 aircraft were confirmed destroyed by pilots flying BR108. Although initially equipped with 4 cannons, two were removed on arrival at Malta. This was standard practice on all VCs. Although unconfirmed the reason for this was to lighten the aircraft and to conserve ammunition which was very scarce at the time. Considering that the Malta spitfires were already hampered by the tropical filter, the additional weight of two extra 20mm cannon did no good to their already reduced performance.
Following is an extract from the book ‘Malta - the Spitfire Year’ which just about sums up the aircraft’s history.
SPITFIRE Vc BR108
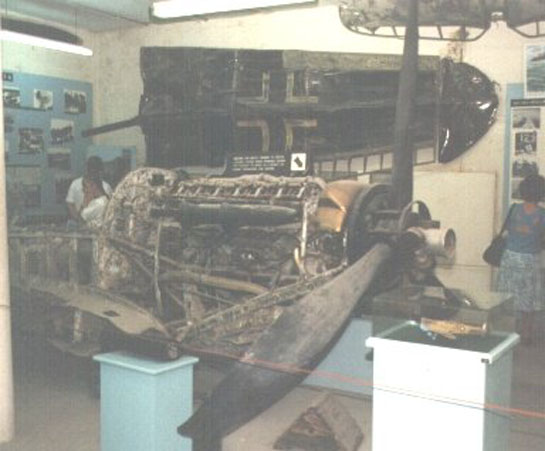
Pride of place in the Air Hall at the National War Museum in Valletta is taken by the front section of the wreckage of Spitfire Vc BR108. This was recovered from the seabed of Marsalforn Bay, Gozo, by members of the RAF Subaqua Club in 1973, and was the aircraft ditched by Flt. Lt. Lester Sanders of 603 Squadron on 8th July 1942.
BR108 was built by Vickers-Armstrong (Supermarine) Ltd. in early 1942, its maiden flight taking place at High Post Aerodrome on 3rd March; it was flown to 8 Maintenance Unit five days later, then to 47 Maintenance Unit on 23 March. From here, in company with others, it was partially disassembled, crated and loaded aboard the freighter Empire Heath, destined for Gibraltar. Here it was reassembled, test flown, allocated the code C-20 and loaded aboard the USS Wasp on 7 May, from where it was flown to Malta two days later.
BR108 was issued to 249 Squadron, retaining the code markings C-20 until about 19 June, when it was re-coded T-W (T being 249 Squadron’s identification letter). Finally, at the beginning of July, BR108 was transferred to 603 Squadron and was presumably re-coded once more, possibly as X-W (X being 603 Squadron’s identification letter) Known important flights were:
249 Squadron Pilot Action
- 9 May Plt. Off. P.A. Nash Bf109 destroyed Bf109 probable Plt. Off. P.A. Nash Bf109 damaged Plt. Off. P.A. Nash Ju87 probable
- 10 May Plt. Off. P.A. Nash Scramble Plt. Off. P.A. Nash 2 Ju87’s destroyed
- 12 May Plt. Off. P.A. Nash Scramble - hit steamroller when taxiyng-in on return; damaged
- 6 June Flt. Lt. P.B. Lucas Scramble Flt. Lt. R.W. McNair Scramble
- 8 June Sqn. Ldr. S.B. Grant Shipping patrol Sgt. R.B. Brennan Scramble
- 10 June Flt. Lt. P.B. Lucas Scramble Flt. Lt. P.B. Lucas Scramble Flt. Lt. P.B. Lucas Scramble
- 11June Sqn. Ldr. S.B. Grant Scramble
- 12 June Flt. Lt. P.B. Lucas Scramble Flt. Lt. P.B. Lucas Scramble
- 16 June Flt. Sgt. M.E. Tomkins Scramble
- 19 June Flt. Lt. P.B. Lucas Scramble
- 20 June Flg. Off. J. Smith Scramble
- 21 June Flt. Lt. P.B. Lucas Scramble Flt. Lt. P.B. Lucas Scramble
- 24 June Flg. Off. R. Daddo-Langlois Scramble
- 25 June Plt. Off. C.H. Lattimer Bf109 destroyed Bf109 probable
- 28 June Flg. Off. J. Smith Scramble
- 29 June Wt. Off. C.B. Ramsey Scramble Wt. Off. C.B. Ramsey Scramble
603 Squadron
- 8 July Flt. Lt. L.V. Sanders Ju88 damaged, Bf109 probable shared with Plt. Off. N.S. King
BR108 was then shot down by Lt. Heinz-Berres of I/JG 77, and ditched in Marsalforn Bay, Gozo, from where the slightly injured pilot was rescued by Maltese fishermen. Although initially located by members of the RAF Luqa’s Subaqua Club in 1968, the wreckage of BR108 would remain on the seabed for a further five years.
I don’t know about you, but I think I’ve built a model of a pretty significant aircraft.
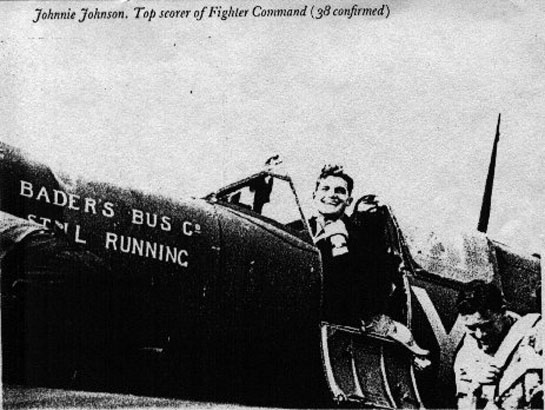
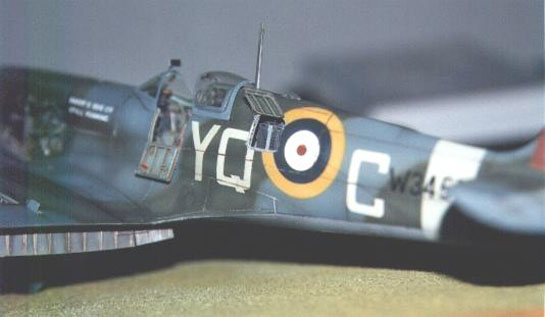
‘Johnnie’ Johnson is the highest scoring Commonwealth ace with 38 confirmed victories. He patiently supplied me with all the necessary information such as codes and serial number required to build the Mk.VB which he flew with 616 Squadron. This aircraft was flown by Johnnie during August 1941 just after the famous Douglas Bader was shot down and captured, hence the inscription ‘BADER’S BUS Co. STILL RUNNING’. The only photograph showing this aircraft is that shown and is featured in a number of books. It is most unfortunate for us researchers and modellers that the photographer was more concerned with the pilot than with the aircraft. The information which one can gleam from this photo is very limited and some of the finer details were assumed and certain decisions arrived at by looking at other 616 Squadron VBs. Even here, there are few photos showing VBs from this particular Squadron. Being accurate is sometimes very frustrating indeed! In contrast to BR108 which was finished in a desert scheme, this model was finished in a temperate scheme with a grey/green camouflage topsides and lighter grey underside.
James Edgar Johnson was born in Barrow upon Soar in Leicestershire, U.K. His first action was with 616 squadron in December 1940 when he flew Spitfire MkI’s. He later flew Mk IIs and as Mk Vs as the squadron received these aircraft. His first confirmed combat victory took place on 26th June 1941 when he shot down a 109E when flying a spitfire MkIIA. During this time, he often flew as wingman to Douglas Bader. He was promoted to Squadron Leader in June 1942 and took command of 610 Squadron flying Spitfire Vs. In March 1943 he was promoted to Wing Commander when he took command of the Kenley Wing, flying Spitfire IXs. In September of the same year, he began a rest tour and returned to the front on March 1944 when he commanded the Canadian manned No 144 Wing, also equipped with Mk IXs. In August, the Wing was disbanded and the then took command of No127 Wing where he stayed till he was promoted Group Captain in April 1945. His score at the end of the war was 34 enemy aircraft destroyed and 7 shared plus a further 3 and 2 shared probably destroyed, 10 and 3 shared damaged and 1 shared destroyed on the ground. Of great significance is the fact the Johnnie is the top scoring Spitfire pilot of the war and obtained all his victories whilst flying this aircraft. Of all his victories, all were single engined fighters except for a Bf 110.
Following is a brief history of Spitfire VB serial number W3457 as obtained from Spitfire - the history.
W3457 was produced at Eastleigh and first flew on 10th July 1941. It was transferred to No.12 Maintenance Unit on 13th July. Its first assignment was with 616 Squadron where it was delivered on the 23rd July. It saw service with this Squadron till the 23rd December of the same year when it was transferred to Air Service Training. W3457 was involved in a flying accident and suffered category AC damage on the 13th July 1942. It was repaired on site. On the 16th August, it was transferred to 41 squadron where it was involved in another two flying accidents on the 27th August and 11th September respectively. In both cases, it suffered category B damage. On 4th February 1944 in was fitted with a tailhook by the Cunliffe Owen Aircraft Ltd. and then transferred to the Royal Naval Air Station at Henstridge on the 28th March. The Aircraft was struck off charge on the 28th March 1945.
Its history stops there and it seems that W3457 survived the whole war and had a rather varying career. One wonders what happened to this aircraft in the end. To think that it could have been an exhibit in some museum. Another significant aircraft.
© Brian Cauchi
This article was published on Wednesday, July 20 2011; Last modified on Saturday, May 14 2016