
Messerschmitt Bf 109 E Comparison Part 1
By Ray Peterson
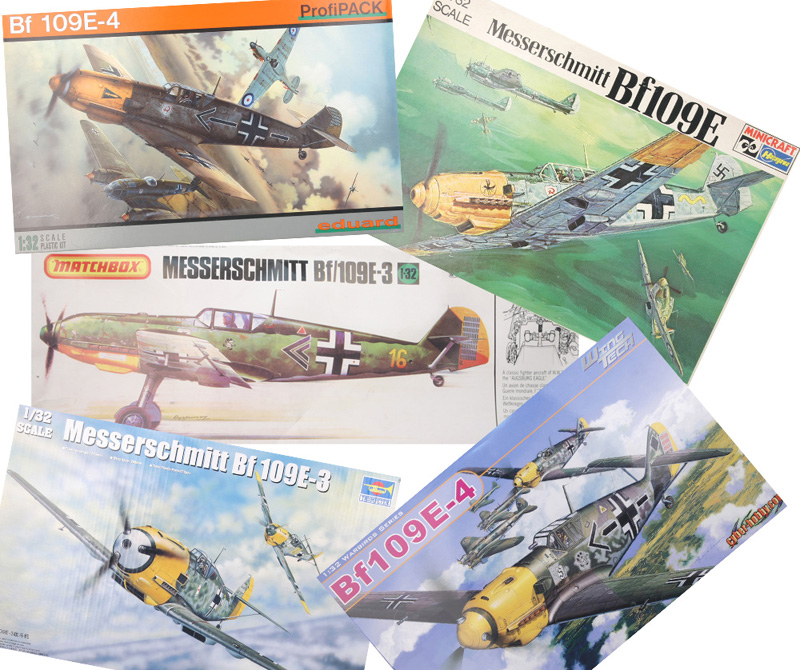
With the last release by Cyber-Hobby/DML, we now have five manufacturers that have released Bf 109E kits. The first to release a 109E I believe was Hasegawa in the ´70s. This was followed in 1982 by the Matchbox release, noteworthy for being an early kit to have recessed panel lines, as well as professed to have a more accurate outline. Only recently were these kits superseded by more modern tooling, first by Eduard then shortly followed by Trumpeter and finally Cyber-Hobby. So how do these kits compare? We shall see...
I am going to break this review down into two parts, due to the scope and amount of work required to do the review. This first part will cover the main components of the kits and their accuracy, while part two will cover details of the cockpits, engines, landing gear and the rest.
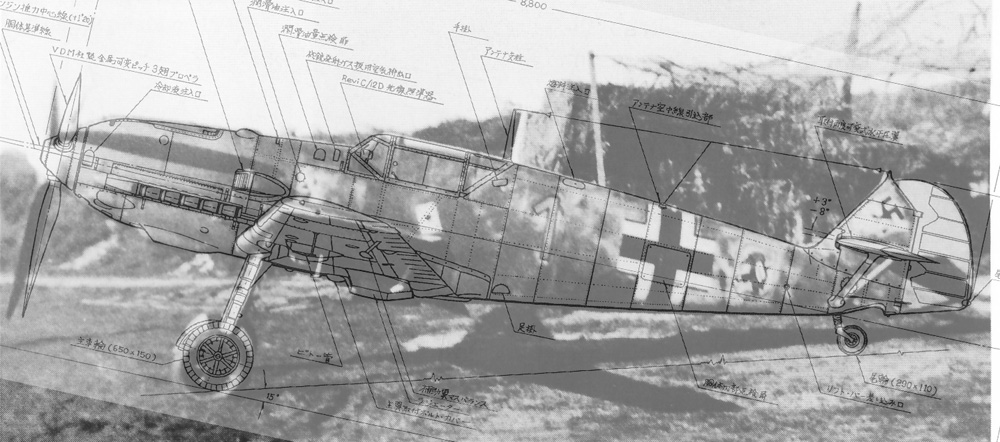
My first task was to find a set of drawings that I felt were pretty accurate. After flipping my references, I selected drawings that were used in both Model Art no.375, "Messerschmitt Bf 109B-E;" and Aero Detail #1: Messerschmitt Bf 109E." These drawings got my attention as they were dimensioned, and were backed up by smaller detailed sketches, which I felt meant there was quite a bit of research done. Details of the drawing I checked against other references including the Bf 109E catalog of parts, and other reference material and walkarounds (see the end of this article for a list of references).
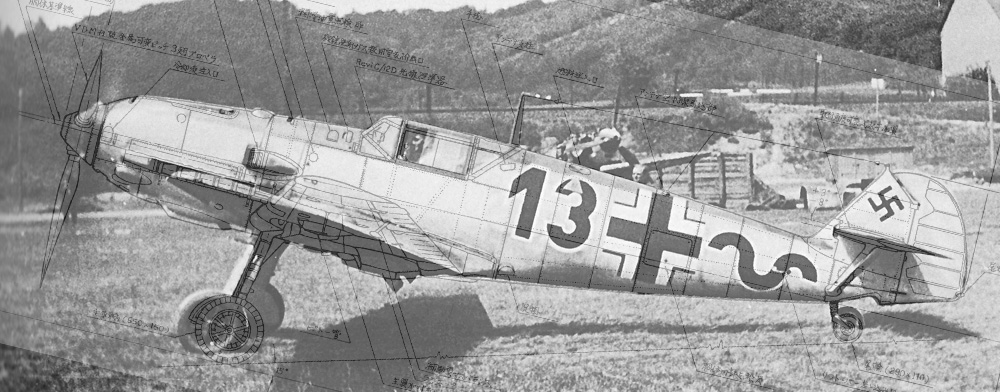
As a check of the drawings, I found a couple of period photos in two different volumes of the Jagdwaffe series, Vol 2, Section 4 and Vol 3, Section 1. By scanning these photos into Photoshop, and layering the drawings over them, I got a pretty good match, especially concerning distortion from camera lenses.
Satisfied these drawings were pretty darn accurate, I moved on.
First, I taped together enough parts to get a good idea of the profile of the kit. I then printed out a set of drawings to 1/32nd scale. I taped the profile drawing on a piece of mat board and took a photo of it. I then cut out an area of the board that let me attach the half-fuselage to the mat board, then I took photos of the half kit and board set at the same distance from the camera, with the same focus point. In other words I didn´t move or touch the camera, simply changed the kit on the board and set the board on the same markings each time. The idea being to get as little distortion as possible from the camera lens. There will always be some distortion due to the kits being three-dimensional versus the two-dimensional drawing, but I hoped to reduce the effect.
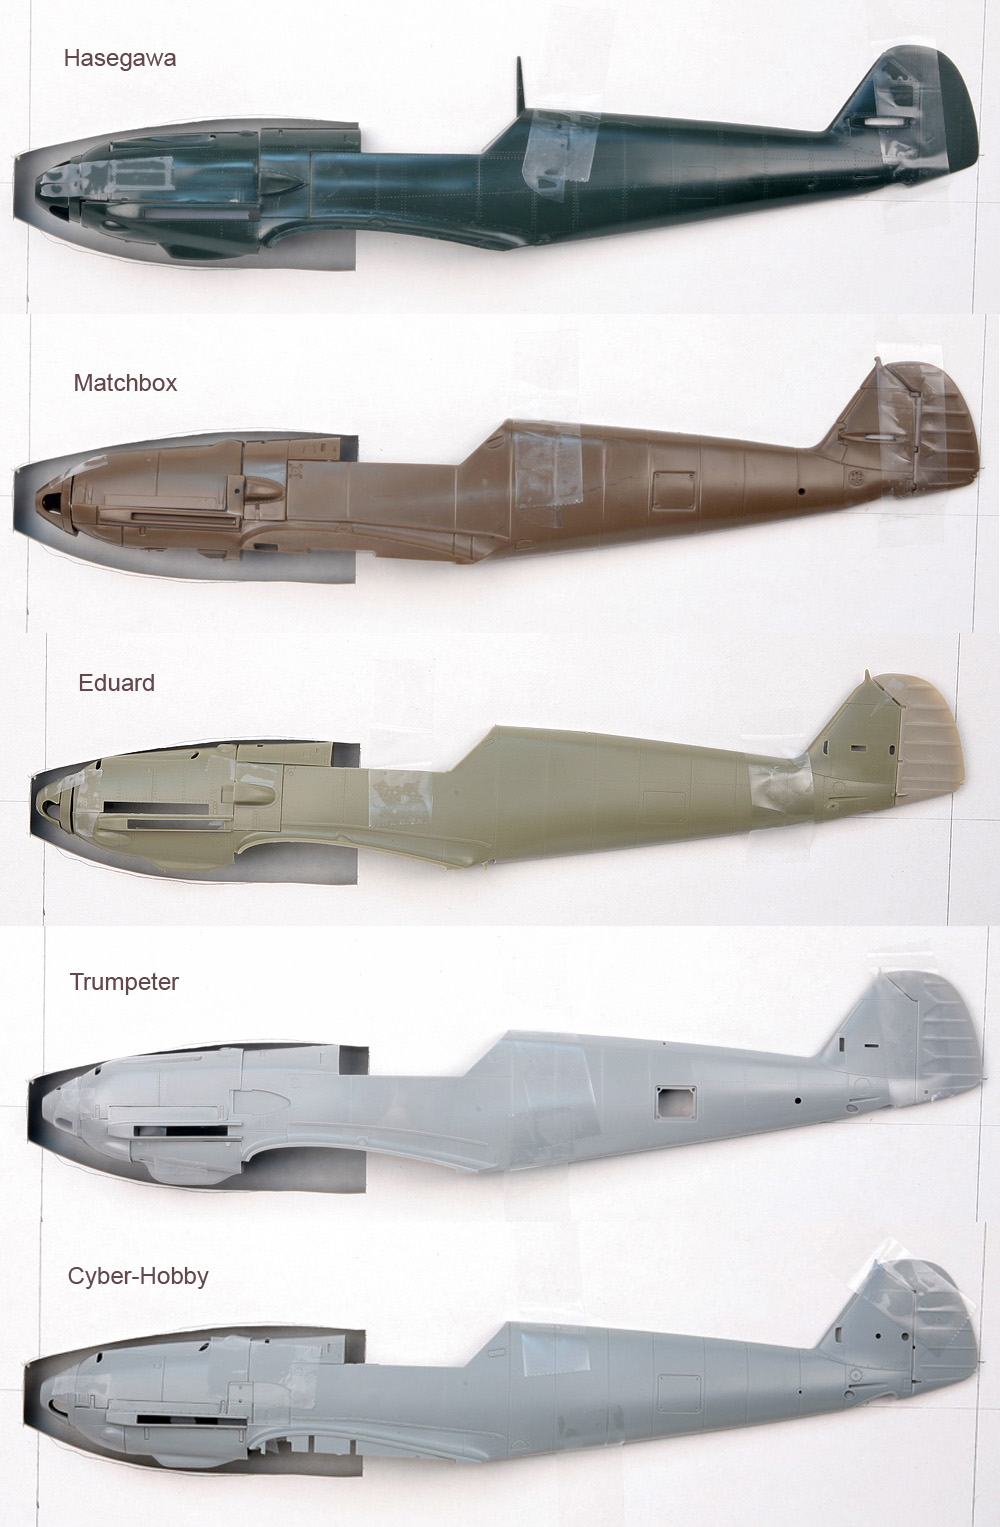
This first picture is the profiles of the fuselage of the kits without the drawings overlaid. I didn´t perfectly crop the photos, so don´t read anything into the varying lengths of the fuselages. Here are the actual lengths of the fuselages, with 8800mm / 32 = 275mm being the correct length:
- Hasegawa 271mm
- Matchbox 273mm
- Eduard 280mm
- Trumpeter 275mm
- Cyber-Hobby 274mm
As a quick description of the kits, only the Hasegawa kit has raised panel lines and details, including petite, raised rivets. The Matchbox kit has deep and wide trenches for panel lines with no rivet detail. Both Eduard and Trumpeter´s kits have recessed rivet details with Eduard´s being more petite. I would say Eduard´s kit has the best surface treatment of all the kits, with the finest rivets and panel lines. Cyber-Hobby´s Emil has panel lines and fastener detail only, though it is well done, nearly as fine as Eduard´s.
Here are the kit profiles with the drawing overlaid. Note I used the canopy opening to line the two up as it was closest to the center of the camera.
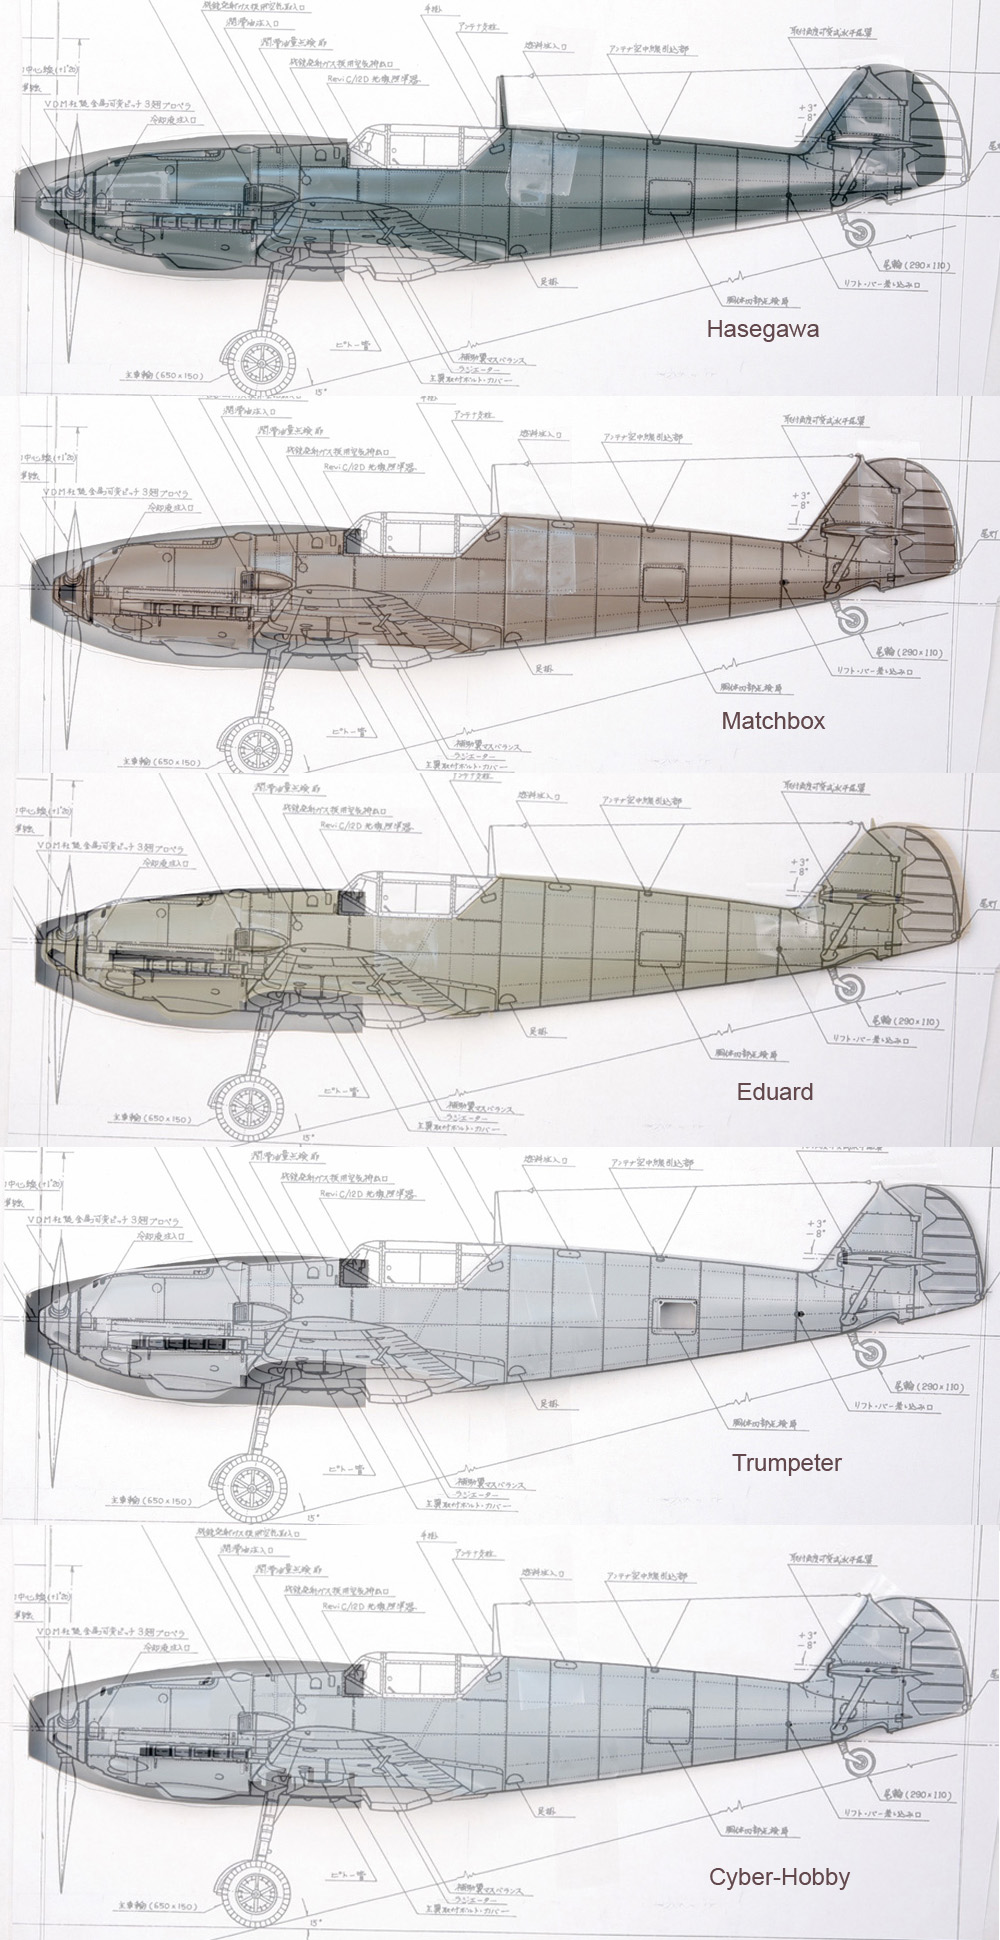
Due to the problem with 3D vs. 2D, there is still a little induced variation, but it is pretty clear which are the kits closest to the drawing. Both the Cyber-Hobby fare well in the comparison; the Cyber-Hobby kit is so close it appears they may have used these drawings in making the kit! The only discrepancy is the rudder. The Cyber-Hobby kit´s rudder appears a little short in chord. The Matchbox kit is probably the second closest with only panel lines varying from the drawing. As a matter of fact, if one were to match up a fuselage half from Matchbox and Cyber-Hobby, they will match up very well except for those panel lines. The Eduard kit shows the additional length of their kit, with a longer and a slightly deeper fuselage, the depth especially shows at the back of the cockpit. Trumpeter´s kit also matches well except for a bulbous oil cooler and it also appears the MG access panel is too long by about 2mm, causing the engine panel to be too short. Trumpeter, it seems, does have the most accurate rudder shape and with a little filing for a better fit, I believe the rudder would be useable on the Cyber-Hobby kit, adding almost a full millimeter to the Cyber-Hobby length, making it almost dead-on accurate. As for the Hasegawa kit, well, where does one start? It appears the cockpit location is off, being set too far forward. This makes the fuselage short in length and cowl too long. Overall it is just a mess.
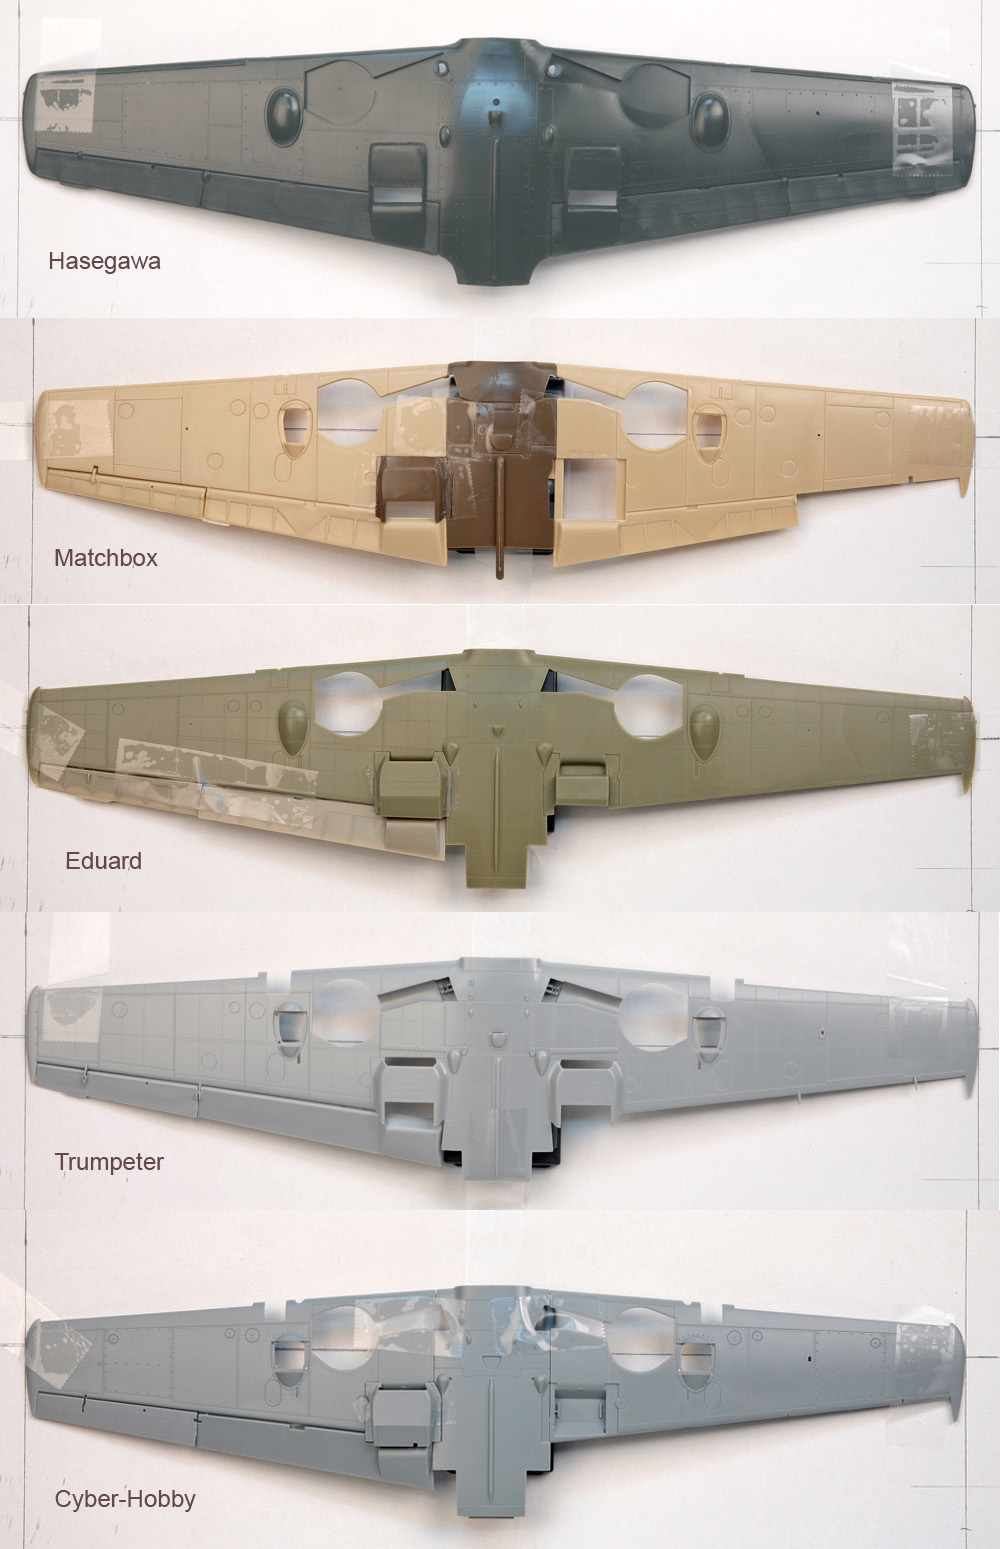
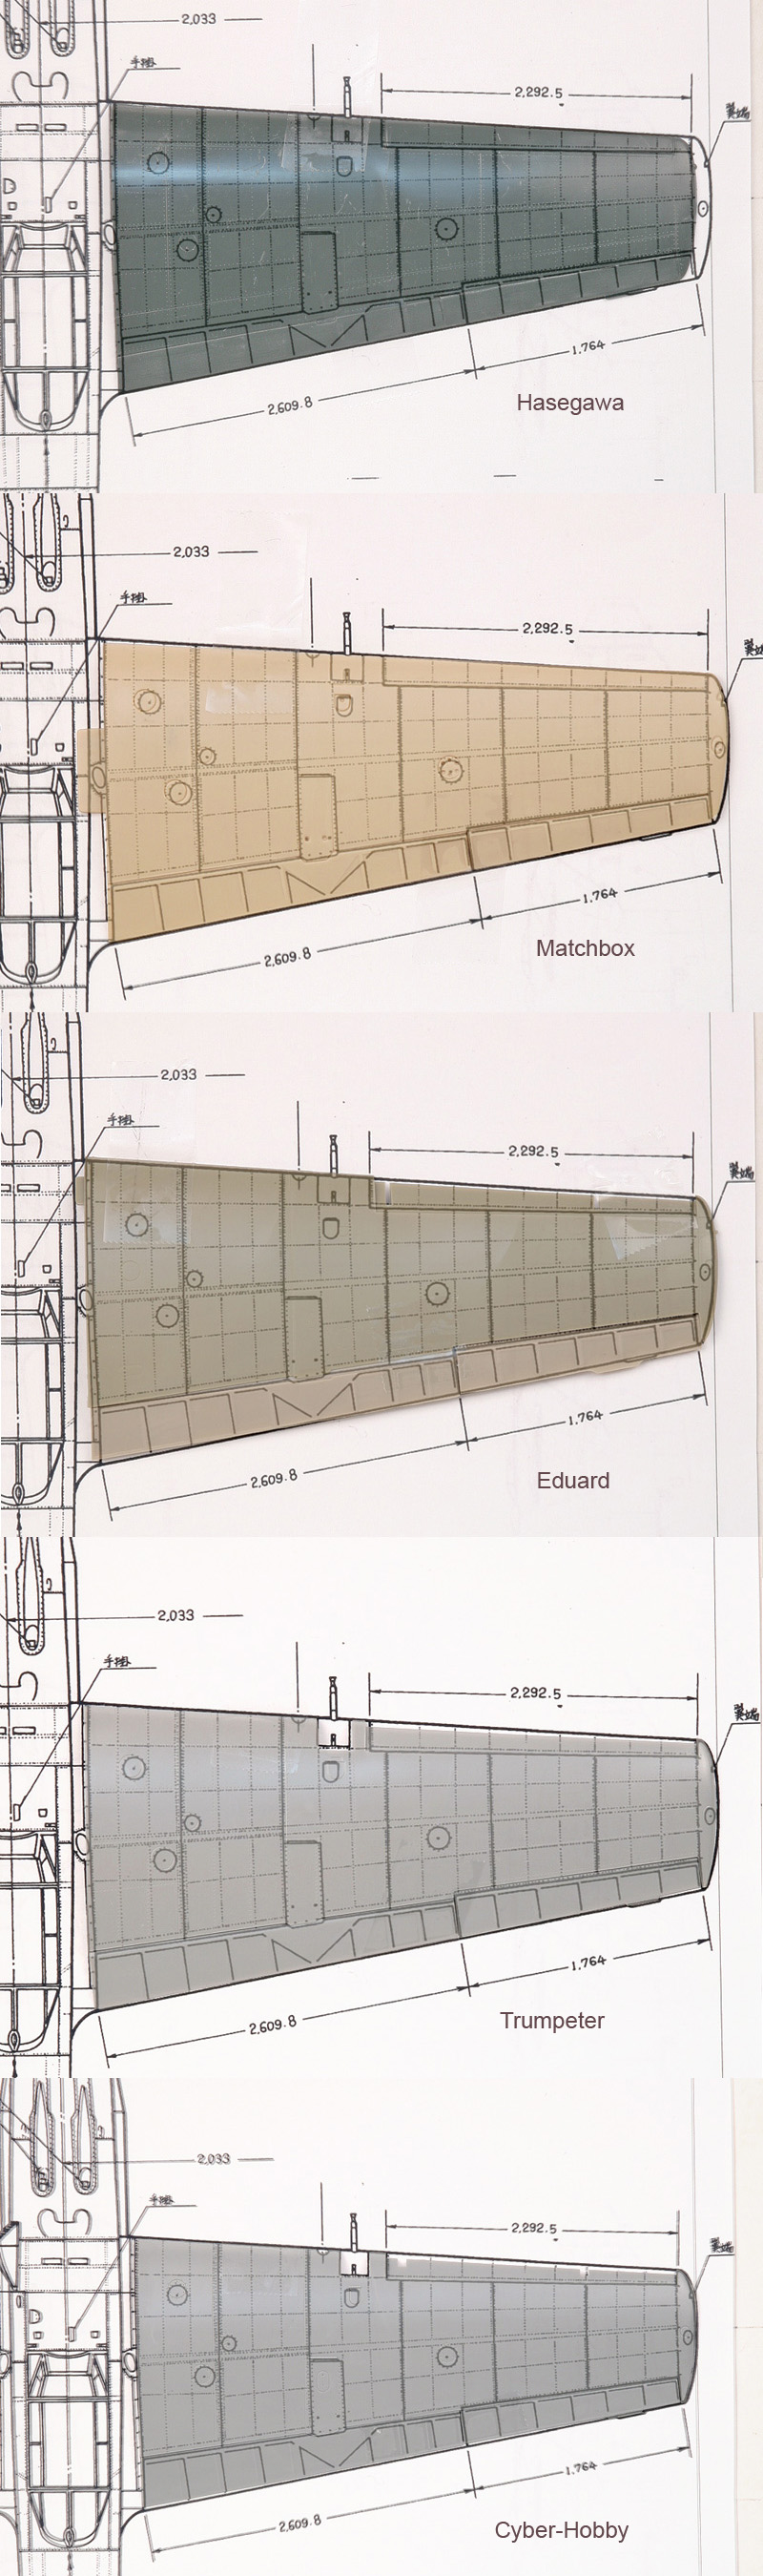
Next up, the wingspan. This was most easily checked by using the lower wing section from each of the kits. Most have a single part for the lower wings, the exception being Matchbox and Cyber-Hobby. For overall wingspan, all the kits weren´t too bad, the worst being Hasegawa which was short by 3mm. Here is the list of measurements with 9900mm / 32 = 309mm (rounded down from 309.375mm) being the correct length:
- Hasegawa 306mm
- Matchbox 309mm
- Eduard 311mm
- Trumpeter 309mm
- Cyber-Hobby 309mm
Once again, here are the parts with the drawing overlaid:
Again, the Hasegawa comes across as the most off, being short, elevators and flaps being off, and with cannon bulges being way off in shape. They are too egg-shaped, instead of more of a teardrop shape. Also, the radiators are off in shape and how they are represented at the flaps. More on all the kits radiator shapes later. The Matchbox kit again looks surprising good, except for heavy recessed lines and clunky detail on the radiator. The overall shapes and locations appear very good. The only small miss being the missing trim tabs on the ailerons. The Eduard kit is also pretty darn good, just being a few millimeters wide. The Trumpeter kit also is not too bad, with the exception of the radiators which are seemingly squashed. Again, more on that later. The Cyber-Hobby kit is also very good, although in retrospect I did not do as good a job of lining up the drawing! This kit has the most accurate shape to the cannon bulges; with the separate cover being a bit flatter than the drawings which when compared to walk-arounds appears to be correct. Eagle-eyed readers will note the Cyber-Hobby kit is missing the aileron trim tab; this is because it is on the upper half. One further note: Only Cyber-Hobby gives the small inlet on the fuselage as a separate part, offering a choice of two parts, A7 or F33. Part A7 is for a standard Bf109E-4 or -4/N; part F33 is the flattened version for a Bf109E-4/B or -4/N/B, the fighter-bomber variant. The flattened intake was required to provide clearance for the ETC500 or other racks. This distinction is not mentioned in the instructions.
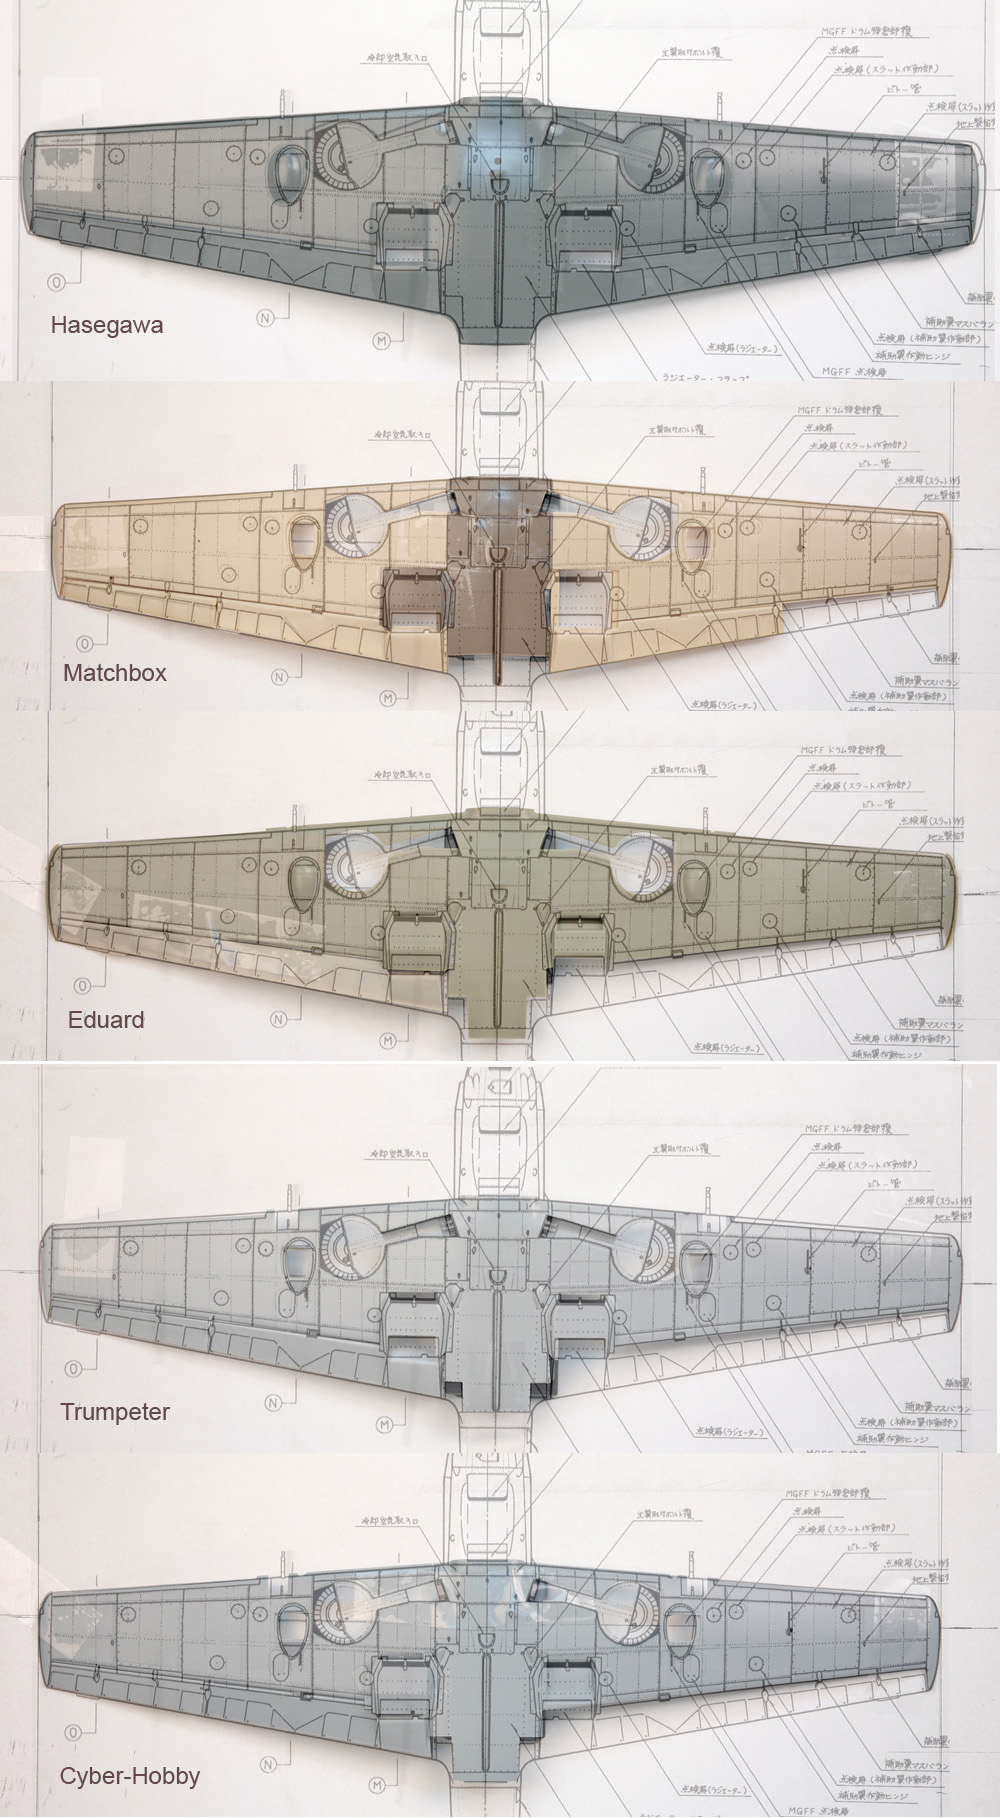
We now look at the upper wings. I have only used the starboard upper wing for each kit. Again, they are all not too bad with the exception of Hasegawa, which has too short a wing and incorrect division of flaps and ailerons. Matchbox did well except for the missing aileron trim tab. Eduard´s wing may have a few access ports miss-placed, although I could not reliably verify this detail. The Eduard wing is slightly too long, the aileron trim tab is too long and not correctly located, and as has been pointed out by others; the front slats are too deep. Trumpeter´s upper wing looks near spot on; same with the Cyber-Hobby wing.
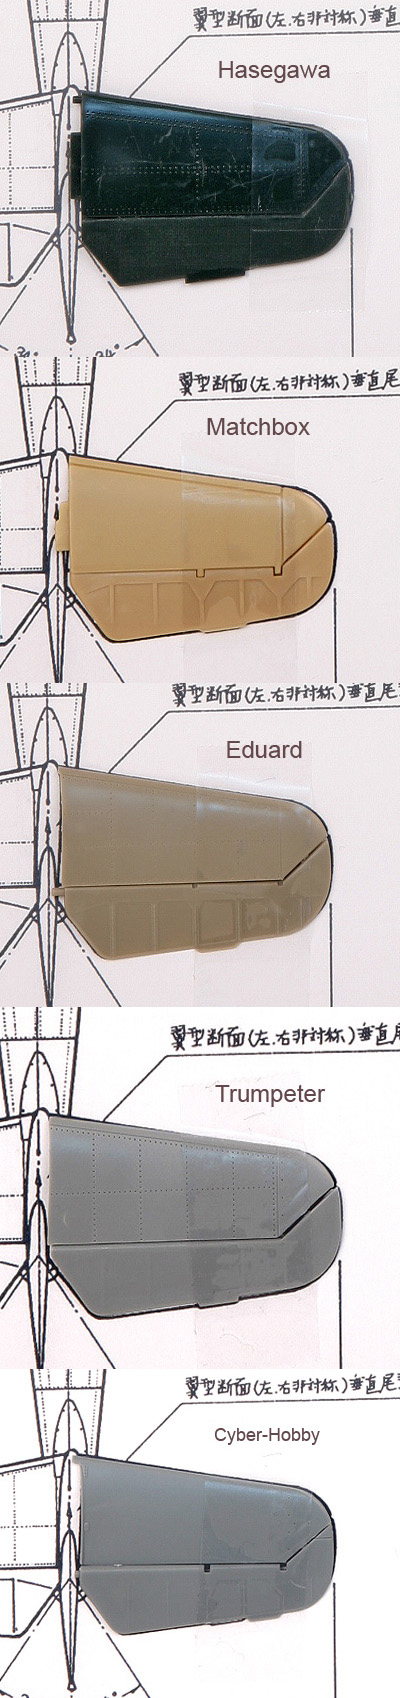
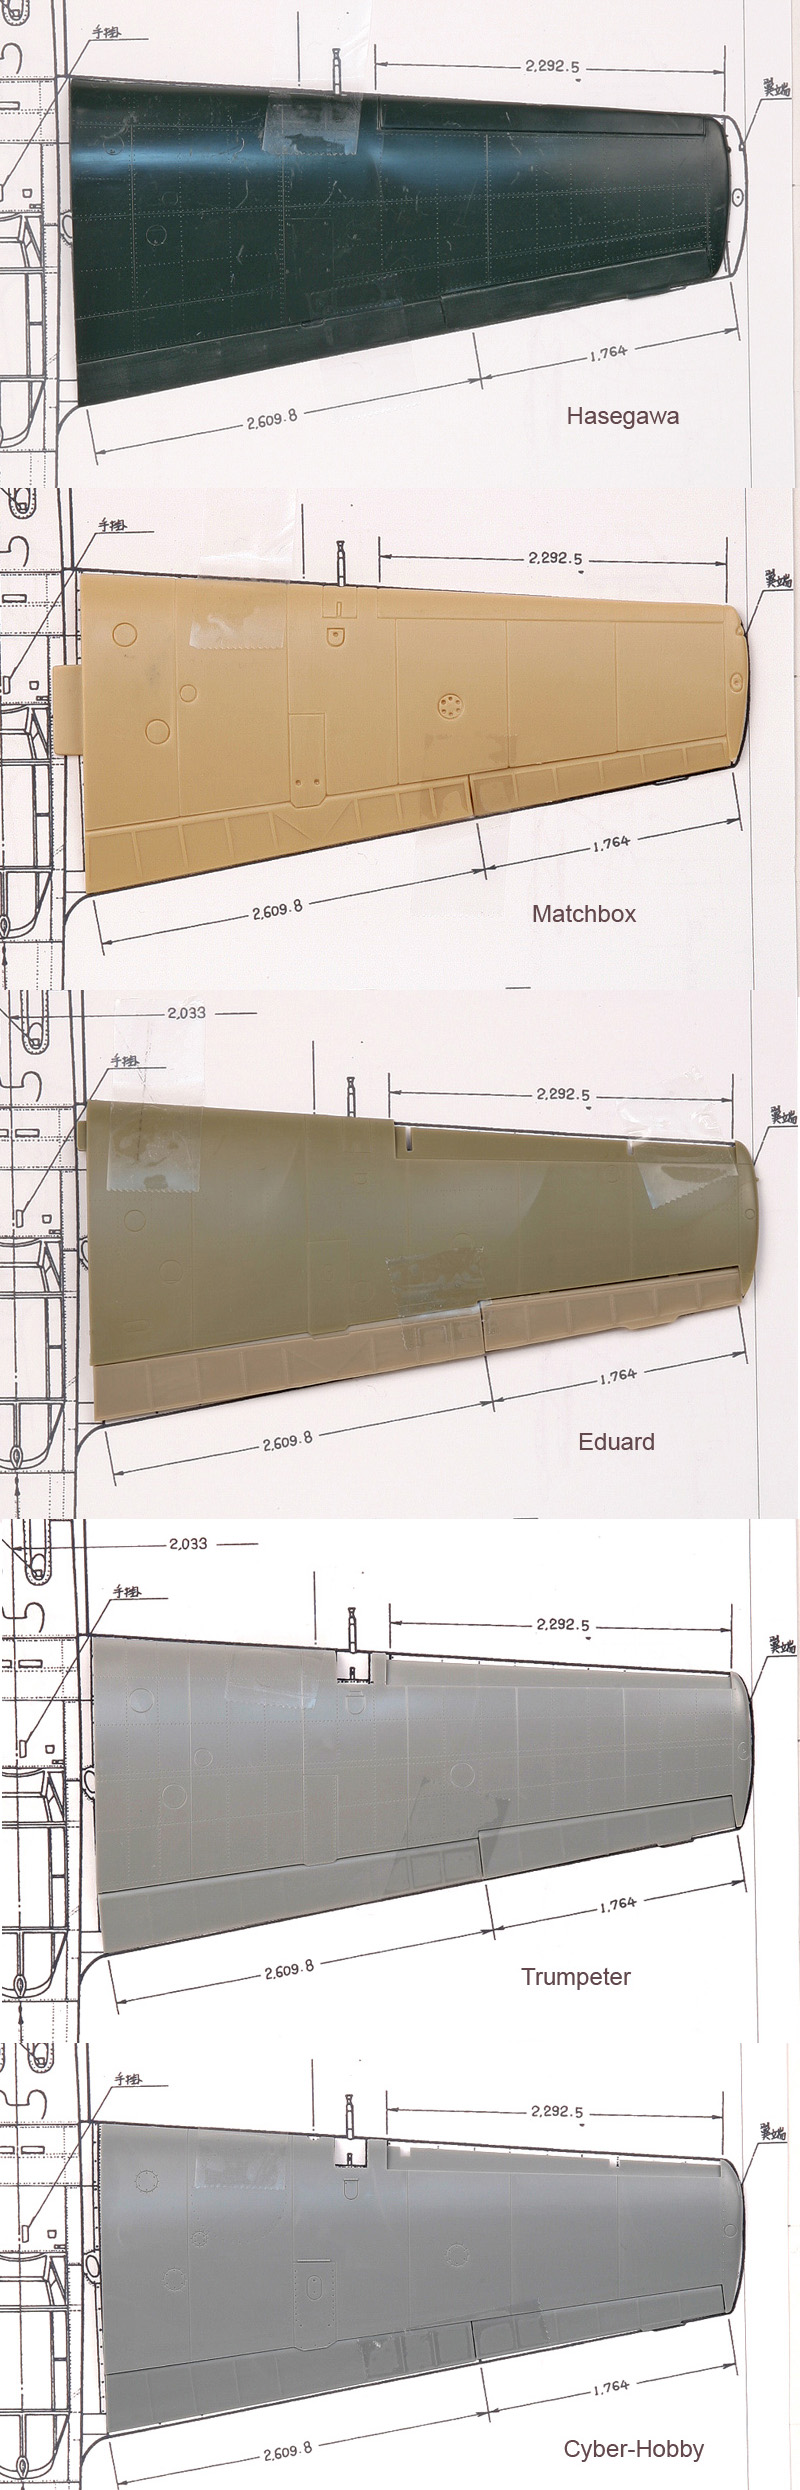
The last major airframe part is the tailplane. All the kits were pretty darn close here. I didn´t even bother overlaying the drawings; I simply laid the part over the drawing to give an idea of overall outline. Just a few notes: Hasegawa is the only kit which does not feature separate elevators. Also, their trim tab is not properly located. Cyber-Hobby´s elevator also has the trim tab incorrectly located, one structural panel too far outboard. Trumpeter´s kit seems to be the most correct, but is missing the two hinge or actuator notches in the front edge of the elevators. Eduard´s tailplane is also pretty good, just a touch larger than the others, and with what seems to be an extra row of rivets.
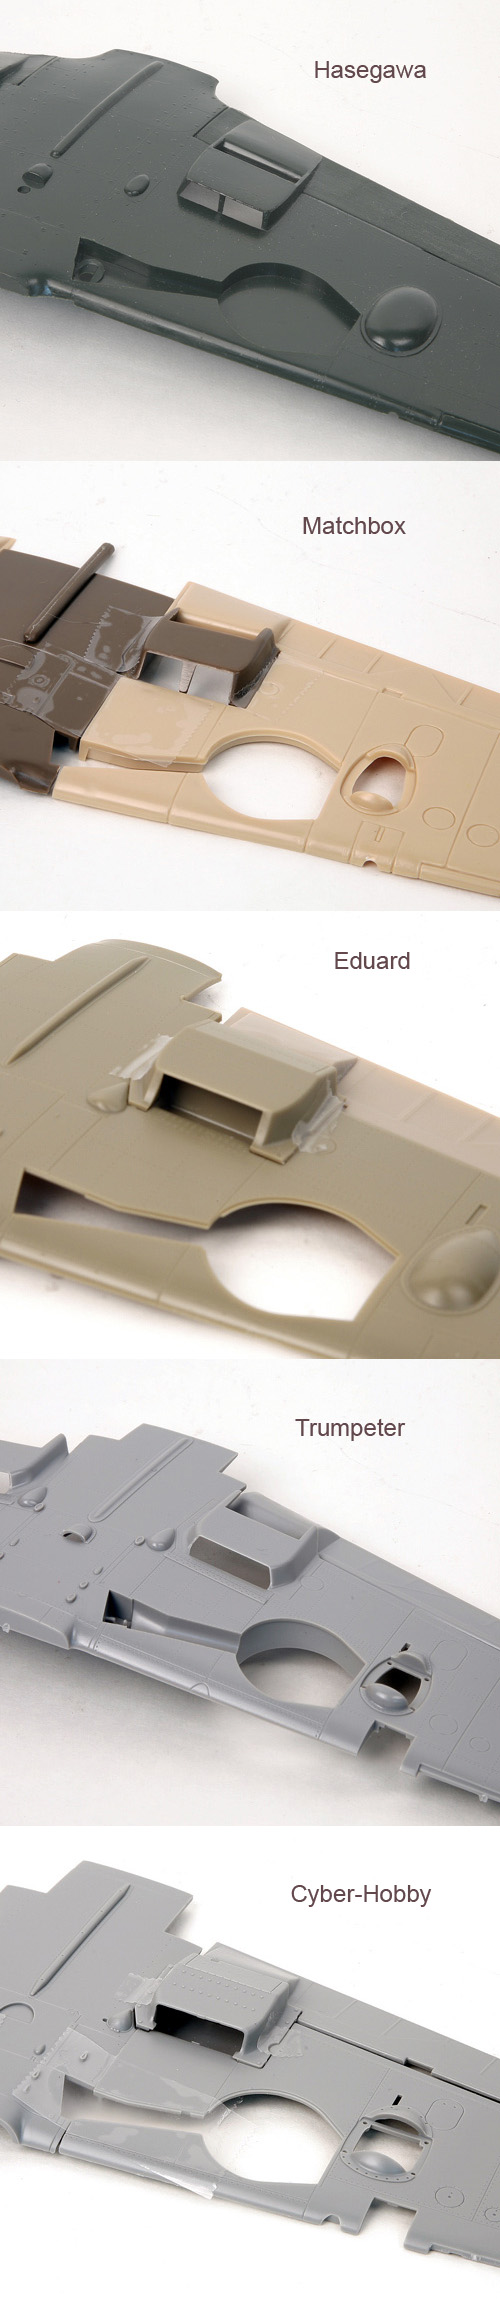
Lastly, another look at those wing-mounted radiators. There is a lot of variation here. Hasegawa´s are not even close to looking like any photos with an incorrect front profile, incorrect plan, and incorrect interface with the flaps. Matchbox´s is not too bad, but the support in the front face need replacing with a fine rod. Trumpeter´s is simply squashed, being too short, and the intake profile should be more rectangular, not trapezoidal. The Eduard and Cyber-Hobby kits are the closest to being correct, but both are possibly a little angular when matched against photos. Maybe some judicious filing and sanding could help if so desired? The Eduard set definitely needs work on the front face as the sides are way too thick. They should be thinned up considerably. One other note: The Matchbox, Trumpeter and Cyber-Hobby kits all have notches in both of the exit flaps of the radiators (the Matchbox and Trumpeter kits have them as extra parts and they are not shown in the pictures). Eduard´s and Hasegawa´s do not. I could not come to a conclusion as to what is 100% correct. There is apparently a short pipe that appears behind the port radiator and it appears the notch is in the flap to clear this pipe. This is also shown in the 109 parts catalog. What is frustrating is the catalog does not show if the starboard side is different. One walk-around, in the Aero Detail book, shows the notch in the port radiator flap, the starboard flap with no notch. I do not know if that is original or a replacement part. It may be that there should only be a notch on the port side, which makes sense if that is where the only dump pipe is. More research is needed. Incidentally, only Cyber-Hobby provides a small part to represent that bit of piping in the port radiator.
So, that takes us to the end of part one. So far, the Cyber-Hobby looks like the most accurate choice, with the worst being the old Hasegawa kit. Part 2 will look more at details and we will see what holds there.
References
- "Aero Detail #1: Messerschmitt Bf 109E," Model Graphix
- "Messerschmitt Bf 109B-E," Model Art Co., Ltd.
- "Messerschmitt Bf 109A-E: Development, Testing, Production," Schiffer Military History
- "Modellers Datafile #9: The Messerschmitt Bf 109; A Comprehensive Guide for the Modeller; Part 1: Prototype to ´E´ Variants," SAM Publications
© Ray Peterson
This article was published on Wednesday, July 20 2011; Last modified on Sunday, December 03 2017